overview
1. Cluster Planning
2. preparation
3. Modify the Hadoop configuration file
4. Copy content
5. Start the cluster
6. view jps
7. test
1. Cluster Planning
HDFS HA Background
There is a single point of failure (SPOF) in NameNode in HDFS cluster. For a cluster with only one NameNode, if an accident occurs on the NameNode machine, the entire cluster will not be available until the NameNode restarts.
The impact of HDFS cluster unavailability mainly includes the following two situations: first, the downtime of NameNode machine will result in the unavailability of the cluster, which can only be used after restarting NameNode; second, the planned software or hardware upgrade of NameNode node will result in the unavailability of the cluster in a short period of time.
To solve the above problems, Hadoop presents a high availability HA solution for HDFS: HDFS usually consists of two NameNodes, one in active state and the other in standby state. Active NameNode provides external services, such as processing RPC requests from clients, while Standby NameNode does not provide external services, only synchronizing the status of Active NameNode so that it can switch quickly when it fails.
Plan
The subsequent service startup and configuration files are installed with this configuration. The master is namenode,slave2 is yarn, and slave1 is a backup for namenode and yarn.
| host name | IP | Namenode | DataNode | Yarn | Zookeeper | JournalNode |
|---|---|---|---|---|---|---|
| master | 192.168.134.154 | yes | yes | no | yes | yes |
| slave1 | 192.168.134.155 | yes | yes | yes | yes | yes |
| slave2 | 192.168.134.156 | no | yes | yes | yes | yes |
The following points need to be explained:
HDFS HA usually consists of two NameNodes, one in the Active state and the other in the Standby state. Active NameNode provides services to the outside world, while Standby NameNode does not provide services to the outside world. It only synchronizes the status of Active NameNode so that it can switch quickly when it fails.
Hadoop 2.0 officially provides two HDFS HA solutions, one is NFS and the other is QJM. Here we use a simple QJM. In this scheme, metadata information is synchronized between master and backup NameNodes through a set of JournalNodes, and a data is considered successful as long as it is successfully written to most JournalNodes. Often, odd JournalNodes are configured, and a Zookeeper cluster is configured for ZKFC failover. When Active NameNode is suspended, Standby NameNode is automatically switched to Active status.
YARN's Resource Manager also has a single point of failure problem, which was solved in hadoop-2.4.1: there are two Resource Managers, one is Active, the other is Standby, and the state is coordinated by zookeeper.
MapReduce in the YARN framework can open JobHistory Server to record historical task information, otherwise only the task information currently being executed can be viewed.
Zookeeper is responsible for the election of NameNode primary and standby nodes in HDFS and the election of ResourceManaer primary and standby nodes in YARN framework.
2. preparation
Software:
1.jdk1.8.141
2. Hadoop 2.7.3 (jdk1.8 version compiled)
3.Zookeeper3.4.12
4.Xshell5 + Xftp5
1. Setting up static ip for reference Hadoop Cluster Stand-alone Edition Set up static ip, then use the Xshell tool to connect (free version of the official website)
2. Configure jdk,hosts file
jdk installation reference Hadoop Cluster Stand-alone Edition jdk installation
[root@master bin]#  vi /etc/hosts

#127.0.0.1   localhost localhost.localdomain localhost4 localhost4.localdomain4

#::1         localhost localhost.localdomain localhost6 localhost6.localdomain6
# The above is commented out or deleted
192.168.134.154 master
192.168.134.155 slave1
192.168.134.156 slave2
3. Configure ssh Secret-Free Logon, Reference Hadoop Cluster Construction ssh secret-free login
4. Configure Zookeeper for reference Installation of Zookeeper
3. Modify the Hadoop configuration file
If you've built a hadoop cluster before, you just need to modify the configuration file.
1. Create a hadoop folder under / usr as the storage path and decompression path for hadoop installation (compression) packages
#Enter the usr folder
cd /usr
#Create hadoop folders
mkdir hadoop
#Enter the hadoop folder
cd hadoop
Using Xftp Tool to Transfer Files to Virtual Machine
After decompression, enter the decompression path of hadoop / etc/hadoop folder
cd /usr/hadoop/hadoop-2.7.3/etc/hadoop/
3.1.core-site.xml
vim core-site.xml
Add the following to the configuration tag
<!-- Appoint hdfs Of nameservice by ns -->
<property>
<name>fs.defaultFS</name>
<value>hdfs://ns</value>
</property>
<!--Appoint hadoop Data Storage Catalogue-->
<property>
<name>hadoop.tmp.dir</name>
<value>/HA/hadoop/tmp</value>
</property>

<property>
<name>io.file.buffer.size</name>
<value>4096</value>
</property>
<!--Appoint zookeeper address-->
<property>
<name>ha.zookeeper.quorum</name>
<value>master:2181,slave1:2181,slave2:2181</value>
</property>


<property>
  <name>ipc.client.connect.max.retries</name>
  <value>100</value>
  <description>Indicates the number of retries a client will make to establish
      a server connection.
  </description>
 </property>
 <property>
  <name>ipc.client.connect.retry.interval</name>
  <value>10000</value>
  <description>Indicates the number of milliseconds a client will wait for
  before retrying to establish a server connection.
  </description>
 </property>
3.2.hdfs-site.xml
vim hdfs-site.xml
Add the following to the configuration tag
<!--Appoint hdfs Of nameservice by ns,Need and core-site.xml Consistency in -->
    <property>
        <name>dfs.nameservices</name>
        <value>ns</value>
    </property>
    <!-- ns There are two below. NameNode,Namely nn1,nn2 -->
    <property>
       <name>dfs.ha.namenodes.ns</name>
       <value>nn1,nn2</value>
    </property>
    <!-- nn1 Of RPC Mailing address -->
    <property>
       <name>dfs.namenode.rpc-address.ns.nn1</name>
       <value>master:9000</value>
    </property>
    <!-- nn1 Of http Mailing address -->
    <property>
        <name>dfs.namenode.http-address.ns.nn1</name>
        <value>master:50070</value>
    </property>
    <!-- nn2 Of RPC Mailing address -->
    <property>
        <name>dfs.namenode.rpc-address.ns.nn2</name>
        <value>slave1:9000</value>
    </property>
    <!-- nn2 Of http Mailing address -->
    <property>
        <name>dfs.namenode.http-address.ns.nn2</name>
        <value>slave1:50070</value>
    </property>
    <!-- Appoint NameNode The metadata of the JournalNode Storage location on -->
    <property>
         <name>dfs.namenode.shared.edits.dir</name>
         <value>qjournal://master:8485;slave1:8485;slave2:8485/ns</value>
    </property>
    <!-- Appoint JournalNode Location of data on local disk -->
    <property>
          <name>dfs.journalnode.edits.dir</name>
          <value>/HA/hadoop/journal</value>
    </property>
    <!-- open NameNode Automatic switching in case of failure -->
    <property>
          <name>dfs.ha.automatic-failover.enabled</name>
          <value>true</value>
    </property>
    <!-- Configuration Failure Automatic Switching Implementation -->
    <property>
            <name>dfs.client.failover.proxy.provider.ns</name>
            <value>org.apache.hadoop.hdfs.server.namenode.ha.ConfiguredFailoverProxyProvider</value>
    </property>
    <!-- Configuration isolation mechanism -->
    <property>
             <name>dfs.ha.fencing.methods</name>
             <value>sshfence</value>
    </property>
    <!-- Requirements when using isolation mechanisms ssh No landfall -->
    <property>
            <name>dfs.ha.fencing.ssh.private-key-files</name>
            <value>/root/.ssh/id_rsa</value>
    </property>

    <property>
        <name>dfs.namenode.name.dir</name>
        <value>file:///HA/hadoop/hdfs/name</value>
    </property>

    <property>
        <name>dfs.datanode.data.dir</name>
        <value>file:///HA/hadoop/hdfs/data</value>
    </property>

    <property>
       <name>dfs.replication</name>
       <value>3</value>
    </property>
    <!-- stay NN and DN Upper opening WebHDFS (REST API)function,Not necessary -->
    <property>
       <name>dfs.webhdfs.enabled</name>
       <value>true</value>
    </property>
3.3.mapred-site.xml
This file was not available at first, so we need to create it.
#copy out a template file
cp mapred-site.xml.template mapred-site.xml
Then add the following in its configuration tag vim mapred-site.xml
 <!-- Appoint mr Run in yarn upper -->
       	<property>
              <name>mapreduce.framework.name</name>
              <value>yarn</value>
        </property>
3.4.yarn-site.xml
vim yarn-site.xml
Add the following to its configuration tag
Ordinary Edition
Only slave2 has Resourcemanager
<!-- Appoint nodemanager Start-up loading server The way is shuffle server -->
  <property>
    <name>yarn.nodemanager.aux-services</name>
    <value>mapreduce_shuffle</value>
  </property>
  <!-- Appoint resourcemanager address -->
  <property>
    <name>yarn.resourcemanager.hostname</name>
    <value>slave2</value>
  </property>
yarn HA High Availability Edition
Both slave 1 and slave 2 have Resourcemanager
<!-- ////////////// The following is the configuration of YARNHA ///////////////-->.
  <!-- open YARN HA -->
  <property>
    <name>yarn.resourcemanager.ha.enabled</name>
    <value>true</value>
  </property>

  <!-- Enabling automatic failover -->
  <property>
    <name>yarn.resourcemanager.ha.automatic-failover.enabled</name>
    <value>true</value>
  </property>

  <!-- Appoint YARN HA Name -->
  <property>
    <name>yarn.resourcemanager.cluster-id</name>
    <value>yarncluster</value>
  </property>

  <!-- Specify two resourcemanager Name -->
  <property>
    <name>yarn.resourcemanager.ha.rm-ids</name>
    <value>rm1,rm2</value>
  </property>

  <!-- To configure rm1,rm2 Host computer -->
  <property>
    <name>yarn.resourcemanager.hostname.rm1</name>
    <value>slave2</value>
  </property>
  <property>
    <name>yarn.resourcemanager.hostname.rm2</name>
    <value>slave1</value>
  </property>

  <!-- To configure YARN Of http port -->
  <property>
    <name>yarn.resourcemanager.webapp.address.rm1</name>
    <value>slave2:8088</value>
  </property>
  <property>
    <name>yarn.resourcemanager.webapp.address.rm2</name>
    <value>slave1:8088</value>
  </property>

  <!-- To configure zookeeper Address -->
  <property>
    <name>yarn.resourcemanager.zk-address</name>
    <value>master:2181,slave1:2181,slave2:2181</value>
  </property>

  <!-- To configure zookeeper Storage location -->
  <property>
    <name>yarn.resourcemanager.zk-state-store.parent-path</name>
    <value>/rmstore</value>
  </property>

  <!-- open yarn resourcemanager restart -->
  <property>
    <name>yarn.resourcemanager.recovery.enabled</name>
    <value>true</value>
  </property>

  <!-- To configure resourcemanager The state of the zookeeper in -->
  <property>
    <name>yarn.resourcemanager.store.class</name>
    <value>org.apache.hadoop.yarn.server.resourcemanager.recovery.ZKRMStateStore</value>
  </property>

  <!-- open yarn nodemanager restart -->
  <property>
    <name>yarn.nodemanager.recovery.enabled</name>
    <value>true</value>
  </property>

  <!-- To configure nodemanager IPC Communication Port -->
  <property>
    <name>yarn.nodemanager.address</name>
    <value>0.0.0.0:45454</value>
  </property>
3.5 .hadoop-env.sh
The export JAVA_HOME=${JAVA_HOME} line,
Modify it to export JAVA_HOME=/usr/java/jdkxx (jdk installation path)
3.6. Modify the slaves file (dataNode)
Modified to
#localhost

#Your cluster hostname
master
slave1
slave2
4. Copy content to slave1,slave2
If your slave1 and slave2 have nothing, you can copy the profile file that configures jdk and the hosts file that configures ip mapping together. Zookeeper needs to pay attention to changing the configuration file.
#Copy it to slave1, and if you have hadoop before, you will overwrite it
[root@master hadoop]# scp -r /usr/hadoop root@slave1:/usr/
#Copy to slave2
[root@master hadoop]# scp -r /usr/hadoop root@slave2:/usr/
5. Start the cluster
5.1 Start Zookeeper separately
All virtual machines are booted
Start in the / bin directory of the Zookeeper installation directory
[root@master hadoop]# cd /usr/zookeeper/zookeeper-3.4.12/bin
[root@master bin]# ./zkServer.sh start
ZooKeeper JMX enabled by default
Using config: /usr/zookeeper/zookeeper-3.4.12/bin/../conf/zoo.cfg
Starting zookeeper ... STARTED
View status after startup
[root@slave1 bin]# ./zkServer.sh status
ZooKeeper JMX enabled by default
Using config: /usr/zookeeper/zookeeper-3.4.12/bin/../conf/zoo.cfg
Mode: leader #leader or follower represents the success of starting Zookeeper
5.2 Start journal node on master, slave 1, slave 2
#Go to the hadoop installation directory sbin folder
[root@master bin]# cd /usr/hadoop/hadoop-2.7.3/sbin/
[root@master sbin]# ls
distribute-exclude.sh  kms.sh                   start-balancer.sh    stop-all.cmd        stop-yarn.cmd
hadoop-daemon.sh       mr-jobhistory-daemon.sh  start-dfs.cmd        stop-all.sh         stop-yarn.sh
hadoop-daemons.sh      refresh-namenodes.sh     start-dfs.sh         stop-balancer.sh    yarn-daemon.sh
hdfs-config.cmd        slaves.sh                start-secure-dns.sh  stop-dfs.cmd        yarn-daemons.sh
hdfs-config.sh         start-all.cmd            start-yarn.cmd       stop-dfs.sh
httpfs.sh              start-all.sh             start-yarn.sh        stop-secure-dns.sh

#Here's a daemon s and a daemon. Start a single without s and start a cluster with S.
[root@master sbin]# ./hadoop-daemons.sh start journalnode
slave2: starting journalnode, logging to /usr/hadoop/hadoop-2.7.3/logs/hadoop-root-journalnode-slave2.out
slave1: starting journalnode, logging to /usr/hadoop/hadoop-2.7.3/logs/hadoop-root-journalnode-slave1.out
master: starting journalnode, logging to /usr/hadoop/hadoop-2.7.3/logs/hadoop-root-journalnode-master.out
View jps on master, slave 1, and slave 2, respectively
#This is normal, otherwise check to see if your Zookeeper started successfully
[root@master sbin]# jps
2232 JournalNode
2281 Jps
2157 QuorumPeerMain
5.3 Format zkfc on master
[root@master sbin]# hdfs zkfc -formatZK
5.4 Format hdfs on master
[root@master sbin]# hadoop namenode -format
5.5 Start namenode on master
[root@master sbin]#  ./hadoop-daemon.sh start  namenode
starting namenode, logging to /usr/hadoop/hadoop-2.7.3/logs/hadoop-root-namenode-master.out
[root@master sbin]# jps
2232 JournalNode
2490 Jps
2157 QuorumPeerMain
2431 NameNode
5.6 Start data synchronization and standby's namenode on slave1
[root@slave1 sbin]# hdfs namenode -bootstrapStandby

[root@slave1 sbin]# ./hadoop-daemon.sh start namenode
5.7 Start datanode on master
[root@master sbin]#  ./hadoop-daemons.sh start datanode
master: starting datanode, logging to /usr/hadoop/hadoop-2.7.3/logs/hadoop-root-datanode-master.out
slave2: starting datanode, logging to /usr/hadoop/hadoop-2.7.3/logs/hadoop-root-datanode-slave2.out
slave1: starting datanode, logging to /usr/hadoop/hadoop-2.7.3/logs/hadoop-root-datanode-slave1.out
5.8 Start yarn on slave1 and slave2
./start-yarn.sh
5.9 Start zkfc on master
./hadoop-daemons.sh start zkfc
6. view jps
master
[root@master sbin]# jps
2593 DataNode
2709 NodeManager
2902 DFSZKFailoverController
2232 JournalNode
2969 Jps
2157 QuorumPeerMain
2431 NameNode
slave1
[root@slave1 sbin]# jps
2337 QuorumPeerMain
3074 Jps
2259 JournalNode
2709 ResourceManager
2475 NameNode
2587 DataNode
3007 DFSZKFailoverController
slave2
[root@slave2 sbin]# jps
2355 DataNode
2164 JournalNode
2244 QuorumPeerMain
3126 NodeManager
3017 ResourceManager
3162 Jps
Startup as above is normal
If a service is not started, restart the service, such as Resourcemanager is not started
#Stop it
./stop-yarn.sh
#start-up
./start-yarn.sh
Then test on ports 50070 and 8088
To prevent namenode from being Hot-Switched before testing, it's best to install this plug-in
Install on master and slave1
yum -y install psmisc
7. test
View the status of namenode on (master ip)192.168.134.154:50070 and (slave 1 ip)192.168.134.155:50070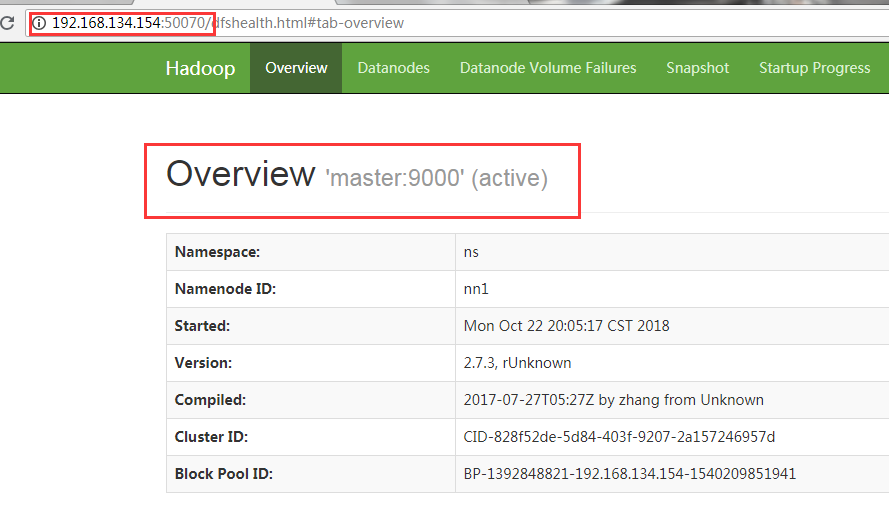
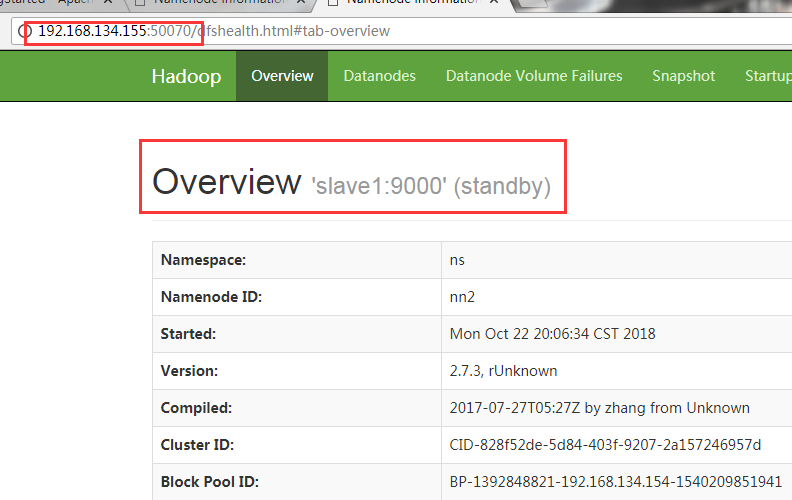
All accessible and one active and one standby state
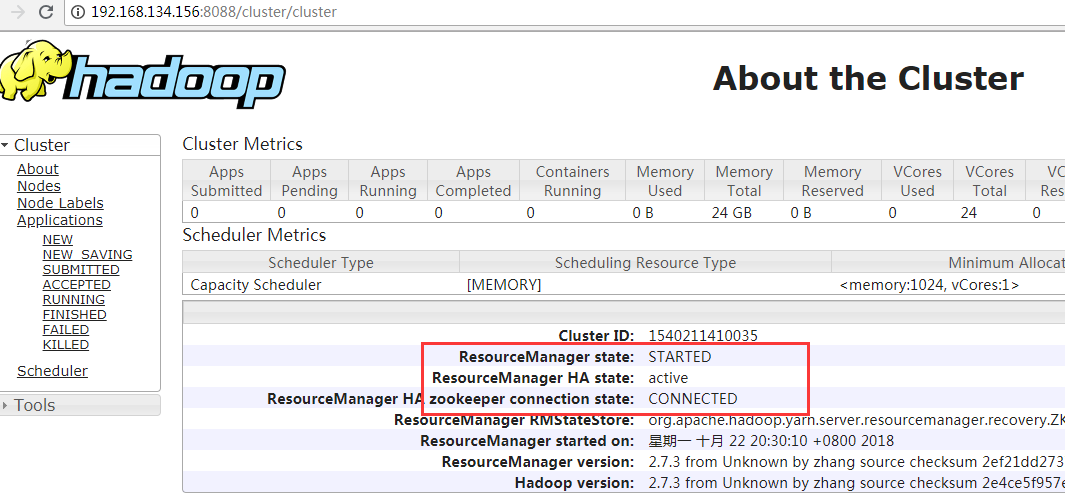
Then visit (slave 1) 192.168.134.155:8088 and (slave 2) 192.168.134.156:8088 to see the status of Resourcemanager.
If one can access, it's not wrong to jump to the previous one when accessing the other. That's normal.
The one that can be accessed is the active state, and if both can be accessed, one is the active state and the other is the standby state.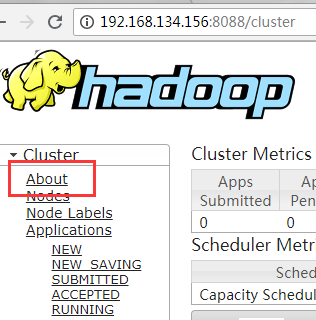

First you want to upload a file to hdfs on the master host, and then try to see if you can view it on slave1 and slave2
[root@master tmp]# cd /usr/tmp
[root@master tmp]# touch test
[root@master tmp]# hadoop fs -put test /
#View on three virtual machines
[root@master tmp]# hadoop fs -ls /
Found 1 items
-rw-r--r--   3 root supergroup          0 2018-10-22 20:42 /test
If you can see it, then test whether hot switching is possible.
#View process
[root@master tmp]# jps
2593 DataNode
2902 DFSZKFailoverController
2232 JournalNode
3609 NodeManager
2157 QuorumPeerMain
2431 NameNode
3807 Jps
#Kill the namenode of the active
[root@master tmp]# kill -9 2431
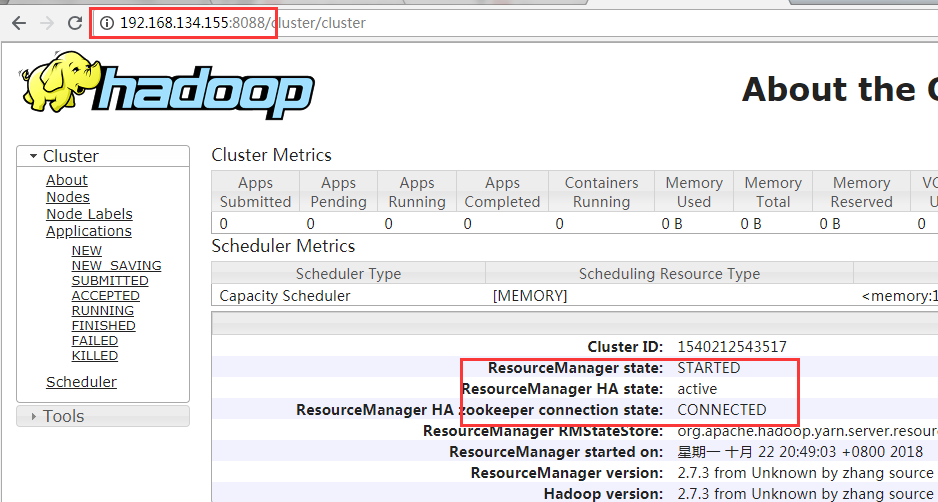
Check to see if standby has become active on the Web
Successful change from standby to active indicates success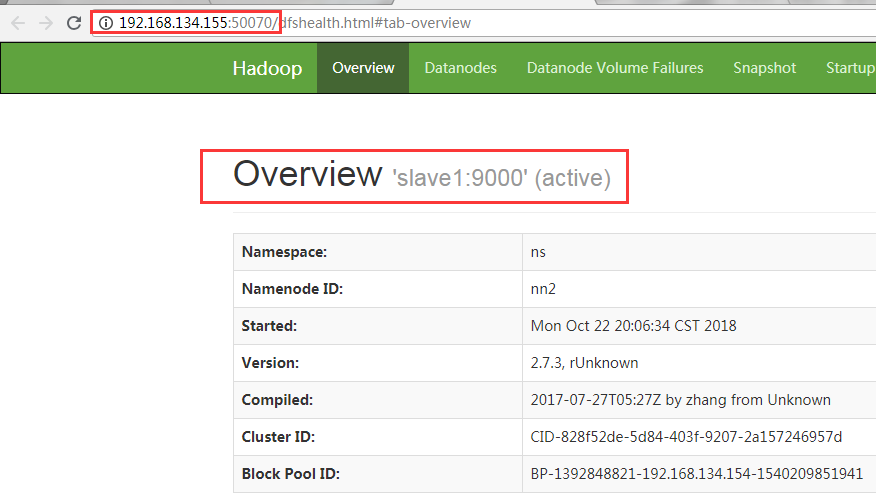

Similarly, test yarn HA for high availability
#View process
[root@slave2 sbin]# jps
4050 Jps
2355 DataNode
2164 JournalNode
2244 QuorumPeerMain
3423 ResourceManager
3919 NodeManager
#Roesource Manager Killing active
[root@slave2 sbin]# kill -9 3423
Viewing on the Web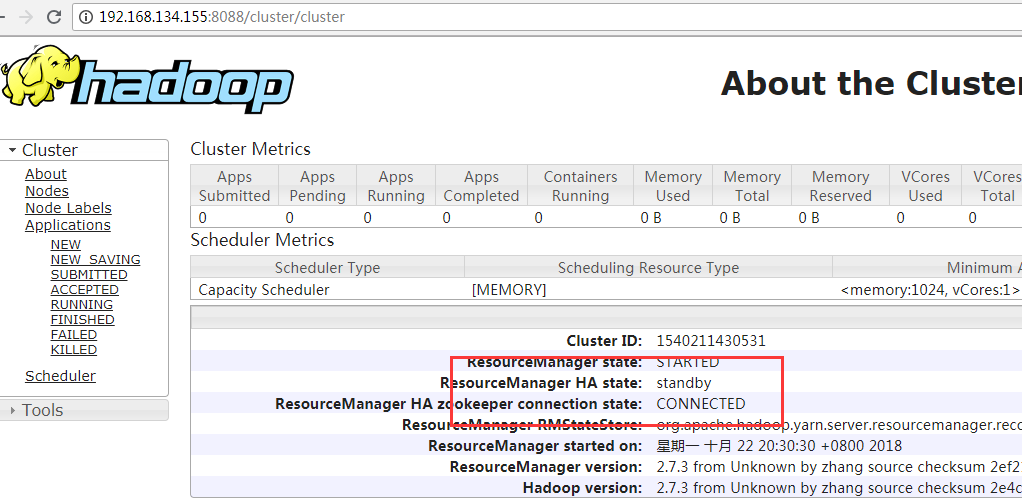
If you kill the namenode process, then the corresponding port 50070 will not be accessible, just like port 8088.
So far, the high availability version of hadoop HA has been built.
Next, I'll talk about the installation and use of hive.