Pseudo distributed clusters are shown in:
https://blog.csdn.net/weixin_40612128/article/details/119008295?spm=1001.2014.3001.5501
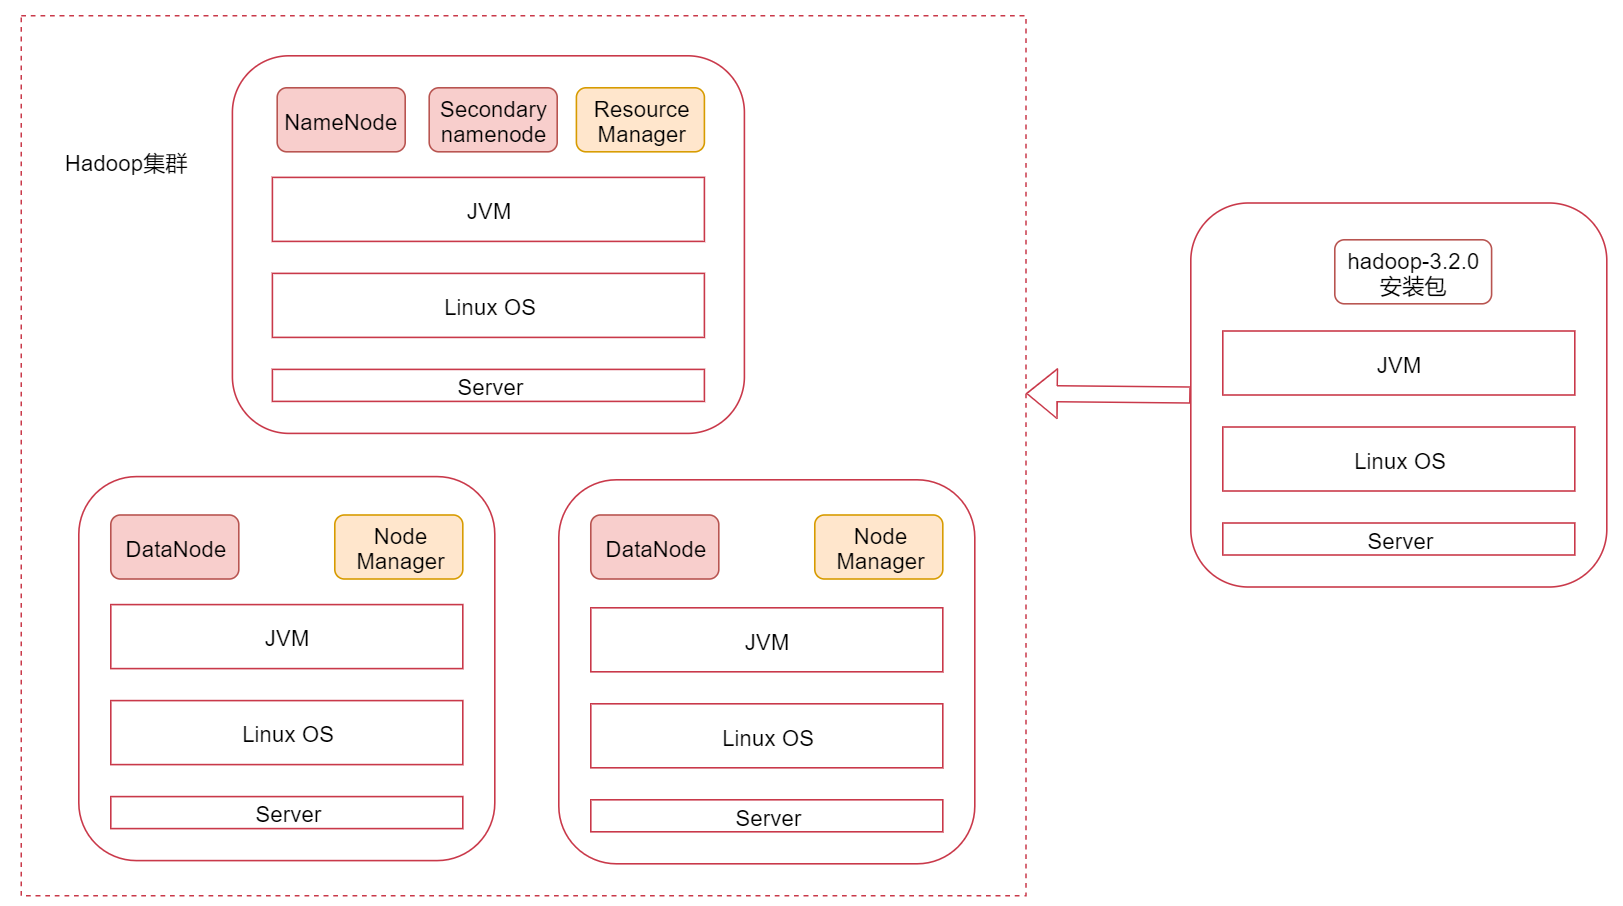
After the pseudo distributed cluster is completed, let's take a look at what the real distributed cluster is like.
Take a look at this figure. It shows three nodes. The one on the left is the master node and the two on the right are the slave nodes. hadoop cluster supports the master-slave architecture.
The processes started on different nodes are different by default.
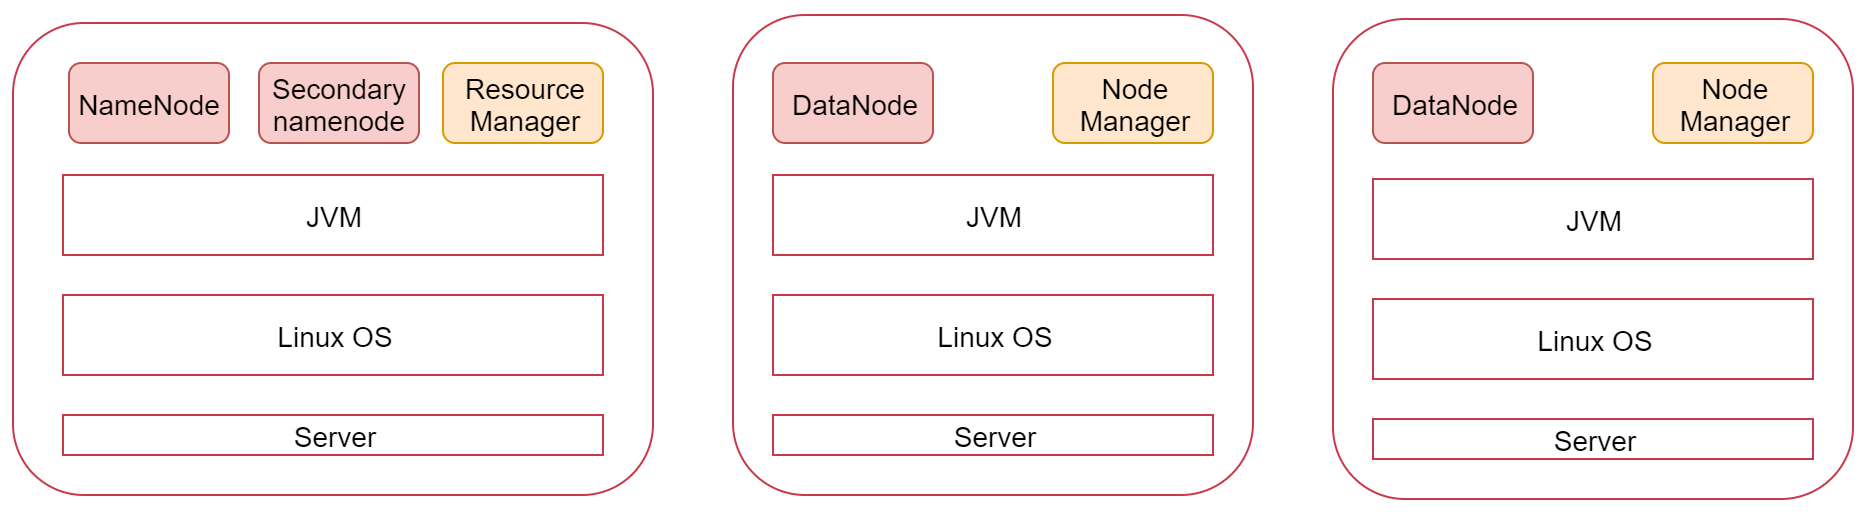
Next, we will implement a hadoop cluster with one master and two slaves according to the plan in the figure
Environment preparation: three nodes
bigdata01 192.168.182.100
bigdata02 192.168.182.101
bigdata03 192.168.182.102
Note: the basic environment of each node should be configured first, including ip, hostname, firewalld, ssh password free login and JDK
The current number of nodes is not enough. According to the contents learned in the first week, multiple nodes are created by cloning. The specific cloning steps will not be repeated here.
First delete the hadoop installed before in bigdata01, delete the extracted directory, and modify the environment variable.
Note: we need to add Hadoop in / data directory of bigdata01 node_ Delete the repo directory and hadoop-3.2.0 directory under / data/soft to restore the environment of this node, which records some information of the previously pseudo distributed cluster.
[root@bigdata01 ~]# rm -rf  /data/soft/hadoop-3.2.0
[root@bigdata01 ~]# rm -rf  /data/hadoop_repo
Suppose we have three linux machines now, which are all new environments.
Let's start.
Note: the basic environment configuration steps for ip, hostname, firewalld and JDK of these three machines are no longer recorded here. Refer to the steps in 2.1 for specific steps.
bigdata01
bigdata02
bigdata03
The basic environments of ip, hostname, firewalld, ssh password free login and JDK of these three machines have been configured ok.
These basic environments have not been configured yet, and some configurations need to be improved.
Configure / etc/hosts
Because two slave nodes need to be remotely connected to the master node, the master node needs to be able to identify the host name of the slave node and use the host name for remote access. By default, only ip remote access can be used. If you want to use the host name for remote access, you need to configure the ip and host name information of the corresponding machine in the / etc/hosts file of the node.
Therefore, here we need to configure the following information in the / etc/hosts file of bigdata01. It is best to configure the current node information in it, so that the contents of this file are universal and can be copied directly to the other two slave nodes
[root@bigdata01 ~]# vi /etc/hosts
192.168.182.100 bigdata01
192.168.182.101 bigdata02
192.168.182.102 bigdata03
Modify the / etc/hosts file of bigdata02
[root@bigdata02 ~]# vi /etc/hosts
192.168.182.100 bigdata01
192.168.182.101 bigdata02
192.168.182.102 bigdata03
Modify the / etc/hosts file of bigdata03
[root@bigdata03 ~]# vi /etc/hosts
192.168.182.100 bigdata01
192.168.182.101 bigdata02
192.168.182.102 bigdata03
Time synchronization between cluster nodes
As long as the cluster involves multiple nodes, it is necessary to synchronize the time of these nodes. If there is too much time difference between nodes, it will affect the stability of the cluster and even cause problems in the cluster.
First, operate on the bigdata01 node
Use ntpdate - U NTP sjtu. edu. Cn realizes time synchronization, but when executing, it prompts that the ntpdata command cannot be found
[root@bigdata01 ~]# ntpdate -u ntp.sjtu.edu.cn
-bash: ntpdate: command not found
There is no ntpdate command by default. You need to use yum to install online. Execute the command yum install -y ntpdate
[root@bigdata01 ~]# yum install -y ntpdate
Loaded plugins: fastestmirror
Loading mirror speeds from cached hostfile
 * base: mirrors.cn99.com
 * extras: mirrors.cn99.com
 * updates: mirrors.cn99.com
base                                                    | 3.6 kB     00:00
extras                                                  | 2.9 kB     00:00
updates                                                 | 2.9 kB     00:00
Resolving Dependencies
--> Running transaction check
---> Package ntpdate.x86_64 0:4.2.6p5-29.el7.centos will be installed
--> Finished Dependency Resolution

Dependencies Resolved

===============================================================================
 Package        Arch          Version                        Repository   Size
===============================================================================
Installing:
 ntpdate        x86_64        4.2.6p5-29.el7.centos          base         86 k

Transaction Summary
===============================================================================
Install  1 Package

Total download size: 86 k
Installed size: 121 k
Downloading packages:
ntpdate-4.2.6p5-29.el7.centos.x86_64.rpm                  |  86 kB   00:00
Running transaction check
Running transaction test
Transaction test succeeded
Running transaction
  Installing : ntpdate-4.2.6p5-29.el7.centos.x86_64                        1/1
  Verifying  : ntpdate-4.2.6p5-29.el7.centos.x86_64                        1/1

Installed:
  ntpdate.x86_64 0:4.2.6p5-29.el7.centos

Complete!
Then manually execute ntpdate - U NTP sjtu. edu. Cn confirm whether it can be executed normally
[root@bigdata01 ~]# ntpdate -u ntp.sjtu.edu.cn
 7 Apr 21:21:01 ntpdate[5447]: step time server 185.255.55.20 offset 6.252298 sec
It is recommended to add this synchronization time operation to the crontab timer of linux and execute it every minute
[root@bigdata01 ~]# vi /etc/crontab
* * * * * root /usr/sbin/ntpdate -u ntp.sjtu.edu.cn
Then configure time synchronization on bigdata02 and bigdata03 nodes
Operate on bigdata02 node
[root@bigdata02 ~]# yum install -y ntpdate
[root@bigdata02 ~]# vi /etc/crontab
* * * * * root /usr/sbin/ntpdate -u ntp.sjtu.edu.cn
Operate on bigdata03 node
[root@bigdata03 ~]# yum install -y ntpdate
[root@bigdata03 ~]# vi /etc/crontab
* * * * * root /usr/sbin/ntpdate -u ntp.sjtu.edu.cn
SSH password free login
Note: for password free login, only self password free login is realized at present. Finally, the host point can log in to all nodes without password, so the password free login operation needs to be improved.
First, execute the following command on bigdata01 machine to copy the public key information to two slave nodes
[root@bigdata01 ~]# scp ~/.ssh/authorized_keys bigdata02:~/
The authenticity of host 'bigdata02 (192.168.182.101)' can't be established.
ECDSA key fingerprint is SHA256:uUG2QrWRlzXcwfv6GUot9DVs9c+iFugZ7FhR89m2S00.
ECDSA key fingerprint is MD5:82:9d:01:51:06:a7:14:24:a9:16:3d:a1:5e:6d:0d:16.
Are you sure you want to continue connecting (yes/no)? yes
Warning: Permanently added 'bigdata02,192.168.182.101' (ECDSA) to the list of known hosts.
root@bigdata02's password:
authorized_keys                              100%  396   506.3KB/s   00:00
[root@bigdata01 ~]# scp ~/.ssh/authorized_keys bigdata03:~/
The authenticity of host 'bigdata03 (192.168.182.102)' can't be established.
ECDSA key fingerprint is SHA256:uUG2QrWRlzXcwfv6GUot9DVs9c+iFugZ7FhR89m2S00.
ECDSA key fingerprint is MD5:82:9d:01:51:06:a7:14:24:a9:16:3d:a1:5e:6d:0d:16.
Are you sure you want to continue connecting (yes/no)? yes
Warning: Permanently added 'bigdata03,192.168.182.102' (ECDSA) to the list of known hosts.
root@bigdata03's password:
authorized_keys                              100%  396   606.1KB/s   00:00
It is then executed on bigdata02 and bigdata03
bigdata02:
[root@bigdata02 ~]# cat ~/authorized_keys >> ~/.ssh/authorized_keys
bigdata03:
[root@bigdata03 ~]# cat ~/authorized_keys >> ~/.ssh/authorized_keys
Verify the effect. Use ssh to remotely connect two slave nodes on bigdata01 node. If you do not need to enter a password, it means that it is successful. At this time, the host point can log in to all nodes without password.
[root@bigdata01 ~]# ssh bigdata02
Last login: Tue Apr  7 21:33:58 2020 from bigdata01
[root@bigdata02 ~]# exit
logout
Connection to bigdata02 closed.
[root@bigdata01 ~]# ssh bigdata03
Last login: Tue Apr  7 21:17:30 2020 from 192.168.182.1
[root@bigdata03 ~]# exit
logout
Connection to bigdata03 closed.
[root@bigdata01 ~]#
Is it necessary to realize password free login between slave nodes?
This is not necessary because only the primary node needs to connect to other nodes remotely when starting the cluster.
OK, so far, the basic environment of the three nodes in the cluster has been configured. Next, you need to install Hadoop in these three nodes.
First, install on the bigdata01 node.
1: Hadoop-3.2.0 tar. Upload the GZ installation package to the / data/soft directory of the linux machine
[root@bigdata01 soft]# ll
total 527024
-rw-r--r--. 1 root root 345625475 Jul 19  2019 hadoop-3.2.0.tar.gz
drwxr-xr-x. 7   10  143       245 Dec 16  2018 jdk1.8
-rw-r--r--. 1 root root 194042837 Apr  6 23:14 jdk-8u202-linux-x64.tar.gz
2: Unzip the hadoop installation package
[root@bigdata01 soft]# tar -zxvf hadoop-3.2.0.tar.gz
3: Modify hadoop related configuration files
Enter the directory where the configuration file is located
[root@bigdata01 soft]# cd hadoop-3.2.0/etc/hadoop/
[root@bigdata01 hadoop]#
First, modify Hadoop env SH file, add environment variable information at the end of the file
[root@bigdata01 hadoop]# vi hadoop-env.sh
export JAVA_HOME=/data/soft/jdk1.8
export HADOOP_LOG_DIR=/data/hadoop_repo/logs/hadoop
Modify core site XML file, note FS The host name in the defaultfs attribute must be consistent with the host name of the primary node
[root@bigdata01 hadoop]# vi core-site.xml
<configuration>
    <property>
        <name>fs.defaultFS</name>
        <value>hdfs://bigdata01:9000</value>
    </property>
    <property>
        <name>hadoop.tmp.dir</name>
        <value>/data/hadoop_repo</value>
   </property>
</configuration>
Modify hdfs site XML file, set the number of file copies in hdfs to 2, up to 2, because there are two slave nodes in the cluster and the node information where the secondaryNamenode process is located
[root@bigdata01 hadoop]# vi hdfs-site.xml
<configuration>
    <property>
        <name>dfs.replication</name>
        <value>2</value>
    </property>
    <property>
        <name>dfs.namenode.secondary.http-address</name>
        <value>bigdata01:50090</value>
    </property>
</configuration>
Modify mapred site XML to set the resource scheduling framework used by mapreduce
[root@bigdata01 hadoop]# vi mapred-site.xml
<configuration>
    <property>
        <name>mapreduce.framework.name</name>
        <value>yarn</value>
    </property>
</configuration>
Modify Yard site XML, set the white list of services and environment variables supported to run on yarn
Note that for distributed clusters, the hostname of the resource manager needs to be set in this configuration file, otherwise nodemanager cannot find the resource manager node.
[root@bigdata01 hadoop]# vi yarn-site.xml
<configuration>
    <property>
        <name>yarn.nodemanager.aux-services</name>
        <value>mapreduce_shuffle</value>
    </property>
    <property>
        <name>yarn.nodemanager.env-whitelist</name>
        <value>JAVA_HOME,HADOOP_COMMON_HOME,HADOOP_HDFS_HOME,HADOOP_CONF_DIR,CLASSPATH_PREPEND_DISTCACHE,HADOOP_YARN_HOME,HADOOP_MAPRED_HOME</value>
    </property>
	<property>
		<name>yarn.resourcemanager.hostname</name>
		<value>bigdata01</value>
	</property>
</configuration>
Modify the workers file and add the host names of all slave nodes, one line at a time
[root@bigdata01 hadoop]# vi workers
bigdata02
bigdata03
Modify startup script
Modify start DFS sh,stop-dfs.sh these two script files, add the following content in front of the file
[root@bigdata01 hadoop]# cd /data/soft/hadoop-3.2.0/sbin
[root@bigdata01 sbin]# vi start-dfs.sh
HDFS_DATANODE_USER=root
HDFS_DATANODE_SECURE_USER=hdfs
HDFS_NAMENODE_USER=root
HDFS_SECONDARYNAMENODE_USER=root

[root@bigdata01 sbin]# vi stop-dfs.sh
HDFS_DATANODE_USER=root
HDFS_DATANODE_SECURE_USER=hdfs
HDFS_NAMENODE_USER=root
HDFS_SECONDARYNAMENODE_USER=root
Modify start yarn sh,stop-yarn.sh these two script files, add the following content in front of the file
[root@bigdata01 sbin]# vi start-yarn.sh
YARN_RESOURCEMANAGER_USER=root
HADOOP_SECURE_DN_USER=yarn
YARN_NODEMANAGER_USER=root

[root@bigdata01 sbin]# vi stop-yarn.sh
YARN_RESOURCEMANAGER_USER=root
HADOOP_SECURE_DN_USER=yarn
YARN_NODEMANAGER_USER=root
4: Copy the installation package of the modified configuration on bigdata01 node to the other two slave nodes
[root@bigdata01 sbin]# cd /data/soft/
[root@bigdata01 soft]# scp -rq hadoop-3.2.0 bigdata02:/data/soft/
[root@bigdata01 soft]# scp -rq hadoop-3.2.0 bigdata03:/data/soft/
5: Format HDFS on bigdata01 node
[root@bigdata01 soft]# cd /data/soft/hadoop-3.2.0
[root@bigdata01 hadoop-3.2.0]# bin/hdfs namenode -format
If you can see this line in the following log information, it indicates that the namenode is formatted successfully.
common.Storage: Storage directory /data/hadoop_repo/dfs/name has been successfully formatted.
6: Start the cluster and execute the following command on the bigdata01 node
[root@bigdata01 hadoop-3.2.0]# sbin/start-all.sh
Starting namenodes on [bigdata01]
Last login: Tue Apr  7 21:03:21 CST 2020 from 192.168.182.1 on pts/2
Starting datanodes
Last login: Tue Apr  7 22:15:51 CST 2020 on pts/1
bigdata02: WARNING: /data/hadoop_repo/logs/hadoop does not exist. Creating.
bigdata03: WARNING: /data/hadoop_repo/logs/hadoop does not exist. Creating.
Starting secondary namenodes [bigdata01]
Last login: Tue Apr  7 22:15:53 CST 2020 on pts/1
Starting resourcemanager
Last login: Tue Apr  7 22:15:58 CST 2020 on pts/1
Starting nodemanagers
Last login: Tue Apr  7 22:16:04 CST 2020 on pts/1
7: Validation cluster
Execute the jps command on three machines respectively, and the process information is as follows:
Execute on bigdata01 node
[root@bigdata01 hadoop-3.2.0]# jps
6128 NameNode
6621 ResourceManager
6382 SecondaryNameNode
Execute on bigdata02 node
[root@bigdata02 ~]# jps
2385 NodeManager
2276 DataNode
Execute at bigdata03 node
[root@bigdata03 ~]# jps
2326 NodeManager
2217 DataNode
8: Stop cluster
Execute the stop command on the bigdata01 node
[root@bigdata01 hadoop-3.2.0]# sbin/stop-all.sh
Stopping namenodes on [bigdata01]
Last login: Tue Apr  7 22:21:16 CST 2020 on pts/1
Stopping datanodes
Last login: Tue Apr  7 22:22:42 CST 2020 on pts/1
Stopping secondary namenodes [bigdata01]
Last login: Tue Apr  7 22:22:44 CST 2020 on pts/1
Stopping nodemanagers
Last login: Tue Apr  7 22:22:46 CST 2020 on pts/1
Stopping resourcemanager
Last login: Tue Apr  7 22:22:50 CST 2020 on pts/1
So far, hadoop distributed cluster has been successfully installed!
Note: there are so many operation steps above. If I am a novice, how do I know I need to do these operations? We don't have to worry about the official instructions, which are the most accurate instructions for us to buy and use.
Let's take a look at the official website document of Hadoop:
https://hadoop.apache.org/docs/stable/hadoop-project-dist/hadoop-common/SingleCluster.html
Hadoop client node
In practical work, it is not recommended to directly connect the nodes in the cluster to operate the cluster. It is unsafe to directly expose the nodes in the cluster to ordinary developers
It is recommended to install Hadoop on the business machine. Just ensure that the configuration of Hadoop on the business machine is consistent with that in the cluster, so that the Hadoop cluster can be operated on the business machine. This machine is called the client node of Hadoop
There may be multiple Hadoop client nodes. Theoretically, we can configure this machine as the client node of Hadoop cluster on which machine we want to operate Hadoop cluster.