Hardware environment:
Virtual machine environment configuration
Hardware: 1CPU + [RAM]4G + [DISK]128G
System: Centos7 x64
There is no address mapping and resolution like that of Silicon Valley, which directly takes IP (I'm too lazy)
192.168.242.131
192.168.242.132
192.168.242.133
Pre dependent environment:
Pre environment preparation (required for all 3 machines):
sudo yum install -y net-tools
sudo yum install -y vim
sudo yum install -y wget
sudo yum install -y lrzsz
sudo yum install -y pcre pcre-devel
sudo yum install -y zlib zlib-devel
sudo yum install -y openssl openssl-devel
sudo yum install -y unzip
sudo yum install -y libtool
sudo yum install -y gcc-c++
sudo yum install -y telnet
sudo yum install -y tree
sudo yum install -y nano
sudo yum install -y psmisc
sudo yum install -y rsync
sudo yum install -y java-1.8.0-openjdk-devel.x86_64
Installation process of unit 1 (192.168.242.131)
Download Hadoop package (unit 1, any one):
If it is another version, pay attention to the file path and replace it in time when writing the script
wget https://archive.apache.org/dist/hadoop/common/hadoop-3.3.1/hadoop-3.3.1.tar.gz
(optional) use scp command to transfer to other machines for backup:
# For example, those downloaded from unit 1 need to be transmitted to unit 2 and unit 3
scp ~/hadoop-3.3.1.tar.gz root@192.168.242.132:/root/
scp ~/hadoop-3.3.1.tar.gz root@192.168.242.133:/root/
Unpack to the specified [opt/module /] directory (unit 1)
mkdir -p /opt/module/
tar -zxvf hadoop-3.3.1.tar.gz -C /opt/module/
Configure environment variables of Hadoop + Jdk (unit 1)
vim /etc/profile.d/my_env.sh

=====Add the following=====
# HADOOP_HOME
export HADOOP_HOME=/opt/module/hadoop-3.3.1
export PATH=$PATH:$HADOOP_HOME/bin
export PATH=$PATH:$HADOOP_HOME/sbin

# JDK variable JAVA_HOME
export JAVA_HOME=/usr/lib/jvm/java-1.8.0-openjdk-1.8.0.322.b06-1.el7_9.x86_64
export PATH=$PATH:$JAVA_HOME/bin
Add environment variables and take effect immediately (unit 1)
source /etc/profile
Check whether (unit 1) is installed successfully?
hadoop version
Version 3.3.1, the information I show here
[root@localhost ~]# hadoop version
Hadoop 3.3.1
Source code repository https://github.com/apache/hadoop.git -r a3b9c37a397ad4188041dd80621bdeefc46885f2
Compiled by ubuntu on 2021-06-15T05:13Z
Compiled with protoc 3.7.1
From source with checksum 88a4ddb2299aca054416d6b7f81ca55
This command was run using /opt/module/hadoop-3.3.1/share/hadoop/common/hadoop-common-3.3.1.jar
Pre preparation for cluster deployment
1, Script cluster distribution
Create xsync command script (unit 1) under the [/ usr/bin /] directory
vim /usr/bin/xsync
Script code:
#!/bin/bash
#1. Number of judgment parameters
if [ $# -lt 1 ]
then
 echo Not Enough Arguement!
 exit;
fi

#2. Traverse all machines in the cluster
for host in 192.168.242.131 192.168.242.132 192.168.242.133
do
 echo ==================== $host ====================
 #3. Traverse all directories and send them one by one
 for file in $@
 do
 #4. Determine whether the file exists
 if [ -e $file ]
 then
 #5. Get parent directory
 pdir=$(cd -P $(dirname $file); pwd)
 #6. Gets the name of the current file
 fname=$(basename $file)
 ssh $host "mkdir -p $pdir"
 rsync -av $pdir/$fname $host:$pdir
 else
 echo $file does not exists!
 fi
 done
done
Note that you need to give [executable] permission after saving
chmod +x /usr/bin/xsync
Here is the additional information
The location in the video presentation and documents is in the user's bin directory (/ root/bin , non root user is / home / user name / bin)
And the directory does not exist. You need to create it yourself
The reason is that the global PATH variable points to this PATH (guess)
[root@localhost ~]# echo $PATH
/usr/local/sbin:/usr/local/bin:
/usr/sbin:
/usr/bin:
/opt/module/hadoop-3.3.1/bin:
/opt/module/hadoop-3.3.1/sbin:
/usr/lib/jvm/java-1.8.0-openjdk-1.8.0.322.b06-1.el7_9.x86_64/bin:
/root/bin
Test whether the xsync command is available?
Synchronize the environment variable file configured by unit 1 to other machines
xsync my_env.sh

# sudo When executing, the file path must be complete
sudo xsync /etc/profile.d/my_env.sh
At this time, the login account and password will be required for each transmission of machine scp,
After the transfer is completed, check whether the file exists in the path on the target machine
2, Login free processing - generate SSH key
Switch to the directory under the current user (root) ssh hidden directory (executed by every machine)
cd ~/.ssh
Execute key generation command
Press enter to confirm the three settings directly (each machine will execute)
ssh-keygen -t rsa
Process display:
[root@localhost .ssh]# ssh-keygen -t rsa
Generating public/private rsa key pair.
Enter file in which to save the key (/root/.ssh/id_rsa):
Enter passphrase (empty for no passphrase):
Enter same passphrase again:
Your identification has been saved in /root/.ssh/id_rsa.
Your public key has been saved in /root/.ssh/id_rsa.pub.
The key fingerprint is:
SHA256:3rFBbU4jq2Y6HepDVxJDZEwuldF1NpFzWTWn9Sgc/dQ root@localhost.localdomain
The key's randomart image is:
+---[RSA 2048]----+
|       =B+ .o.=+X|
|       += .o ++*E|
|      . .oo B o=.|
|       ....* o  .|
|        So+ .    |
|      ..oo +     |
|     . +=.o      |
|      ++.        |
|     .oo         |
+----[SHA256]-----+
Generated ssh directory
[root@localhost .ssh]# ll -a
 Total dosage 12
drwx------. 2 root root   57 1 month  28 15:03 .
dr-xr-x---. 4 root root  201 1 month  28 14:33 ..
-rw-------. 1 root root 1675 1 month  28 15:03 id_rsa
-rw-r--r--. 1 root root  408 1 month  28 15:03 id_rsa.pub
-rw-r--r--. 1 root root  531 1 month  28 14:39 known_hosts
You can see two files [id_rsa] and [id_rsa.pub]
The private key without pub is used for other machines to access local verification
The suffix of pub is the public key, which is used to log in to other machines for verification
known_ The hosts} file is the public key information left over from the ip of other machines accessed by the scp command
for instance:
A. B 2 machines
If A wants to log in to B without entering A password, B needs to know A's account information and put A's public key into B's machine
On the contrary, if B logs in to A, it needs B's public key to exist in A
Each machine needs the public key of other machines, including its own
The public key of machine 1 is given to machine 2 and machine 3, and their own are added to the authorization key
ssh-copy-id 192.168.242.132
ssh-copy-id 192.168.242.133
cat ~/.ssh/id_rsa.pub >> ~/.ssh/authorized_keys
Machine 2 to 1 and 3, join yourself
ssh-copy-id 192.168.242.131
ssh-copy-id 192.168.242.133
cat ~/.ssh/id_rsa.pub >> ~/.ssh/authorized_keys
The same is true for unit 3
ssh-copy-id 192.168.242.131
ssh-copy-id 192.168.242.132
cat ~/.ssh/id_rsa.pub >> ~/.ssh/authorized_keys
reference resources:
https://blog.csdn.net/sinat_35821976/article/details/99939757
Cluster deployment
1, Resource Planning
Suggestion: NameNode \ ResourceManager \ SecondaryNameNode should be deployed independently
Reason: the hardware resource takes up too much
Resource allocation:
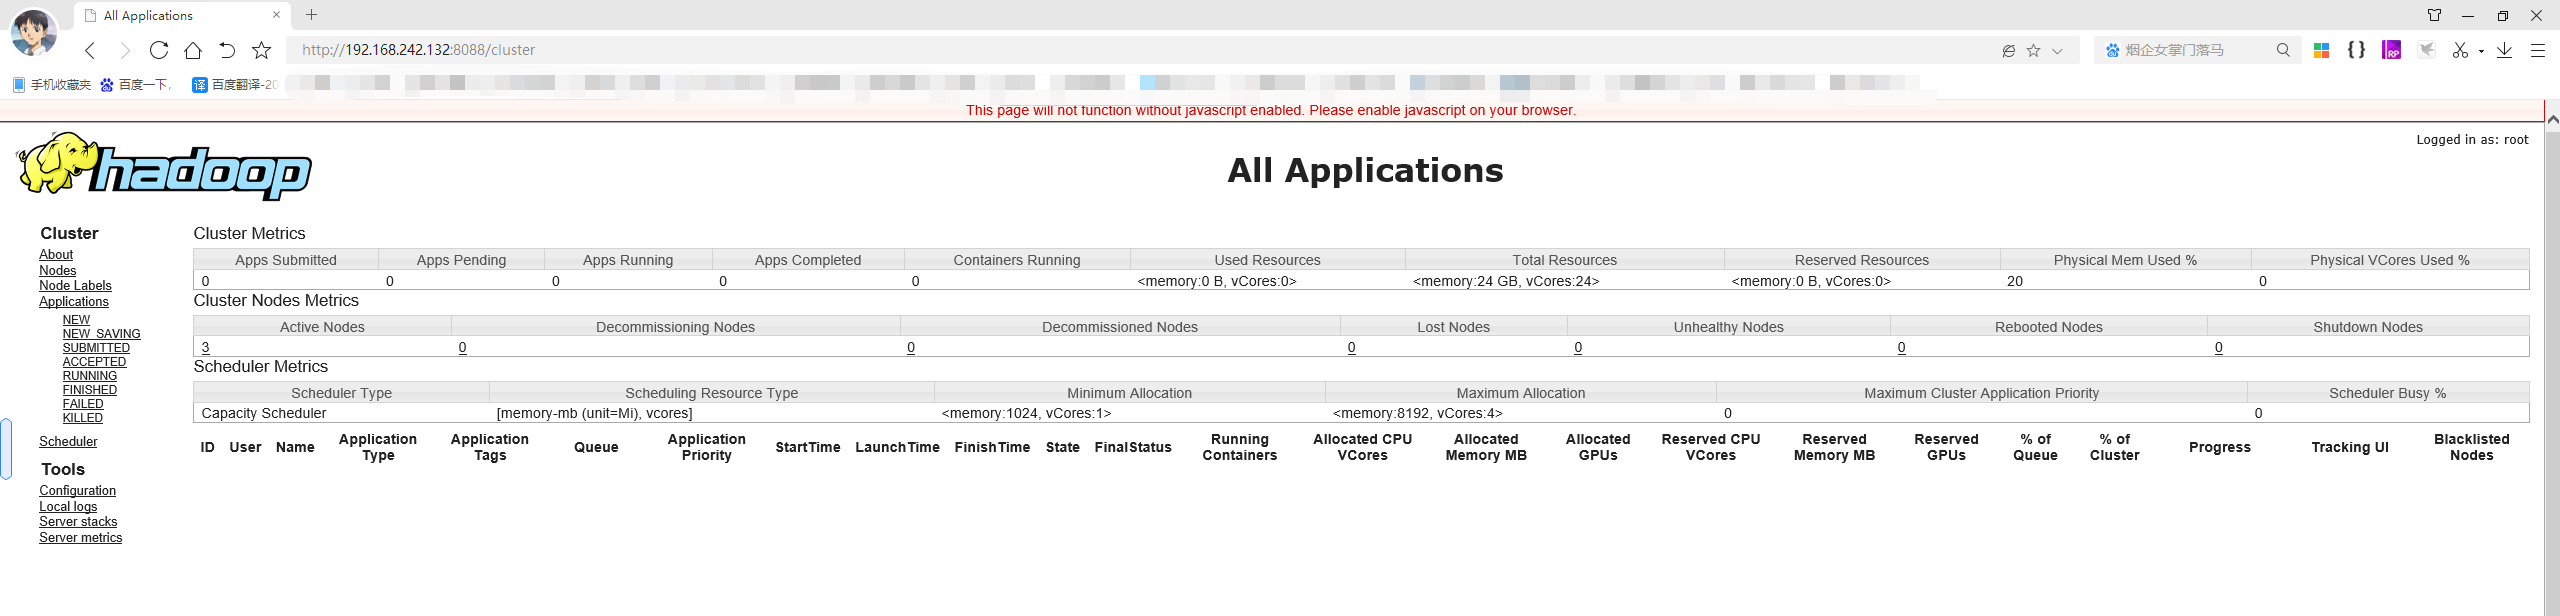
Unit 1 puts # NameNode, unit 2 puts # ResourceManager, and unit 3 puts # SecondaryNameNode
2, Configuration file preparation (unit 1)
First, back up the files that need to be changed
cp -r $HADOOP_HOME/etc/hadoop/core-site.xml $HADOOP_HOME/etc/hadoop/core-site.xml.bak
cp -r $HADOOP_HOME/etc/hadoop/hdfs-site.xml $HADOOP_HOME/etc/hadoop/hdfs-site.xml.bak
cp -r $HADOOP_HOME/etc/hadoop/yarn-site.xml $HADOOP_HOME/etc/hadoop/yarn-site.xml.bak
cp -r $HADOOP_HOME/etc/hadoop/mapred-site.xml $HADOOP_HOME/etc/hadoop/mapred-site.xml.bak
Now let's change the configuration file
1,core-site.xml
<?xml version="1.0" encoding="UTF-8"?>
<?xml-stylesheet type="text/xsl" href="configuration.xsl"?>
<configuration>
 <!-- appoint NameNode Because the address of is the cluster address, the cluster points to this address node -->
 <property>
 <name>fs.defaultFS</name>
 <value>hdfs://192.168.242.131:8020</value>
 </property>
 <!-- appoint hadoop Storage directory of data -->
 <property>
 <name>hadoop.tmp.dir</name>
 <value>/opt/module/hadoop-3.3.1/data</value>
 </property>
 <!-- to configure HDFS The static user used for web page login is atguigu -->
 <property>
 <name>hadoop.http.staticuser.user</name>
 <value>root</value>
 </property>
</configuration>
2,hdfs-site.xml
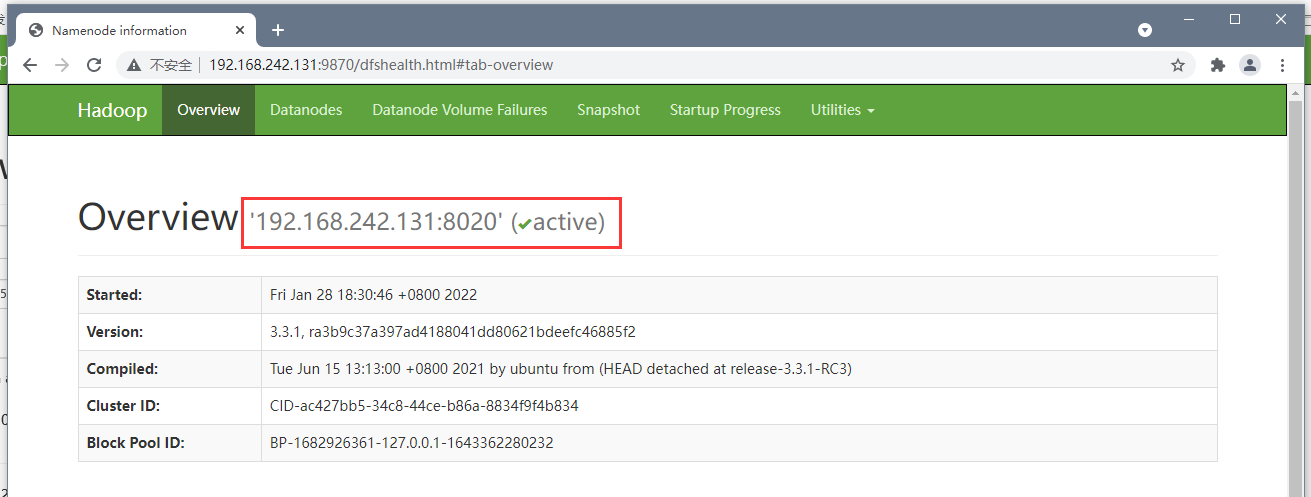
<?xml version="1.0" encoding="UTF-8"?>
<?xml-stylesheet type="text/xsl" href="configuration.xsl"?>
<configuration>
<!-- nn web End access address-->
<property>
 <name>dfs.namenode.http-address</name>
 <value>192.168.242.131:9870</value>
 </property>
<!-- 2nn web End access address-->
 <property>
 <name>dfs.namenode.secondary.http-address</name>
 <value>192.168.242.133:9868</value>
 </property>
</configuration>
3,mapred-site.xml
The following environment variables do not seem to need to be added
<?xml version="1.0" encoding="UTF-8"?>
<?xml-stylesheet type="text/xsl" href="configuration.xsl"?>
<configuration>
<!-- appoint MapReduce The program runs on Yarn upper -->
 <property>
 <name>mapreduce.framework.name</name>
 <value>yarn</value>
 </property>

 <property>
  <name>yarn.app.mapreduce.am.env</name>
  <value>HADOOP_MAPRED_HOME=/opt/module/hadoop-3.3.1</value>
 </property>
 <property>
  <name>mapreduce.map.env</name>
  <value>HADOOP_MAPRED_HOME=/opt/module/hadoop-3.3.1</value>
 </property>
 <property>
  <name>mapreduce.reduce.env</name>
  <value>HADOOP_MAPRED_HOME=/opt/module/hadoop-3.3.1</value>
 </property>
</configuration>
4,yarn-site.xml
<?xml version="1.0" encoding="UTF-8"?>
<?xml-stylesheet type="text/xsl" href="configuration.xsl"?>
<configuration>
 <!-- appoint MR go shuffle -->
 <property>
 <name>yarn.nodemanager.aux-services</name>
 <value>mapreduce_shuffle</value>
 </property>
 <!-- appoint ResourceManager Address of-->
 <property>
 <name>yarn.resourcemanager.hostname</name>
 <value>192.168.242.132</value>
 </property>
 <!-- Inheritance of environment variables -->
 <property>
  <name>yarn.nodemanager.env-whitelist</name>
  <value>JAVA_HOME,HADOOP_COMMON_HOME,HADOOP_HDFS_HOME,HADOOP_CONF_DIR,CLASSPATH_PREPEND_DISTCACHE,HADOOP_YARN_HOME,HADOOP_MAPRED_HOME</value>
 </property>
</configuration>
Declare workers file
Note that the workers file cannot have extra spaces and empty lines!
vim /opt/module/hadoop-3.1.3/etc/hadoop/workers

===== file information =====
192.168.242.131
192.168.242.132
192.168.242.133
Then synchronize to other machines
xsync /opt/module/hadoop-3.3.1/etc/hadoop
Hadoop cluster startup
Because there is no dedicated execution user for hadoop programs like the Silicon Valley tutorial
Here, you need to add execution parameters to the startup script
If it is not set, this error will appear, and the solution is obtained from this
https://blog.csdn.net/hongxiao2016/article/details/88903289/
Unit 1 opens the script and adds these information to the top (#! / usr/bin/env bash)
[/opt/module/hadoop-3.3.1/sbin/start-dfs.sh ]
[/opt/module/hadoop-3.3.1/sbin/stop-dfs.sh]
HDFS_DATANODE_USER=root
HADOOP_SECURE_DN_USER=hdfs
HDFS_NAMENODE_USER=root
HDFS_SECONDARYNAMENODE_USER=root
[/opt/module/hadoop-3.3.1/sbin/start-yarn.sh ]
[/opt/module/hadoop-3.3.1/sbin/stop-yarn.sh]
YARN_RESOURCEMANAGER_USER=root
HADOOP_SECURE_DN_USER=yarn
YARN_NODEMANAGER_USER=root
Synchronize to other machines:
xsync /opt/module/hadoop-3.3.1/sbin
Then hdfs is started by unit 1 and yarn is started by unit 2
Format before the first startup of unit 1:
hdfs namenode -format
If you need to reformat and start later, you need to delete the data directory + logs directory (all machines) [to be verified]?
Start HDFS
$HADOOP_HOME/sbin/start-dfs.sh
Successful information after startup:
[root@localhost ~]# /opt/module/hadoop-3.3.1/sbin/start-dfs.sh
WARNING: HADOOP_SECURE_DN_USER has been replaced by HDFS_DATANODE_SECURE_USER. Using value of HADOOP_SECURE_DN_USER.
Starting namenodes on [192.168.242.131]
Last login: May January 28 18:30:20 CST 2022pts/1 upper
Starting datanodes
 Last login: May January 28 18:30:43 CST 2022pts/1 upper
Starting secondary namenodes [192.168.242.133]
Last login: May January 28 18:30:45 CST 2022pts/1 upper
[root@localhost ~]#
Unit 2 starts YARN
$HADOOP_HOME/sbin/start-yarn.sh
Successful information after startup:
[root@localhost ~]# /opt/module/hadoop-3.3.1/sbin/start-yarn.sh
Starting resourcemanager
 Last login: May January 28 18:30:38 CST 2022pts/0 upper
Starting nodemanagers
 Last login: May January 28 18:31:09 CST 2022pts/0 upper
[root@localhost ~]#
Turn off firewall before access (all machines execute)
systemctl stop firewalld
Visit the page to view:
http://192.168.242.131:9870/explorer.html#/
http://192.168.242.132:8088/cluster