Python WeChat Subscription Applet Course Video
https://edu.csdn.net/course/detail/36074
Python Actual Quantitative Transaction Finance System
https://edu.csdn.net/course/detail/35475
Environmental preparation
- vm virtual machine (self-installing Centos7 system)
- hadoop3.x Installation Package (linux version)
- java1.8 installation package (linux version)
In order to follow the tutorial smoothly, several details need to be noted
- Do not copy and paste without looking at the text
- The user who operates the command is important, otherwise permissions will be raised later
- ftp and terminal tools need to operate by themselves. This tutorial does not cover operations. If necessary, Baidu itself, this tutorial uses terminal shell tool screenshots, which are the same nature as linux system right-click open terminal.
Start!
- Log in with the root user and manage the hadoop cluster with a single user, so create a user named hadoop with the administrator (root) user.
[root@hadoop102 ~]# useradd hadoop
- Set password for hadoop user
[root@hadoop102 ~]# passwd hadoop
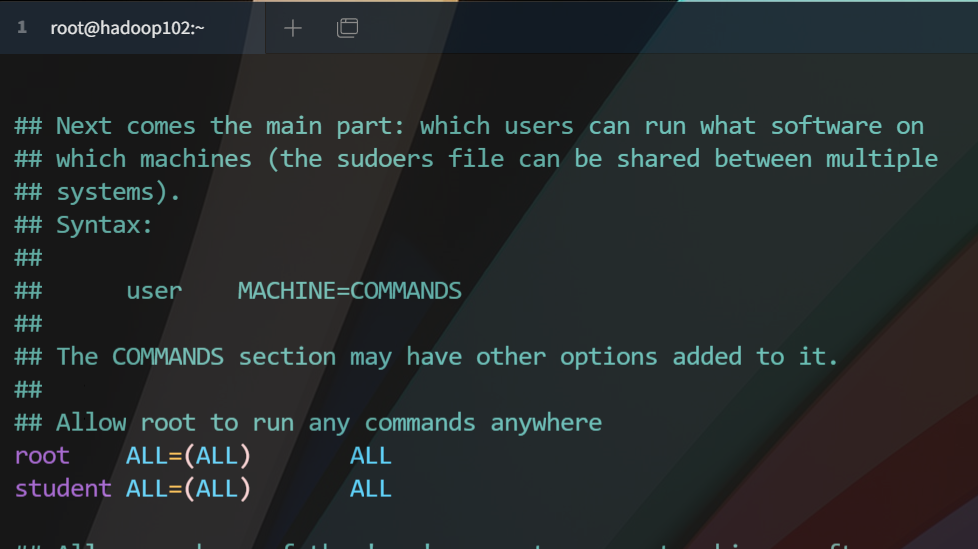
- Give hadoop users permission to edit the following path file
[root@hadoop102 ~]# vim /etc/sudoers
Modify the file here to look like this (around 100 lines)
- Modify Static IP
[root@hadoop102 ~]# vim /etc/sysconfig/network-scripts/ifcfg-ens33
The static ip file is modified as follows
TYPE="Ethernet"
PROXY_METHOD="none"
BROWSER_ONLY="no"
BOOTPROTO="static"
DEFROUTE="yes"
IPV4_FAILURE_FATAL="no"
IPV6INIT="yes"
IPV6_AUTOCONF="yes"
IPV6_DEFROUTE="yes"
IPV6_FAILURE_FATAL="no"
IPV6_ADDR_GEN_MODE="stable-privacy"
NAME="ens33"
UUID="385ea190-1b85-42cf-9df4-916f2dd86bc7"
DEVICE="ens33"
ONBOOT="yes"
#ip writes its own settings
IPADDR=192.168.127.112
#Fixed subnet mask
NETMASK=255.255.255.0
#Gateway is to change the last segment of your ip to 1
GATEWAY=192.168.127.1
- Modify Host Name
[root@hadoop102 ~]# vim /etc/hostname
Write your host name in the file
- Modify Host Domain Name Mapping
[root@hadoop102 ~]# vim /etc/hosts
The hosts file is as follows

-
Close the firewall (run b to permanently close)
- One-time shutdown - Firewall will be turned on by default after restart
[root@hadoop102 ~]# systemctl stop firewalld
- Close firewall permanently
[root@hadoop102 ~]# systemctl disable firewalld
- View current firewall status
[root@hadoop102 ~]# systemctl status firewalld
Status Screenshot

-
Restart the machine, take effect of all configurations, note that the next login directly uses the hadoop account information to log in to the system, so that direct directory creation rights belong to hadoop
- If you want the terminal to connect to the virtual machine, you can log in to the terminal by entering ip and user information after restart.

[root@hadoop102 ~]# reboot
-
Create directories required for javajdk and hadoop installation
-
Create Software Installation Package Storage Directory
- The software directory is used to store installation packages
- The module directory is used for the installation directory (or unzipped directory) of the software
[hadoop@hadoop102 /]$ sudo mkdir /opt/software
[hadoop@hadoop102 /]$ sudo mkdir /opt/module
- Give the software directory upload permissions, and you can see that the following permissions have allowed external reads and writes
[root@hadoop102 opt]# chmod +777 /opt/software /opt/module
[root@hadoop102 opt]# ll
 Total usage 12
drwxrwxrwx. 2 root root 4096 3 September 21:56 module
drwxr-xr-x. 2 root root 4096 10 Month 31 2018 rh
drwxrwxrwx. 2 root root 4096 3 September 21:56 software
- Upload the hadoop and java installation packages (this is not covered, note: use the hadoop user login operation when logging in to a connection using any ftp tool)
- Unzip to module directory
[hadoop@hadoop102 software]$ tar -zxvf hadoop-3.1.3.tar.gz -C ../module/
[hadoop@hadoop102 software]$ tar -zxvf jdk-8u212-linux-x64.tar.gz -C ../module/
-
-
Configuring environment variables for java and hadoop
- Switch to the root user operating system file, then switch to the hadoop user when the operation is complete
[hadoop@hadoop102 software]$ su root
- Use the root user to modify the environment variable file, append the following information to the end of the file. If your installation path is different from mine, you need to write your own, follow the tutorial, and do not need any modifications to the same version of the installation package or the name of the same installation folder
#java
export JAVA_HOME=/opt/module/jdk1.8.0_212
export PATH=$PATH:$JAVA_HOME/bin

#hadoop3.1.3
export HADOOP_HOME=/opt/module/hadoop-3.1.3
export PATH=$PATH:$HADOOP_HOME/bin
- Switch to the hadoop user and validate the profile to see the effect
[hadoop@hadoop102 software]$ source /etc/profile
- Run the following commands on your own to test the environment, enough not to test yourself.
[hadoop@hadoop102 software]$ java
[hadoop@hadoop102 software]$ javac
[hadoop@hadoop102 software]$ java -version
[hadoop@hadoop102 software]$ hadoop version
-
Configure hadoop
- Edit core-site.xml file
[hadoop@hadoop102 /]$ vim /opt/module/hadoop-3.1.3/etc/hadoop/core-site.xml
<property>
	<name>fs.defaultFSname>
	<value>hdfs://hadoop102:8020value>
property>


<property>
	<name>hadoop.tmp.dirname>
	<value>/opt/module/hadoop-3.1.3/datavalue>
property>
- Edit hdfs-site.xml file
[hadoop@hadoop102 /]$ vim /opt/module/hadoop-3.1.3/etc/hadoop/hdfs-site.xml
<property> <name>dfs.namenode.http-addressname> <value>hadoop102:9870value> property> <property> <name>dfs.namenode.secondary.http-addressname> <value>hadoop104:9868value> property>- Edit yarn-site.xml file
[hadoop@hadoop102 /]$ vim /opt/module/hadoop-3.1.3/etc/hadoop/yarn-site.xml
<property> <name>yarn.nodemanager.aux-servicesname> <value>mapreduce_shufflevalue> property> <property> <name>yarn.resourcemanager.hostnamename> <value>hadoop103value> property> <property> <name>yarn.nodemanager.env-whitelistname> <value>JAVA_HOME,HADOOP_COMMON_HOME,HADOOP_HDFS_HOME,HADOOP_CONF_DIR,CLASSPATH_PREPEND_DISTCACHE,HADOOP_YARN_HOME,HADOOP_MAPRED_HOMEvalue> property>- Edit mapred-site.xml file
[hadoop@hadoop102 /]$ vim /opt/module/hadoop-3.1.3/etc/hadoop/mapred-site.xml
<property> <name>mapreduce.framework.namename> <value>yarnvalue> property>- Edit hadoop-env.sh file
[hadoop@hadoop102 /]$ vim /opt/module/hadoop-3.1.3/etc/hadoop/hadoop-env.sh
1. Append a line to the end of the file
export JAVA_HOME=/opt/module/jdk1.8.0_212
- Edit workers file
[hadoop@hadoop102 hadoop]$ vim workers
1. Write the following
hadoop102
hadoop103
hadoop104
-
To this step, shut down the virtual machine and clone two, please Baidu yourself. After cloning is completed, turn on the two cloned machines, do not connect through the terminal, then do the following operation in vm.
-
All three hosts are logged in using root user
- Modify Host Name of Clone 1 Machine
[root@hadoop102 hadoop]# vim /etc/hostname
The contents are as follows
hadoop103
- Modify Clone 1 ip
[root@hadoop102 ~]# vim /etc/sysconfig/network-scripts/ifcfg-ens33
The contents are as follows
TYPE="Ethernet"
PROXY_METHOD="none"
BROWSER_ONLY="no"
BOOTPROTO="static"
DEFROUTE="yes"
IPV4_FAILURE_FATAL="no"
IPV6INIT="yes"
IPV6_AUTOCONF="yes"
IPV6_DEFROUTE="yes"
IPV6_FAILURE_FATAL="no"
IPV6_ADDR_GEN_MODE="stable-privacy"
NAME="ens33"
UUID="385ea190-1b85-42cf-9df4-916f2dd86bc7"
DEVICE="ens33"
ONBOOT="yes"
IPADDR=192.168.127.113
NETMASK=255.255.255.0
GATEWAY=192.168.127.1
- Modify Host Name of Clone 2 Machine
[root@hadoop102 hadoop]# vim /etc/hostname
The contents are as follows
hadoop104
- Modify ip of clone 2 machine
[root@hadoop102 ~]# vim /etc/sysconfig/network-scripts/ifcfg-ens33
The contents are as follows
TYPE="Ethernet"
PROXY_METHOD="none"
BROWSER_ONLY="no"
BOOTPROTO="static"
DEFROUTE="yes"
IPV4_FAILURE_FATAL="no"
IPV6INIT="yes"
IPV6_AUTOCONF="yes"
IPV6_DEFROUTE="yes"
IPV6_FAILURE_FATAL="no"
IPV6_ADDR_GEN_MODE="stable-privacy"
NAME="ens33"
UUID="385ea190-1b85-42cf-9df4-916f2dd86bc7"
DEVICE="ens33"
ONBOOT="yes"
IPADDR=192.168.127.114
NETMASK=255.255.255.0
GATEWAY=192.168.127.1
- Restart both clone machines for the configuration reload to take effect.
[root@hadoop102 ~]#reboot
-
-
Configure Secret-Free Login
- Hadoop102 generates decryption-free and sends to the remaining two nodes (hadoop102,hadoop103,hadoop104)
[hadoop@hadoop102 .ssh]$ ssh-keygen -t rsa
[hadoop@hadoop104 .ssh]$ ssh-copy-id hadoop102
[hadoop@hadoop102 .ssh]$ ssh-copy-id hadoop103
[hadoop@hadoop102 .ssh]$ ssh-copy-id hadoop104
- Hadoop103 generates decryption-free and is sent to the remaining two nodes (hadoop102,hadoop103,hadoop104)
[hadoop@hadoop103 .ssh]$ ssh-keygen -t rsa
[hadoop@hadoop103 .ssh]$ ssh-copy-id hadoop102
[hadoop@hadoop104 .ssh]$ ssh-copy-id hadoop103
[hadoop@hadoop103 .ssh]$ ssh-copy-id hadoop104
- Hadoop104 generates decryption-free and is sent to the remaining two nodes (hadoop102,hadoop104,hadoop103)
[hadoop@hadoop104 .ssh]$ ssh-keygen -t rsa
[hadoop@hadoop104 .ssh]$ ssh-copy-id hadoop102
[hadoop@hadoop104 .ssh]$ ssh-copy-id hadoop103
[hadoop@hadoop104 .ssh]$ ssh-copy-id hadoop104
-
Formatting (primary node must operate, both hadoop102)
[hadoop@hadoop102 sbin]$ hdfs namenode -format
- You can then view the corresponding information in the following text
192.168.127.112:9870  --Visit hadoop Cluster foreground page
192.168.127.113:8088  --Visit hadoop All application pages
 You can also use individual nodes jps Command to view the status of the started task node.
__EOF__
Mr. Liu - Link to this article: https://blog.csdn.net/lszbk/p/15987604.html
- About bloggers: Comments and private messages will be answered in the first place. perhaps Direct Private Trust I.
- Copyright Statement: All articles in this blog, except special statements, use BY-NC-SA License agreement. Reprint please indicate the source!
- Support blogger: If you feel the article is helpful to you, you can click on the bottom right corner of the article ** [Recommended] (javascript:void(0) 😉]** Once.