preface
This article is a masterpiece of Zhang XuYao and others Drawing and Recognizing Chinese Characters with Recurrent Neural Network Simplified reproduction of. This paper is divided into two parts. The first part is Online Chinese character recognition based on the Stacked LSTM Layer customized in the Layer layer, and the second part is Chinese character generation based on the GRU Cell customized in the Cell Layer.
The data are obtained from the data provided by the State Key Laboratory of pattern recognition Handwritten Chinese character dataset , where Online data is a data sequence containing order, while Offline does not contain order, similar to bitmap. Therefore, RNN can be given priority in processing Online data.
1. Chinese character recognition
1.1 data set preparation
For Tensorflow Dataset, the data is divided into x part and y part (for Chinese character recognition, X part is the sample and y part is the label).
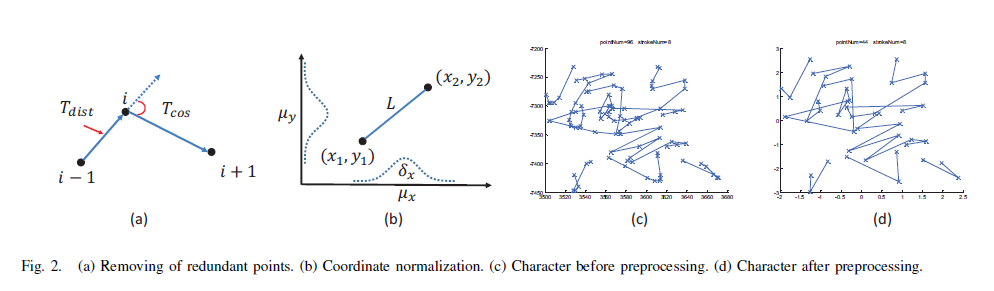
The data preparation method of part x is very clear and easy to understand in the article. Here we only talk about the results. The processing result is to convert Chinese characters into a sequence with length N, that is, a two-dimensional array with shape [n, 6]. For different Chinese character writing examples, n is likely to be different, that is, the length of the sequence is uncertain, which is the characteristic of RNN model - accepting variable length sequences.
The prepared part x (several writing examples of several Chinese characters, including data August) is a list whose elements are [n, 6] two-dimensional arrays (although n is different here, they are all known). When feeding the RNN model, we also need to combine the elements equal to N, that is, batch, which is of great significance to improve the operation speed.
From the following code that uses the generator to construct a Dataset, you can see how to do batch. In Tensorflow, the dimensions that are undetermined during model construction and determined only after each run-time injection are represented by None.
Part y is relatively simple. In this paper, only 10 words are taken in the Chinese character recognition part, and the label is the one hot code of the word category.
with open(ss.data_path + "x_y_la_n_" + str(ss.la_total) + "_s_" + str(ss.la_per_sample) + "_dist_" + str(ss.la_remove_dist_th) + "_ang_" + str(ss.la_remove_ang_th), "rb") as f:
    x, y = pickle.load(f)

def train_generator():
    i = 0
    while True:
        curlen = np.size(x[i], 0)
        xout = [x[i]]
        yout = [y[i]]
        i += 1
        if i == len(x):
            return
        while np.size(x[i], 0) == curlen:
            xout = np.append(xout, [x[i]], axis=0)
            yout = np.append(yout, [y[i]], axis=0)
            i += 1
            if i == len(x):
                return
        yield (xout, np.expand_dims(yout, 1))

dataset = tf.data.Dataset.from_generator(train_generator, output_types=(tf.float32, tf.float32),output_shapes=([None, None, 6], [None, 1, 10]))
You can see that the generator is provided by merging equal length sequences (previously, the sequences have been sorted by length), so the output_shapes have one more dimension: batch from left to right_ size,time_step (sequence length), input_feature.
1.2 model construction and training
This part of the model construction can directly use the ready-made components of keras, and there are many tutorials on the Internet. Here we recommend the demonstration code of the second work of the paper GitHub - YifeiY/hanzi_recognition.
This paper does not use ready-made components to implement an LSTM layer.
For the keras based RNN Model, the hierarchy is Cell → Layer → Model, this article customizes an S_LSTM class (Stacked LSTM Layer) is derived from keras.layers.Layer. Therefore, the standard interfaces of Layer class need to be overloaded.
Implementation logic reference of LSTM:
Creating a simple RNN from scratch with TensorFlow
Implementing a LSTM from scratch with Numpy – Christina's blog
Unfolding RNNs II - Vanilla, GRU, LSTM RNNs from scratch in Tensorflow
GitHub - suriyadeepan/rnn-from-scratch: Use tensorflow's tf.scan to build vanilla, GRU and LSTM RNNs
class S_LSTM(keras.layers.Layer):
    def __init__(self, h_size, nlayer, **kwargs):
        super(S_LSTM, self).__init__(**kwargs)
        self.h_size = h_size
        self.nlayer = nlayer
        self.Wxi, self.Wxf, self.Wxc, self.Wxo = [], [], [], []
        self.Whi, self.Whf, self.Whc, self.Who = [], [], [], []
        self.Whsi, self.Whsf, self.Whsc, self.Whso = [], [], [], []
        self.Wc = []
        self.bi, self.bf, self.bc, self.bo = [], [], [], []

    def build(self, input_shape):
        for i in range(self.nlayer):
            self.Wxi.append(self.add_weight(shape=(input_shape[2], self.h_size), initializer=keras.initializers.glorot_uniform))
            self.Wxf.append(self.add_weight(shape=(input_shape[2], self.h_size), initializer=keras.initializers.glorot_uniform))
            self.Wxc.append(self.add_weight(shape=(input_shape[2], self.h_size), initializer=keras.initializers.glorot_uniform))
            self.Wxo.append(self.add_weight(shape=(input_shape[2], self.h_size), initializer=keras.initializers.glorot_uniform))
            if i > 0:
                self.Whsi.append(self.add_weight(shape=(self.h_size, self.h_size), initializer=keras.initializers.glorot_uniform))
                self.Whsf.append(self.add_weight(shape=(self.h_size, self.h_size), initializer=keras.initializers.glorot_uniform))
                self.Whsc.append(self.add_weight(shape=(self.h_size, self.h_size), initializer=keras.initializers.glorot_uniform))
                self.Whso.append(self.add_weight(shape=(self.h_size, self.h_size), initializer=keras.initializers.glorot_uniform))
            self.Whi.append(self.add_weight(shape=(self.h_size, self.h_size), initializer=keras.initializers.glorot_uniform))
            self.Whf.append(self.add_weight(shape=(self.h_size, self.h_size), initializer=keras.initializers.glorot_uniform))
            self.Whc.append(self.add_weight(shape=(self.h_size, self.h_size), initializer=keras.initializers.glorot_uniform))
            self.Who.append(self.add_weight(shape=(self.h_size, self.h_size), initializer=keras.initializers.glorot_uniform))
            self.Wc.append(self.add_weight(shape=(self.h_size, self.h_size), initializer=keras.initializers.glorot_uniform))
            self.bi.append(self.add_weight(shape=(self.h_size,), initializer=keras.initializers.zeros))
            self.bf.append(self.add_weight(shape=(self.h_size,), initializer=keras.initializers.zeros))
            self.bc.append(self.add_weight(shape=(self.h_size,), initializer=keras.initializers.zeros))
            self.bo.append(self.add_weight(shape=(self.h_size,), initializer=keras.initializers.zeros))

    def call(self, inputs, **kwargs):
        in_shape = tf.shape(inputs)
        batch_size = in_shape[0]
        init_c = []
        init_h = []
        for i in range(self.nlayer):
            init_c.append(tf.zeros([batch_size, self.h_size]))
            init_h.append(tf.zeros([batch_size, self.h_size]))

        def time_step(prev, xt):
            c_1, h_1 = tf.unstack(prev)
            c, h = [], []
            for i in range(self.nlayer):
                _i = tf.math.sigmoid(tf.matmul(xt, self.Wxi[i]) + (i > 0 and tf.matmul(h[i - 1], self.Whsi[i - 1])) + tf.matmul(h_1[i], self.Whi[i]) + self.bi[i])
                _f = tf.math.sigmoid(tf.matmul(xt, self.Wxf[i]) + (i > 0 and tf.matmul(h[i - 1], self.Whsf[i - 1])) + tf.matmul(h_1[i], self.Whf[i]) + self.bf[i])
                _o = tf.math.sigmoid(tf.matmul(xt, self.Wxo[i]) + (i > 0 and tf.matmul(h[i - 1], self.Whso[i - 1])) + tf.matmul(h_1[i], self.Who[i]) + self.bo[i])
                _c = tf.math.tanh(tf.matmul(xt, self.Wxc[i]) + (i > 0 and tf.matmul(h[i - 1], self.Whsc[i - 1])) + tf.matmul(h_1[i], self.Whc[i]) + self.bc[i])
                c.append(tf.multiply(_f, c_1[i]) + tf.multiply(_i, _c))
                h.append(tf.multiply(_o, tf.tanh(c[i])))
            return tf.stack([c, h])

        outputs = tf.scan(time_step, tf.transpose(inputs, [1, 0, 2]), tf.stack([init_c, init_h]))
        return tf.transpose(outputs[:, 1, self.nlayer-1, :, :], [1, 0, 2])

    def get_config(self):
        config = super(S_LSTM, self).get_config()
        config.update({"h_size": self.h_size, "nlayer": self.nlayer})
        return config
In this way, the customized LSTM layer can be perfectly integrated into the Sequential model of keras:
s_lstm_layer = S_LSTM(16, 2)

model = keras.Sequential([
    keras.layers.Input(shape=(None, 6), dtype=tf.float32, ragged=False),
    s_lstm_layer,
    keras.layers.Dropout(0.2),
    keras.layers.TimeDistributed(keras.layers.Dense(10, activation="softmax")),
])

model.compile(optimizer=keras.optimizers.Adam(1e-4), loss=keras.losses.CategoricalCrossentropy(from_logits=False), metrics=['accuracy'])
model.summary(line_length=200)
model.fit(take_batches, steps_per_epoch=500, epochs=300)
You can directly use the built-in optimizer, loss function and training method of keras. The training accuracy of this paper can reach more than 90%.
2. Chinese character generation
2.1 basic ideas
Before preparing the data, first analyze how to generate Chinese characters. The idea is actually targeted prediction of sequence data, that is, let the RNN model predict the next data according to the input data and historical information. The official tutorial of Tensorflow is recommended for the introduction of such tasks Recurrent neural network (RNN) text generation . Classic works cited in the original paper Generating Sequences With Recurrent Neural Networks , and its classic implementation https://github.com/hardmaru/write-rnn-tensorflow It is also one of the important references of this paper.
Returning to this article, the generation of a Chinese character is intuitively the process of continuous movement of the pen tip. Therefore, it is necessary to predict the position and writing state of the next point (pen [1, 0, 0], pen [0, 1, 0], termination [0, 0, 1]).
Let's start with the prediction of the location of the next point. In order to increase the variability of generation (I guess), the original paper and Generating Sequences With Recurrent Neural Networks The prediction of the position of the next point does not directly produce a two-dimensional vector [x, y], but a set of parameters of the Gaussian mixture model (GMM) used to randomly generate the position of the next point (a little winding, which means that whenever you want to write a stroke, a set of parameters will be output, a GMM will be determined by this set of parameters, and then the GMM will randomly generate the writing point). Explanation of GMM: Detailed explanation of EM algorithm and Gaussian mixture model (GMM)_ Lin Limin loves bathing - CSDN blog_ gaussian mixture model . The loss function for GMM is as follows:
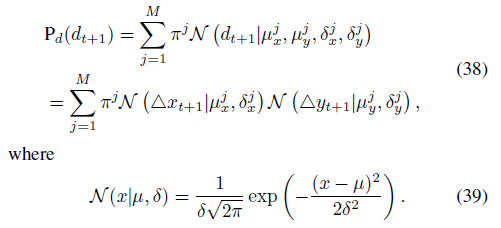
It can be considered that when the training makes the loss function smaller and smaller, the writing points generated by GMM are more and more consistent with the actual writing points. It is suggested to combine the code of this article with the original paper.
The prediction of writing state is relatively simple, just direct prediction, and the weighted cross entropy is used as the loss function.
2.2 data set preparation
Let's start with part y, and use the actual position of the next point + the actual writing state. Through the author's experiment, the absolute position is better than the relative displacement for the actual position information of the next point, which is helpful to make the trained model have the ability of "overall error correction".
Besides part x, the original paper provides the actual position of the current point + the actual writing state as an input. After the author's experimental analysis, it is considered that the position and writing state of the next point are mainly related to the number of strokes of the current word, but can have nothing to do with the current point position and writing state. Even this independence helps to improve the ability of "overall error correction". Therefore, in the simplified reproduction of this paper, only the category of the word is input in part x (the current information is expressed by the hidden state of RNN).
2.3 model construction and training
This paper implements a GRU Cell, derived from abstractrncell, and implements various standard interfaces, so that it can be called directly by keras.layers.RNN. GRU is equivalent to a simplified version of LSTM. I believe it will be easier to understand the implementation code of LSTM in the previous part. reference material:
GitHub - suriyadeepan/rnn-from-scratch: Use tensorflow's tf.scan to build vanilla, GRU and LSTM RNNs
class SGRUCell(AbstractRNNCell, keras.layers.Layer):
    def __init__(self, units, nclass, **kwargs):
        super(SGRUCell, self).__init__(**kwargs)
        self.units = units
        self.nclass = nclass

    @property
    def state_size(self):
        return self.units

    def build(self, input_shape):
        self.bias_z = self.add_weight(shape=(self.units), initializer=keras.initializers.constant(5), name='bias_z')
        self.recurrent_kernel = self.add_weight(shape=(self.units, self.units * 4), initializer='orthogonal', name='recurrent_kernel')
        self.kernel_c = self.add_weight(shape=(self.nclass, self.units * 4), initializer='glorot_uniform', name='kernel_c')
        self.bias = self.add_weight(shape=(self.units * 3), initializer='zeros', name='bias')
        self.built = True

    def call(self, inputs, states, training):
        tf.debugging.assert_all_finite(inputs, 'sgrucell inputs ill')
        h_tm1 = states[0] if nest.is_sequence(states) else states  # previous memory
        ch = tf.cast(inputs[:, 0], tf.int32)
        _ch = tf.one_hot(ch, self.nclass)
        z = tf.sigmoid(tf.matmul(h_tm1, self.recurrent_kernel[:, :self.units])
                       + tf.matmul(_ch, self.kernel_c[:, :self.units])
                       + self.bias_z)
        r = tf.sigmoid(tf.matmul(h_tm1, self.recurrent_kernel[:, self.units:self.units * 2])
                       + tf.matmul(_ch, self.kernel_c[:, self.units:self.units * 2])
                       + self.bias[:self.units])
        hh = tf.tanh(tf.matmul(r * h_tm1, self.recurrent_kernel[:, self.units * 2:self.units * 3])
                       + tf.matmul(_ch, self.kernel_c[:, self.units * 2:self.units * 3])
                       + self.bias[self.units * 1:self.units * 2])
        h = z * h_tm1 + (1 - z) * hh
        o = tf.tanh(tf.matmul(h, self.recurrent_kernel[:, self.units * 3:])
                       + tf.matmul(_ch, self.kernel_c[:, self.units * 3:])
                       + self.bias[self.units * 2:])
        new_state = [h] if nest.is_sequence(states) else h
        return o, new_state

    def get_config(self):
        config = super(SGRUCell, self).get_config()
        config.update({'units': self.units, 'nclass': self.nclass})
        return config
To improve operation efficiency, move some operations to a PostProcess layer:
class PostProcess(keras.layers.Layer):
    def __init__(self, M, **kwargs):
        super(PostProcess, self).__init__(**kwargs)
        self.M = M

    def build(self, input_shape):
        input_dim = input_shape[-1]
        self.Wgmm = self.add_weight(shape=(input_dim, self.M * 5), initializer='glorot_uniform', name='Wgmm')
        self.bgmm = self.add_weight(shape=(self.M * 5), initializer='zeros', name='bgmm')
        self.Wsoftmax = self.add_weight(shape=(input_dim, 3), initializer='glorot_uniform', name='Wsoftmax')
        self.bsoftmax = self.add_weight(shape=(3), initializer='zeros', name='bsoftmax')
        self.built = True

    def call(self, inputs, **kwargs):
        tf.debugging.assert_all_finite(inputs, 'postprocess inputs ill')
        R5M = tf.matmul(inputs, self.Wgmm) + self.bgmm
        _pi = R5M[:, :, :self.M]
        pi = exp_safe(_pi) / tf.reduce_sum(exp_safe(_pi), axis=-1, keepdims=True)
        mux = R5M[:, :, self.M:self.M * 2]
        muy = R5M[:, :, self.M * 2:self.M * 3]
        sigmax = exp_safe(R5M[:, :, self.M * 3:self.M * 4])
        sigmay = exp_safe(R5M[:, :, self.M * 4:])
        R3 = tf.matmul(inputs, self.Wsoftmax) + self.bsoftmax
        p = exp_safe(R3) / tf.reduce_sum(exp_safe(R3), axis=-1, keepdims=True)
        return tf.concat([pi, mux, muy, sigmax, sigmay, p], axis=-1)

    def get_config(self):
        config = super(PostProcess, self).get_config()
        config.update({"M": self.M})
        return config
In this way, it can still be perfectly integrated into keras's Sequential model:
def construct_model(rnn_cell_units, nclass, M, stateful, batch_shape):
    rnn_cell = SGRUCell(units=rnn_cell_units, nclass=nclass)
    rnn_layer = tf.keras.layers.RNN(rnn_cell, return_state=False, return_sequences=True, stateful=stateful)
    model = tf.keras.Sequential([
        tf.keras.layers.Input(batch_shape=batch_shape),
        rnn_layer,
        PostProcess(M=M)
      ])
    return model
Loss function:
def exp_safe(x):
    return tf.clip_by_value(tf.exp(x), clip_value_min=1e-10, clip_value_max=1e10)

def log_safe(x):
    return tf.clip_by_value(tf.math.log(x), clip_value_min=-20, clip_value_max=20)

def N(x, mu, sigma):
    return exp_safe(-(x - mu)**2 / (2 * sigma**2)) / (sigma * np.sqrt(2 * np.pi))

def Loss(y, pred):
    tf.debugging.assert_all_finite(pred, 'loss inputs ill')
    pi, mux, muy, sigmax, sigmay,  = tf.split(pred[:, :, :-3], 5, axis=-1)
    p = pred[:, :, -3:]
    xtp1 = tf.expand_dims(y[:, :, 0], axis=-1)
    ytp1 = tf.expand_dims(y[:, :, 1], axis=-1)
    stp1 = y[:, :, 2:5]
    w = tf.constant([1, 5, 100], dtype=tf.float32)
    lPd = log_safe(tf.reduce_sum(pi * N(xtp1, mux, sigmax) * N(ytp1, muy, sigmay), axis=-1))
    lPs = tf.reduce_sum(w * stp1 * log_safe(p), axis=-1)
    return - (lPd + lPs)
Training:
with open(ss.data_path + "x_y_lb100_n_" + str(ss.nclass) + "_r_" + str(ss.repeat) + "_dist_" + str(ss.lb_remove_dist_th) + "_ang_" + str(ss.lb_remove_ang_th) + "_drop_" + str(ss.drop) + "_np_" + str(ss.noise_prob) + "_nr_" + str(ss.noise_ratio), 'rb') as f:
x, y = pickle.load(f)
dataset = tf.data.Dataset.from_generator(lambda: iter(zip(x, y)), output_types=(tf.float32, tf.float32),output_shapes=([None, None, 1], [None, None, 5]))
take_batches = dataset.repeat().shuffle(5000)
sess = tf.compat.v1.Session(config=tf.compat.v1.ConfigProto(gpu_options=tf.compat.v1.GPUOptions(per_process_gpu_memory_fraction=0.45)))
tf.compat.v1.keras.backend.set_session(sess)
loss_tracker = keras.metrics.Mean(name="loss")
mae_metric = keras.metrics.MeanAbsoluteError(name="mae")
class CustomModel(keras.Model):
def train_step(self, data):
x, y = data
with tf.GradientTape() as tape:
y_pred = self(x, training=True)
loss = Loss(y, y_pred)
trainable_vars = self.trainable_variables
_gradients = tape.gradient(loss, trainable_vars)
gradients = []
for i in range(len(_gradients)):
_g = tf.clip_by_norm(_gradients[i], clip_norm=100)
gradients.append(_g)
self.optimizer.apply_gradients(zip(gradients, trainable_vars))
loss_tracker.update_state(loss)
return {"loss": loss_tracker.result()}
@property
def metrics(self):
return [loss_tracker]
class CustomCallback(keras.callbacks.Callback):
def __init__(self, model2, ckp_path):
self.model2 = model2
self.ckp_path = ckp_path
def on_epoch_begin(self, epoch, logs=None):
pass
tf.random.set_seed(123 + epoch)
def on_epoch_end(self, epoch, logs=None):
self.model2.load_weights(tf.train.latest_checkpoint(self.ckp_path))
draw_chars(x, y, self.model2, [0, 1, 2, 3, 4], 50, False, self.ckp_path + 'epoch_' + str(epoch + 1))
rnn_cell = SGRUCell(units=ss.units, nclass=ss.nclass)
rnn_layer = tf.keras.layers.RNN(rnn_cell, return_state=False, return_sequences=True, stateful=False)
postprocess = PostProcess(M=ss.M)
inputs = keras.Input(batch_shape=[None, None, 1])
rnn_out = rnn_layer(inputs)
outputs = postprocess(rnn_out)
model = CustomModel(inputs, outputs)
model.compile(optimizer=keras.optimizers.Adam(learning_rate=0.001))
checkpoint_callback = tf.keras.callbacks.ModelCheckpoint(filepath=ss.checkpoint_path + 'ck_{epoch}', save_weights_only=True)
custom_callback = CustomCallback(construct_model(ss.units, ss.nclass, ss.M, True, [1, 1, 1]), ss.checkpoint_path)
model.run_eagerly = False
# model.load_weights(tf.train.latest_checkpoint(ss.checkpoint_path))
model.fit(take_batches, steps_per_epoch=ss.steps_per_epoch, epochs=ss.epochs, initial_epoch=0,
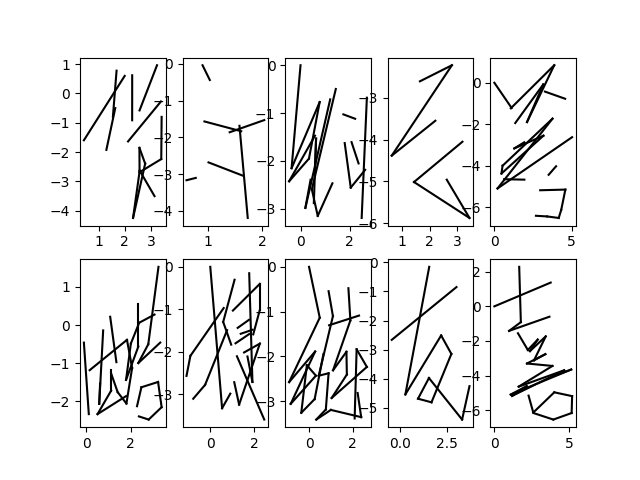
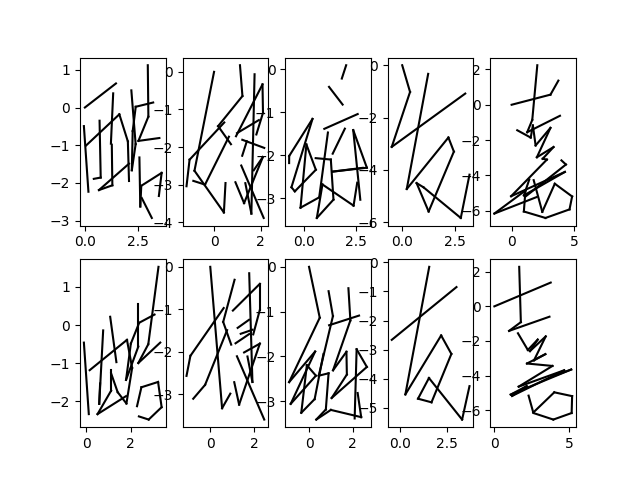
callbacks=[checkpoint_callback, custom_callback])Training effect (prediction data on the top and real samples on the bottom):
Round 1:
Round 50:
The above codes are excerpts, incomplete and cannot be run directly. For the complete project code, see Github address: https://github.com/xiexi1990/rnn_chinese_new.