Preface
Learning how to use Spring, Spring MVC is very fast, but in the process of future use, it is inevitable to want to explore the principles behind the framework. This article will explain how to write a simple version of Spring MVC framework by hand, directly look at the framework from the code of request distribution, control inversion and dependency injection how to achieve. .
It is recommended to read the sample source code. The github address is as follows:
https://github.com/liuyj24/mini-spring
Project Construction
The project construction can refer to the project in github. First, choose the jar package management tool, Maven and Gradle. This project uses Gradle.
Then two modules are built under the project, one is framework, which is used to write the framework; the other is test, which is used to apply and test the framework (note that the test module depends on the framework module).
Then under the framework module, the corresponding packages of beans, core, context, web and other modules are created according to spring. After completion, the packages can be written into the framework.
Request Distribution
Before we talk about request distribution, let's sort out the whole web model:
- Firstly, the user sends a request to the server on the client side, which is parsed by the TCP/IP stack of the operating system and handed over to the web server listening on a certain port.
- After the web server program listens to the request, it will distribute the request to the corresponding program for processing. For example, Tomcat will distribute the request to the corresponding java program (servlet) for processing, and the web server itself will not process the request.
The web server of this project chooses Tomcat, and in order to make the project run directly, it chooses to embedded Tomcat in the project, so that the framework can be started like spring boot when testing, which is convenient for testing.
Servlet
Now that you have chosen to write server-side programs in Java, you have to mention the Servlet interface. In order to standardize the communication between servers and Java programs, Java official formulated the Servlet specification. Java applications on the server side must implement this interface, and servers that use Java as processing language must also dock according to the Servlet specification.
Before spring, people developed web programs like this: a business logic corresponds to a servlet, so there will be multiple servlets in a large project. A large number of servlets will be configured in a configuration file called web.xml. When the server runs, tomcat will search in the web.xml file according to the uri requested. Find the corresponding Servlet business class to process the request.
But you think it's a waste of resources to create a Servlet every time a request comes, and we usually rewrite only one service method in a Servlet implementation class, and the other four methods are just empty implementations. And it's hard to write programs to create many servlets. Can you improve it?
Spring's Dispatcher Servlet
The methods are:
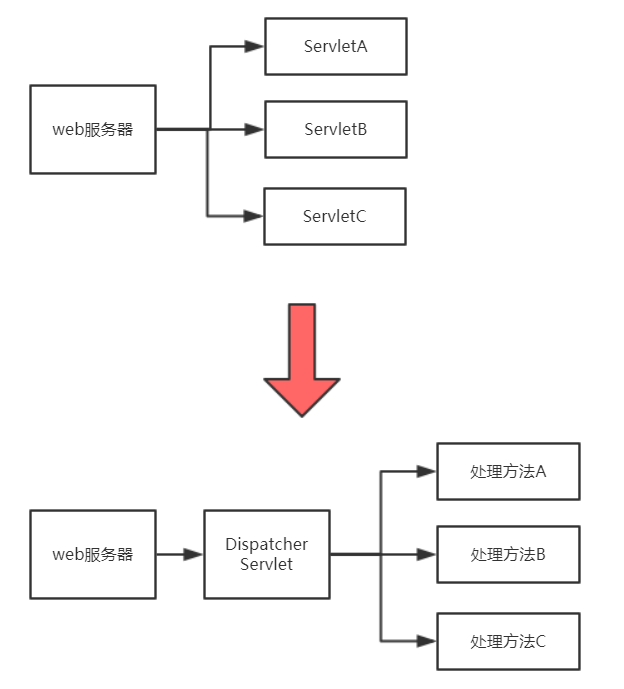
As you can see from the figure above, we used to distribute requests to different servlets through web servers; we can change our thinking, let the web server send requests to a Servlet, and then the Servlet distributes requests to different ways according to uri.
In this way, no matter what request is received, the web server will distribute to the same servlet (Dispatcher Servlet), avoiding the problems caused by multiple servlets, which has the following advantages:
- Moving the distribution request step from the web server to the framework makes it easier to control and expand.
- It is possible to centralize the processing methods of the same business into the same class, which is called controller. There are many processing methods in a controller, so the configuration is not messy.
- When configuring uri mapping path, you can configure it directly with annotations without using configuration files, which solves the problem of centralized configuration.
Practical operation
Suggestions for reference with the source code given at the beginning of the article
- First, create three annotations in the web.mvc package: Controller, Request Mapping, Request Param. With annotations, we can get configuration information dynamically when the framework starts.
- Since the processing methods are annotated, to parse the annotated classes, you first need to obtain all the classes related to the project, corresponding to the ClassScanner class under the core package in the source code.
public class ClassScanner {
    public static List<Class<?>> scanClass(String packageName) throws IOException, ClassNotFoundException {
        //Containers for storing results
        List<Class<?>> classList = new ArrayList<>();
        //Change file name to file path
        String path = packageName.replace(".", "/");
        //Get the default class loader
        ClassLoader classLoader = Thread.currentThread().getContextClassLoader();
        //Get the URL s of all resources under this folder through the file path
        Enumeration<URL> resources = classLoader.getResources(path);

        int index = 0;//test

        while(resources.hasMoreElements()){
            //Get the next resource
            URL resource = resources.nextElement();
            //First decide whether it is a jar package, because the default. class file is packaged as a jar package.
            if(resource.getProtocol().contains("jar")){
                //Turn URL s strongly into jar package links
                JarURLConnection jarURLConnection = (JarURLConnection)resource.openConnection();
                //Get the path name of the jar package from the jar package
                String jarFilePath = jarURLConnection.getJarFile().getName();
                //Pack all classes under jar in containers that store results
                classList.addAll(getClassFromJar(jarFilePath, path));
            }else{//Or maybe it's not a jar file. Put it down first.
                //todo
            }
        }
        return classList;
    }

    /**
     * Get the class file for all paths in the jar package
     * @param jarFilePath
     * @param path
     * @return
     */
    private static List<Class<?>> getClassFromJar(String jarFilePath, String path) throws IOException, ClassNotFoundException {
        List<Class<?>> classes = new ArrayList<>();//Collection of saved results
        JarFile jarFile = new JarFile(jarFilePath);//Create a handle to the corresponding jar package
        Enumeration<JarEntry> jarEntries = jarFile.entries();//Get all the files in the jar package
        while(jarEntries.hasMoreElements()){
            JarEntry jarEntry = jarEntries.nextElement();//Get a document
            String entryName = jarEntry.getName();//Get the filename, like this: com/shenghao/test/Test.class
            if (entryName.startsWith(path) && entryName.endsWith(".class")){//Determine whether it is a class file
                String classFullName = entryName.replace("/", ".")
                        .substring(0, entryName.length() - 6);
                classes.add(Class.forName(classFullName));
            }
        }
        return classes;
    }
}- Then the MappingHandler class is created in the handler package. In the future framework, a MappingHandler corresponds to a business logic, such as adding a user. So there are four fields in a Mapping Handler: Request uri, Processing Method, Method Parameters, Method Class. The Request URI is used to match the Request uri, and the last three parameters are used to invoke the Processing Method by reflection at runtime.
public class MappingHandler {

    private String uri;
    private Method method;
    private Class<?> controller;
    private String[] args;

    MappingHandler(String uri, Method method, Class<?> cls, String[] args){
        this.uri = uri;
        this.method = method;
        this.controller = cls;
        this.args = args;
    }

    public boolean handle(ServletRequest req, ServletResponse res) throws IllegalAccessException, InstantiationException, InvocationTargetException, IOException {
        //Get the requested uri
        String requestUri = ((HttpServletRequest)req).getRequestURI();
        if(!uri.equals(requestUri)){//If it's different from your own uri, skip
            return false;
        }
        Object[] parameters = new Object[args.length];
        for(int i = 0; i < args.length; i++){
            parameters[i] = req.getParameter(args[i]);
        }
        Object ctl = BeanFactory.getBean(controller);
        Object response = method.invoke(ctl, parameters);
        res.getWriter().println(response.toString());
        return true;
    }
}- Next, create the Handler Manager class in the handler package, which has a static set of Mapping Handlers. The purpose of this class is to find the classes annotated by @controller from all the classes obtained, and encapsulate each method annotated by @ReqeustMapping in the controller class as a Mapping Handler, and then to map the Mapping Handle. R is put into a static set
public class HandlerManager {

    public static List<MappingHandler> mappingHandlerList = new ArrayList<>();

    /**
     * Processing class file collection, picking out Mapping Handler
     * @param classList
     */
    public static void resolveMappingHandler(List<Class<?>> classList){
        for(Class<?> cls : classList){
            if(cls.isAnnotationPresent(Controller.class)){//Mapping Handler will be in the controller
                parseHandlerFromController(cls);//Continue to separate one Mapping Handler from the controller
            }
        }
    }

    private static void parseHandlerFromController(Class<?> cls) {
        //Get all the methods in the controller first
        Method[] methods = cls.getDeclaredMethods();
        //Select the method annotated by RequestMapping for encapsulation
        for(Method method : methods){
            if(!method.isAnnotationPresent(RequestMapping.class)){
                continue;
            }
            String uri = method.getDeclaredAnnotation(RequestMapping.class).value();//Get the uri defined by RequestMapping
            List<String> paramNameList = new ArrayList<>();//Save the set of method parameters
            for(Parameter parameter : method.getParameters()){
                if(parameter.isAnnotationPresent(RequestParam.class)){//Add parameters annotated by RequestParam to the collection
                    paramNameList.add(parameter.getDeclaredAnnotation(RequestParam.class).value());
                }
            }
            String[] params = paramNameList.toArray(new String[paramNameList.size()]);//Convert the set of parameters to an array for reflection
            MappingHandler mappingHandler = new MappingHandler(uri, method, cls, params);//Reflection Generation Mapping Handler
            mappingHandlerList.add(mappingHandler);//Loading mappingHandler into a collection
        }
    }
}- After completing the above four steps, we get a Mapping Handler set when the framework starts. When the request arrives, we can call the corresponding processing method by reflecting the corresponding Mapping Handler from the set according to the uri of the request, and then complete the function of the framework request distribution.
Control Inversion and Dependency Injection
After completing the request distribution function, consider further such a question:
Assuming that processing a request now requires creating three objects, A, B and C, and
A has a field D
B has a field D.
C has a field B
If ABC is created sequentially,
First create a D, then create an A.
Next, create a D, and then create a B.
Then create a D, then create a B, then create a C.
A total of one A, two B, one C and three D are created.
These are the ways in which one of our programmers creates objects. You can see that because objects cannot be referenced repeatedly, a large number of duplicate objects are created.
In order to solve this problem, spring proposed the concept of bean. You can understand a bean as an object, but it has the following characteristics compared with ordinary objects:
- Unlike ordinary objects, the declaration cycle is longer.
- Visible throughout the virtual machine, unlike ordinary objects that are visible only in a code block
- Maintenance costs are high and exist as a single case
In order to make the beans mentioned above, we need to have a bean factory, and the principle of the bean factory is simple: create the related beans when the framework is initialized (or when they are used), and take them directly from the factory when the beans need to be used. That is, we give the power to create objects to the framework, which is the inversion of control.
With the bean factory, the process of creating ABC in sequence is as follows:
First create a D, put D into the factory, then create an A, put A into the factory;
Then take out a D from the factory, create a B, and put B into the factory.
Then take out a B from the factory, create a C, and put C into the factory.
A total of A, B, C and D are created.
The goal of reusing objects is achieved.
The process of creating a D and then setting D to a field of A is called dependency injection.
So the concepts of control inversion and dependency injection are well understood. Control inversion is an idea, and dependency injection is a concrete realization of control inversion.
Practical operation
- First, two annotations @Bean and @AutoWired are created under the bean package, which are also used for framework parsing classes.
- Then create a BeanFactory under the bean package. BeanFactory should provide a function to retrieve instances according to the class, which requires it to have a static getBean() method and a set of mappings to save beans.
- To initialize beans, you need a way to parse beans based on the collection of class files. This method traverses all classes in the collection, extracts annotated classes belonging to beans, creates objects of this class and puts them into static collections.
- Here's an interesting point -- in what order do you create beans? In the source code given in this article, a loop is used to create beans. If the beans do not depend on other beans, they will be created directly. If they depend on other beans, they will see whether other beans have been created or not. If not, they will skip the current beans and create the current beans.
- In the process of creating beans in a loop, there may be a phenomenon of interdependence between beans. The source code temporarily throws an exception to this phenomenon and does not deal with it.
public class BeanFactory {

    //Save the mapping set of Bean instances
    private static Map<Class<?>, Object> classToBean = new ConcurrentHashMap<>();

    /**
     * Getting bean s by class type
     * @param cls
     * @return
     */
    public static Object getBean(Class<?> cls){
        return classToBean.get(cls);
    }

    /**
     * Initialize bean factory
     * @param classList Need A. class file collection
     * @throws Exception
     */
    public static void initBean(List<Class<?>> classList) throws Exception {
        //First create a copy of the. class file collection
        List<Class<?>> toCreate = new ArrayList<>(classList);
        //Loop creation of bean instances
        while(toCreate.size() != 0){
            int remainSize = toCreate.size();//Collection size at the beginning of the record, if the size does not change at the end of the round, proves to be interdependent
            for(int i = 0; i < toCreate.size(); i++){//Traverse to create bean s, skip them if they fail, and wait until the next round to create them
                if(finishCreate(toCreate.get(i))){
                    toCreate.remove(i);
                }
            }
            if(toCreate.size() == remainSize){//Throw exceptions first when there is interdependence
                throw new Exception("cycle dependency!");
            }
        }
    }

    private static boolean finishCreate(Class<?> cls) throws IllegalAccessException, InstantiationException {
        //Created bean instances include only beans and ontroller annotated classes
        if(!cls.isAnnotationPresent(Bean.class) && !cls.isAnnotationPresent(Controller.class)){
            return true;
        }
        //First create instance objects
        Object bean = cls.newInstance();
        //See if the instance object needs to perform dependency injection to inject other bean s
        for(Field field : cls.getDeclaredFields()){
            if(field.isAnnotationPresent(AutoWired.class)){
                Class<?> fieldType = field.getType();
                Object reliantBean = BeanFactory.getBean(fieldType);
                if(reliantBean == null){//If the bean to be injected has not been created, skip it first
                    return false;
                }
                field.setAccessible(true);
                field.set(bean, reliantBean);
            }
        }
        classToBean.put(cls, bean);
        return true;
    }
}- With a bean factory, any place where beans are used can be taken directly through the bean factory.
- Finally, we can write a small Demo to test whether our framework can handle requests correctly and complete responses. Believe that the whole mini-framework, Spring's core functions, and control inversion, dependence on control and other nouns in your mind are no longer just concepts, but clear lines of code.