preface
For this project, I also happened to see a SVE Pana explaining this at station B, knocking the code with his video and learning it. And write a note here, and also provide you with code, ha ha ha.
1, Keras?
1.Keras introduction
Keras is a deep learning framework based on theano/tensorflow written in pure python. Keras is a high-level neural network API that supports fast experiments and can quickly convert your idea into results. If you have the following requirements, you can give priority to keras.
2. Why
At present, keras has been included by TensorFlow and added to TensorFlow to become its default framework and the official high-level API of TensorFlow. Keras simple and fast prototyping (keras has highly modular, minimalist, and extensible features), user-friendly: keras is an API designed for humans rather than Zentraedi. User experience is always the primary and central content we consider. Keras follows the best practice of reducing cognitive difficulties: keras provides a consistent and concise API, which can greatly reduce the workload of users in general applications. At the same time, keras provides clear and practical bug feedback.
2, Implementation of fully connected neural network
1. Ideas
Import data ------ > select model ------ -- > design neural network ------ > compilation ------ > training weight parameters ------ > prediction
2. Implementation code
Define the function train() implementation (import data - > training weight parameters).
Define the function text() to achieve prediction and output results.
Import data: mnist = tf.keras.datasets.mnist # import MNIST
Select model: model = tf.keras.models.Sequential()
There are two types of models, sequential Model and functional Model. Functional Model is more widely used. Sequential Model is a special case of functional Model.
Sequential model: single input and single output, one path to the end, only adjacent relationship between layers, no cross layer connection. This model has fast compilation speed and simple operation;
Design neural network:
		tf.keras.layers.Flatten(input_shape=(28,28)),
        tf.keras.layers.Dense(512,activation='relu'),
        tf.keras.layers.Dense(128,activation='relu'),
        tf.keras.layers.Dense(10,activation='softmax',kernel_regularizer=tf.keras.regularizers.l2())
compile:
model.compile(optimizer = optimizer,

                        loss = Loss function,

                        metrics = [""Accuracy"]')
Training weight parameters:
history = model.fit(x_train,y_train,batch_size=Number of pictures per workout,epochs=Training times,
validation_data=(x_test,y_test),validation_freq=1,callbacks=[cp_callback])
model.summary()
train function all code
def train():
    mnist = tf.keras.datasets.mnist #Import mnist
    (x_train,y_train),(x_test,y_test) = mnist.load_data() #division
    x_train,x_test =x_train/255.0, x_test/255.0
    model = tf.keras.models.Sequential([
        tf.keras.layers.Flatten(input_shape=(28,28)),
        tf.keras.layers.Dense(512,activation='relu'),
        tf.keras.layers.Dense(128,activation='relu'),
        tf.keras.layers.Dense(10,activation='softmax',kernel_regularizer=tf.keras.regularizers.l2())])
    model.compile(optimizer= 'adam',
                  loss=tf.keras.losses.SparseCategoricalCrossentropy(from_logits=False),
                  metrics=['sparse_categorical_accuracy'])#Evaluation indicators category_accuracy and spark_category_accuracy
                  #Pay attention to modifying the path
    checkpoint_save_path="C:/Users/VULCAN/sxti/TEST/Disconnect_detection/mnist.ckpt"
    if os.path.exists(checkpoint_save_path + '.index'):
        print('------load the model--------')
        model.load_weights(checkpoint_save_path)
    cp_callback = tf.keras.callbacks.ModelCheckpoint(filepath=checkpoint_save_path,
                                                     save_weights_only=True,
                                                     save_best_only=True)#Breakpoint continuation training
    history = model.fit(x_train,y_train,batch_size=25,epochs=30,validation_data=(x_test,y_test),validation_freq=1,callbacks=[cp_callback])
    model.summary()

    #The following are the accuracy and loss rate of printing training
    acc = history.history['sparse_categorical_accuracy']
    val_acc = history.history['val_sparse_categorical_accuracy']
    loss = history.history['loss']
    val_loss = history.history['val_loss']
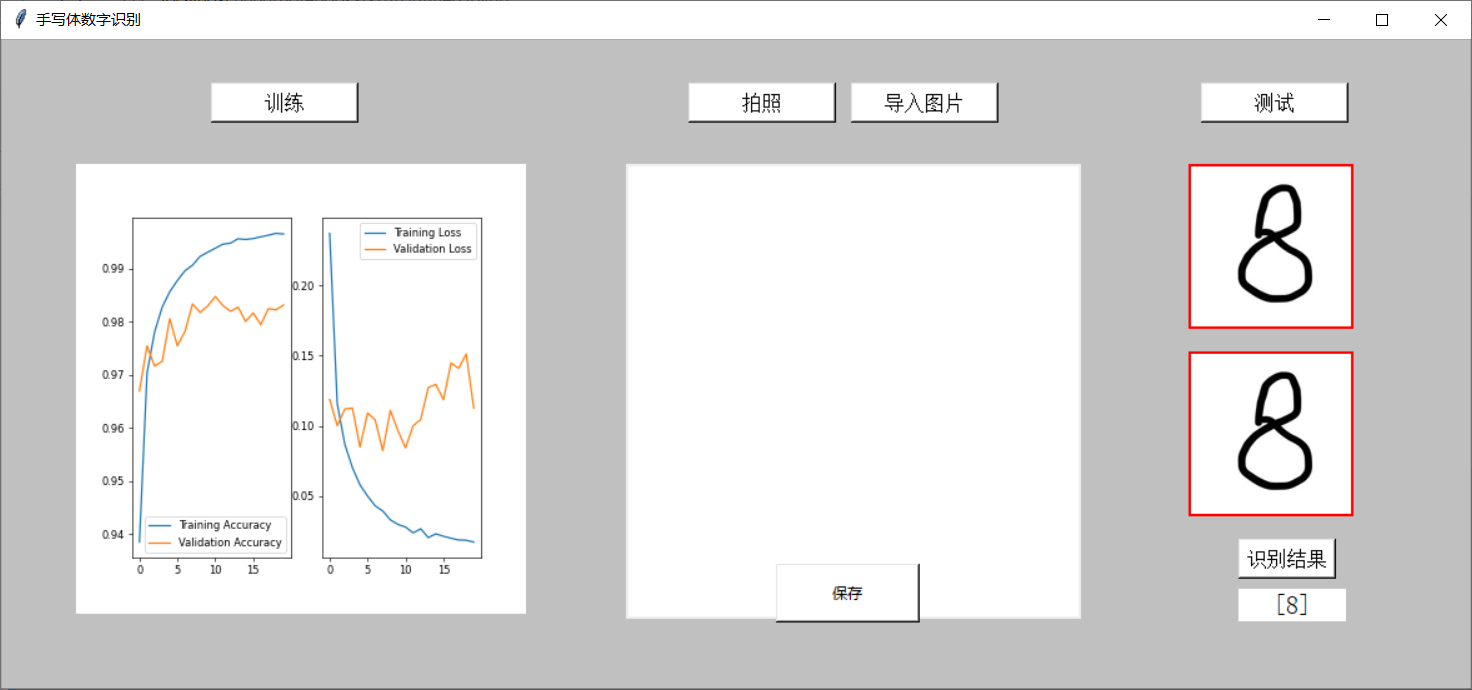
    f = Figure(figsize=(6,6),dpi=60)
    a = f.add_subplot(1,2,1)
    a.plot(acc,label = 'Training Accuracy')
    a.plot(val_acc,label = 'Validation Accuracy')#Verification accuracy
    a.legend()
    b = f.add_subplot(1,2,2)
    b.plot(loss,label = 'Training Loss')
    b.plot(val_loss,label = 'Validation Loss')
    b.legend()
    canvas = FigureCanvasTkAgg(f,master=root)
    canvas.draw()
    canvas.get_tk_widget().place(x=60,y=100)
test function all code
#Print forecast results
def text():
	#Note that the modified path is consistent with the path saved above the function train
    model_save_path = "C:/Users/VULCAN/sxti/TEST/Disconnect_detection/mnist.ckpt"
    model = tf.keras.models.Sequential([
        tf.keras.layers.Flatten(input_shape=(28,28)),
        tf.keras.layers.Dense(512,activation='relu'),
        tf.keras.layers.Dense(128,activation='relu'),
        tf.keras.layers.Dense(10,activation='softmax',kernel_regularizer=tf.keras.regularizers.l2())])
    model.load_weights(model_save_path)
    for i in range(1):
        img = Image.open("tem2.png")
        #Forced compression is 28, 28
        img = img.resize((28,28),Image.ANTIALIAS)
        #Convert the original image to grayscale image
        img_arr = np.array(img.convert("L"))
        #Picture inversion
        for i in range(28):
            for  j in range(28):
                if img_arr[i][j]<100:
                    img_arr[i][j]=255
                else:
                    img_arr[i][j]= 0
        img_arr = img_arr/255.0
        x_predict = img_arr[tf.newaxis,...]
        result = model.predict(x_predict)
        pred = np.argmax(result , axis = 1)
        #Display results in GUI interface
        e4 = l = tk.Label(root,text = pred, bg="white",font=("Arial,12"),width=8)
        e4.place(x=990,y=440)
3, GUI design
In this part, I attach the code directly and make necessary comments in the code.
All required library functions:
#You need to import before using Tkinter
import tkinter as tk
#Import dialog module
import tkinter.filedialog
#Create the library needed for the canvas
from matplotlib.backends.backend_tkagg import FigureCanvasTkAgg
#Create libraries required for toolbars
from matplotlib.backends.backend_tkagg import NavigationToolbar2Tk
#Module 2 required for shortcut keys
from matplotlib.backend_bases import key_press_handler
#Import modules required for drawing
from matplotlib.figure import Figure
import cv2
import tensorflow as tf
import os
import numpy as np
from matplotlib import pyplot as plt
from PIL import Image,ImageTk
Other function definition codes for image file import and camera call:
#Call the camera and take pictures
def buttonl():
    capture = cv2.VideoCapture(0)   #cv2 module access camera
    while(capture.isOpened()):
        ret,frame = capture.read() #ret indicates whether the capture was successful
        frame = frame[:,80:560] #The default is 640 * 480
        cv2.imwrite("tem1.png",frame)
        dig_Gray = cv2.cvtColor(frame,cv2.COLOR_BGR2GRAY)
        ref2,dig_Gray = cv2.threshold(dig_Gray,100,255,cv2.THRESH_BINARY)
        cv2.imwrite("tem2.png",dig_Gray)
        break
    global photo1,photo2
    #Display the picture on the interface
    img1 = Image.open("tem1.png")
    img1 = img1.resize((128,128))
    photo1 = ImageTk.PhotoImage(img1)
    l1 = tk.Label(root,bg="red",image = photo1).place(x=950,y=100)
    img2 = Image.open("tem2.png")
    img2 = img2.resize((128,128))
    photo2 = ImageTk.PhotoImage(img2)
    l2 = tk.Label(root,bg="red",image = photo2).place(x=950,y=250)

 #Save current camera picture
def frame():
    capture = cv2.VideoCapture(0)
    #Control definition
    while(capture.isOpened()):
        ref,frame = capture.read()
        frame = frame[:,80:560]
        cvimage = cv2.cvtColor(frame,cv2.COLOR_BGR2RGBA)
        pilImage = Image.fromarray(cvimage)
        pilImage = pilImage.resize((360,360),Image.ANTIALIAS)
        tkImage = ImageTk.PhotoImage(image = pilImage)
        canvas.create_image(0,0,anchor = "nw",image = tkImage)
        root.update()
        root.after(10)
#Select file
def select_pic():
    file_path = tk.filedialog.askopenfilename(title="Select file",initialdir = (os.path.expanduser(r"")))
    image = Image.open(file_path)
    image.save("tem1.png")
    gray = image.convert("L")
    gray.save("tem2.png")
    global photo3,photo4
#Display the picture on the interface
    img3 = Image.open("tem1.png")
    img3 = image.resize((128,128))
    photo3 = ImageTk.PhotoImage(img3)
    l3 = tk.Label(root,bg="red",image = photo3).place(x=950,y=100)
    img4 = Image.open("tem2.png")
    img4 = img4.resize((128,128))
    photo4 = ImageTk.PhotoImage(img4)
    l4 = tk.Label(root,bg="red",image = photo4).place(x=950,y=250)
Main function part:
if __name__ =='__main__':
    root = tk.Tk()
    #The second step is to name the visualization of the window
    root.title('handwritten numeral recognition ')
    #Step 3: set the window size (length * width)
    root.geometry('1176x520')  #The product here is small x
    root.configure(bg = "#C0C0C0")
    f = Figure(figsize=(6,6), dpi=60)
    a=f.add_subplot(1,2,1)  #Add Subgraph: 1 row, 1 column, first
    a.plot(0,0)
    b=f.add_subplot(1,2,2)  #Add subgraph, row 1, column 2
    b.plot(0,0)
    #Display the drawn figure to tkinter: create a canvas canvas belonging to root and place figure f on the canvas
    canvas=FigureCanvasTkAgg(f,master=root)
    canvas.draw()#Note that the show method is outdated. Use draw instead
    canvas.get_tk_widget().place(x=60,y=100)
    b1 = tk.Button(root,text='train',bg='white',font=('Arial',12),width=12,height=1,command=train).place(x=168,y=35)
    b2 = tk.Button(root,text='photograph',bg='white',font=('Arial',12),width=12,height=1,command=frame).place(x=550,y=35)
    b3 = tk.Button(root,text='test',bg='white',font=('Arial',12),width=12,height=1,command=text).place(x=960,y=35)
    b4 = tk.Button(root,text='import picture',bg='white',font=('Arial',12),width=12,height=1,command=select_pic).place(x=680,y=35)
    b5 = tk.Button(root,text='Identification results',font=('Arial',12),bg='white').place(x=990,y=400)
    canvas=tk.Canvas(root,bg="white",width=360,height=360)  #Draw canvas
    #Control location settings
    canvas.place(x=500,y=100)
    b6=tk.Button(root,text="preservation",bg="white",width=15,height=2,command=buttonl).place(x=620,y=420)
    #Step 6: the main window is displayed circularly
    root.mainloop()
Finally, the interface is attached
