Official Documents
https://hadoop.apache.org/docs/r3.1.1/hadoop-project-dist/hadoop-hdfs/HDFSHighAvailabilityWithQJM.html#Configuration_details
**
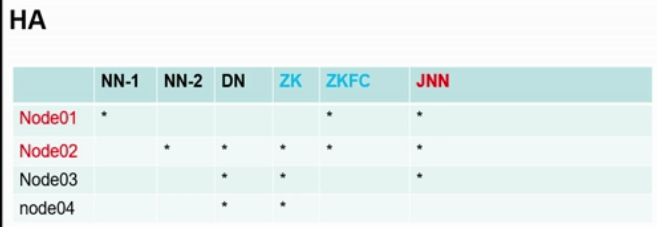
1. Resource Role Planning
**
**
2. Configuration
**
2.1 Backup of fully distributed cluster. If you want to use fully distributed cluster in the future, change the name of hadoop-full to hadoop, and the program will read it.
cd /var/opt/hadoop-3.1.2/etc
cp -r  hadoop hadoop-full
2.2 Modify the hadoop-env.sh file
Enter the etc in the hadoop directory (add two role configurations)
vi + hadoop-env.sh

Comment out the line SECONDARYNAMENODE
Add the following two lines
export HDFS_ZKFC_USER=root
export HDFS_JOURNALNODE_USER=root
2.3 Modify the core-site.xml file
vi + core-site.xml
<property>
        <name>fs.defaultFS</name>
        <value>hdfs://mycluster</value>
    </property>
<property>
        <name>hadoop.tmp.dir</name>
        <value>/var/cjc/hadoop/ha</value>     #Set up the storage directory of hadoop files
<description>A base for other temporary directories.</description>   #Without this, NameNode won't start.
    </property>                                                      #The pit I trampled on
<property>
   <name>hadoop.http.staticuser.user</name>
   <value>root</value>
   </property>
<property>
   <name>ha.zookeeper.quorum</name>
   <value>slave2:2181,slave3:2181,slave4:2181</value>
</property>
<property>
  <name>ipc.client.connect.max.retries</name>
  <value>100</value>
  <description>Indicates the number of retries a client will make to establish
      a server connection.
  </description>
</property>
<property>
  <name>ipc.client.connect.retry.interval</name>
  <value>10000</value>
</property>
2.4 Modify the hdfs-site.xml file
vi + hdfs-site.xml
property>
        <name>dfs.replication</name>
        <value>2</value>
    </property>
<property>
       <name>dfs.nameservices</name>    #set name
       <value>mycluster</value>
    </property>
<property>
  <name>dfs.ha.namenodes.mycluster</name>   #Set the number of NameNode s, two of which are set here.
  <value>nn1,nn2</value>
</property>
<property>
  <name>dfs.namenode.rpc-address.mycluster.nn1</name>  #Call of remote service
  <value>master:8020</value>
</property>
<property>
  <name>dfs.namenode.rpc-address.mycluster.nn2</name>
  <value>slave2:8020</value>
</property>
<property>
  <name>dfs.namenode.http-address.mycluster.nn1</name>  #Browsers access the IP and address of namenode configuration
  <value>master:50070</value>
</property>
<property>
  <name>dfs.namenode.http-address.mycluster.nn2</name> #Two
  <value>slave2:50070</value>
</property>
<property>
  <name>dfs.namenode.shared.edits.dir</name>
  <value>qjournal://Master: 8485; slave 2: 8485; slave 3: 8485 / mycluster < / value > # journalnode is set to three nodes
</property>
<property>
  <name>dfs.client.failover.proxy.provider.mycluster</name>
  <value>org.apache.hadoop.hdfs.server.namenode.ha.ConfiguredFailoverProxyProvider</value>  #The hdfs client finds the proxy class of NameNode, activity class name
</property>
    <property>
      <name>dfs.ha.fencing.methods</name>
      <value>sshfence</value>
    </property>
    <property>
      <name>dfs.ha.fencing.ssh.private-key-files</name>
      <value>/root/.ssh/id_rsa</value>
    </property>
<property>
  <name>dfs.journalnode.edits.dir</name>
  <value>/var/cjc/hadoop/ha/journalnodeDiary</value>
</property>
<property>
# Configuration of automatic failover
   <name>dfs.ha.automatic-failover.enabled</name>
   <value>true</value>
</property>
Save out
Run this command in the hadoop directory of etc in hadoop 3.1.2
scp core-site.xml hdfs-site.xml hadoop-env.sh slave2:pwd
Change 2 to 3,4 and do it twice.
pwd needs to be wrapped in `, and CSDN editors wrapped in `will become blocks of code
Distribution of configuration files to nodes 2, 3, 4 without knocking one by one
**
3. Install zookeeper
**
3.1 Unzip and configure zookeeper
According to the resource allocation, zookeeper is installed in node 2, 3, 4.
tar xf zookeeper-3.4.6.tar.gz -C /var/opt/ #decompression
vi + /etc/profile
Add these two lines
export ZOOKEEPER_HOME=/var/opt/zookeeper-3.4.6
PATH=$PATH:$JAVA_HOME/bin:$HADOOP_HOME/bin:$HADOOP_HOME/sbin:$ZOOKEEPER_HOME/bin
Scp/etc/profile slave3:/etc/# distributed to slave3 nodes
Scp/etc/profile slave4:/etc/# is distributed to slave4 nodes
source /etc/profile #Make the configuration file effective
Enter the conf directory of zookeeper
cp zoo_sample.cfg zoo.cfg #Rename
vi zoo.cfg #Edit zoo.cfg file, mainly change data directory and configure zookeeper startup node
dataDir=/var/opt/zk #zk data storage directory to be changed, directory customization
# Add the following three lines at the bottom
server.1=slave2:2888:3888
server.2=slave3:2888:3888
server.3=slave4:2888:3888
Make sure you save and quit
You can't run zookeeper after you have the configuration file. You need to generate an ID file.
mkdir -p /var/opt/zk #02 03 04 nodes need to be created


[root@slave02 ~]# echo 1 > /var/opt/zk/myid
[root@slave03 ~]# echo 2 > /var/opt/zk/myid
[root@slave04 ~]# echo 3 > /var/opt/zk/myid
1, 2, 3 correspond to the above configuration file.
When everything is ready, hit zkS on the command line and TAB will automatically complete it.
zkServer.sh start #Start zookeeper, running at 2.3 and 4 nodes
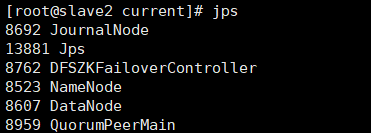
jps to see if there is a zookeeper process
**~~
4. Start journalnode
~~ **
hdfs --daemon start journalnode #Run on three configured journalnode nodes
Format namenode on master node
hdfs namenode -format
# Start namenode on master node
hadoop-daemon.sh start namenode
jps view process
**
5. Synchronization
**
Run this command at Node 2
hdfs namenode -bootstrapStandby #Synchronization command
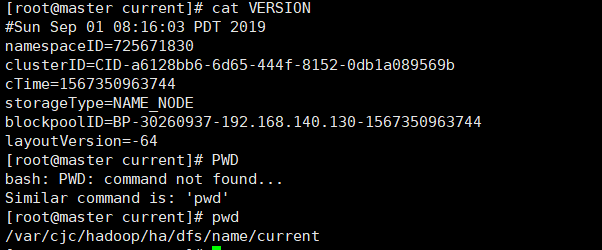
cd /var/cjc/hadoop/ha/name/current
cat VERSION


You can see that the cluster ID is the same
Prove synchronization success
There was a time when the namenode of my node 2 could not be started. I looked through the log and found that a file of fsimage was missing.
Solution: https://www.cnblogs.com/zy1234567/p/10643895.html
hdfs zkfc -formatZK    #Format zk


start-dfs.sh    #Start the cluster


See these proven startup success
Browser Running Address


**
HA High Availability Build Successfully!
**