Haproxy cooperates with Nginx to build a web Cluster
1, Common Web Cluster scheduler
At present, the common Web Cluster scheduler is divided into software and hardware
The software usually uses open source LVS, Haproxy and Nginx
·LVS has the best performance, but the construction is relatively complex;
·The upstream module of Nginx supports the cluster function, but the health check function of cluster nodes is not strong, and the high concurrency is not as good as Haproxy
·F5 is the most commonly used hardware, and many people use barracuda, Lvmeng and other domestic products
2, Haproxy application analysis
·LVS has strong anti load ability in enterprise applications, but it has shortcomings
·LVS does not support regular processing and cannot realize dynamic and static separation
·For large websites, the implementation configuration of LVS is complex, and the maintenance success is relatively high
·HTTP proxy is a kind of application based, load balancing and high availability of HTTP proxy
·Suitable for Web sites with heavy load
·Running on hardware, it can support tens of thousands of connection requests of concurrent connections
3, Principle of Haproxy scheduling algorithm
Haproxy supports a variety of scheduling algorithms, three of which are most commonly used
· RR (Round Robin)
·RR algorithm is the simplest and most commonly used algorithm, namely polling scheduling
· LC(Least Connections)
·The minimum number of connections algorithm dynamically allocates the front-end requests according to the number of connections of the back-end nodes.
· SH(Source Hashing)
·The source based access scheduling algorithm is used in some scenarios where Session sessions are recorded on the server. Cluster scheduling can be done based on source IP, cookies, etc
4, Building Web cluster with Haproxy
Installation package required for experiment
haproxy-1.5.19.tar.gz
nginx-1.12.0.tar.gz
Environment configuration
host	            operating system	  IP address	      Required software/Installation package/tool
Haproxy-Server	CentOS7	192.168.37.40	haproxy-1.5.19.tar.gz
Nginx-Server1	CentOS7	192.168.37.20	nginx-1.12.0.tar.gz
Nginx-Server2	CentOS7	192.168.37.30	nginx-1.12.0.tar.gz
 client	Win10	192.168.37.22
1. Compile and install Nginx server
Nginx-Server1: 192.168.37.20
Nginx-Server2: 192.168.37.30

Nginx-Server1: 192.168.37.20
echo "this is 192.168.37.20 web" > /usr/local/nginx/html/test.html

Nginx-Server2: 192.168.37.30
echo "this is 192.168.37.30 web" > /usr/local/nginx/html/test.html

2. Deploy haproxy server
Haproxy-Server: 192.168.37.40
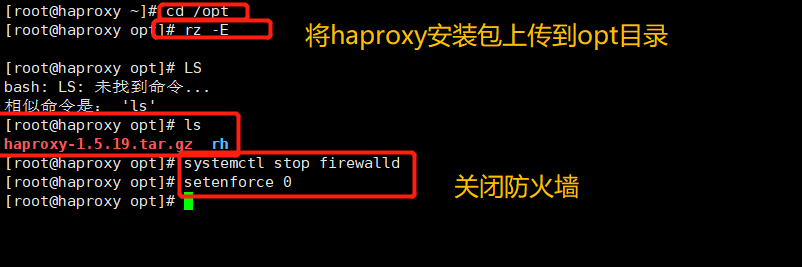
(1) Close the firewall and transfer the software package required to install Haproxy to the / opt directory
systemctl stop firewalld
setenforce 0

cd /opt
haproxy-1.5.19.tar.gz
2. Compile and install Haproxy
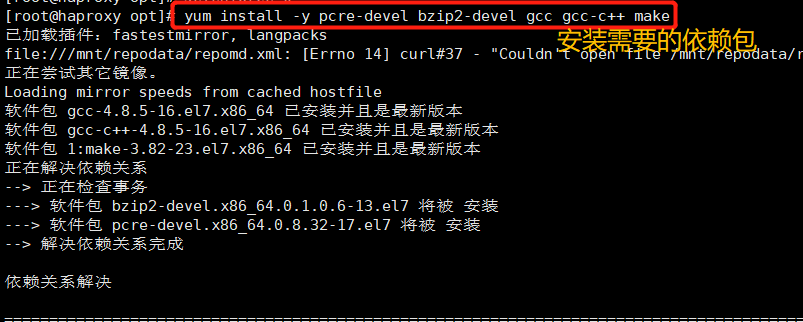
yum install -y pcre-devel bzip2-devel gcc gcc-c++ make

tar zxvf haproxy-1.5.19.tar.gz
cd haproxy-1.5.19/
make TARGET=linux2628 ARCH=x86_64
make install

Parameter description
#Use uname -r to view the kernel, such as 2.6.18-371 El5, in this case, TARGET=linux26 is used for this parameter; TARGET=linux2628 for kernel greater than 2.6.28
TARGET=linux26	#Kernel version
ARCH=x86_64 	#System bits, 64 bit system


3. Haproxy server configuration
mkdir /etc/haproxy
cp examples/haproxy.cfg /etc/haproxy/
cd /etc/haproxy/
vim haproxy.cfg
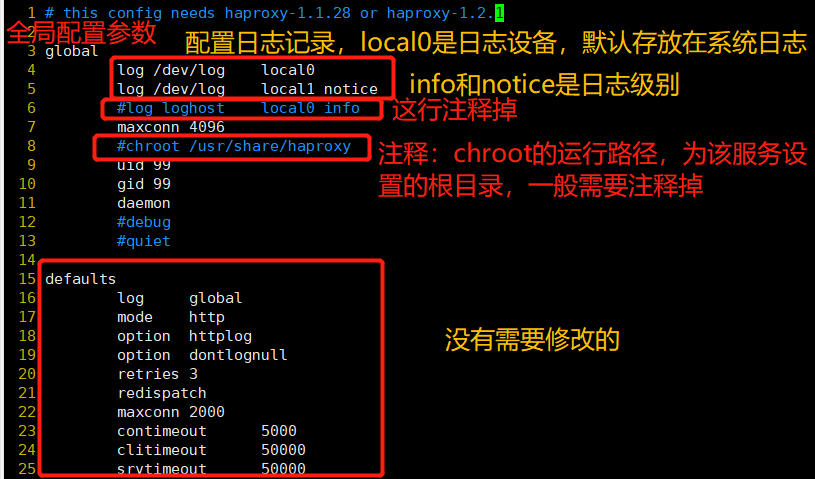
global
#Lines 4 ~ 5 – modify and configure logging. local0 is the logging device and is stored in system log 3 by default
log /dev/log local0 info
log /dev/log local0 notice
#log loghost local0 info
maxconn 4096 #The maximum number of connections needs to consider the ulimit-n limit
#Line 8 – comment, chroot running path, which is the root directory set by the service itself. Generally, this line needs to be commented out
#chroot /usr/share/haproxy
uid 99 #User UID
gid 99 #User GID
daemon #Daemon mode
defaults
log global #Define log is the log definition in global configuration
mode http #The mode is http
option httplog #Log in http log format
option dontlognull #Do not record health check log information
retries 3 #Check the number of failures of the node server. If there are three consecutive failures, the node is considered unavailable
redispatch #When the server load is very high, it will automatically end the connection that has been queued for a long time
maxconn 2000 #maximum connection
contimeout 5000 #Connection timeout
clitimeout 50000 #Client timeout
srvtimeout 50000 #Server timeout
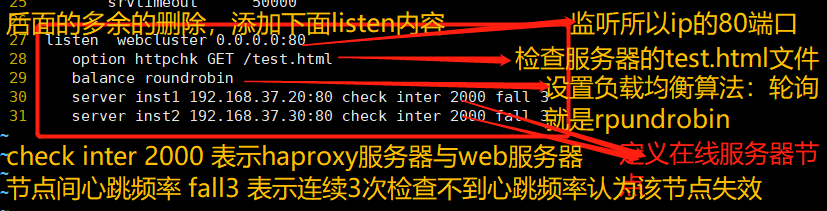
#Delete all the following listen items –, add
listen webcluster 0.0.0.0:80
option httpchk GET /test.html #Check the test of the server HTML file
balance roundrobin #The load balancing scheduling algorithm uses the polling algorithm roundrobin
server inst1 192.168.37.20:80 check inter 2000 fall 3 #Define online nodes
server inst2 192.168.37.30:80 check inter 2000 fall 3
#--Parameter description----------------
balance roundrobin #Load balancing scheduling algorithm
#Polling algorithm: roundrobin; Minimum connection number algorithm: leastconn; Source access scheduling algorithm: source, which is similar to the IP address of nginx_ hash
check inter 2000 #Represents a heartbeat rate between the haproxy server and the node
fall 3 #Indicates that the node fails if the heartbeat frequency is not detected for three consecutive times
If the node is configured with""backup"It means that this node is only a backup node. This node will only be connected if the primary node fails. Not carry"backup",Indicates the master node, which provides services together with other master nodes.


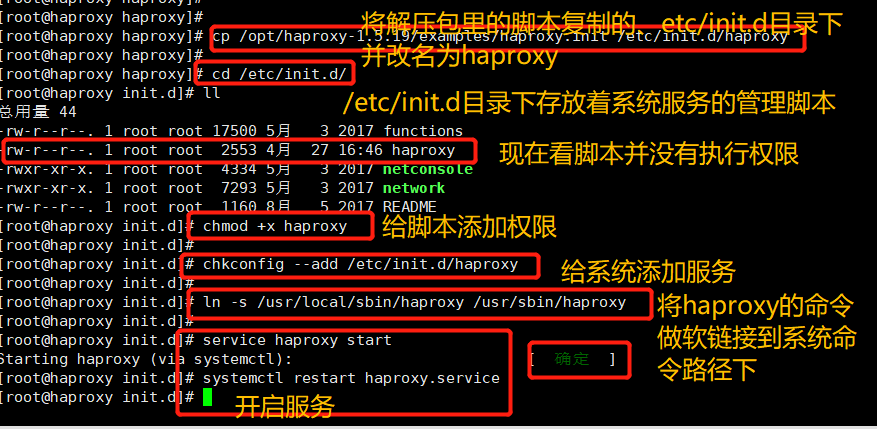
Add Haproxy system service
(if you build a Haproxy server first, you need to wait until the Nginx server is built, otherwise the startup will fail)
cp /opt/haproxy-1.5.19/examples/haproxy.init /etc/init.d/haproxy
cd /etc/init.d/
ll
chmod +x haproxy
chkconfig --add /etc/init.d/haproxy
ln -s /usr/local/sbin/haproxy /usr/sbin/haproxy
service haproxy start
3. Test Web Cluster
Open using browser on client http://192.168.37.40/test.html , constantly refresh the browser to test the effect of load balancing


5, Log definition
By default, the log of haproxy is output to the syslog of the system, which is not very convenient to view. In order to better manage the log of haproxy, we generally define it separately in the production environment. The info and notice logs of haproxy need to be recorded in different log files.
vim /etc/haproxy/haproxy.cfg
global
	log /dev/log local0 info
	log /dev/log local0 notice

service haproxy restart


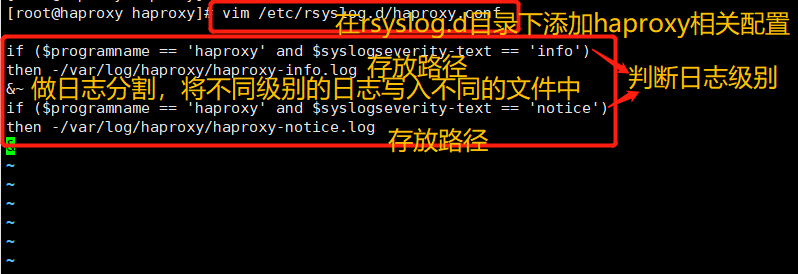
The rsyslog configuration needs to be modified to facilitate management. Define the configuration related to haproxy independently to haproxy Conf and put it in / etc / rsyslog D /, all configuration files in this directory will be loaded automatically when rsyslog is started.
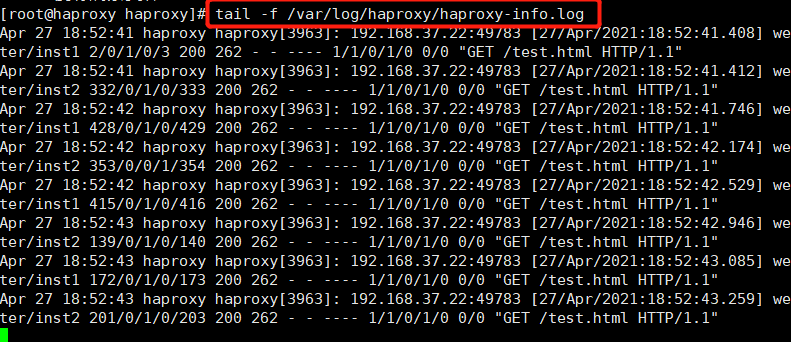
vim /etc/rsyslog.d/haproxy.conf

if ($programname == 'haproxy' and $syslogseverity-text == 'info')
then -/var/log/haproxy/haproxy-info.log
&~
if ($programname == 'haproxy' and $syslogseverity-text == 'notice')
then -/var/log/haproxy/haproxy-notice.log
&~
explain:
This part of the configuration will haproxy of info Log to/var/log/haproxy/haproxy-info.log Next, will notice Log to/var/log/haproxy/haproxy-notice.log Down. “&~"Indicates that after the log is written to the log file, rsyslog Stop processing this message.

systemctl restart rsyslog.service

tail -f /var/log/haproxy/haproxy-info.log		#View the access request log information of haproxy

At this time, there is no log file. After the client accesses it, go back to the server to view the log
6, Haproxy parameter optimization
With the increasing load of enterprise websites, the optimization of haproxy parameters is very important
·maxconn: the maximum number of connections is adjusted according to the actual situation of the application. It is recommended to use 10 240
·Daemon: daemon mode. Haproxy can be started in non daemon mode. It is recommended to start in daemon mode
·nbproc: the number of concurrent processes for load balancing. It is recommended to be equal to or twice the number of CPU cores of the current server
·Retries: the number of retries. It is mainly used to check the cluster nodes. If there are many nodes and the amount of concurrency is large, it is set to 2 or 3 times
·Option http server close: actively turn off the http request option. It is recommended to use this option in the production environment
·Timeout HTTP keep alive: long connection timeout, which can be set to 10s
·Timeout HTTP request: http request timeout. It is recommended to set this time to 5 ~ 10s to increase the release speed of HTTP connection
·timeout client: the timeout time of the client. If the traffic is too large and the response of the node is slow, you can set this time to be shorter. It is recommended to set it to about 1min