HAproxy + keepalive + Kubeadm installation kubernetes master highly available
Author: Zhang Shoufu
 Time: 2019-06-18
 Personal blog: www.zhangshoufu.com
 QQ group: 895291458
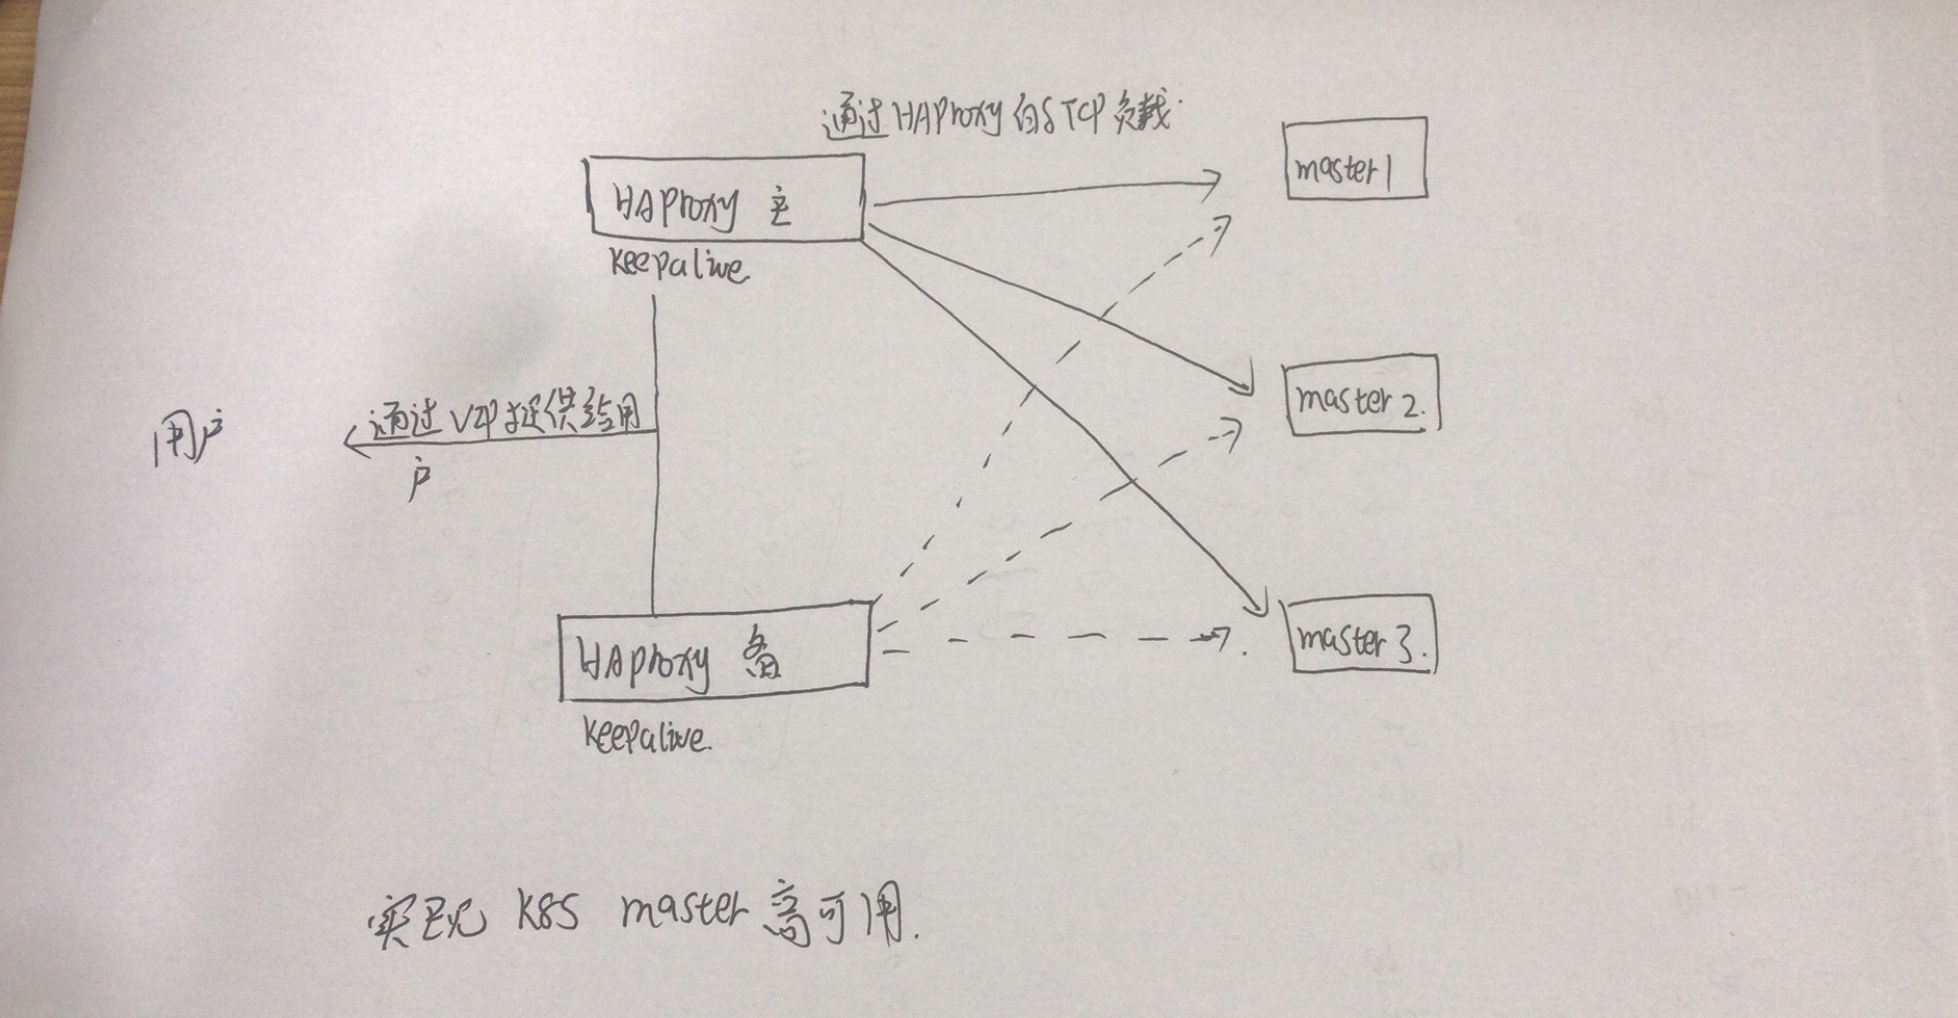
Network Topology
Host Planning, System Initialization
Machine Information
| host name | IP Address | Effect |
|---|---|---|
| K8s-master01 | 192.168.1.25 | Kubernetes master/etcd, keepalive (primary), HAproxy |
| K8s-master02 | 192.168.1.26 | Kubernetes master/etcd, keepalive, HAproxy |
| k8s-master03 | 192.168.1.196 | Kubernetes master/etcd |
| / | 192.168.1.16 | VIP (Virtual IP) |
System Initialization
1) Add host resolution
cat >> /etc/hosts<<EOF
192.168.1.25  k8s-master01
192.168.1.26  k8s-master02
192.168.1.196 k8s-master03
192.168.1.16  vip
EOF
2) Close selinux and firewall
setenforce 0
sudo sed -i 's/SELINUX=enforcing/SELINUX=disabled/g' /etc/selinux/config # Close selinux

systemctl stop firewalld.service && systemctl disable firewalld.service # Close Firewall
3) Modify the system time zone, language
echo 'LANG="en_US.UTF-8"' >> /etc/profile;source /etc/profile #Modify System Language

ln -sf /usr/share/zoneinfo/Asia/Shanghai /etc/localtime # Modify the time zone (if necessary)
4) Performance tuning
cat >> /etc/sysctl.conf<<EOF
net.ipv4.ip_forward=1
net.bridge.bridge-nf-call-iptables=1
net.ipv4.neigh.default.gc_thresh1=4096
net.ipv4.neigh.default.gc_thresh2=6144
net.ipv4.neigh.default.gc_thresh3=8192
EOF
sysctl -p
5) Configure forwarding
cat <<EOF >  /etc/sysctl.d/k8s.conf
net.bridge.bridge-nf-call-ip6tables = 1
net.bridge.bridge-nf-call-iptables = 1
vm.swappiness=0
EOF
sysctl --system
6) Configure Secret-Free Login
k8s-master01:
ssh-keygen -t rsa //Enter all the way
ssh-copy-id -i ~/.ssh/id_rsa.pub root@k8s-master01
ssh-copy-id -i ~/.ssh/id_rsa.pub root@k8s-master02
ssh-copy-id -i ~/.ssh/id_rsa.pub root@k8s-master03
k8s-master02:
ssh-keygen -t rsa //Enter all the way
ssh-copy-id -i ~/.ssh/id_rsa.pub root@k8s-master01
ssh-copy-id -i ~/.ssh/id_rsa.pub root@k8s-master02
ssh-copy-id -i ~/.ssh/id_rsa.pub root@k8s-master03
k8s-master03:
ssh-keygen -t rsa //Enter all the way
ssh-copy-id -i ~/.ssh/id_rsa.pub root@k8s-master01
ssh-copy-id -i ~/.ssh/id_rsa.pub root@k8s-master02
ssh-copy-id -i ~/.ssh/id_rsa.pub root@k8s-master03
Deploy keepalive+HAproxy
k8s-master01 install keepalive:
yum -y install epel-re*
yum -y install keepalived.x86_64
cat > /etc/keepalived/keepalived.conf <<-'EOF'
! Configuration File for keepalived

global_defs {
   router_id k8s-master01
}

vrrp_instance VI_1 {
    state MASTER
    interface enp2s0
    virtual_router_id 51
    priority 150
    advert_int 1
    authentication {
        auth_type PASS
        auth_pass zsf
    }
    virtual_ipaddress {
        192.168.1.16
    }
}
EOF
systemctl enable keepalived.service && systemctl start keepalived.service
k8s-master01 install HAproxy:
yum -y install haproxy.x86_64
cat > /etc/haproxy/haproxy.cfg <<-'EOF'
global
        chroot  /var/lib/haproxy
        daemon
        group haproxy
        user haproxy
        log 127.0.0.1:514 local0 warning
        pidfile /var/lib/haproxy.pid
        maxconn 20000
        spread-checks 3
        nbproc 8
defaults
        log     global
        mode    tcp
        retries 3
        option redispatch
listen https-apiserver
        bind 192.168.1.16:8443
        mode tcp
        balance roundrobin
        timeout server 15s
        timeout connect 15s
        server apiserver01 192.168.1.25:6443 check port 6443 inter 5000 fall 5
        server apiserver02 192.168.1.26:6443 check port 6443 inter 5000 fall 5
        server apiserver03 192.168.1.196:6443 check port 6443 inter 5000 fall 5
EOF
systemctl start haproxy.service  && systemctl enable haproxy.service
k8s-master02 install keepalive:
yum -y install epel-re*
yum -y install keepalived.x86_64
cat > /etc/keepalived/keepalived.conf <<-'EOF'
! Configuration File for keepalived

global_defs {
   router_id k8s-master02
}

vrrp_instance VI_1 {
    state MASTER
    interface enp2s0
    virtual_router_id 51
    priority 100
    advert_int 1
    authentication {
        auth_type PASS
        auth_pass zsf
    }
    virtual_ipaddress {
        192.168.1.16
    }
}
EOF
systemctl enable keepalived.service && systemctl start keepalived.service
k8s-master02 install HAproxy:
yum -y install haproxy.x86_64
cat > /etc/haproxy/haproxy.cfg <<-'EOF'
global
        chroot  /var/lib/haproxy
        daemon
        group haproxy
        user haproxy
        log 127.0.0.1:514 local0 warning
        pidfile /var/lib/haproxy.pid
        maxconn 20000
        spread-checks 3
        nbproc 8
defaults
        log     global
        mode    tcp
        retries 3
        option redispatch
listen https-apiserver
        bind 192.168.1.16:8443
        mode tcp
        balance roundrobin
        timeout server 15s
        timeout connect 15s
        server apiserver01 192.168.1.25:6443 check port 6443 inter 5000 fall 5
        server apiserver02 192.168.1.26:6443 check port 6443 inter 5000 fall 5
        server apiserver03 192.168.1.196:6443 check port 6443 inter 5000 fall 5
EOF
systemctl start haproxy.service  && systemctl enable haproxy.service
View service status:
1) View keepalive
[root@k8s-master01 ~]# ip a | grep "192.168.1.16"
    inet 192.168.1.16/32 scope global enp2s0
Install and deploy kubernetes 1.14.0
Add a kubernetes source
All three machines need to be executed:
cat <<EOF > /etc/yum.repos.d/kubernetes.repo
[kubernetes]
name=Kubernetes
baseurl=https://mirrors.aliyun.com/kubernetes/yum/repos/kubernetes-el7-x86_64/
enabled=1
gpgcheck=1
repo_gpgcheck=1
gpgkey=https://mirrors.aliyun.com/kubernetes/yum/doc/yum-key.gpg https://mirrors.aliyun.com/kubernetes/yum/doc/rpm-package-key.gpg
EOF
Install docker
All three machines need to be executed
yum install -y yum-utils device-mapper-persistent-data lvm2
wget -O /etc/yum.repos.d/docker-ce.repo https://download.docker.com/linux/centos/docker-ce.repo
yum makecache fast
yum -y install docker-ce
systemctl enable docker && systemctl start docker
Install k8s components
All three machines need to be executed:
yum -y install kubectl-1.14.0
yum -y install kubelet-1.14.0
yum -y install kubeadm-1.14.0
systemctl enable kubelet && systemctl start  kubelet
Configure the cgroup driver used by kubelet (all hosts are post-installed)
echo 'Environment="KUBELET_CGROUP_ARGS=--cgroup-driver=cgroupfs --runtime-cgroups=/systemd/system.slice --kubelet-cgroups=/systemd/system.slice"' >> /usr/lib/systemd/system/kubelet.service.d/10-kubeadm.conf
Configuring kubelet service privileges (all hosts are post-installed) will cause errors if heapster is not deployed later
echo 'Environment="KUBELET_SYSTEM_PODS_ARGS=--pod-manifest-path=/etc/kubernetes/manifests --allow-privileged=true --fail-swap-on=false"' >> /usr/lib/systemd/system/kubelet.service.d/10-kubeadm.conf
Set docker image acceleration (all hosts)
cat > /etc/docker/daemon.json <<-'EOF'
{
  "registry-mirrors": ["https://tj7mo5wf.mirror.aliyuncs.com"]
}
EOF
Close swp partition
swapoff -a && sed -ir 's/.*-swap/#&/' /etc/fstab
Configure kubeadm parameters
cat > kubeadm-config.yaml <<-'EOF'
apiVersion: kubeadm.k8s.io/v1beta1
kind: ClusterConfiguration
kubernetesVersion: v1.14.0
controlPlaneEndpoint: 192.168.1.16:8443
imageRepository: registry.cn-hangzhou.aliyuncs.com/google_containers
networking:
  podSubnet: 10.10.0.0/16
EOF

kubeadm config images pull --config kubeadm-config.yaml #Pull down the mirror you need first
kubeadm init --config=kubeadm-config.yaml --experimental-upload-certs
After successful installation, you can see the following information
Your Kubernetes control-plane has initialized successfully!

To start using your cluster, you need to run the following as a regular user:

  mkdir -p $HOME/.kube
  sudo cp -i /etc/kubernetes/admin.conf $HOME/.kube/config
  sudo chown $(id -u):$(id -g) $HOME/.kube/config

You should now deploy a pod network to the cluster.
Run "kubectl apply -f [podnetwork].yaml" with one of the options listed at:
  https://kubernetes.io/docs/concepts/cluster-administration/addons/

You can now join any number of the control-plane node running the following command on each as root:

  kubeadm join 192.168.1.16:8443 --token o3444m.kt32joh143khrgga \
    --discovery-token-ca-cert-hash sha256:fdff2f2a155fd3c0bcbde02cf9b5cf48ca95f9dfdf7a2b8f492a3b36119edf2a \
    --experimental-control-plane --certificate-key 52dcb9e043e802555d3f758e09cf7beb2c4e80628e6132f30b3a4ae5246ca9d1

Please note that the certificate-key gives access to cluster sensitive data, keep it secret!
As a safeguard, uploaded-certs will be deleted in two hours; If necessary, you can use
"kubeadm init phase upload-certs --experimental-upload-certs" to reload certs afterward.

Then you can join any number of worker nodes by running the following on each as root:

kubeadm join 192.168.1.16:8443 --token o3444m.kt32joh143khrgga \
    --discovery-token-ca-cert-hash sha256:fdff2f2a155fd3c0bcbde02cf9b5cf48ca95f9dfdf7a2b8f492a3b36119edf2a
Follow the prompt to create a key in the user's home directory that operates on kubectl
mkdir -p $HOME/.kube
sudo cp -i /etc/kubernetes/admin.conf $HOME/.kube/config
sudo chown $(id -u):$(id -g) $HOME/.kube/config
View the current k8s node
# kubectl get nodes -o wide
NAME           STATUS     ROLES    AGE   VERSION   INTERNAL-IP    EXTERNAL-IP   OS-IMAGE                KERNEL-VERSION          CONTAINER-RUNTIME
k8s-master01   NotReady   master   16m   v1.14.0   192.168.1.25   <none>        CentOS Linux 7 (Core)   3.10.0-862.el7.x86_64   docker://18.9.6
There is one now, and the status is "NotReady"
View the currently started pod
# kubectl get pods --all-namespaces -o wide
NAMESPACE     NAME                                   READY   STATUS    RESTARTS   AGE   IP             NODE           NOMINATED NODE   READINESS GATES
kube-system   coredns-d5947d4b-h4wcv                 0/1     Pending   0          14m   <none>         <none>         <none>           <none>
kube-system   coredns-d5947d4b-mr86q                 0/1     Pending   0          14m   <none>         <none>         <none>           <none>
kube-system   etcd-k8s-master01                      1/1     Running   0          13m   192.168.1.25   k8s-master01   <none>           <none>
kube-system   kube-apiserver-k8s-master01            1/1     Running   0          14m   192.168.1.25   k8s-master01   <none>           <none>
kube-system   kube-controller-manager-k8s-master01   1/1     Running   0          14m   192.168.1.25   k8s-master01   <none>           <none>
kube-system   kube-proxy-d84dh                       1/1     Running   0          14m   192.168.1.25   k8s-master01   <none>           <none>
kube-system   kube-scheduler-k8s-master01            1/1     Running   0          13m   192.168.1.25   k8s-master01   <none>           <none>
Croedns is in Pending because we don't have a network plugin
Two other master s join the cluster
How the k8s v1.14.0 feature joins the cluster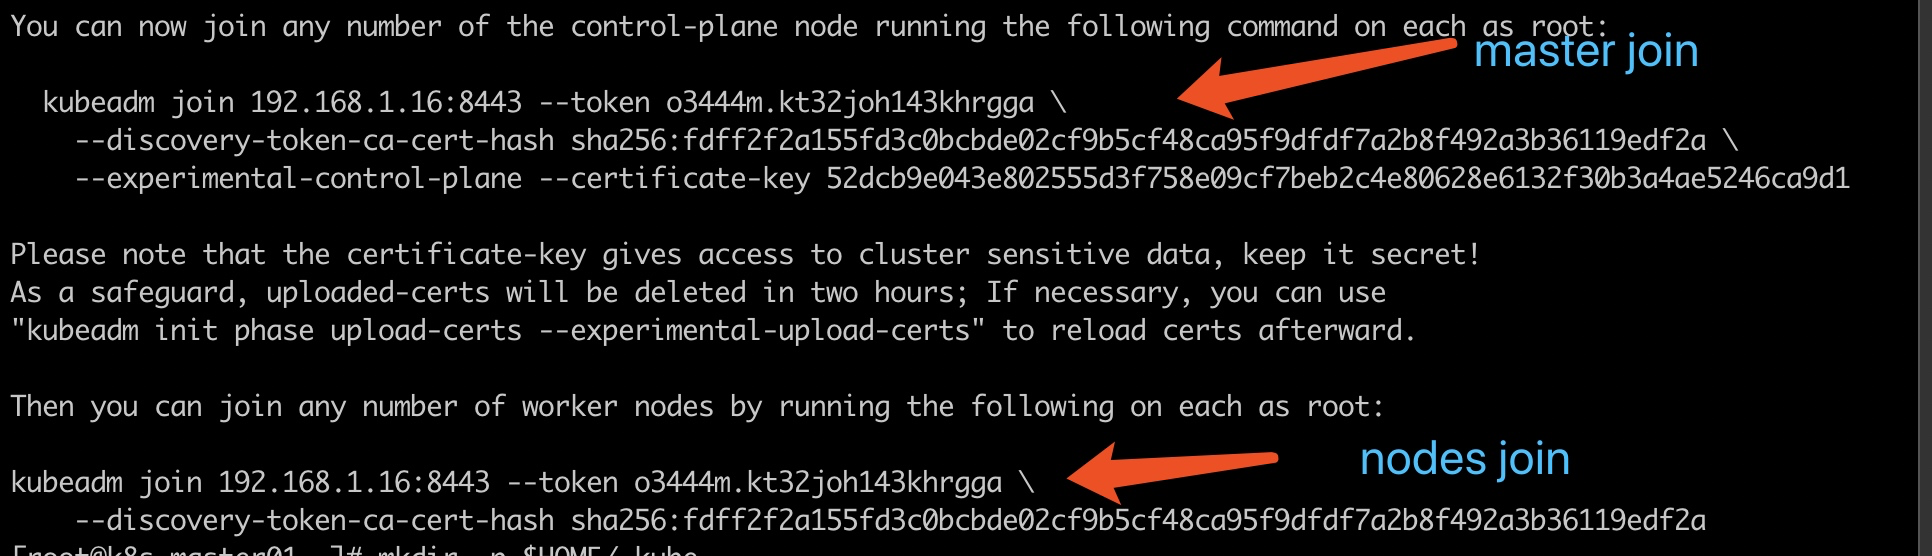
 kubeadm join 192.168.1.16:8443 --token o3444m.kt32joh143khrgga \
    --discovery-token-ca-cert-hash sha256:fdff2f2a155fd3c0bcbde02cf9b5cf48ca95f9dfdf7a2b8f492a3b36119edf2a \
    --experimental-control-plane --certificate-key 52dcb9e043e802555d3f758e09cf7beb2c4e80628e6132f30b3a4ae5246ca9d1

mkdir -p $HOME/.kube
sudo cp -i /etc/kubernetes/admin.conf $HOME/.kube/config
sudo chown $(id -u):$(id -g) $HOME/.kube/config
View cluster status
# kubectl  get nodes -o wide
NAME           STATUS     ROLES    AGE     VERSION   INTERNAL-IP     EXTERNAL-IP   OS-IMAGE                KERNEL-VERSION          CONTAINER-RUNTIME
k8s-master01   NotReady   master   7m33s   v1.14.0   192.168.1.25    <none>        CentOS Linux 7 (Core)   3.10.0-862.el7.x86_64   docker://18.9.6
k8s-master02   NotReady   master   4m28s   v1.14.0   192.168.1.26    <none>        CentOS Linux 7 (Core)   3.10.0-862.el7.x86_64   docker://18.9.6
k8s-master03   NotReady   master   5m27s   v1.14.0   192.168.1.196   <none>        CentOS Linux 7 (Core)   3.10.0-862.el7.x86_64   docker://18.9.6
Discover that the cluster is all in NotReady state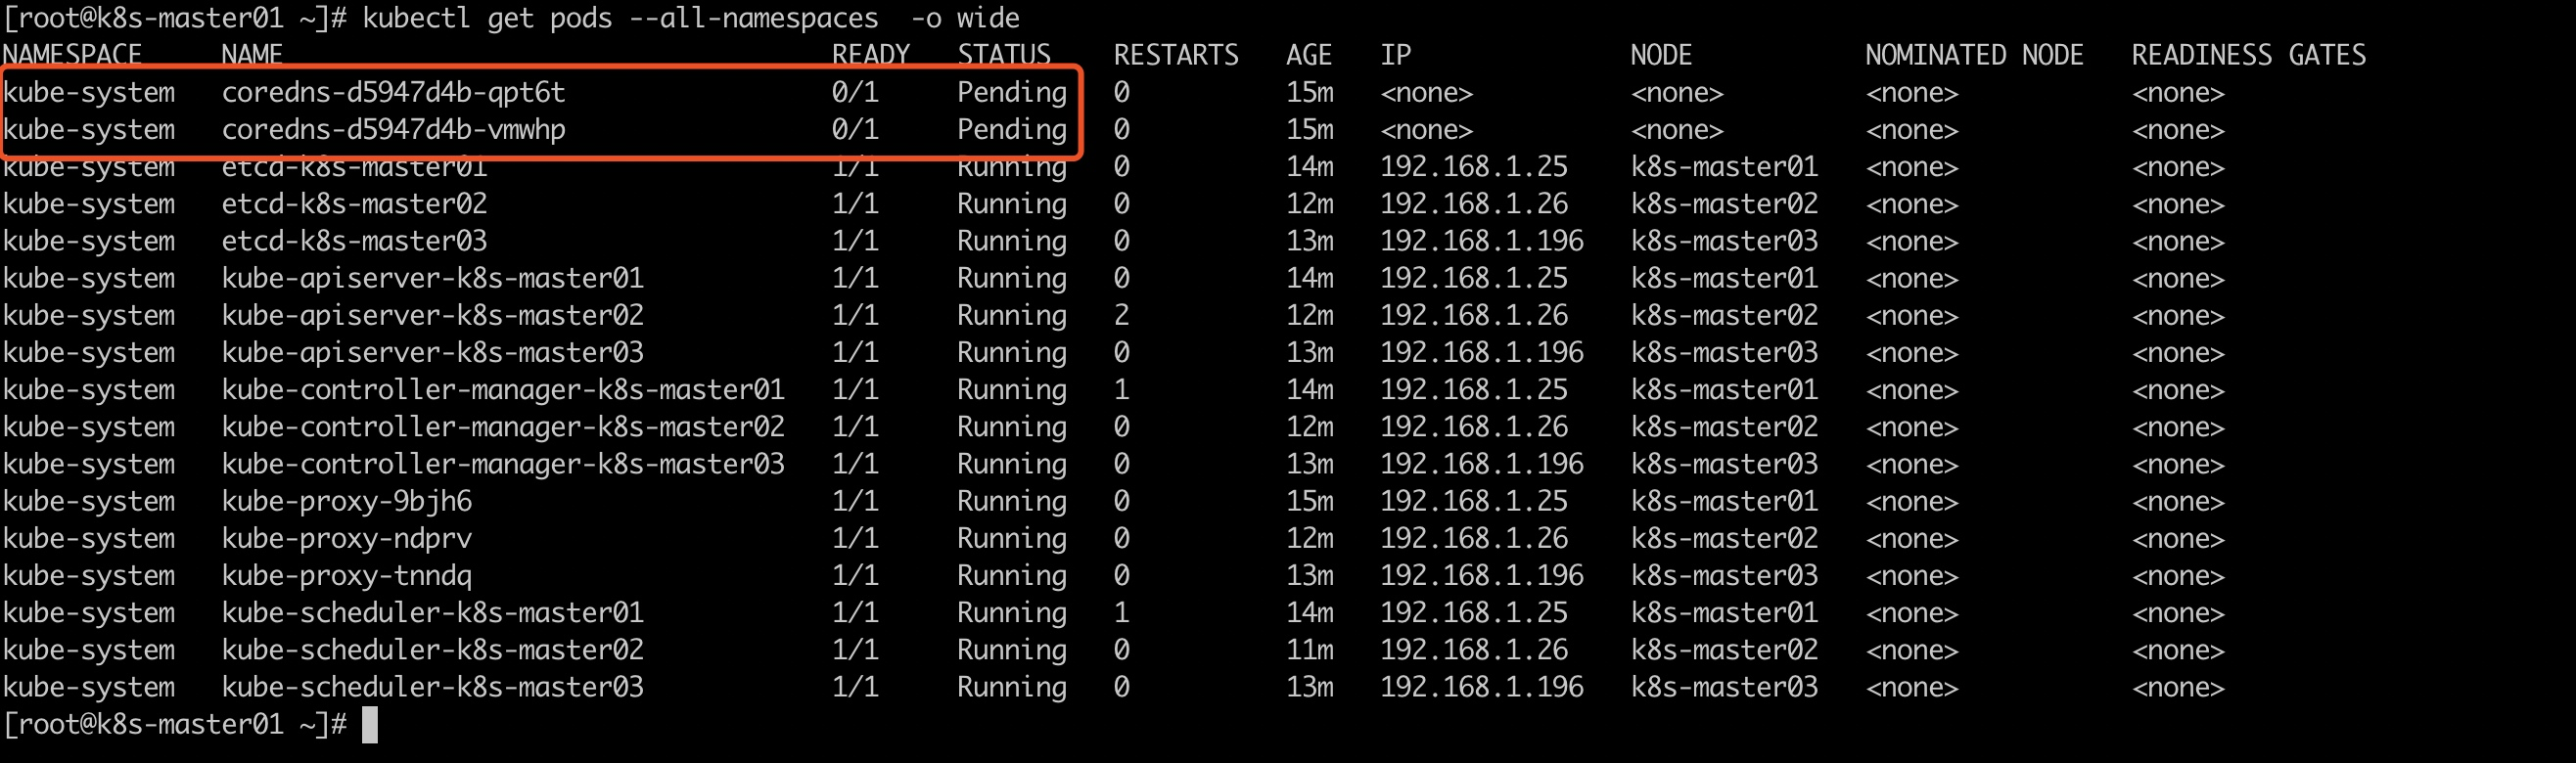
Because we did not install the network plug-in, we installed the flannel network plug-in
Install flannel network plug-in
kubectl apply -f http://tools.zhangshoufu.com/tools/k8s/kube-flannel.yaml
Check to see if the installation was successful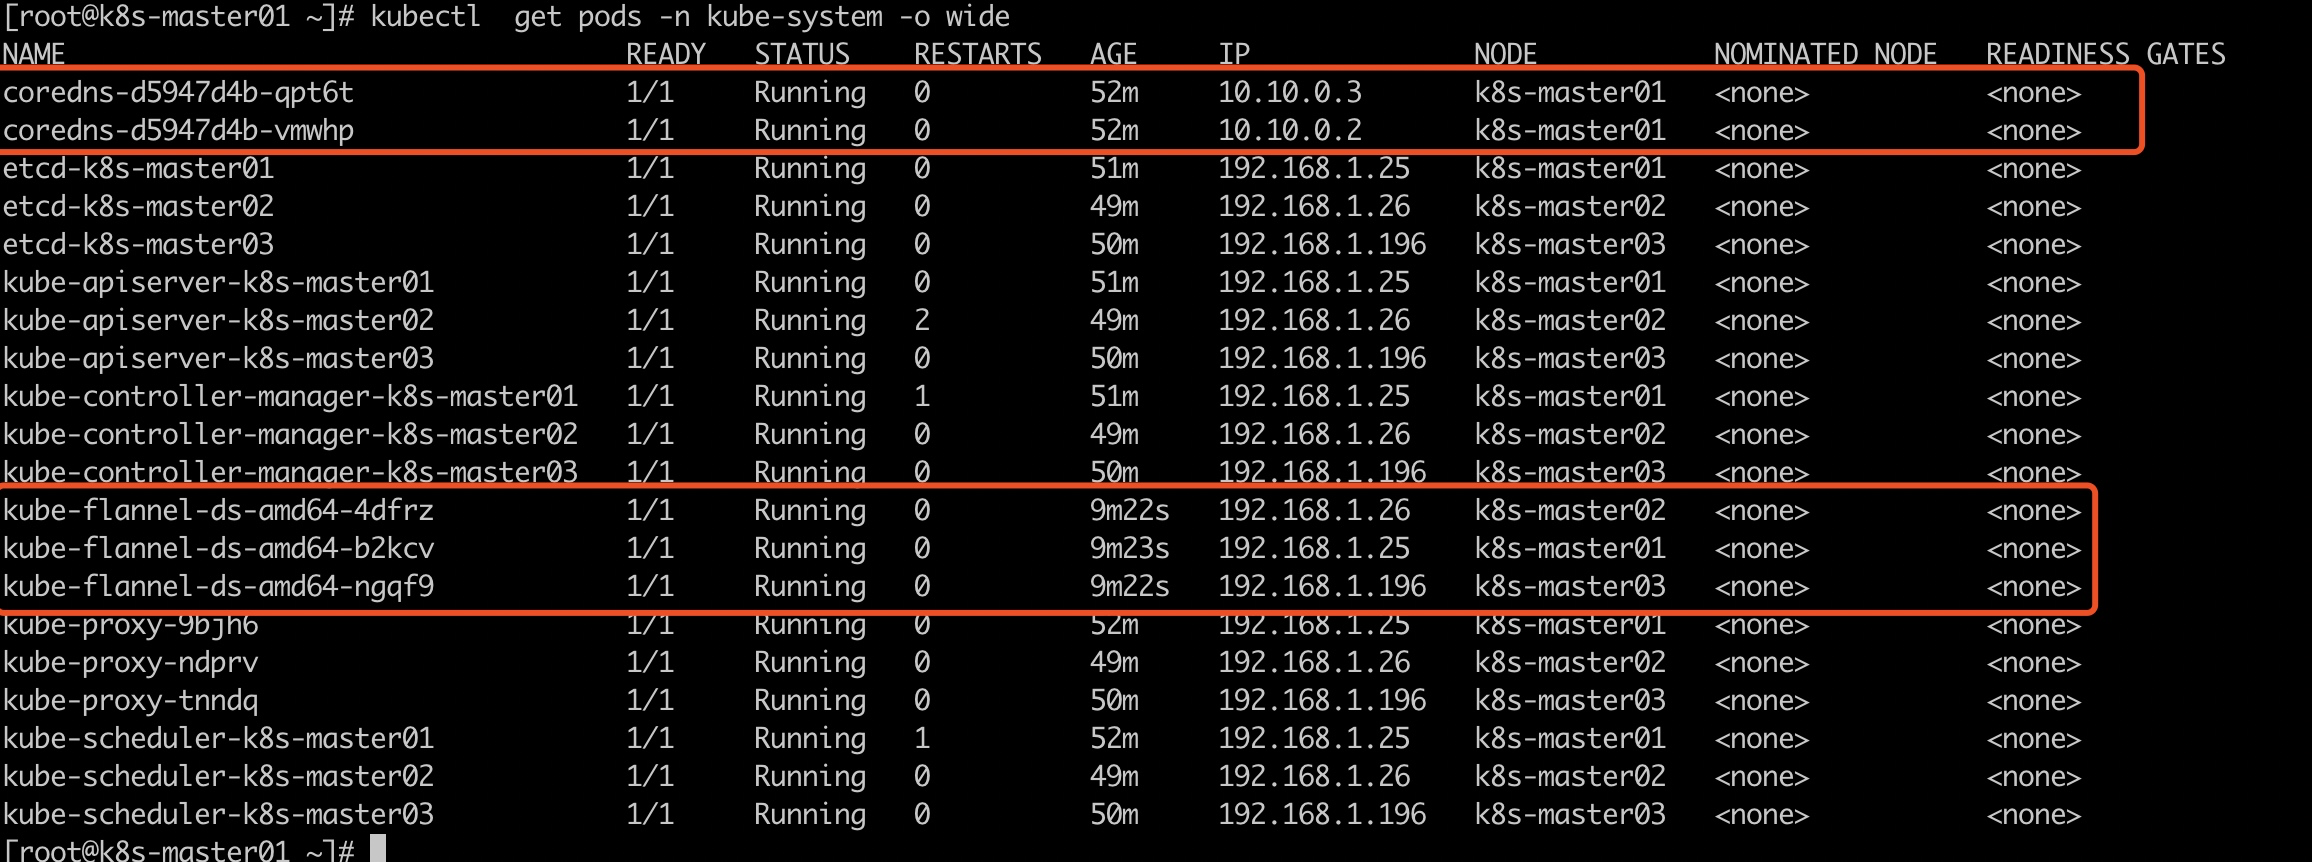

Up to now, the kubeadm installation of highly available master s has been completed.
Explain:
1, flannel is in Vxlan mode and can be changed by itself
2, keepalive should write a monitoring script