Growing up is a process of constant loss.

The author is a post-90s.
When we were young, our family conditions were poor and the means of entertainment were very poor. Unlike today's children who can play with mobile phones, tablets and computers, at that time, a stack of small raccoon Water Margin cards can play for a whole day. If there is a rare card, such as Song Jiang, Lu Junyi and Hu yanzhuo, there will be a long list of fans behind their ass.
If there is anything more enviable in the world, it is definitely that there can be a bully learning machine at home. Although I cajoled my parents into buying it under the banner of learning Wubi, no one really bought it for learning, right? Dog head.
A learning machine, a cassette tape, a handle, a cassette tape (soul duel, Saro slow snake, tank war, ninja turtle, double dragon, super Mary, etc.), how to quickly cool the burning black power adapter constitutes countless happy childhood memories. In contrast, now, the game screen is more and more gorgeous and the mechanism is more and more complex, but it is difficult to experience the pure happiness brought by those simple pixel games.
Growing up is really a process of constant loss.
It seems to be a little far. Let's get back to the point. Then, the author will take you to make a little bully learning machine hand in hand, and play games on it to recall the happy time when you were a child, Didi.
If a worker wants to do well, he must sharpen his tools first—— The Analects of Confucius: Wei linggong
singlechip × 1.


Here, it looks like this.
What is single chip microcomputer?
In short, single chip microcomputer is a computer, but there are a lot of peripherals.
How to choose MCU?
For novices, the author recommends Arduino development board, which is jokingly called a toy by people in the industry, but is easy to use and active in the community. The model I bought is UNO R3, which is sold by cats and dogs. There are more than 100 Italian dull profit versions and dozens of national versions.
What is development board?
The development board is suitable for learning and experiment, and provides more pins: it is convenient to realize functions, and supporting components: such as communication serial port, program burning port, reset button and so on. The development board has complete functions, but its size is also large. In actual production, all these things may not be needed.
How does MCU work?
If you want to talk to me about this, I'm not sleepy. Here is only a brief introduction, because the author is only an amateur.
First introduce the pins. Pins are like human senses, used to receive feedback information. The pin can be an input or an output. Pin status, divided into high level and low level (do you think of anything?), The pin level status will affect the external devices connected with it. The following Hello World will demonstrate it.
In essence, the program burned into the development board is to control the level of each pin, plus various logic gates to form a more complex state, ranging from the light on and off to the control of the aircraft, which can be represented by 01.
People can't help sighing the wisdom of their ancestors. There is a feeling that Tao gives birth to one, two, two and three, and three give birth to all things.
Once the development board is powered on, it will repeat [input - > operation] according to the program. This process is familiar to the little friends who have studied the computer: read instructions, get data from the register, calculate the results by the CPU, and finally save the results back to the register.
FBI Warning, the above author's humble opinion. If there are mistakes, please correct them.
Four pin key switch × 3.

Give you a lovely little green hat.
Press the one that will make a "tick", which is the same as the little overlord handle.
Several public to public DuPont lines.
The interested little friend will ask, since there is a male, there must be a female? The author will put a picture for you to experience.

220 Ω resistance × 3.
How do you think the resistance is 220 Ω?
For those who have not learned electrician knowledge, just understand that the order of color circles on the resistance is: red, red, brown and yellow.

Bread board × 1.
Equivalent to Lego building block base. The details will be discussed later.
Hello World!-Brian Kernighan
If hardware leaves software, it is nothing. So let's take a brief look at the syntax of Arduino.
Go to the official website( https://www.arduino.cc/en/software )Download the Arduino IDE for free (if there is a web version, you'd better download the client for the convenience of uploading the program). This IDE is already very simple and supports Chinese, so I won't introduce the details.
A simple LED lamp experiment.
Hardware connection method: development board pin n - > 220 Ω resistance yellow end - > LED positive pole (the end of the pin len gt h); Led negative - > development board GND (can be understood as power negative). Adding resistance is to reduce the current flowing into the LED and prevent the device from burning out. Considering that some partners may not be able to see the schematic diagram, they can take photos directly.

Start programming (Arduino is a C-like language):
// This function is executed only once
void setup() {
   // Set pin 6 as the output, which is N above
   pinMode(6, OUTPUT);
}

// This guy will cycle
void loop() {
   digitalWrite(6, HIGH); // High level on
   delay(1000);
   digitalWrite(6, LOW); // Low level off
   delay(1000);
}
Click the button in the red box below to upload the program to the development board.

IF upload fails, click Tools - > port to check whether the correct COM (Windows) or device (Linux) is selected. IF is correct, the driver needs to be installed( https://www.arduino.cn/thread-1008-1-1.html ).
If everything is normal, you can see that the small yellow light of the development board is flashing, which means that there is data transmission. After uploading, your little light bulb will repeat the process of turning on and off for one second, and sprinkle flowers.
Let the game begin—— Medivh
Let's assemble this first. It's not the author's affectation. The word is not the author's P. there is the original picture!

Because the author didn't have enough four corner keys, he only connected three. Except that the pins of the connecting board are different, the other connection methods are the same. Turn the button upside down and you can see that there will be a label of 1234 next to the foot pin. It should be noted that 12 can be powered on and 34 can be powered on (the direction is not important), but 13, 24, 14 and 23 cannot be connected together.
Connection method: pin n - > key pin 1, key pin 2 - > yellow end of 220 Ω resistor, red end of 220 Ω resistor - > 5V of development board; Key pin 3 - > development board GND.
After receiving, you can find that one foot of the key is not used, which is normal. The rest follow suit.

Careful partners will find that there are only two GND S on the development board, so it is certainly not enough to press one button after another.
At this time, you need to plug the DuPont line into the special area of the bread board. As shown in the figure, the two sides of the bread board and the part between the red line and the blue line are connected horizontally. All the feet in this row are considered to be connected to 5V or GND. The area in the middle of the bread is connected vertically, which should be paid attention to.
Next, write a program to read the key signal. I won't say more. Everything is in the code:
 // Here is the pin number
const byte left = 7;
const byte right = 8;
const byte act = 9;

 // Here is the pin status
byte leftHit;
byte rightHit;
byte actHit;

void setup() {
  pinMode(7, INPUT);
  pinMode(8, INPUT);
  pinMode(9, INPUT);
  // The newcomer is initialized in the serial port to receive and send data
  Serial.begin(9600);
}

void loop() {
  // Read the level of four pin key
  leftHit = digitalRead(left);
  rightHit = digitalRead(right);
  actHit = digitalRead(act);
  // When pressed, the level is LOW
  if (leftHit == LOW) {
    sendSerial(0);
  }
  if (rightHit == LOW) {
    sendSerial(1);
  }
  if (actHit == LOW) {
    sendSerial(2);
  }
  // Because pressing and releasing this period of time is still a long time for the program
  // This is delayed for a while to reduce the frequency of sending data
  // For the game, you can't press it all the time
  delay(100);
}

void sendSerial(byte data) {
  // When sending data, interrupt to ensure timing
  delayMicroseconds(2);
  Serial.print(data);
  delayMicroseconds(2);
}
So far, so good, come and test it. Here's a trick: after uploading the program, open the IDE tool - > serial port monitor (the serial port will be occupied when uploading the program, so we have to wait until the program is uploaded). Adjust the baud rate to 9600 in the program in the lower right corner. IF the hardware connection is correct. Each time you press a button, the corresponding value will be displayed on the monitor.
Well, with the handle, it's time to write the game.
Hello World!Again!-Brian Kernighan
Because the author is a layman in game development, he chose a relatively simple processing language for development. Processing was originally used for image design. Here, it is also used to do a more eccentric thing. Considering that most kids should never have heard of this guy, let's take an example to see how processing plays.
As usual, go to the official website( https://processing.org/download/ )Download the Processing3 IDE for free. Its interface is very similar to Arduino, so I don't want to introduce it more.
Demo:
// Ha ha, like Arduino, it is a setup function and a loop function
void setup() {
  // Set canvas size
  size(200, 200);
}

// As with Arduino, the number of frames of the game can be benchmarked through endless cycles
void draw() {
  // The background is set to black. For specific parameters, please refer to the official website
  background(0);
  // Fill the next element with white
  fill(255);
  // Draw a circle with a radius of 80 pixels centered on the mouse coordinates
  ellipse(mouseX, mouseY, 80, 80);
}
Click Run in the upper left corner. IF the IF code is correct, a black box will pop up. After the mouse enters, a white circle will follow the mouse.
A little modification. Define an int x = 0 before setup, and then add x + + to the tail of draw. Change the ellipse parameter to ellipse(x, 40, 80, 80), and the circle will move from left to right. In this way, you can control the movement of elements through variable values.
Similarly, it can be proved that as long as it is a function provided by Processing, variables can be used to control the attributes or behavior of elements.
IF the background is commented out, a circle will be left where all circles have moved.
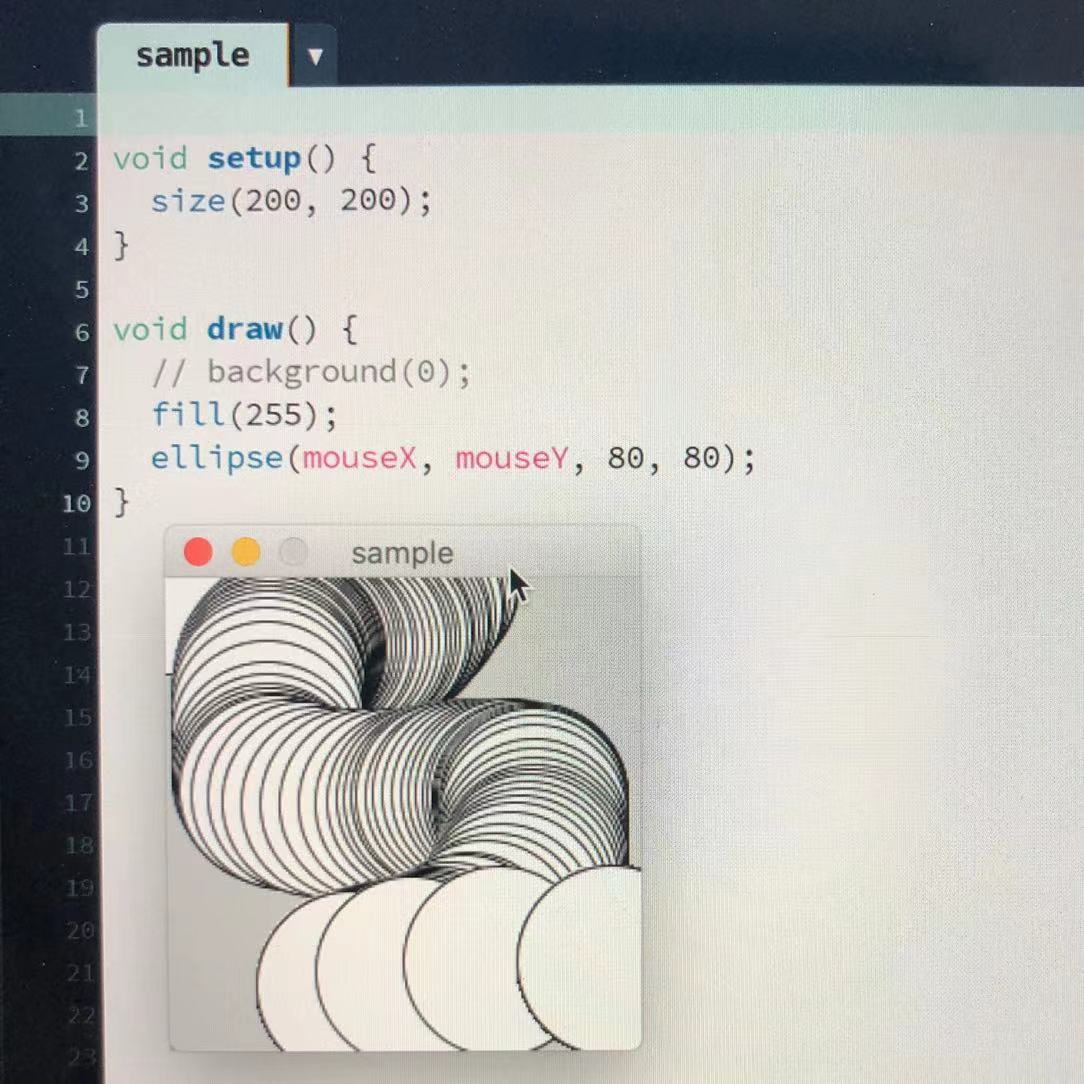
Why emphasize this point alone? Of course, this feature will be used later to retain or remove some elements.
So far, you have the basic knowledge of writing games with Processing.
Everything is ready, only due to the east wind—— Zhuge Liang
There are many foreshadowing ahead, and finally usher in the final moment. Let's start writing the game of playing planes now. Generally speaking, for normal programming, the actual coding time ratio is 8 to 2. So don't worry, take care of it first.
The author refers to the classic game little bee.
Game type: Flying shooting
Victory condition: destroy all enemy aircraft
Failure condition: player is shot
Human computer interface (User Interface, in other words, is it suddenly tall, dog head):
-
At the top of the screen are three rows of six enemy planes in each row. The enemy's actions include: moving left and right, shooting.
-
At the bottom of the screen is the player, 1 plane. Shooting command: left and right, move.
-
Game flow: press any key to start the game; The player is shot or the enemy plane is completely extinguished, the corresponding text is prompted in the middle of the screen, and the game is interrupted; When interrupted, press any key to start a new game.
The above is what players see, and the following is the internal part of the program:
Movement: very simple, that is to change the x-axis and y-axis positions of players and enemy aircraft.
Shooting: generate a bullet, the enemy's bullet moves downward, fix the x axis, change the y axis, and the player's bullet direction is opposite.
Collision determination: the most difficult part is to determine whether the bullet hit an object. Since each bullet has to be calculated for each frame, when there are a large number of bullets on the screen, the amount of calculation will increase geometrically. If it is not properly optimized, it is likely to get stuck in the cycle of violence, resulting in poor player experience.
Almost, the whole job. Processing provides multiple language modes, and the author chooses Java mode (upper right corner of IDE).
// The protagonist first
class Ship {
  // current location
  int sx;
  int sy;
  // Moving speed
  int speed = 6;

  Ship(int initX, int initY) {
    sx = initX;
    sy = initY;
  }

  void display() {
    // The player's plane is a 40x26 picture, which can be replaced with one you like
    image(shipShape, sx, sy, 40, 26);
  }

  void drive(int direct) {
    // Move left
    if (0 == direct) {
      sx = sx - speed;
      // Can't fly out of the screen
      if (sx <= 0) {
        sx = 0;
      }
      return;
    }
    sx += speed;
    int right = width - 40;
    if (sx >= right) {
      sx = right;
    }
  }
}

PImage shipShape;
Ship ship;

void setup() {
  size(600, 360);
  // The file path is the same level as the Process file
  shipShape = loadImage("resource/ship.png");
  ship = new Ship(280, 324);
}

void draw() {
  // To fly
  // ship.drive(1);
  ship.display();
}
At this point, you can control the aircraft by calling the drive method of ship. The types of enemy aircraft are similar, so we don't paste the code again here.
Wait, how do you respond to Arduino's buttons? In fact, I have answered this question before, serial communication!
import processing.serial.*;

Serial port;

void setup() {
  ...
  // The breaking rate should be consistent with that of Arduino
  port = new Serial(this, "{Your serial port/equipment}", 9600);
}

void draw() {
  if (port.available() <= 0) {
    return;
  }
  // The data output by Arduino needs to be changed into its own definition
  int coming = port.read();
  switch(coming) {
  case 48:
    ship.drive(0);
    break;
  case 49:
    ship.drive(1);
    break;
  case 50:
    // The attack method of aircraft has not been defined yet
    ship.attack();
    break;
  }
}
According to common sense, we should write the attack logic now, but we can only fight with bullets, so we should write the code related to the bullet object first.
class Bullet {
  int bx = 0;
  int by = 0;
  int speed = 5;
  // Public bullet class, call different methods to fly up or down
  boolean up() {
    by -= speed;
    image(bulletUp, bx, by, 2, 14);
  }

  boolean down() {
    by += speed;
    image(bulletDown, bx, by, 2, 14);
  }
}

// Distinguish between enemy and enemy bullets with different pictures
PImage bulletUp;
PImage bulletDown;
// For demonstration, so here's a new bullet
Bullet bullet = new Bullet();

void setup() {
  ...
  bulletUp = loadImage("resource/bullet_up.png");
  bulletDown = loadImage("resource/bullet_down.png");
}

void draw() {
  ...
  bullet.up();
}
Next, attack.
// Add attributes and methods to the bullet class
// Do you want to display
boolean alive = false;

// Strike
void trigger(int initX, int initY, int initSpeed) {
    alive = true;
    bx = initX;
    by = initY;
    speed = initSpeed;
}

// After flying out of the screen, the bullet doesn't need to be displayed
void clean() {
    alive = false;
    bx = 0;
    by = 0;
}

// Modify the up-down method
boolean up() {
  by -= speed;
  // This is a negative number because you have to wait until the bullet completely flies out of the screen before removing it
  if (by <= -14) {
    return false;
  }
  image(bulletUp, bx, by, 2, 14);
  return true;
}

boolean down() {
  by += speed;
  if (by >= height + 14) {
    return false;
  }
  image(bulletDown, bx, by, 2, 14);
  return true;
}

// Add attack methods to aircraft
void attack() {
  // Sorry, we only recruit dormant bullets
  if (!bullet.alive) {
    // The position of the initial x-axis of the bullet. 5 is the flight speed of the bullet
    bullet.trigger(sx + 20, sy, 5);
    break;
  }
}

void draw() {
  ...
  // Only live bullets are shown
  if (bullet.alive) {
    if (!bullet.up()) {
      // Goodbye, bullets flying out of the screen
      bullet.clean();
    }
  }
}
In order to control the number of bullets in the screen, the author did not press the attack key to new a bullet. Instead, you create a container and put some in it in advance. When the container runs out of bullets, it will no longer respond to the attack. When the bullets fly out of the screen, wake up the bullets for standby.
Finally, and the most difficult part, the collision test.
The author's idea is the simplest way of violence. The code of fake is as follows:
int len = Number of remaining enemies
for (int i = 0; i < len; i++) {
    // Calculate the upper, lower, left and right boundaries of the enemy. The enemy is a 28 x 38 square
    // int top = enemy.pool[i].ey;
    int bottom = enemy.pool[i].ey + 28;
    // int left = enemy.pool[i].ex;
    int right = enemy.pool[i].ex + 38;
    int len2 = Number of surviving bullets
    for (int j = 0; j < len2; j++) {
      Bullet tmp = bullet[j];
      // Although the bullet has a width, the author is lazy to regard it as a point
      if (tmp.bx > enemy.pool[i].ex && tmp.bx < right && tmp.by < bottom && tmp.by > enemy.pool[i].ey) {
        // If this point coincides with the enemy's block, it is determined that the enemy has been hit
        enemy[i].alive = false;
        // The bullet hit the object and disappeared
        tmp.clean();
      }
    }
  }
}
This can realize the function, but it is still too rough. So I optimized it a little and made a fool of myself.
Because the Y-axis of the player and the enemy is fixed, the author created two containers. Each time the bullets refresh, load the bullets that enter the y-axis moving area of the enemy and the y-axis moving area of the player, and then modify the above code to traverse only the bullets in these two containers. This greatly reduces the number of iterations. When the screen is refreshed next time, empty the container. Of course, a more mature approach is to use algorithms to accelerate calculation, but the author has limited ability and has no practice.
The rest of the work is simple.
Cycle instantiates enemies and players. The enemy is set to move a random number every time. If it is greater than this number, it will attack. During the draw cycle, judge whether the player is hit or whether the enemy is completely destroyed to judge whether the game should continue. When the author completes, the code is less than 400 lines. The final effect is as follows:

See warehouse for complete code( https://gitee.com/kyzx/mutalisk/tree/master/ctlTest ), you can order a Star if you like.
With the above skeleton, the little friends can realize their brain holes crazily. For example, change the aircraft movement to up, down, left and right, add blood strips to players and enemies, add bullet trajectory, bullets can offset bullets, score mechanism, etc.
I've written so much before I know it.
In retrospect, this process is full of difficulties and there is no expert guidance around, but relying on the powerful tool of the Internet, the author still stumbled through it, and the sense of achievement is self-evident.
This game is really very simple to play. It can't even compare with those games on yellow cassette. But from 0 to 1, this groping process is the same as when I played games when I was a child. It hurts and is happy.
May you always be a teenager.