Catalogue
1, Introduction to clock card:
II. Construction of development environment:
Step 1: create an empty project file:
Card configuration in "forms" tab:
Fixed point / regular refresh of card:
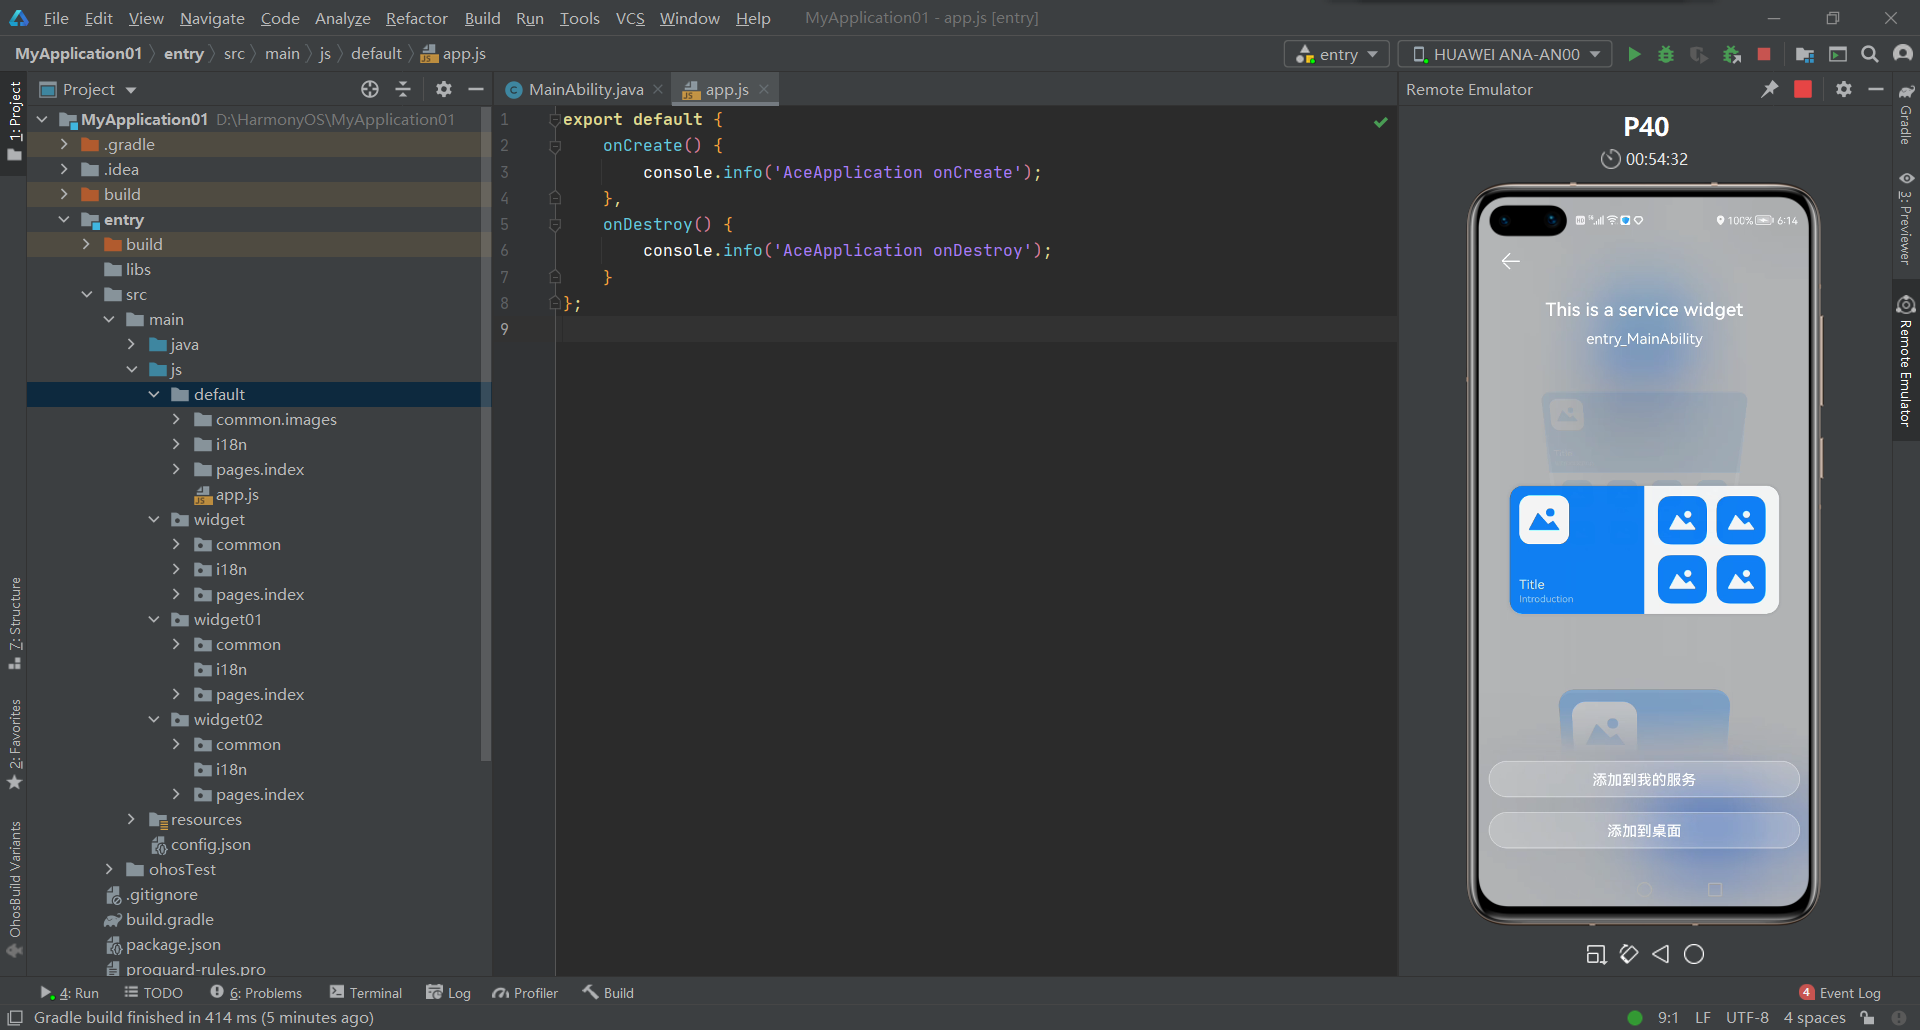
Card application initialization:
1, Introduction to clock card:
Service card is an interface display form of FA, which brings important FA information or operations to the card, so as to achieve the purpose of direct service and reduce hierarchical experience.
Here we will introduce how to develop a clock FA card application on HarmonyOS. The card contains two layout styles: 2 * 2 and 2 * 4. The display effect of the card application on the desktop is as follows:
II. Construction of development environment:
To install and configure DevEco Studio, please refer to my introductory blog: Downloading and installing software
In this actual battle, the DevEco Studio version is DevEco Studio 2.1 beta 4, and the SDK version is API Version 5
Step 1: create an empty project file:
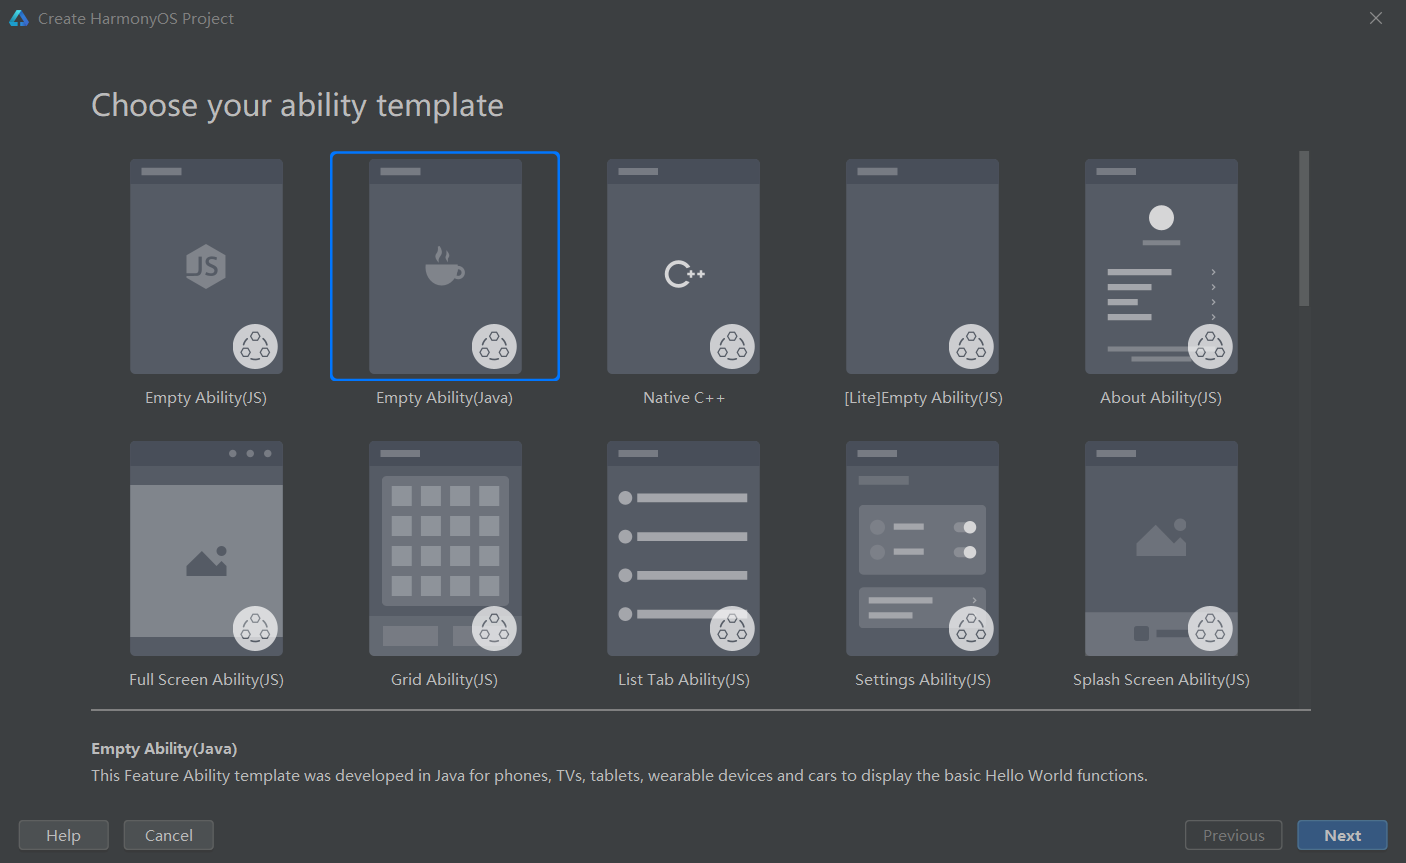
Create a harmony OS project, select the template empty capability (JS) or empty capability (Java), and click Next to enter the project configuration interface: (here, the SDK version is API Version 5)

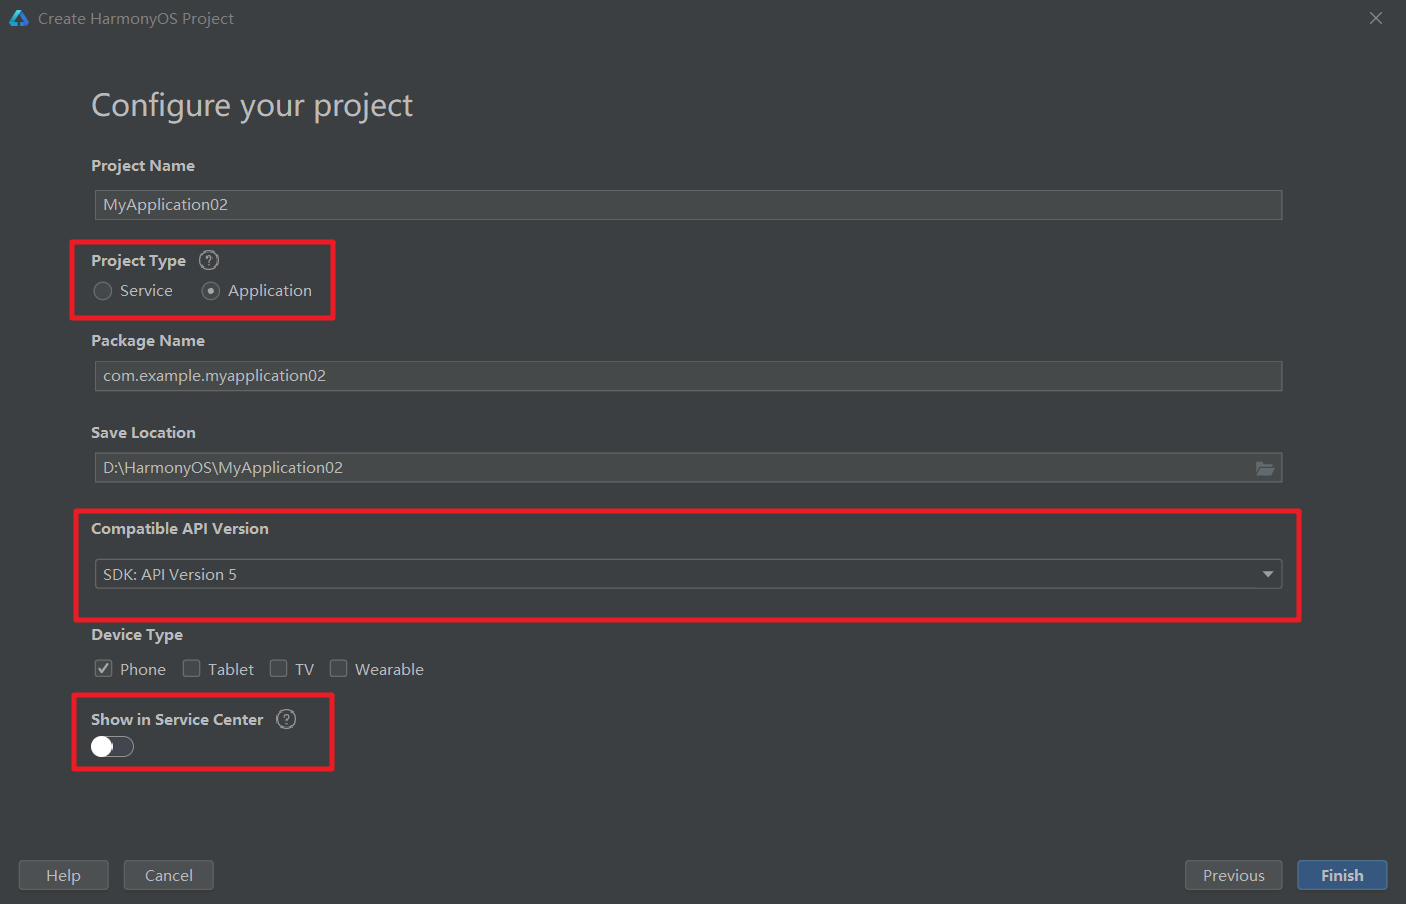
There are two types of projects: one is "Service", that is, atomized Service; The other is "Application", that is, traditional Application. In addition, you can choose whether to display in the Service center. We specify the project type as "atomized Service" and select "display in Service center". After configuring according to the above figure, click Finish to create a project.
To connect a remote device:


 Turn on the remote device:
Develop cards using JS:
Open DevEco Studio, create a harmony OS project, select the template Empty Ability (JS), and click Next to enter the project configuration interface:

Among them, the project type is designated as traditional application, and "show in service center" is not selected. After configuring according to the above figure, click Finish to create a project.
How to create cards in a traditional application project?
Right click the directory entry, select New in the pop-up menu, and then click Service Widget in the pop-up submenu:

The Service Widget here refers to the card.
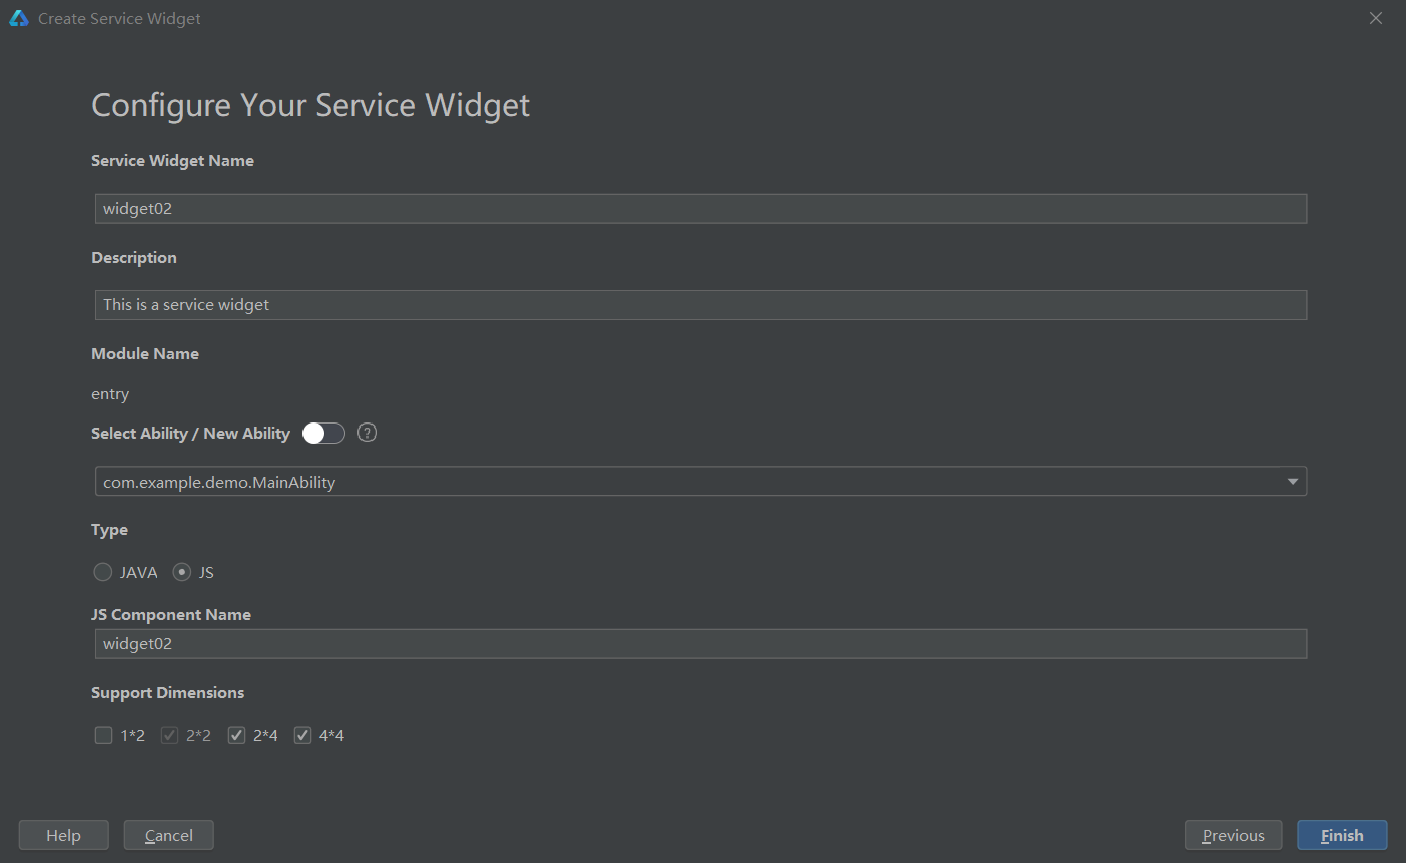
In the template selection interface, select the basic template Grid Pattern and click Next to enter the card configuration interface:

First, configure the name and description of the card; Then configure the page capability associated with the card; Then, the programming language type of the configuration card is JS; Next, configure the JS component name of the card; Finally, configure the specifications supported by the card, in which the small size of 2 * 2 must be supported, and then check a 1 * 2 micro size. Click the button Finish to create a card.

Then create 2 * 4 medium size and 4 * 4 large size:
DevEco Studio will automatically generate some directories and files for us: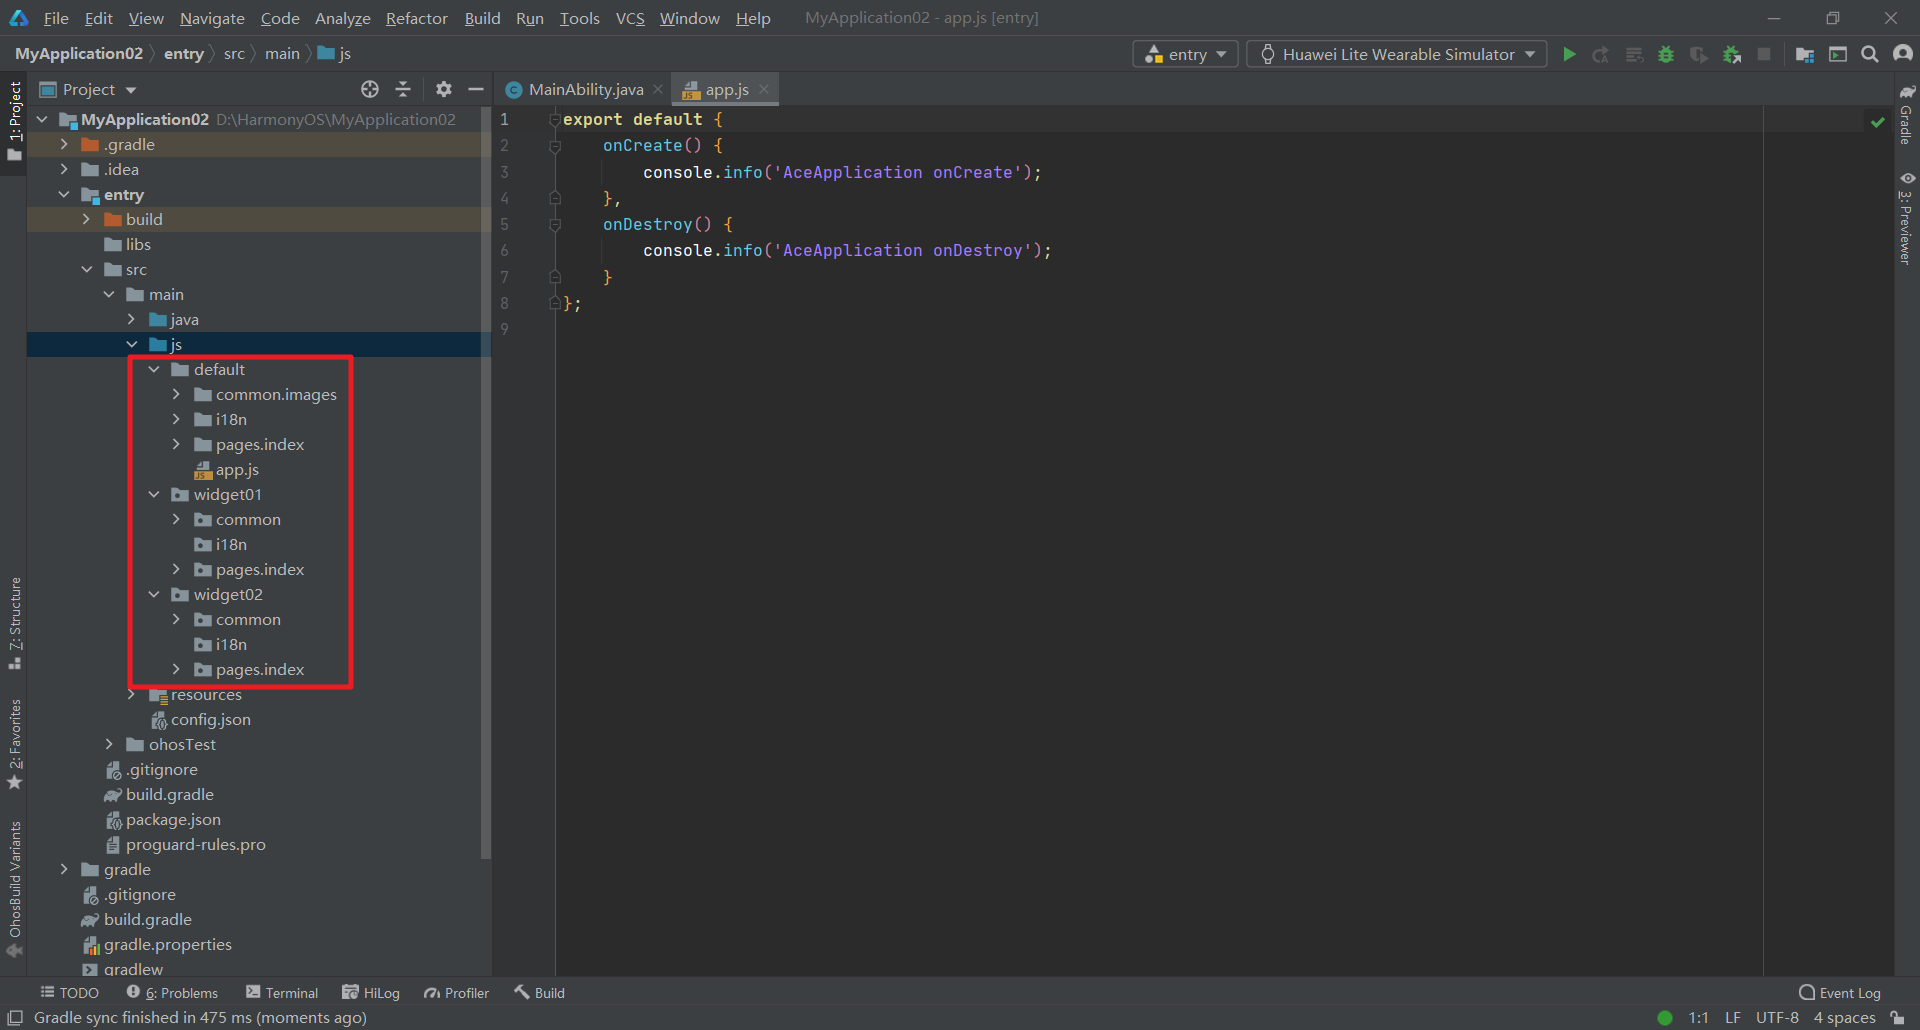
- widget01 and widget02 are the names of JS components configured when creating cards
- index.hml defines which UI components are included in the card; index.css defines the UI component style in the card
- index.json defines the data dynamically bound in the card. In addition, click trigger events can be defined

Widget01 and widget01 are card names configured when creating cards; The card life cycle callback methods are added in MainAbility, such as onCreateForm(), onUpdateForm(), onTriggerFormEvent(), etc. FormControllerManager, FormController, and two implementation classes ending in Impl have also been added.
In config Many configurations are automatically added to JSON:
{
"app": {
"bundleName": "com.example.demo",
"vendor": "example",
"version": {
"code": 1000000,
"name": "1.0.0"
}
},
"deviceConfig": {},
"module": {
"package": "com.example.demo",
"name": ".MyApplication",
"mainAbility": "com.example.demo.MainAbility",
"deviceType": [
"phone"
],
"distro": {
"deliveryWithInstall": true,
"moduleName": "entry",
"moduleType": "entry",
"installationFree": true
},
"abilities": [
{
"skills": [
{
"entities": [
"entity.system.home"
],
"actions": [
"action.system.home"
]
}
],
"name": "com.example.demo.MainAbility",
"icon": "$media:icon",
"description": "$string:mainability_description",
"label": "$string:entry_MainAbility",
"type": "page",
"launchType": "standard",
"formsEnabled": true,
"forms": [
{
"jsComponentName": "widget01",
"isDefault": true,
"scheduledUpdateTime": "10:30",
"defaultDimension": "2*2",
"name": "widget01",
"description": "This is a service widget",
"colorMode": "auto",
"type": "JS",
"supportDimensions": [
"1*2",
"2*2"
],
"updateEnabled": true,
"updateDuration": 1
},
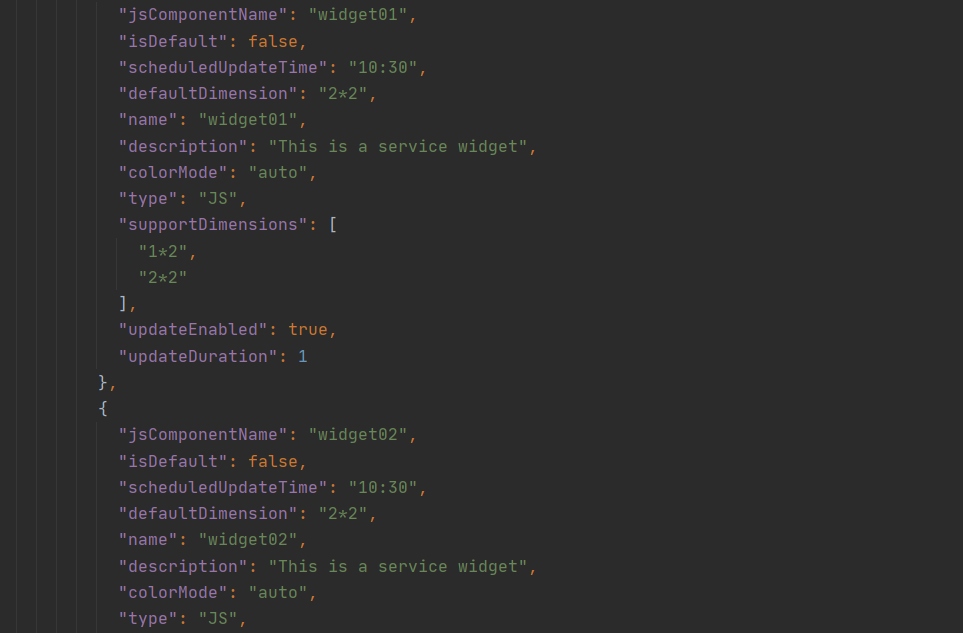
{
"jsComponentName": "widget02",
"isDefault": false,
"scheduledUpdateTime": "10:30",
"defaultDimension": "2*2",
"name": "widget02",
"description": "This is a service widget",
"colorMode": "auto",
"type": "JS",
"supportDimensions": [
"2*2",
"2*4",
"4*4"
],
"updateEnabled": true,
"updateDuration": 1
}
]
}
],
"js": [
{
"pages": [
"pages/index/index"
],
"name": "default",
"window": {
"designWidth": 720,
"autoDesignWidth": true
}
},
{
"pages": [
"pages/index/index"
],
"name": "widget01",
"window": {
"designWidth": 720,
"autoDesignWidth": true
},
"type": "form"
},
{
"pages": [
"pages/index/index"
],
"name": "widget02",
"window": {
"designWidth": 720,
"autoDesignWidth": true
},
"type": "form"
}
]
}
}The label "forms" is added to the MainAbility. The form here means card, which is the same thing as the Service Widget. " "Forms" is an array containing two elements representing the two cards we created. Incidentally, we mentioned earlier that "0 ~ 16 cards can be configured for each Page Ability in config.json", that is, the array "forms" can contain up to 16 elements. A tag "js" is also added at the bottom of the figure above. js "is also an array, which contains three elements. The last two elements are the js components corresponding to the two cards." name "is" widget01 "and" widget02 "respectively. These two values correspond to the two values of" jsComponentName "in the above tag" forms ". That is, the js component of the card in the "forms" tab above is defined in the "js" tab below.
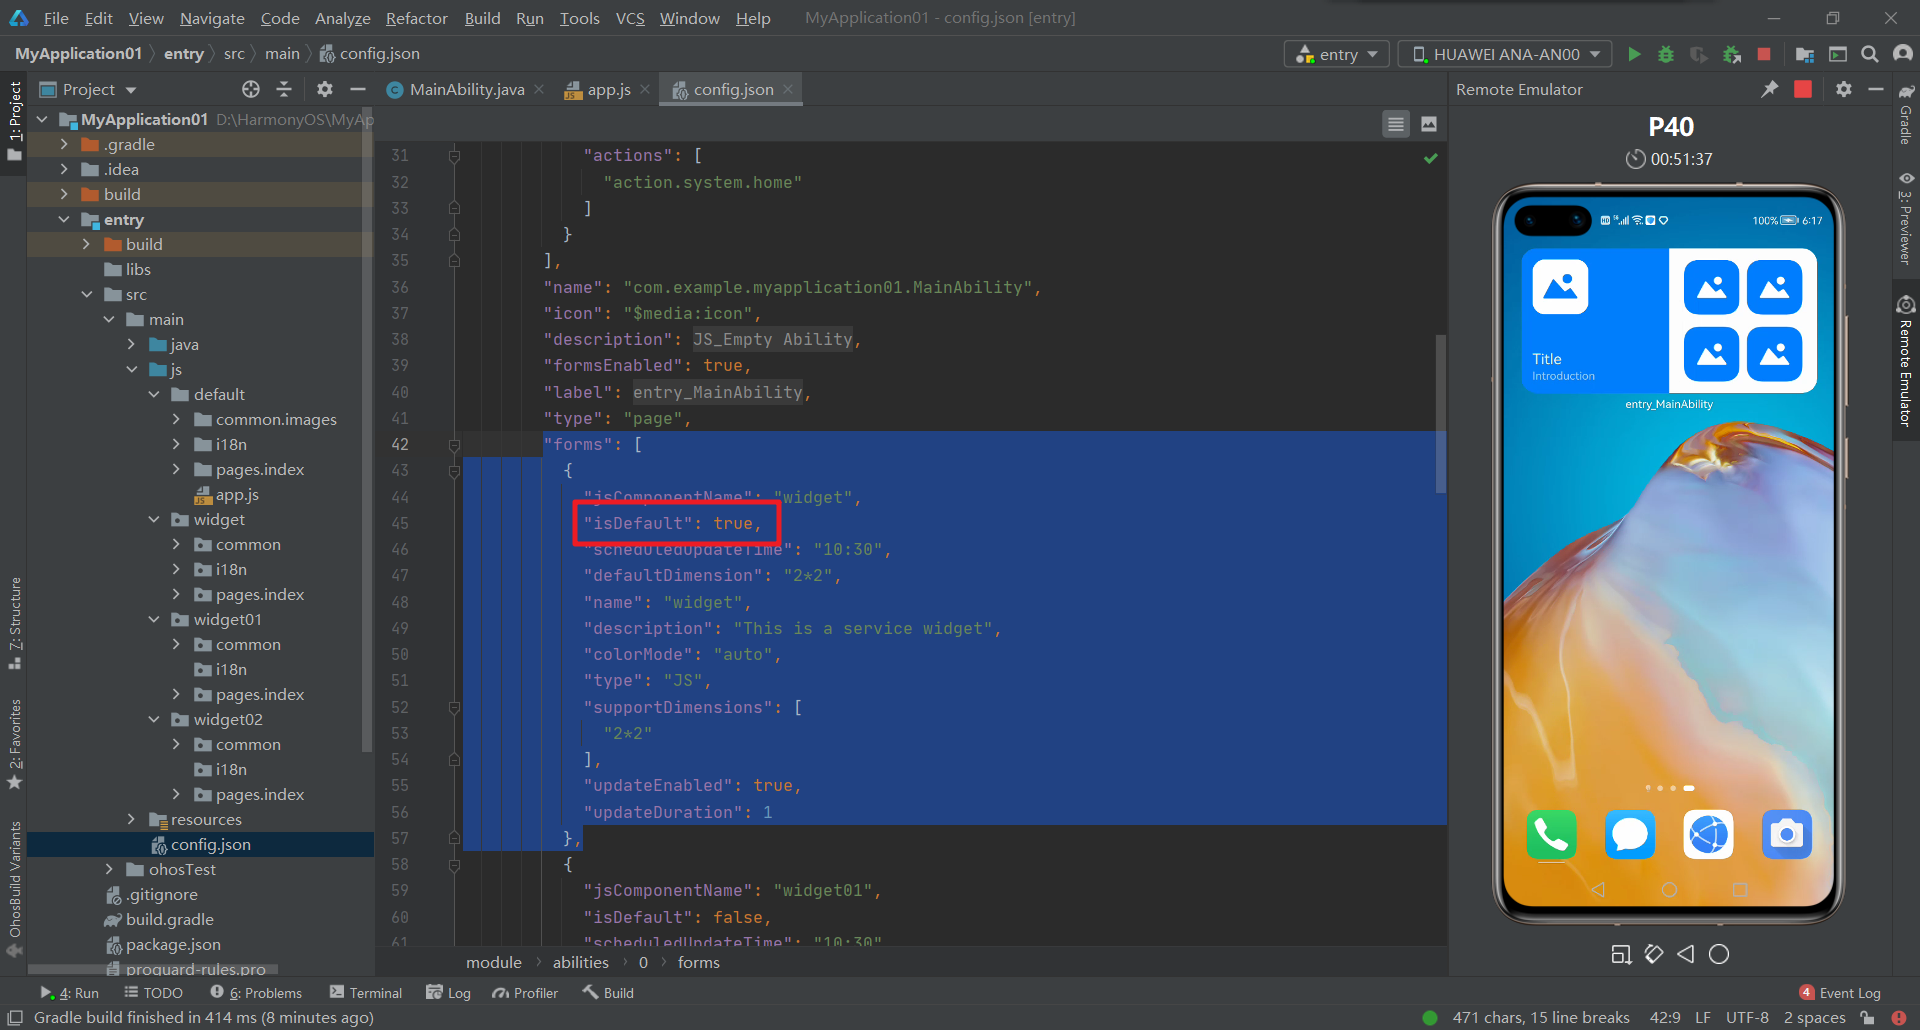
Card configuration in "forms" tab:
- "isDefault" indicates whether the card is the default slide up card, that is, the card that pops up when you slide up while pressing the application icon with your finger.
- "scheduledUpdateTime" refers to the time when the card is refreshed at a fixed point, using a 24-hour system, accurate to minutes.
- "defaultDimension" indicates the default size specification of the card. The value must be in the list configured by "supportDimensions" below.
- "colorMode" indicates the theme style of the card. The default value is "auto", indicating adaptive. It can also be taken as "dark" or "light", indicating dark theme and light theme respectively.
- "supportDimensions" indicates the dimensions supported by the card, that is, the dimensions configured when creating the card.
- "updateEnabled" indicates whether the card supports regular refresh or fixed-point refresh. Regular refresh is preferred.
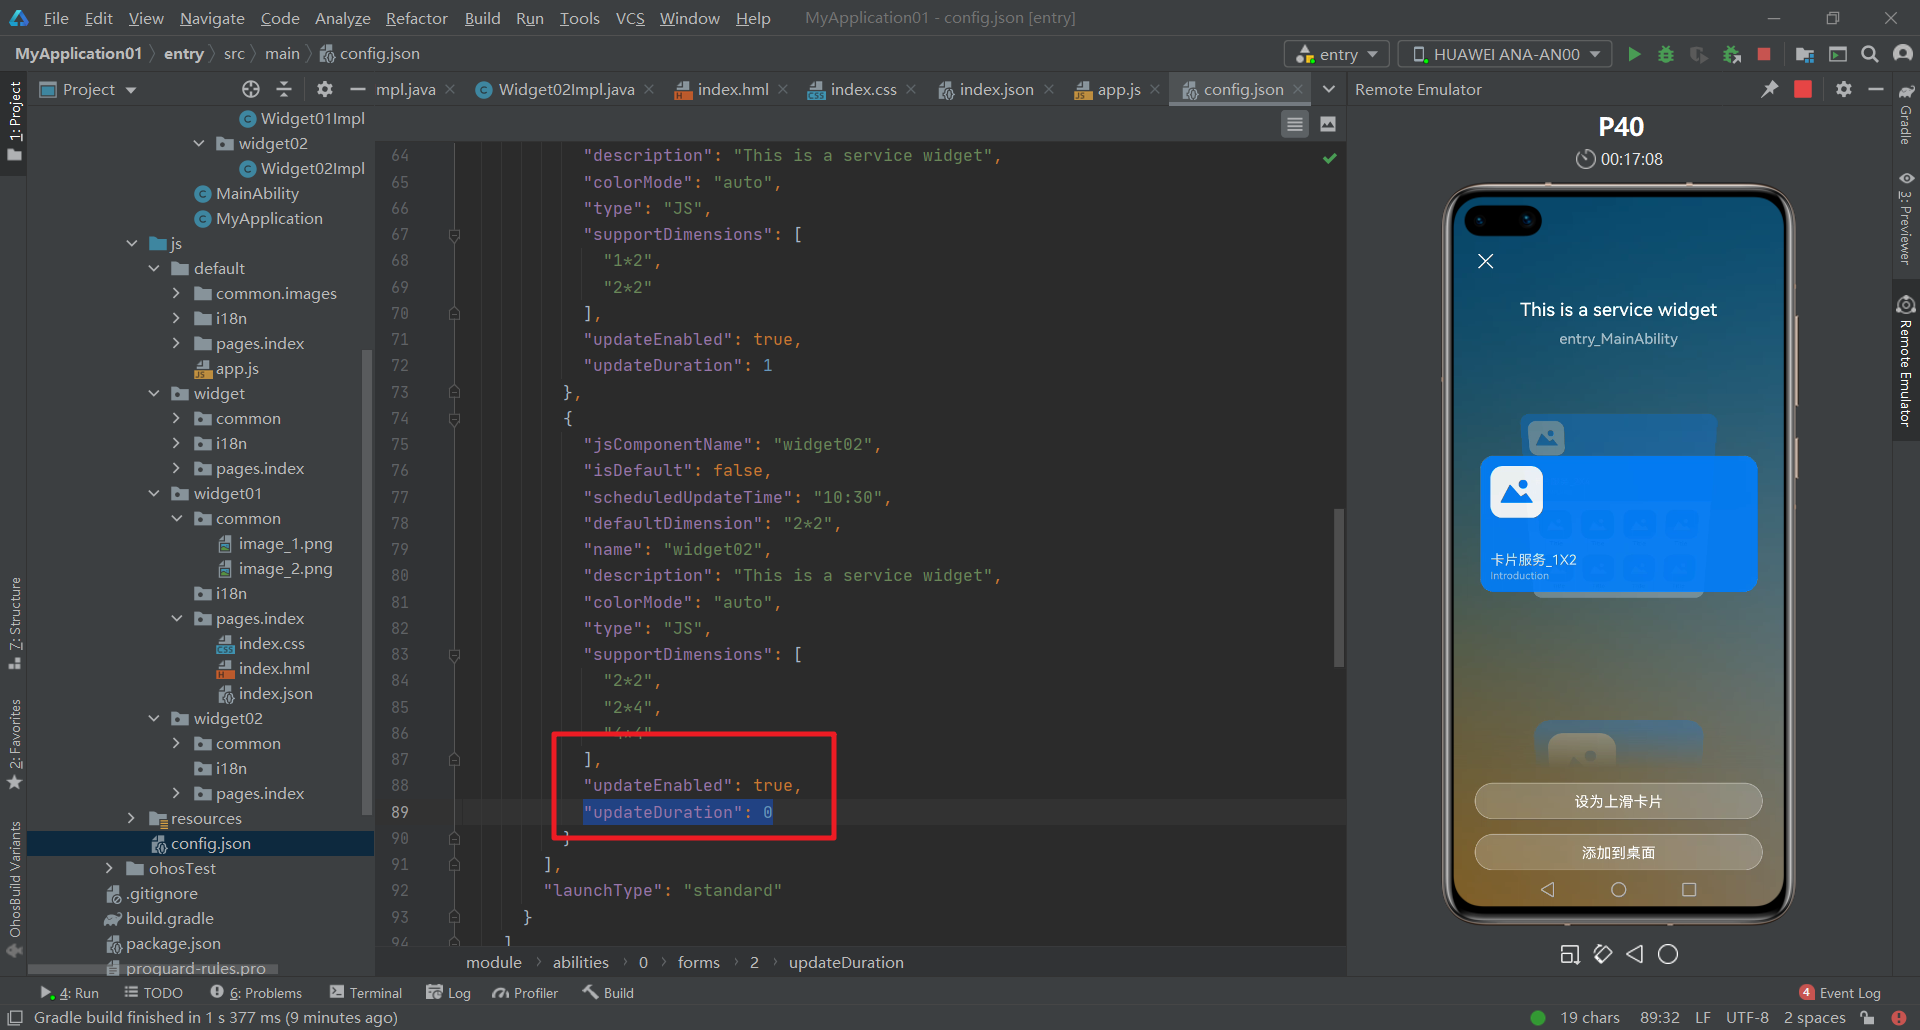
- "updateDuration" indicates the periodic refresh of the card. When the value is 0, the parameter does not take effect; when the value is a positive integer N, the refresh cycle is 30*N minutes.
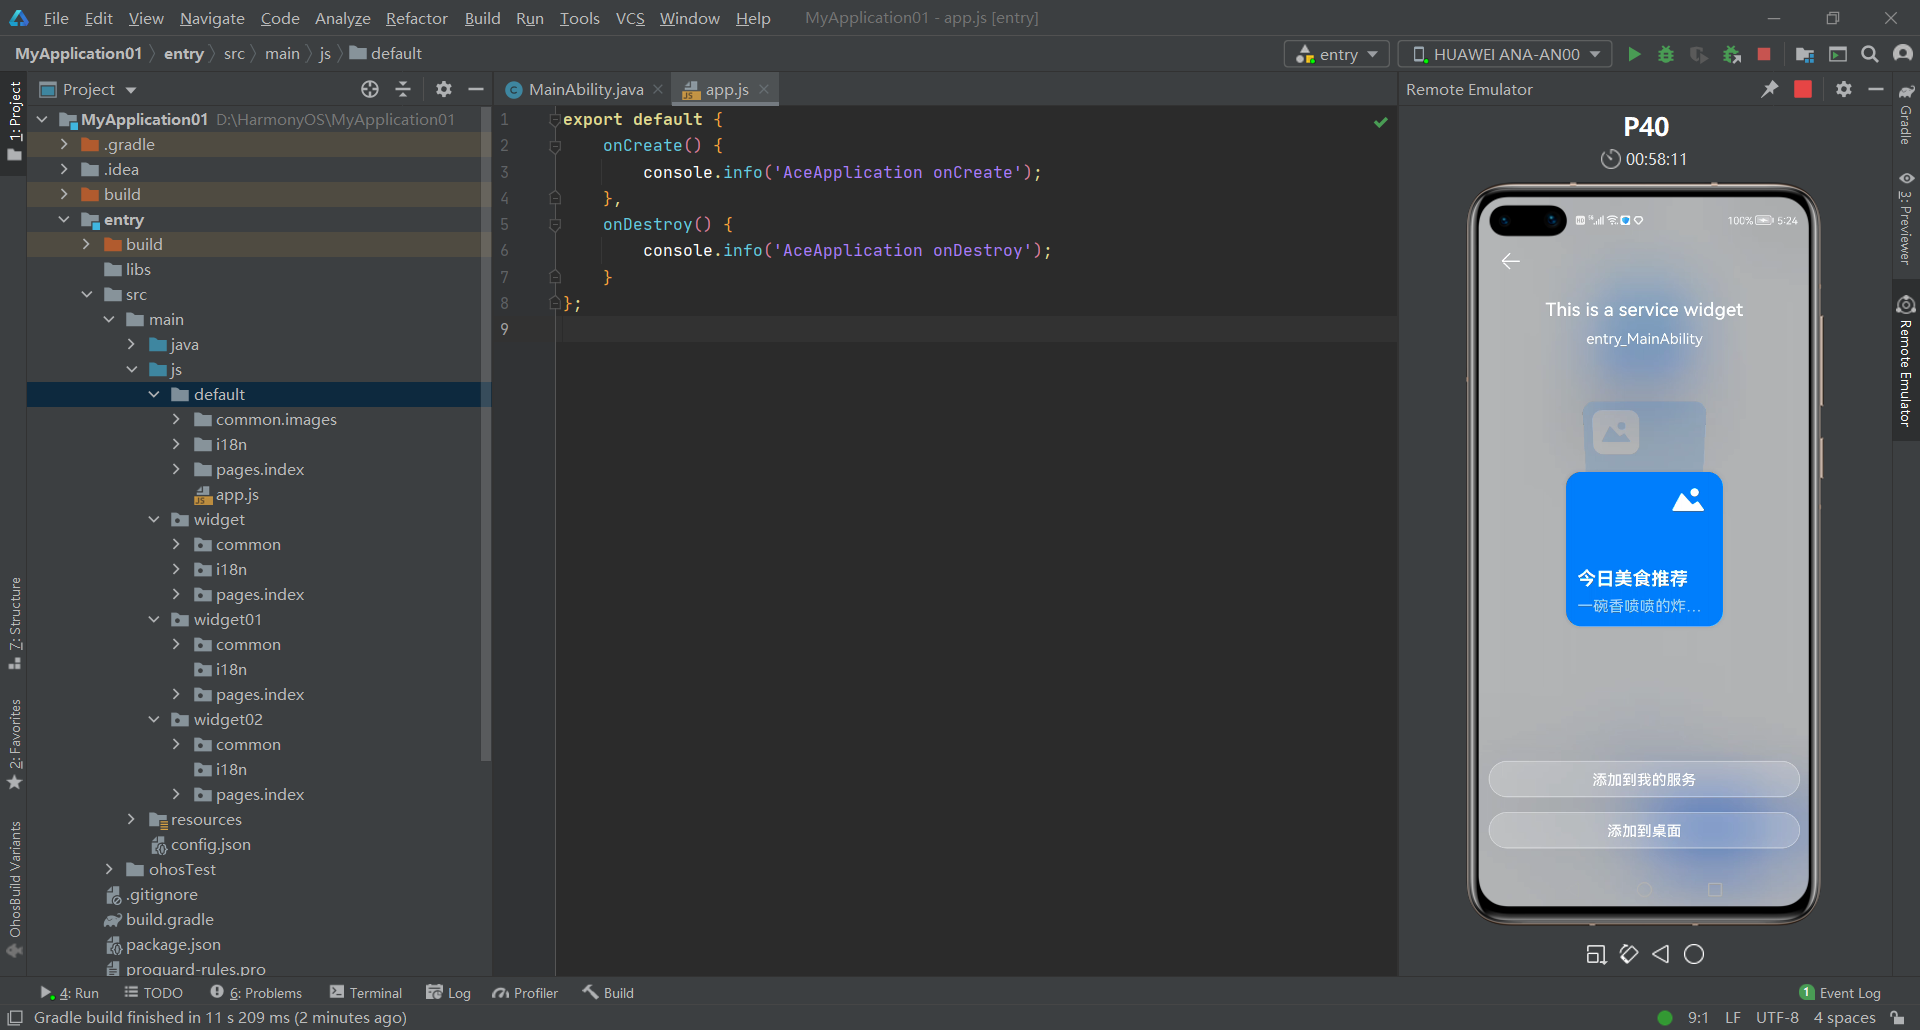
Because the project type is "atomic service", there is no corresponding icon on the desktop. Since "show in service center" is selected when creating the project, open the service center and you will see the corresponding entry card:
Slide all cards up and down, a total of 5:
- widget01 has two cards with dimensions of 1 * 2 and 2 * 2 respectively
- widget02 has three cards with dimensions of 2 * 2, 2 * 4 and 4 * 4
The 2 * 2 card of widget 1 is set to slide up because: in config JSON, set "isDefault" to "true" and "defaultDimension" to "2 * 2":
"forms": [
          {
            "jsComponentName": "widget",
            "isDefault": true,
            "scheduledUpdateTime": "10:30",
            "defaultDimension": "2*2",
            "name": "widget",
            "description": "This is a service widget",
            "colorMode": "auto",
            "type": "JS",
            "supportDimensions": [
              "2*2"
            ],
            "updateEnabled": true,
            "updateDuration": 1
          },
When long pressing the icon of the application on the desktop and displaying all cards, the life cycle method onCreateForm() of cards in MainAbility will be automatically recalled. The implementation of method onCreateForm():
    @Override
    protected ProviderFormInfo onCreateForm(Intent intent) {
        HiLog.info(TAG, "onCreateForm");
        long formId = intent.getLongParam(AbilitySlice.PARAM_FORM_IDENTITY_KEY, INVALID_FORM_ID);
        String formName = intent.getStringParam(AbilitySlice.PARAM_FORM_NAME_KEY);
        int dimension = intent.getIntParam(AbilitySlice.PARAM_FORM_DIMENSION_KEY, DEFAULT_DIMENSION_2X2);
        HiLog.info(TAG, "onCreateForm: formId=" + formId + ",formName=" + formName);
        FormControllerManager formControllerManager = FormControllerManager.getInstance(this);
        FormController formController = formControllerManager.getController(formId);
        formController = (formController == null) ? formControllerManager.createFormController(formId,
                formName, dimension) : formController;
        if (formController == null) {
            HiLog.error(TAG, "Get null controller. formId: " + formId + ", formName: " + formName);
            return null;
        }
        return formController.bindFormData();
    }
Because there are 5 cards in total, the method onCreateForm() will be called back 5 times!!!
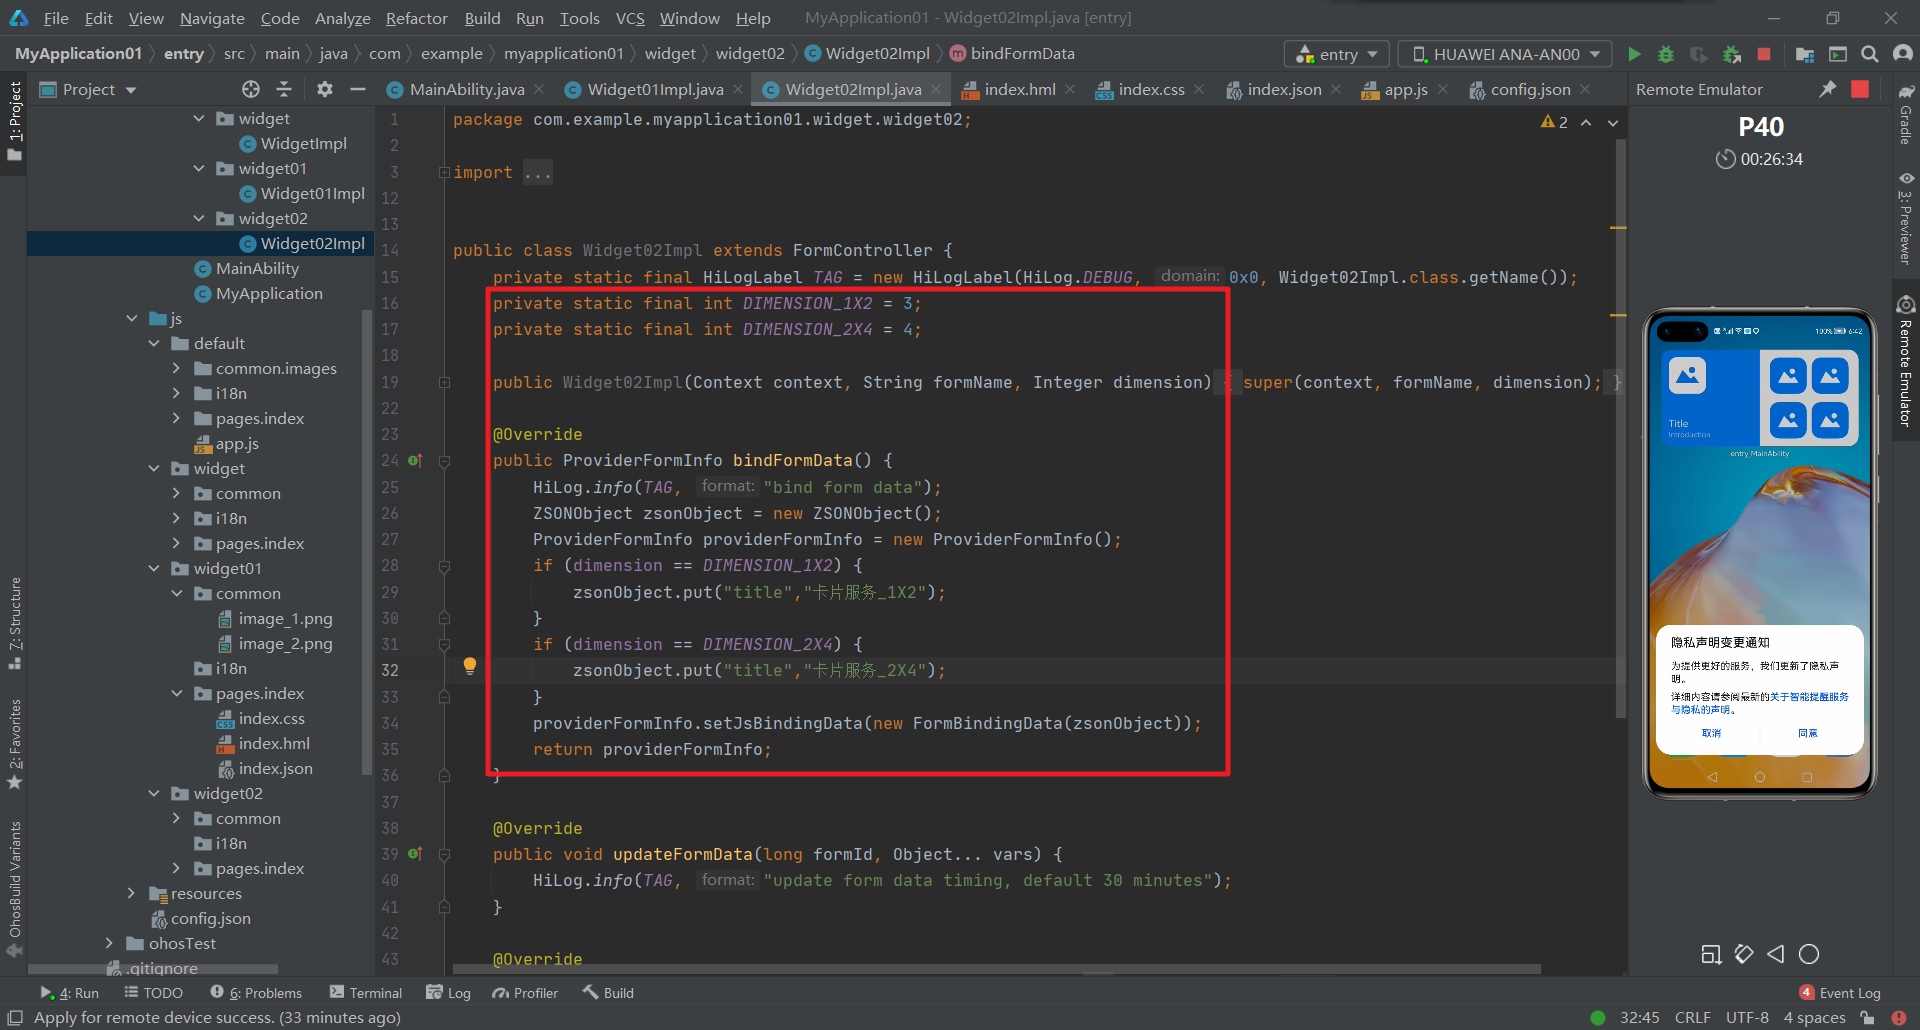
Method bindFormData():
@Override
    public ProviderFormInfo bindFormData() {
        HiLog.info(TAG, "bind form data");
        ZSONObject zsonObject = new ZSONObject();
        ProviderFormInfo providerFormInfo = new ProviderFormInfo();
        if (dimension == DIMENSION_1X2) {
            zsonObject.put("mini", true);
        }
        if (dimension == DIMENSION_2X4) {
            zsonObject.put("dim2X4", true);
        }
        providerFormInfo.setJsBindingData(new FormBindingData(zsonObject));
        return providerFormInfo;
    }
The program sets the values of two variables "mini" and "dim2X4" respectively according to the size of the card. These two variables are the index in the subdirectory widget01 Two variables in JSON.
{
  "data": {
    "mini": false,
    "dim2X4": false,
    "miniTitle": "Title",
    "title": "Title",
    "content": "Introduction",
    "detailTitle": "Title"
  }
}
By the way, in index In HML, many variables are enclosed by two curly braces. The values of these variables are determined dynamically during the running process of the program. This technology is called dynamic binding. The initial values of these variables are in index The tag "data" in JSON is defined. Therefore, in the method bindFormData(), the values of two dynamically bound variables are modified according to the size of the card.

The titles of all cards have been modified (except the smallest card, which does not display the title).
Fixed point / regular refresh of card:
Open config JSON, first modify the tag "updateDuration" corresponding to widget 02 to 0 to turn off scheduled refresh.
 For the time set by the label "scheduledUpdateTime", when it arrives, the callback method onUpdateForm() of the card in MainAbility will be called automatically:

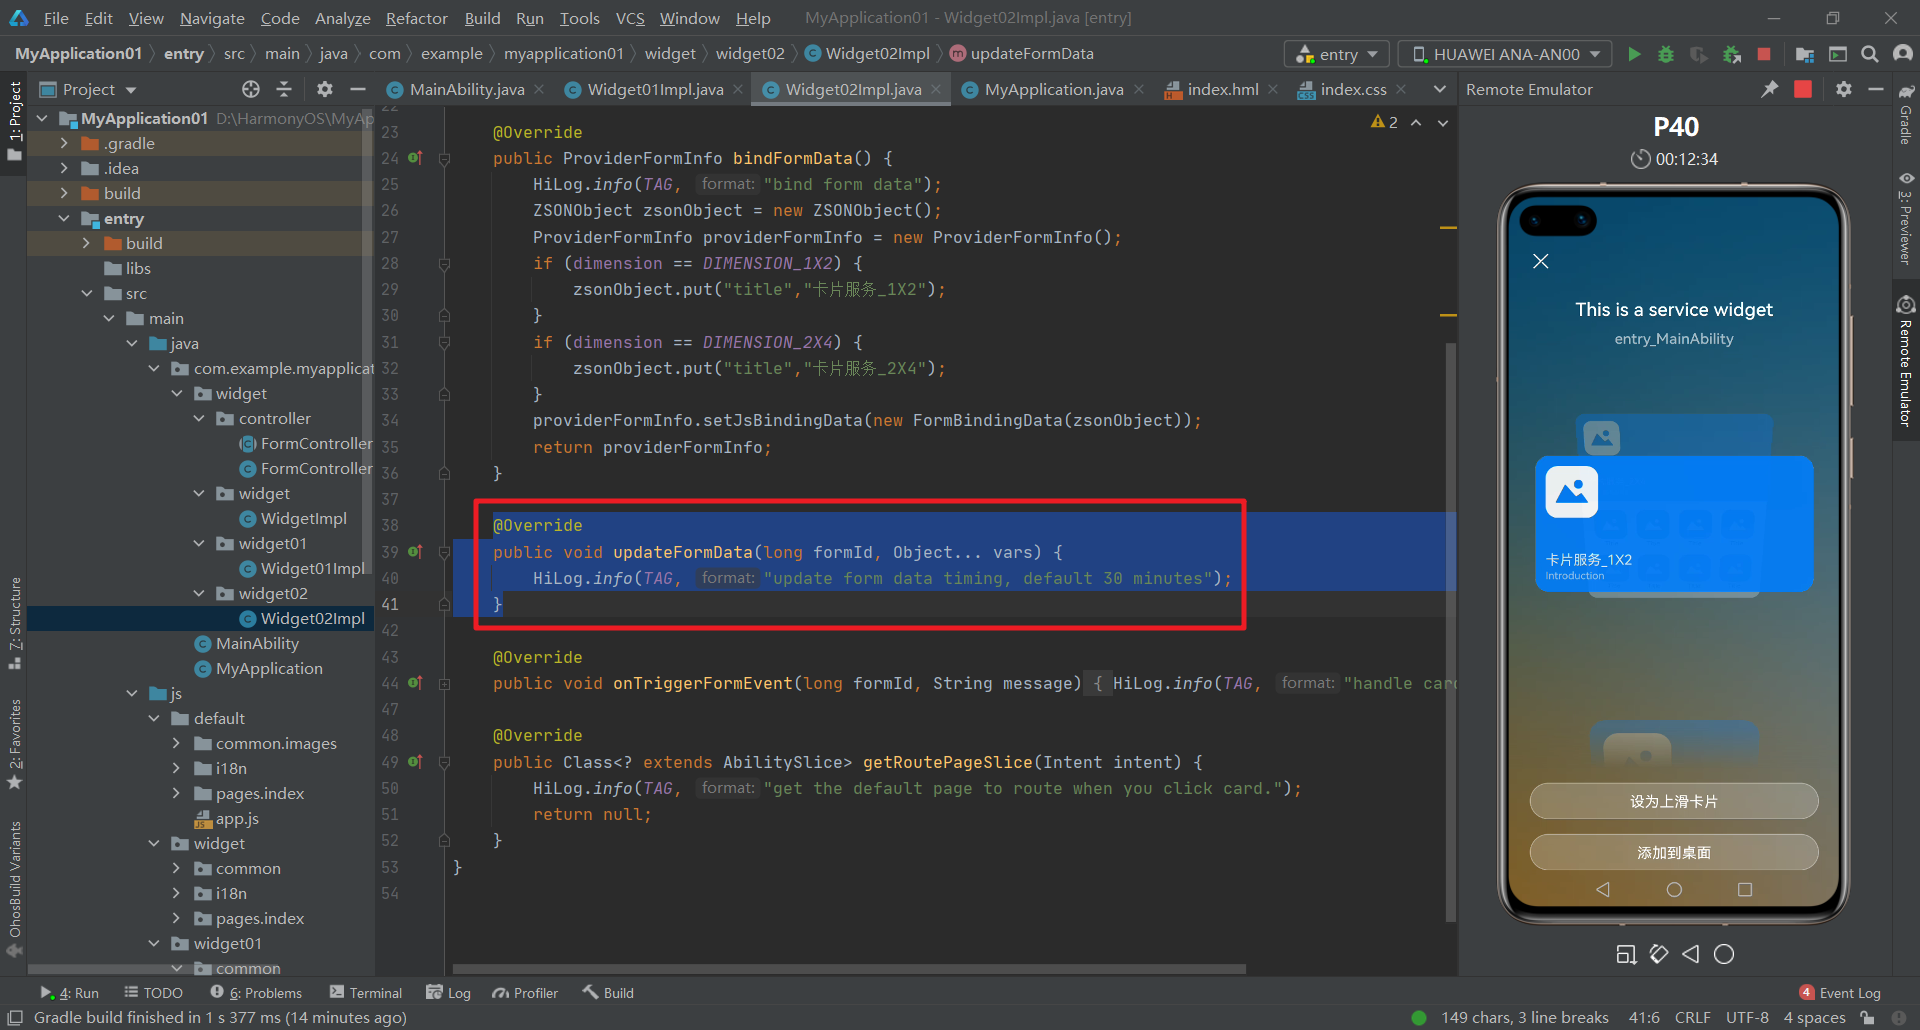
The data to be refreshed is stored in a ZSONObject instance, and then encapsulated in a FormBindingData instance bindingData. Finally, the MainAbility method updateForm() is called, and bindingData is used as the second parameter.
@Override
    public void updateFormData(long formId, Object... vars) {
        HiLog.info(TAG, "update form data timing, default 30 minutes");

        //Refresh data:
        ZSONObject data = new ZSONObject();
        data.put("title","update operation");
        FormBindingData bindingData = new FormBindingData(data);
        try {
            ((MainAbility)context).updateForm(formId, bindingData);
        } catch (FormException e) {
            HiLog.error(TAG,e.toString());
        }
    }
Open config JSON, modify the value of the tag "scheduledUpdateTime" to one minute after the current time:
Run the project and add the cards corresponding to widget 02 to the desktop. When the set fixed point time is reached, the card titles are refreshed:

Clock card profile:
"forms": [
  {
        "landscapeLayouts": [
          "$layout:form_image_with_info_date_card_2_2",
          "$layout:form_image_with_info_date_card_2_4"
        ],
        "isDefault": true,
        "scheduledUpdateTime": "10:30",
        "defaultDimension": "2*2",
        "name": "DateCard",
        "description": "This is a service widget",
        "colorMode": "auto",
        "type": "Java",
        "supportDimensions": [
          "2*2",
          "2*4"
        ],
        "portraitLayouts": [
          "$layout:form_image_with_info_date_card_2_2",
          "$layout:form_image_with_info_date_card_2_4"
        ],
        "updateEnabled": true,
        "updateDuration": 1,
        "formVisibleNotify": true
  }
]
Card layout:
Take the 2 * 2 layout as an example to introduce it in detail. The contents of the whole 2 * 2 card display are date, time and week from top to bottom. The whole is composed of four directionallayouts embedded in the DependentLayout layout. The Text component is used in each DirectionalLayout. Some codes are as follows:
<?xml version="1.0" encoding="utf-8"?>
<DependentLayout
    xmlns:ohos="http://schemas.huawei.com/res/ohos"
    ohos:height="match_parent"
    ohos:width="match_parent"
    ohos:background_element="#6A9F99"
    ohos:remote="true">
    <DirectionalLayout
        ohos:height="match_content"
        ohos:width="match_parent"
        ohos:orientation="vertical"
        >
        <Text...>
     </DirectionalLayout>
     <DirectionalLayout
         ohos:id="$+id:title"
         ohos:height="match_content"
         ohos:width="match_parent"
         ohos:alignment="horizontal_center"
         ohos:orientation="horizontal"
         ohos:top_margin="35fp"
         >
        <Text...>
        <Text...>
        <Text...>
      </DirectionalLayout>

     <DirectionalLayout
         ohos:id="$+id:time"
         ohos:height="match_content"
         ohos:width="match_parent"
         ohos:alignment="horizontal_center"
         ohos:below="$id:title"
         ohos:orientation="horizontal"
         ohos:top_margin="0.5fp"
         >
         <Text...>
         <Text...>
         <Text...>
         <Text...>
         <Text...>
     </DirectionalLayout>

     <DirectionalLayout
         ohos:height="match_content"
         ohos:width="match_parent"
         ohos:alignment="center"
         ohos:below="$id:time"
         ohos:margin="20fp"
         ohos:orientation="horizontal"
      >
         <Text...>
         <Text...>
         <Text...>
         <Text...>
         <Text...>
         <Text...>
         <Text...>
     </DirectionalLayout>
</DependentLayout>
Create card:
To create a card database:
Using the object relational mapping database to store card ID, card name and other information, we created a database (FormDatabase) and a table (Form).
First, define the database class formdatabase Java, the database contains the "Form" table, the version number is "1", and the example code is as follows:
@Database(
    entities = {Form.class},
    version = 1)
public abstract class FormDatabase extends OrmDatabase {}
Define entity class form Java, the table name in the corresponding database is "form", which contains three fields: Card id"formId" (primary key), card name "formName" and card specification "dimension". The example code is as follows:
@Entity(tableName = "form")
public class Form extends OrmObject {
    @PrimaryKey()
    private Long formId;
    private String formName;
    private Integer dimension;

    public Form(Long formId, String formName, Integer dimension) {
        this.formId = formId;
        this.formName = formName;
        this.dimension = dimension;
    }
    // Add the getter and setter methods of the field by yourself, or refer to the complete code
}
Card application initialization:
After the card program is installed and started, it will enter MainAbility. When onStart, it will first start the card timer service TimerAbility to refresh the clock card. Some example codes are as follows:
@Override
public void onStart(Intent intent) {
    super.onStart(intent);
    connect = helper.getOrmContext("FormDatabase", "FormDatabase.db", FormDatabase.class);
    // Start TimerAbility
    Intent intentService = new Intent();
    Operation operation =
            new Intent.OperationBuilder()
                    .withDeviceId("")
                    .withBundleName("com.huawei.cookbooks")
                    .withAbilityName("com.huawei.cookbooks.TimerAbility")
                    .build();
    intentService.setOperation(operation);
    startAbility(intentService);
    super.setMainRoute(ClockCardSlice.class.getName());
}
When the card user requests to obtain the card, the card provider will be pulled up and call the onCreateForm callback function to initialize the card information. The following example code is in MainAbility:
@Override
protected ProviderFormInfo onCreateForm(Intent intent) {
    if (intent == null) {
        return new ProviderFormInfo();
    }
    // Get card id
    formId = INVALID_FORM_ID;
    if (intent.hasParameter(AbilitySlice.PARAM_FORM_IDENTITY_KEY)) {
        formId = intent.getLongParam(AbilitySlice.PARAM_FORM_IDENTITY_KEY, INVALID_FORM_ID);
    } else {
        return new ProviderFormInfo();
    }
    // Get card name
    String formName = EMPTY_STRING;
    if (intent.hasParameter(AbilitySlice.PARAM_FORM_NAME_KEY)) {
        formName = intent.getStringParam(AbilitySlice.PARAM_FORM_NAME_KEY);
    }
    // Get card specifications
    int dimension = DEFAULT_DIMENSION_2X2;
    if (intent.hasParameter(AbilitySlice.PARAM_FORM_DIMENSION_KEY)) {
        dimension = intent.getIntParam(AbilitySlice.PARAM_FORM_DIMENSION_KEY, DEFAULT_DIMENSION_2X2);
    }
    int layoutId = ResourceTable.Layout_form_image_with_info_date_card_2_2;
    if (dimension == DEFAULT_DIMENSION_2X4) {
        layoutId = ResourceTable.Layout_form_image_with_info_date_card_2_4;
    }
    formInfo = new ProviderFormInfo(layoutId, this);
    // Store card information
    Form form = new Form(formId, formName, dimension);
    ComponentProvider componentProvider = ComponentProviderUtils.getComponentProvider(form, this);
    formInfo.mergeActions(componentProvider);
    if (connect == null) {
        connect =
                helper.getOrmContext("FormDatabase", "FormDatabase.db", FormDatabase.class);
    }
    try {
        DatabaseUtils.insertForm(form, connect);
    } catch (Exception e) {
        DatabaseUtils.deleteFormData(form.getFormId(), connect);
    }
    return formInfo;
}
When a card is deleted, you need to override the onDeleteForm method to delete the card instance data according to the card id:
@Override
protected void onDeleteForm(long formId) {
    super.onDeleteForm(formId);
    // Delete card information in database
    DatabaseUtils.deleteFormData(formId, connect);
}
Update card:
In order to facilitate the timing task of clock card refresh, we have created a service capability to regularly update the card information in timerability There are some reference codes in Java as follows:
@Override
public void onStart(Intent intent) {
    connect = helper.getOrmContext("FormDatabase", "FormDatabase.db", FormDatabase.class);
    startTimer();
    super.onStart(intent);
}
// Card update timer, updated once per second
private void startTimer() {
    Timer timer = new Timer();
    timer.schedule(
            new TimerTask() {

                @Override

                public void run() {

                    updateForms();
                    notice();

                }
            },

            0,SEND_PERIOD);
}

private void updateForms() {
    // Get card information from database
    OrmPredicates ormPredicates = new OrmPredicates(Form.class);
    List<Form> formList = connect.query(ormPredicates);
    // Update hours, minutes and seconds
    if (formList.size() > 0) {
        for (Form form : formList) {
            // Traverse the card list to update the card
            ComponentProvider componentProvider = ComponentProviderUtils.getComponentProvider(form, this);
            try {

                Long updateFormId = form.getFormId();

                updateForm(updateFormId, componentProvider);
            } catch (FormException e) {
                // Delete non-existent cards
                DatabaseUtils.deleteFormData(form.getFormId(), connect);
                HiLog.error(LABEL_LOG, "onUpdateForm updateForm error");
            }
        }
    }
}
Front desk service
In order to keep the service from being destroyed by the system, you need to use the foreground service together with the relevant configuration in the mobile housekeeper to achieve the purpose. The example code is as follows:
private void notice() {
        // Create notification
        NotificationRequest request = new NotificationRequest(NOTICE_ID);
        request.setAlertOneTime(true);
        NotificationRequest.NotificationNormalContent content = new NotificationRequest.NotificationNormalContent();
        content.setText(DateUtils.getCurrentDate("yyyy-MM-dd HH:mm:ss"));
        NotificationRequest.NotificationContent notificationContent = new NotificationRequest.NotificationContent(content);
        request.setContent(notificationContent);
        // Binding notification
        keepBackgroundRunning(NOTICE_ID, request);
}
Card component update
For the update of card components, we encapsulated the class ComponentProviderUtils. When the card is updated, we call the updateForm method and pass in the parameters formId and componentProvider to achieve the effect of real-time update of date, time and week. Some codes and effects are as follows:
public static ComponentProvider getComponentProvider(Form form, Context context) {
    int layoutId = ResourceTable.Layout_form_image_with_info_date_card_2_2;
    if (form.getDimension() == DIM_VERSION) {
        layoutId = ResourceTable.Layout_form_image_with_info_date_card_2_4;
    }
    ComponentProvider componentProvider = new ComponentProvider(layoutId, context);
    setComponentProviderValue(componentProvider);
    return componentProvider;
}

// Assign values to each component of the clock
private static void setComponentProviderValue(ComponentProvider componentProvider) {
    Calendar now = Calendar.getInstance();
    int hour = now.get(Calendar.HOUR_OF_DAY);
    int min = now.get(Calendar.MINUTE);
    int second = now.get(Calendar.SECOND);
    String hourString = int2String(hour);
    String minString = int2String(min);
    String secondString = int2String(second);
    componentProvider.setText(ResourceTable.Id_date, DateUtils.getCurrentDate("yyyy-MM-dd"));
    componentProvider.setText(ResourceTable.Id_hour, hourString);
    componentProvider.setText(ResourceTable.Id_min, minString);
    componentProvider.setText(ResourceTable.Id_sec, secondString);

    // Get current week
    int weekDayId = getWeekDayId();
    componentProvider.setTextColor(weekDayId, nowWeekColor);

    // Change the week of the previous day back to the original color
    int lastWeekId = getLastWeekDayId();
    componentProvider.setTextColor(lastWeekId, primaryWeekColor);
}
Refer to the official website: JAVA clock card
[this article is participating in the "prize essay | harmony OS essay contest"]
Transfer port: https://marketing.csdn.net/p/ad3879b53f4b8b31db27382b5fc65bbc