First, we need to build three virtual machines (here is a demonstration). For the construction process, please refer to this article.
After completing the Hadoop fully distributed construction in the previous article, you can do the next operation - build a Zookeeper cluster
First download Zookeeper for Linux
Link: https://pan.baidu.com/s/1_alxqyJMAiCkORtM37RT0Q
Extraction code: hjl4
After downloading, use the command to decompress
Upload the file to / usr/local (the upload method is demonstrated in the above file)
tar -zxvf apache-zookeeper-3.7.0-bin.tar -C ~/home/hadoop/
After decompression, enter the conf directory of zookeeper, and set zoo sampli. The cfg file is modified to zoo cfg
cp zoo.sample.cfg zoo.cfg
Modify zoo cfg
vi cfg
Modify dataDir to a custom directory
dataDir=/home/hadoop/zkdata
Add the following at the end of the document
server.1=master:2888:3888
server.2=slave1:2888:3888
server.3=slave2:2888:3888
1, 2 and 3 in the above configuration refer to the number of each node of the zookeeper cluster. The contents separated by colons on the right side of the equal sign refer to the corresponding host name, heartbeat port between nodes and data interaction port respectively
zoo. After CFG modification, create the dataDir directory specified therein, and save the corresponding node number in the configuration to a file named myid
mkdir  /home/hadoop/zkdata

echo 1 >/home/hadoop/zkdata/myid
Distribute the pressurized zookeeper folder to slave1 and slave2
scp -r apache-zookeeper-3.7.0-bin root@slave1:/home/hadoop/
scp -r /home/hadoop/apache-zookeeper-3.7.0-bin root@slave2:/home/hadoop
Create zkdata on slave1 and slave2 respectively
mkdir  /home/hadoop/zkdata

echo 2 >/home/hadoop/zkdata/myid
mkdir  /home/hadoop/zkdata

echo 3 >/home/hadoop/zkdata/myid
Add zookeeper environment variable
vi /etc/profile
export PATH=$PATH:/home/hadoop/apache-zookeeper-3.7.0-bin/bin
Start zookeeper and check whether the installation is successful
zkServer.sh start
zkServer.sh status


Seeing this, it shows that zookeeper has been successfully installed
zookeeper has been successfully installed. Next, set up the HDFS HA cluster
The HDFS cluster has been installed in the above article. Now directly modify the configuration file to achieve the HA configuration.
First, modify the core site XML file
vi /usr/local/hadoop/etc/hadoop/core-site.xml
Add the following content under the configuration file
 <!-- appoint hdfs of nameservice by ns -->
         <property>
                <!-- HDFS Resource path -->
                <name>fs.defaultFS</name>
                <value>hdfs://ns</value>
        </property>

        <!-- appoint ZooKeeper address -->
        <property>
                <name>ha.zookeeper.quorum</name>
                <value>master:2181,slave1:2181,slave2:2181</value>
        </property>
Modify HDFS site XML file
vi /usr/local/hadoop/etc/hadoop/hdfs-site.xml
Add the following
        <!-- appoint hdfs of nameservice by ns,Need and core-site.xml Consistent in -->
        <property>
                <name>dfs.nameservices</name>
                <value>ns</value>
        </property>
        <!-- ns There are two below NameNode,part nn1,nn2 -->
        <property>
                <name>dfs.ha.namenodes.ns</name>
                <value>nn1,nn2</value>
        </property>
        <!-- nn1 of RPC mailing address -->
        <property>
                <name>dfs.namenode.rpc-address.ns.nn1</name>
                <value>master:8020</value>
        </property>
        <!-- nn1 of http mailing address -->
        <property>
                <name>dfs.namenode.http-address.ns.nn1</name>
                <value>master:9870</value>
        </property>
        <!-- nn2 of RPC mailing address -->
        <property>
                <name>dfs.namenode.rpc-address.ns.nn2</name>
                <value>slave1:8020</value>
        </property>
        <!-- nn2 of http mailing address -->
        <property>
                <name>dfs.namenode-http-address.ns.nn2</name>
                <value>slave1:9870</value>
        </property>
        <!-- appoint NameNodeN Metadata for JournalNode Storage location on -->
        <property>
                <name>dfs.namenode.shared.edits.dir</name>
                <value>qjournal://master:8485;slave1:8485;slave2:8485/ns</value>
        </property>
        <!-- appoint Journal Node Location of data on local disk -->
        <property>
                <name>dfs.journalnode.edits.dir</name>
                <value>/home/hadoop/ha/journal</value>
        </property>
        <!-- open NameNode Automatic switching in case of failure -->
        <property>
                <name>dfs.ha.automatic-failover.enabled</name>
                <value>true</value>
        </property>
        <!-- Implementation mode of automatic switching in case of configuration failure -->
        <property>
                <name>dfs.client.failover.proxy.provider.ns</name>             <value>org.apache.hadoop.hdfs.server.namenode.ha.ConfiguredFailoverProxyProvider</value>
        </property>
        <!-- Configure isolation mechanism -->
        <property>
                 <name>dfs.ha.fencing.methods</name>
                <value>sshfence
                shell(/bin/true)
                </value>
        </property>
        <!-- Required when using isolation mechanism SSH Login free -->
        <property>
                <name>dfs.ha.fencing.ssh.private-key-files</name>
                <value>/home/hadoop/.ssh/id_rsa</value>
        </property>
Modify mapred site xml
vi /usr/local/hadoop/etc/hadoop/mapred-site.xml
Add the following
        <property>
                <name>mapreduce.jobhistory.address</name>
                <value>master:10020</value>
        </property>
        <property>
                <name>mapreduce.jobhistory.webapp.address</name>
                <value>master:19888</value>
        </property>
Modify Yard site XML file
vi /usr/local/hadoop/etc/hadoop/yarn-site.xml
Add the following
 <!-- appoint nodemanajager Load on startup server The method of is shuffle server -->
        <property>
                <name>yarn.nodemanager.aux-services</name>
                <value>mapreduce_shuffle</value>
        </property>
  <!-- appoint resourcemanager address -->
        <property>
                <name>yarn.resourcemanager.hostname</name>
                <value>master</value>
        </property>
        <property>
                <name>yarn.log-aggregation-enable</name>
                <value>true</value>
        </property>
Next, modify the slave file (some are workers files due to different versions, and Hadoop version 3. X or above)
Add the following
master
slave1
slave2
Distribute the configured hadoop to slave1 and slave2
scp -r /usr/local/hadoop/etc/hadoop root@slave1:/usr/local/hadoop/etc/
scp -r /usr/local/hadoop/etc/hadoop root@slave2:/usr/local/hadoop/etc/
Next is the various services required by the HA cluster
zkServer. SH start
Start JournalNode
hadoop-daemon.sh start journalnode
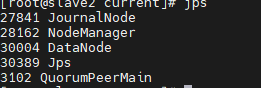
After execution, use jps to view the process
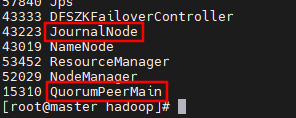
The process in the box needs to be included, which means that the startup is successful
Then format HDFS
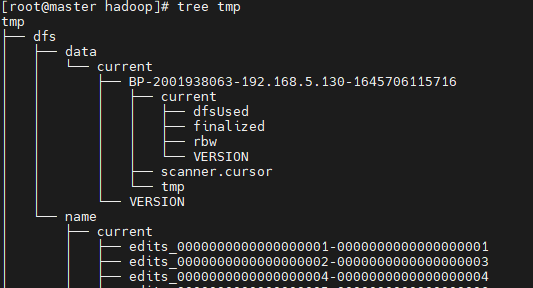
Execute the command in the master: hdfs namenode -format
After successful execution, it will be displayed on the core site Hadoop. XML configuration tmp. Create the corresponding data directory under dir directory. The structure is as follows:
Tree TMP (if the command doesn't work, execute Yum - y install tree first)
Since slave1 also needs to start NameNode, copy the generated directory to the directory corresponding to slave1
Format ZKFC
hdfs zkfc -formatZK
After formatting successfully, a large number of logs will be output

Then start HDFS and YARN clusters
Execute start DFS sh/start-yarn. SH command
Using jps to view processes
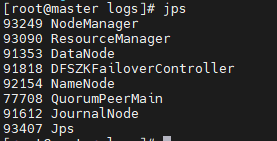
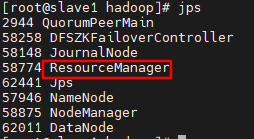
Ignore the process in the red box
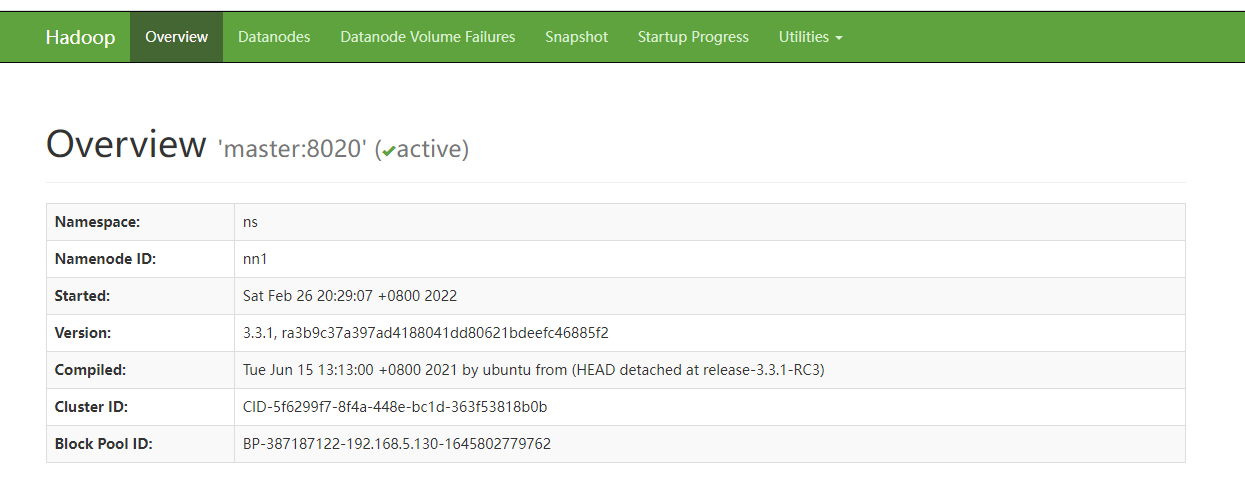
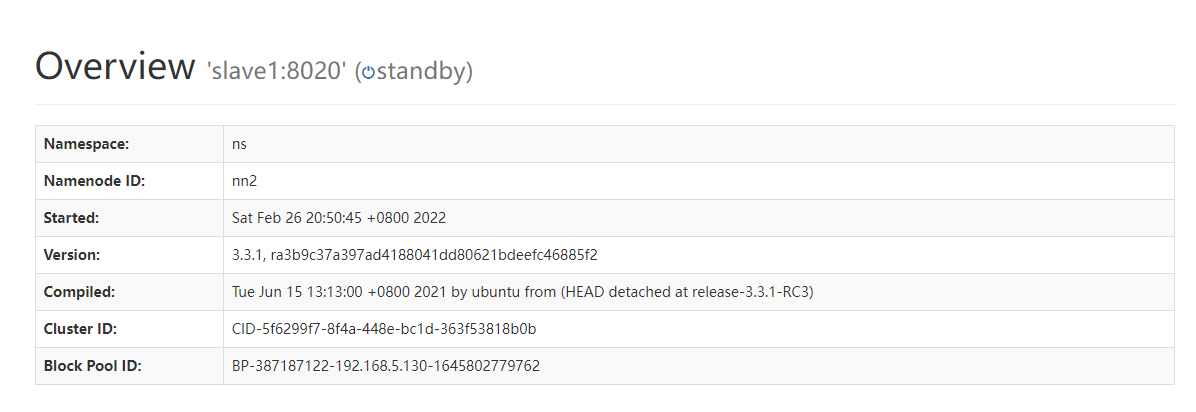
On the master node, enter hdfs haadmin -getAllServiceState

I've switched here. According to the above, it should be master to act
This is accessible http://master:9870 and http://slave1:9870
Through jps, you can see that the process number of NameNode in slave1 is 57946. Use kill -9 57946to kill the process. Check whether the NameNode can be switched normally. Enter address: http://slave1:9870
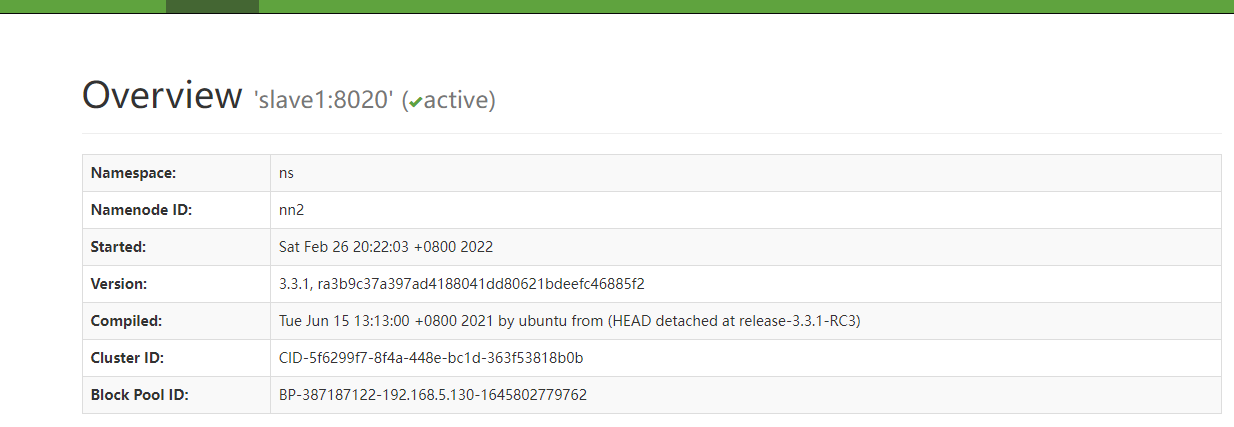
So far, the HDFS high availability configuration has been demonstrated. The next article is about the YARN high availability configuration.