Article source| Hengyuan cloud community
Original address| Geometric change
Original author | inster
1 image zoom
Zoom is to adjust the size of the image, even if the image is enlarged or reduced.
API
cv2.resize(src,dsize,fx=0,fy=0,interpolation=cv2.INTER_LINEAR)
Parameters:
- src: input image
- dsize: absolute size, which directly specifies the size of the adjusted image
- fx,fy: relative size, set dsize to None, and then set fx and fy as scale factors
- Interpolation: interpolation method

Example
import cv2 as cv
# 1. Read pictures
img1 = cv.imread("./image/dog.jpeg")
# 2. Image scaling
# 2.1 absolute dimensions
rows,cols = img1.shape[:2]
res = cv.resize(img1,(2*cols,2*rows),interpolation=cv.INTER_CUBIC)

# 2.2 relative dimensions
res1 = cv.resize(img1,None,fx=0.5,fy=0.5)

# 3 image display
# 3.1 using opencv to display images (not recommended)
cv.imshow("orignal",img1)
cv.imshow("enlarge",res)
cv.imshow("shrink)",res1)
cv.waitKey(0)

# 3.2 displaying images using matplotlib
fig,axes=plt.subplots(nrows=1,ncols=3,figsize=(10,8),dpi=100)
axes[0].imshow(res[:,:,::-1])
axes[0].set_title("Absolute scale (enlarged)")
axes[1].imshow(img1[:,:,::-1])
axes[1].set_title("Original drawing")
axes[2].imshow(res1[:,:,::-1])
axes[2].set_title("Relative scale (reduction)")
plt.show()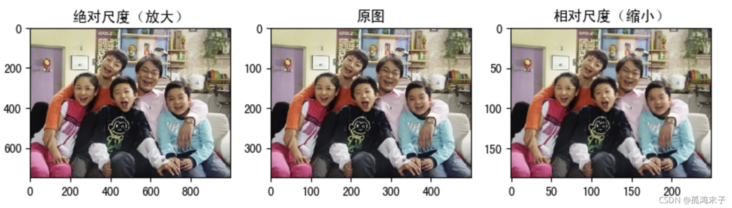
2 image translation
Image pan moves the image to the corresponding position according to the specified direction and distance.
API
cv.warpAffine(img,M,dsize)
Parameters:
- img: input image
- M: 2 * * 3 moving matrix
For the pixel at (x,y), move it to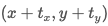 The M matrix shall be set as follows:

Note: set M to NP Numpy array of type float32.
- dsize: the size of the output image
Note: the size of the output image should be in the form of (width, height). Remember, width = number of columns, height = number of rows.
- Example
The requirement is to move (50100) the pixels of the image:
import numpy as np
import cv2 as cv
import matplotlib.pyplot as plt
# 1. Read image
img1 = cv.imread("./image/image2.jpg")

# 2. Image translation
rows,cols = img1.shape[:2]
M = M = np.float32([[1,0,100],[0,1,50]])# translation matrix
dst = cv.warpAffine(img1,M,(cols,rows))

# 3. Image display
fig,axes=plt.subplots(nrows=1,ncols=2,figsize=(10,8),dpi=100)
axes[0].imshow(img1[:,:,::-1])
axes[0].set_title("Original drawing")
axes[1].imshow(dst[:,:,::-1])
axes[1].set_title("Result after translation")
plt.show()
3 image rotation
Image rotation refers to the process that the image rotates a certain angle according to a certain position, and the image still maintains the original size during rotation. After image rotation, the horizontal symmetry axis, vertical symmetry axis and central coordinate origin of the image may be transformed, so the coordinates in image rotation need to be transformed accordingly.
How does the image rotate? As shown in the figure below:
Suppose the image rotates counterclockwise θ\ theta θ, According to the coordinate conversion, the rotation can be converted to:

Of which:
In the above formula, there are:

It can also be written as:

At the same time, we need to correct the position of the origin, because the coordinate origin in the original image is in the upper left corner of the image. After rotation, the size of the image will change, and the origin also needs to be corrected.
Assuming that the rotation center is taken as the coordinate origin during rotation, the coordinate origin needs to be moved to the upper left corner of the image after rotation, that is, a transformation needs to be performed.


In OpenCV, image rotation first obtains the rotation matrix according to the rotation angle and rotation center, and then transforms according to the rotation matrix to achieve the rotation effect of any angle and any center.
API
cv2.getRotationMatrix2D(center, angle, scale)
Parameters:
- Center: rotation center
- Angle: rotation angle
- Scale: scale
return:
M: Rotation matrix
Call cv Warpaffine completes the rotation of the image
Example:
import numpy as np
import cv2 as cv
import matplotlib.pyplot as plt
# 1 read image
img = cv.imread("./image/image2.jpg")

# 2 image rotation
rows,cols = img.shape[:2]
# 2.1 generate rotation matrix
M = cv.getRotationMatrix2D((cols/2,rows/2),90,1)
# 2.2 perform rotation transformation
dst = cv.warpAffine(img,M,(cols,rows))

# 3 image display
fig,axes=plt.subplots(nrows=1,ncols=2,figsize=(10,8),dpi=100)
axes[0].imshow(img1[:,:,::-1])
axes[0].set_title("Original drawing")
axes[1].imshow(dst[:,:,::-1])
axes[1].set_title("Results after rotation")
plt.show()
4 affine transformation
Affine transformation of image involves the change of shape, position and angle of image, which is a common function in deep learning preprocessing. Affine transformation is mainly a combination of image scaling, rotation, flipping and translation.
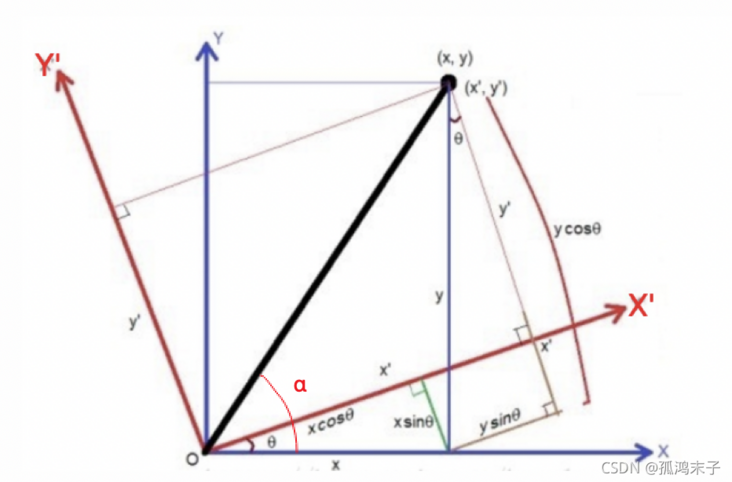
What is the affine transformation of the image? As shown in the figure below, points 1, 2 and 3 in Figure 1 are mapped one by one with the three points in Figure 2, and still form a triangle, but the shape has changed greatly. In this way, the affine transformation is obtained through two groups of three points (points of interest). Next, we can apply the affine transformation to all points in the image to complete the affine transformation of the image.
In OpenCV, the matrix of affine transformation is a 2 × Matrix of 3,

2 on the left × 2 submatrix A is a linear transformation matrix, 2 on the right × 1 submatrix B is the translation term:

For any position (x,y) on the image, the affine transformation performs the following operations:

It should be noted that for the image, the width direction is x and the height direction is y, and the order of coordinates is consistent with the corresponding subscript of image pixels. So the position of the origin is not the lower left corner, but the upper right corner, and the direction of Y is not up, but down.
In affine transformation, all parallel lines in the original image are also parallel in the resulting image. To create this matrix, we need to find three points from the original image and their positions in the output image. Then CV2 Geta ffi neTransform ffi will create a 2x3 matrix, and finally this matrix will be passed to the function ffi CV2 warpAffine.
Example
import numpy as np
import cv2 as cv
import matplotlib.pyplot as plt
# 1 image reading
img = cv.imread("./image/image2.jpg")

# 2 affine transformation
rows,cols = img.shape[:2]
# 2.1 create transformation matrix
pts1 = np.float32([[50,50],[200,50],[50,200]])
pts2 = np.float32([[100,100],[200,50],[100,250]])
M = cv.getAffineTransform(pts1,pts2)
# 2.2 complete affine transformation
dst = cv.warpAffine(img,M,(cols,rows))

# 3 image display
fig,axes=plt.subplots(nrows=1,ncols=2,figsize=(10,8),dpi=100)
axes[0].imshow(img[:,:,::-1])
axes[0].set_title("Original drawing")
axes[1].imshow(dst[:,:,::-1])
axes[1].set_title("Affine result")
plt.show()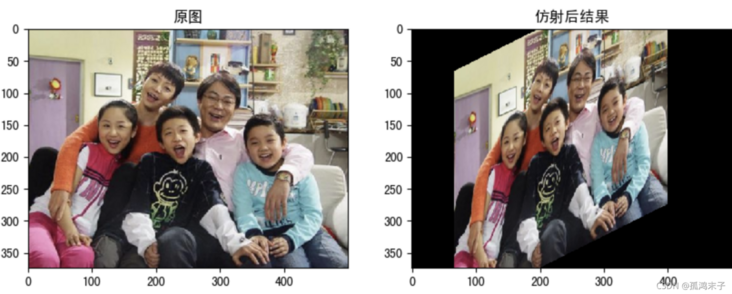
5 transmission transformation
Transmission transformation is the result of the change of viewing angle. It refers to the transformation that uses the condition that the perspective center, image point and target point are collinear, rotates the background surface (perspective surface) around the trace (perspective axis) by a certain angle according to the perspective rotation law, destroys the original projection beam, and can still keep the projection geometry on the background surface unchanged.
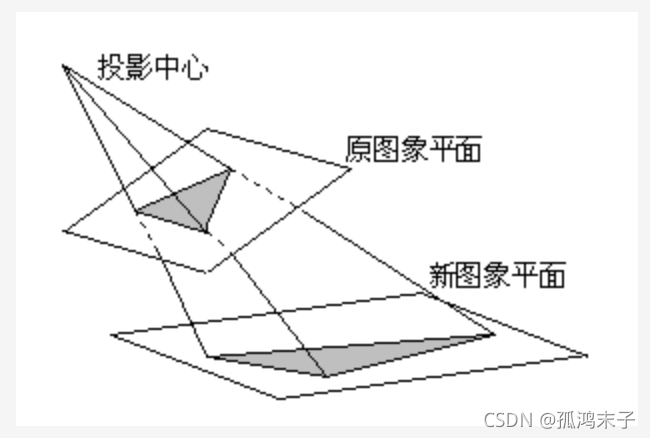
Its essence is to project the image onto a new view plane, and its general transformation formula is:

Where, (u,v) is the original image pixel coordinate, w is 1, (x=x '/ z', y=y '/ z') is the result of transmission transformation. The latter matrix is called perspective transformation matrix. Generally, we divide it into three parts:
Where: T1 represents linear transformation of the image, T2 represents translation of the image, T3 represents projection transformation of the image, Generally set to 1
In opencv, we need to find four points, of which any three are not collinear, and then obtain the transformation matrix T, and then carry out the transmission transformation. Through the function cv Getperspectivetransform finds the transformation matrix and CV The warpperspective is applied to this 3x3 transformation matrix.
Example
import numpy as np
import cv2 as cv
import matplotlib.pyplot as plt
# 1 read image
img = cv.imread("./image/image2.jpg")
# 2 transmission transformation
rows,cols = img.shape[:2]
# 2.1 create transformation matrix
pts1 = np.float32([[56,65],[368,52],[28,387],[389,390]])
pts2 = np.float32([[100,145],[300,100],[80,290],[310,300]])

T = cv.getPerspectiveTransform(pts1,pts2)
# 2.2 transformation
dst = cv.warpPerspective(img,T,(cols,rows))

# 3 image display
fig,axes=plt.subplots(nrows=1,ncols=2,figsize=(10,8),dpi=100)
axes[0].imshow(img[:,:,::-1])
axes[0].set_title("Original drawing")
axes[1].imshow(dst[:,:,::-1])
axes[1].set_title("Post transmission results")
plt.show()
6 image pyramid
Image pyramid is a kind of multi-scale representation of image. It is mainly used for image segmentation. It is an effective but simple structure to interpret image with multi-resolution.
Image pyramid is used for machine vision and image compression. The pyramid of an image is a series of images arranged in the shape of a pyramid, with gradually reduced resolution and derived from the same original image. It is obtained by step down sampling, and the sampling is not stopped until a certain termination condition is reached.
The bottom of the pyramid is a high-resolution representation of the image to be processed, while the top is a low-resolution approximation. The higher the level, the smaller the image and the lower the resolution.

API
cv.pyrUp(img)       #Up sampling the image
cv.pyrDown(img)        #Down sampling the image
Example
import numpy as np
import cv2 as cv
import matplotlib.pyplot as plt
# 1 image reading
img = cv.imread("./image/image2.jpg")
# 2 image sampling
up_img = cv.pyrUp(img)  # Up sampling operation
img_1 = cv.pyrDown(img)  # Down sampling operation
# 3 image display
cv.imshow('enlarge', up_img)
cv.imshow('original', img)
cv.imshow('shrink', img_1)
cv.waitKey(0)
cv.destroyAllWindows()