1. MongDB startup and shutdown
1.1. Command line startup
./mongod --fork --dbpath=/opt/mongodb/data ----logpath=/opt/mongodb/log/mongodb.log
1.2. Configuration file startup
./mongod -f mongodb.cfg
mongoDB Basic configuration/opt/mongodb/mongodb.cfg
dbpath=/opt/mongodb/data
logpath=/opt/mongodb/logs/mongodb.log
logappend=true
fork=true
bind_ip=192.168.209.128
port=27017
Environment variable configuration
export PATH=/opt/mongodb/bin:$PATH
2. MongoDB master-slave setup
Mongodb can be built in three ways: master slave / replica set / sharding. The following is the simplest cluster construction, but it can not be regarded as a cluster. It can only be said to be active and standby. And the official has not recommended this method, so here is just a brief introduction. The construction method is also relatively simple. Host configuration / opt / mongodb / master slave / Master / mongodb cfg
dbpath=/opt/mongodb/master-slave/master/data
logpath=/opt/mongodb/master-slave/master/logs/mongodb.log
logappend=true
fork=true
bind_ip=192.168.209.128
port=27001
master=true
source=192.168.209.128:27002
Slave configuration / opt / mongodb / master slave / slave / mongodb cfg
dbpath=/opt/mongodb/master-slave/slave/data
logpath=/opt/mongodb/master-slave/slave/logs/mongodb.log
logappend=true
fork=true
bind_ip=192.168.209.128
port=27002
slave=true
source=192.168.209.128:27001
Start service
cd /opt/mongodb/master-slave/master/
mongod --config mongodb.cfg #Master node
cd /opt/mongodb/master-slave/slave/
mongod --config mongodb.cfg #Slave node
Connection test
#The client connects to the master node
mongo  --host 192.168.209.128 --port 27001
#Client slave node
mongo  --host 192.168.209.128 --port 27002
Basically, as long as these two commands are executed on the primary node and the standby node respectively, the master slave is built. I haven't tried whether the backup node can become the primary node if the primary node is hung up, but since it is not recommended, there is no need to use it.
3. MongoDB replica set
Chinese translation is called copy set, but I don't like translating English into Chinese. It's always strange. In fact, simply put, the cluster contains multiple copies of data to ensure that the primary node hangs up and the standby node can continue to provide data services. The premise of providing data is that the data needs to be consistent with the primary node. As shown below:
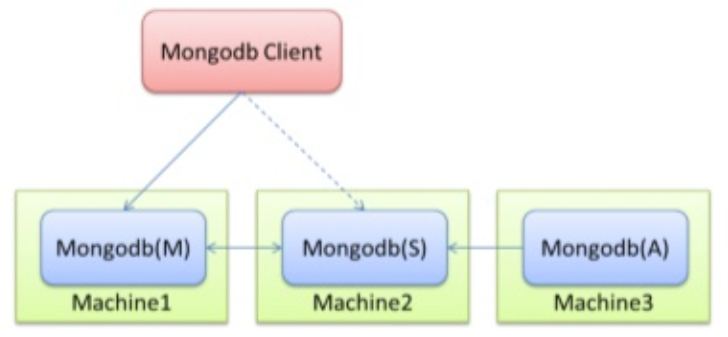
Mongodb(M) represents the primary node, Mongodb(S) represents the standby node, and Mongodb(A) represents the arbitration node. The primary and standby nodes store data, and the arbitration node does not store data. The client connects the primary node and the standby node at the same time, and does not connect the arbitration node.
By default, the primary node provides all addition, deletion, query and modification services, and the standby node does not provide any services. However, the standby node can be set to provide query service, which can reduce the pressure on the primary node. When the client queries data, the request will be automatically transferred to the standby node. This setting is called Read Preference Modes. At the same time, the Java client provides a simple configuration method, so you don't have to operate the database directly.
The arbitration node is a special node. It does not store data itself. Its main function is to determine which standby node is promoted to the primary node after the primary node is hung. Therefore, the client does not need to connect to this node. Although there is only one standby node, an arbitration node is still needed to improve the standby node level. At first, I didn't believe that there must be an arbitration node, but I also tried that if there is no arbitration node, the primary node is connected to the standby node or the standby node, so we still need it.
After introducing the cluster scheme, you can start to build it now.
3.1. Create data folder
Generally, the data directory will not be established in the decompression directory of mongodb, but for convenience here, it will be established in the decompression directory of mongodb.
#The three directories correspond to the primary, standby and arbitration nodes respectively
mkdir -p /opt/mongodb/replset/master
mkdir -p /opt/mongodb/replset/slaver
mkdir -p /opt/mongodb/replset/arbiter
3.2. Create profile
Because there are many configurations, we write the configuration to the file.
vi /opt/mongodb/replset/master/mongodb.cfg
dbpath=/opt/mongodb/replset/master/data
logpath=/opt/mongodb/replset/master/logs/mongodb.log
logappend=true
replSet=shard002
bind_ip=192.168.209.128
port=27017
fork=true
vi /opt/mongodb/replset/slave/mongodb.cfg
dbpath=/opt/mongodb/replset/slave/data
logpath=/opt/mongodb/replset/slave/logs/mongodb.log
logappend=true
replSet=shard002
bind_ip=192.168.209.129
port=27017
fork=true
vi /opt/mongodb/replset/arbiter/mongodb.cfg
dbpath=/opt/mongodb/replset/arbiter/data
logpath=/opt/mongodb/replset/arbiter/logs/mongodb.log
logappend=true
replSet=shard002
bind_ip=192.168.209.130
port=27017
fork=true
Parameter interpretation:
dbpath: data storage directory
logpath: log storage path
logappend: log by appending
replSet: the name of the replica set
bind_ip: the ip address bound by mongodb
Port: the port number used by mongodb process. The default is 27017
fork: running process in background mode
3.3. Distribute to other machines under the cluster
#Send the slave node configuration to 192.168.209.129
scp -r /opt/mongodb/replset/slave root@192.168.209.129:/opt/mongodb/replset
#Send the arbitration node configuration to 192.168.209.130
scp -r /opt/mongodb/replset/arbiter root@192.168.209.130:/opt/mongodb/replset
3.4. Start mongodb
Enter the bin directory of each mongodb node
#Log in to 192.168.209.128 and start the master node
monood -f /opt/mongodb/replset/master/mongodb.cfg
#Log in to 192.168.209.129 to start the slave node
mongod -f /opt/mongodb/replset/slave/mongodb.cfg
#Log in to 192.168.209.130 to start the arbitration node
mongod -f /opt/mongodb/replset/arbiter/mongodb.cfg
Note that the path of the configuration file must be correct, either relative or absolute.
3.5. Configure primary, standby and arbitration nodes
You can connect to mongodb through the client, or you can directly select one of the three nodes to connect to mongodb.
#ip and port are the addresses of a node
mongo 192.168.209.128:27017
use admin
cfg={_id:"shard002",members:[{_id:0,host:'192.168.209.128:27017',priority:9},{_id:1,host:'192.168.209.129:27017',priority:1},{_id:2,host:'192.168.209.130:27017',arbiterOnly:true}]};
#Make configuration effective
rs.initiate(cfg)
Note: cfg is equivalent to setting a variable. It can be any name. Of course, it's best not to use the mongodb keyword. conf and config can be used. Outermost_ id indicates the name of replica set. members contains the addresses and priorities of all nodes. The primary node with the highest priority is 192.168.209.128:27017. In particular, for the arbitration node, you need to have a special configuration - arbiterOnly:true. This must not be less, otherwise the active and standby mode will not take effect.
The effective time of configuration varies according to different machine configurations. If the configuration is good, it can take more than ten seconds. Some configurations take one or two minutes. If it takes effect, execute the rs.status() command and you will see the following information:
{
            "set" : "testrs",
            "date" : ISODate("2013-01-05T02:44:43Z"),
            "myState" : 1,
            "members" : [
                    {
                            "_id" : 0,
                            "name" : "192.168.209.128:27004",
                            "health" : 1,
                            "state" : 1,
                            "stateStr" : "PRIMARY",
                            "uptime" : 200,
                            "optime" : Timestamp(1357285565000, 1),
                            "optimeDate" : ISODate("2017-12-22T07:46:05Z"),
                            "self" : true
                    },
                    {
                            "_id" : 1,
                            "name" : "192.168.209.128:27003",
                            "health" : 1,
                            "state" : 2,
                            "stateStr" : "SECONDARY",
                            "uptime" : 200,
                            "optime" : Timestamp(1357285565000, 1),
                            "optimeDate" : ISODate("2017-12-22T07:46:05Z"),
                            "lastHeartbeat" : ISODate("2017-12-22T02:44:42Z"),
                            "pingMs" : 0
                    },
                    {
                            "_id" : 2,
                            "name" : "192.168.209.128:27005",
                            "health" : 1,
                            "state" : 7,
                            "stateStr" : "ARBITER",
                            "uptime" : 200,
                            "lastHeartbeat" : ISODate("2017-12-22T02:44:42Z"),
                            "pingMs" : 0
                    }
            ],
            "ok" : 1
    }
If the configuration is in effect, it will contain the following information:
"stateStr" : "STARTUP"
At the same time, you can view the log of the corresponding node and find that it is waiting for other nodes to take effect or allocating data files.
Now we have basically completed all the construction of the cluster. As for the testing work, we can leave it to you to try. One is to insert data into the primary node, so that the previously inserted data can be found from the standby node (you may encounter some problems when querying the standby node, and you can check it online). Second, stop the primary node, and the standby node can become the primary node to provide services. Third, restore the primary node, and the standby node can also restore its standby role, rather than continue to play the primary role. Both two and three can pass rs.status()Command to view the changes of the cluster in real time.
4. MongoDB data slicing
Similar to Replica Set, a quorum node is required, but Sharding also needs to configure nodes and routing nodes. This is the most complex of the three cluster building methods.
4.1. Configure data nodes
mkdir -p /opt/mongodb/shard/replset/replica1/data
mkdir -p /opt/mongodb/shard/replset/replica1/logs
mkdir -p /opt/mongodb/shard/replset/replica2/data
mkdir -p /opt/mongodb/shard/replset/replica2/logs
mkdir -p /opt/mongodb/shard/replset/replica3/data
mkdir -p /opt/mongodb/shard/replset/replica3/logs
vi /opt/mongodb/shard/replset/replica1/mongodb.cfg
dbpath=/opt/mongodb/shard/replset/replica1/data
logpath=/opt/mongodb/shard/replset/replica1/logs/mongodb.log
logappend=true
fork=true
bind_ip=192.168.209.128
port=27001
replSet=shard001
shardsvr=true
vi /opt/mongodb/shard/replset/replica2/mongodb.cfg
dbpath=/opt/mongodb/shard/replset/replica2/data
logpath=/opt/mongodb/shard/replset/replica2/logs/mongodb.log
logappend=true
fork=true
bind_ip=192.168.209.128
port=27002
replSet=shard001
shardsvr=true
vi /opt/mongodb/shard/replset/replica3/mongodb.cfg
dbpath=/opt/mongodb/shard/replset/replica3/data
logpath=/opt/mongodb/shard/replset/replica3/logs/mongodb.log
logappend=true
fork=true
bind_ip=192.168.209.128
port=27003
replSet=shard001
shardsvr=true
4.2. Start data node
mongod -f /opt/mongodb/shard/replset/replica1/mongodb.cfg #192.168.209.128:27001
mongod -f /opt/mongodb/shard/replset/replica2/mongodb.cfg #192.168.209.128:27002
mongod -f /opt/mongodb/shard/replset/replica3/mongodb.cfg #192.168.209.128:27003
4.3. Make the data node cluster effective
mongo 192.168.209.128:27001   #ip and port are the addresses of a node
cfg={_id:"shard001",members:[{_id:0,host:'192.168.209.128:27001'},{_id:1,host:'192.168.209.128:27002'},{_id:2,host:'192.168.209.128:27003'}]};
rs.initiate(cfg)  #Make configuration effective
4.4. Configure configsvr
mkdir -p /opt/mongodb/shard/configsvr/config1/data
mkdir -p /opt/mongodb/shard/configsvr/config1/logs
mkdir -p /opt/mongodb/shard/configsvr/config2/data
mkdir -p /opt/mongodb/shard/configsvr/config2/logs
mkdir -p /opt/mongodb/shard/configsvr/config3/data
mkdir -p /opt/mongodb/shard/configsvr/config3/logs
/opt/mongodb/shard/configsvr/config1/mongodb.cfg
dbpath=/opt/mongodb/shard/configsvr/config1/data
configsvr=true
port=28001
fork=true
logpath=/opt/mongodb/shard/configsvr/config1/logs/mongodb.log
replSet=configrs
logappend=true
bind_ip=192.168.209.128
/opt/mongodb/shard/configsvr/config2/mongodb.cfg
dbpath=/opt/mongodb/shard/configsvr/config2/data
configsvr=true
port=28002
fork=true
logpath=/opt/mongodb/shard/configsvr/config2/logs/mongodb.log
replSet=configrs
logappend=true
bind_ip=192.168.209.128
/opt/mongodb/shard/configsvr/config3/mongodb.cfg
dbpath=/opt/mongodb/shard/configsvr/config3/data
configsvr=true
port=28003
fork=true
logpath=/opt/mongodb/shard/configsvr/config3/logs/mongodb.log
replSet=configrs
logappend=true
bind_ip=192.168.209.128
4.5. Start the configsvr node
mongod -f /opt/mongodb/shard/configsvr/config1/mongodb.cfg #192.168.209.128:28001
mongod -f /opt/mongodb/shard/configsvr/config2/mongodb.cfg #192.168.209.128:28002
mongod -f /opt/mongodb/shard/configsvr/config3/mongodb.cfg #192.168.209.128:28003
4.6. Make configsvr node cluster effective
mongo 192.168.209.128:28001   #ip and port are the addresses of a node
use admin  #Switch to admin first
cfg={_id:"configrs",members:[{_id:0,host:'192.168.209.128:28001'},{_id:1,host:'192.168.209.128:28002'},{_id:2,host:'192.168.209.128:28003'}]};
rs.initiate(cfg)  #Make configuration effective
Configure routing nodes
mkdir -p /opt/mongodb/shard/routesvr/logs
#Note: the routing node does not have a data folder
vi /opt/mongodb/shard/routesvr/mongodb.cfg
configdb=configrs/192.168.209.128:28001,192.168.209.128:28002,192.168.209.128:28003
port=30000
fork=true
logpath=/opt/mongodb/shard/routesvr/logs/mongodb.log
logappend=true
bind_ip=192.168.209.128
4.7. Start routing node
./mongos -f /opt/mongodb/shard/routesvr/mongodb.cfg #192.168.209.128:30000
Here, we do not use the configuration file to start, and the meaning of the parameters should be understood by everyone. Generally speaking, a data node corresponds to a configuration node, and the arbitration node does not need a corresponding configuration node. Note: when starting the routing node, write the configuration node address into the startup command.
4.8. Configure Replica Set
It may be a little strange here why Sharding needs to configure Replica Set. In fact, you can also understand that the data of multiple nodes must be associated. If there is no Replica Set, how can you identify the same cluster. This is also the rule of mongodb. Let's abide by it. The configuration method is the same as before. Set a cfg and then initialize the configuration.
4.9. Configuring Sharding
mongo 192.168.209.128:30000   #The routing node must be connected here
sh.addShard("shard001/192.168.209.128:27001");
sh.addShard("shard002/192.168.209.128:27017");
 #shard001 and shard002 represent the name of replica set. After adding the primary node to the shard, the primary, standby and decision nodes in the set will be found automatically
use testdb
sh.enableSharding("testdb")    #testdb is database name
sh.shardCollection("testdb.testcon",{"name":"hashed"})
db.collection.status()
The first command is easy to understand. The second command is to configure the database that needs Sharding. The third command is to configure the Collection that needs Sharding. testcon here is the name of the Collection. There is also a key, which is a key thing and will have a great impact on query efficiency.
Come here Sharding It has also been built. The above is only the simplest way. Some configurations still use the default configuration. Improper settings will lead to abnormally low efficiency, so it is recommended that you look at the official documents and modify the default configuration.

The above three cluster construction methods are preferred Replica Set,Only really big data, Sharding To show its power, after all, it takes time for the standby node to synchronize data. Sharding You can concentrate multiple pieces of data on the routing node for some comparison, and then return the data to the client, but the efficiency is still relatively low.
I have tested it myself, but I don't remember the specific machine configuration. The ips of Replica Set can basically reach about 1000 when the data reaches 1400W, while Sharding has dropped to 500 IPS at 300W. The unit data size of both is about 10kb. We still do more performance tests when applying. After all, unlike Redis, there is a benchmark.
Pay attention to WeChat official account Tom structure and reply to "MongoDB" to get supporting information.
This article is the original of "Tom bomb architecture". Please indicate the source for reprint. Technology lies in sharing, I share my happiness! If you have any suggestions, you can also leave comments or private letters. Your support is the driving force for me to adhere to my creation. Focus on WeChat official account Tom structure, get more dry cargo!
It's not easy to be original. It's cool to insist. I've seen it here. Little partners remember to like, collect and watch it. Pay attention to it three times a button! If you think the content is too dry, you can share and forward it to your friends!