1, Hive installation
1. First, use xftp to transfer apache-hive-3.1.2-bin.tar.gz to the virtual machine, unzip it to / usr/local and change the file permissions.
sudo tar -zxvf ./apache-hive-3.1.2-bin.tar.gz -C /usr/local   # Unzip into / usr/local
cd /usr/local/
sudo mv apache-hive-3.1.2-bin hive       # Change the folder name to hive
sudo chown -R hadoop:hadoop hive         # Modify file permissions, where hadoop:hadoop is filled in according to the actual user group
2. Configure environment variables
vim ~/.bashrc
Add the following
export HIVE_HOME=/usr/local/hive
export PATH=$PATH:$HIVE_HOME/bin
export HADOOP_HOME=/usr/local/hadoop
Save exit enter the following code to make the environment variable take effect immediately
source ~/.bashrc
3. Modify the hive-site.xml file under / usr/local/hive/conf
Execute the following command:
cd /usr/local/hive/conf
mv hive-default.xml.template hive-default.xml
Create a new configuration file hive-site.xml with vim editor. The command is as follows:
cd /usr/local/hive/conf
vim hive-site.xml
Add the following fields to the xml file
<configuration>
  <property>
    <name>javax.jdo.option.ConnectionURL</name>
    <value>jdbc:mysql://localhost:3306/hive?createDatabaseIfNotExist=true</value>
    <description>JDBC connect string for a JDBC metastore</description>
  </property>
  <property>
    <name>javax.jdo.option.ConnectionDriverName</name>
    <value>com.mysql.jdbc.Driver</value>
    <description>Driver class name for a JDBC metastore</description>
  </property>
  <property>
    <name>javax.jdo.option.ConnectionUserName</name>
    <value>hive</value>
    <description>username to use against metastore database</description>
  </property>
  <property>
    <name>javax.jdo.option.ConnectionPassword</name>
    <value>hive</value>
    <description>password to use against metastore database</description>
  </property>
</configuration>
Save and exit.
2, MySql installation
1. First, delete the original mysql and enter the following code to view the sql version
yum list installed | grep mysql

You can see the version number and remove it according to the version number
yum -y remove mysql-libs.x86_64
After deletion, you can see complete!
2. Because the domestic network is gfw limited, you need to replace the yum source to download and install mysql. Here is the method to replace the yum source.
vi /etc/yum.repos.d/CentOS-Base.repo
Replace the original with the following
[base]
name=CentOS-6.10 - Base - mirrors.aliyun.com
failovermethod=priority
baseurl=http://mirrors.aliyun.com/centos-vault/6.10/os/$basearch/
gpgcheck=1
gpgkey=http://mirrors.aliyun.com/centos-vault/RPM-GPG-KEY-CentOS-6

#released updates
[updates]
name=CentOS-6.10 - Updates - mirrors.aliyun.com
failovermethod=priority
baseurl=http://mirrors.aliyun.com/centos-vault/6.10/updates/$basearch/
gpgcheck=1
gpgkey=http://mirrors.aliyun.com/centos-vault/RPM-GPG-KEY-CentOS-6

#additional packages that may be useful
[extras]
name=CentOS-6.10 - Extras - mirrors.aliyun.com
failovermethod=priority
baseurl=http://mirrors.aliyun.com/centos-vault/6.10/extras/$basearch/
gpgcheck=1
gpgkey=http://mirrors.aliyun.com/centos-vault/RPM-GPG-KEY-CentOS-6

#additional packages that extend functionality of existing packages
[centosplus]
name=CentOS-6.10 - Plus - mirrors.aliyun.com
failovermethod=priority
baseurl=http://mirrors.aliyun.com/centos-vault/6.10/centosplus/$basearch/
gpgcheck=1
enabled=0
gpgkey=http://mirrors.aliyun.com/centos-vault/RPM-GPG-KEY-CentOS-6

#contrib - packages by Centos Users
[contrib]
name=CentOS-6.10 - Contrib - mirrors.aliyun.com
failovermethod=priority
baseurl=http://mirrors.aliyun.com/centos-vault/6.10/contrib/$basearch/
gpgcheck=1
enabled=0
gpgkey=http://mirrors.aliyun.com/centos-vault/RPM-GPG-KEY-CentOS-6
Save exit
yum clean all
yum makecache
The operation results are as follows

3. Run the following code to install the source code
wget http://repo.mysql.com/mysql-community-release-el7-5.noarch.rpm
sudo rpm -ivh mysql-community-release-el7-5.noarch.rpm
If the second command reports an error, you can add -- force --nodeps to enforce it

The results are as follows.
4. Install mysql
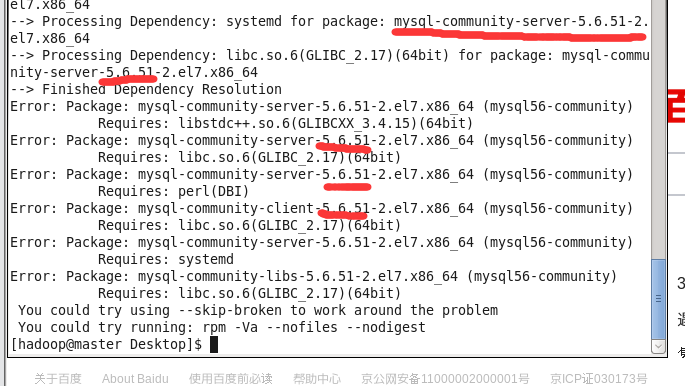
sudo yum install mysql-server
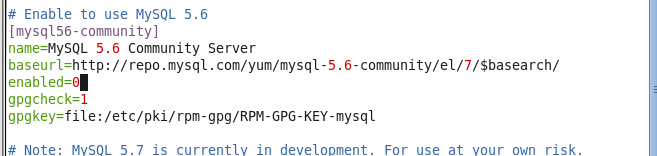
If there is an error in the figure below, remember the version number (marked in the figure) and enter the following code
vi /etc/yum.repos.d/mysql-community.repo
Under the corresponding version number Change enabled=1 to enabled=0 and re execute the above code.
Enter y according to the prompt to start the installation. After the installation is successful, complete will be displayed!
5. Start and open the mysql shell
service mysqld start #service mysql start
mysql -u root -p  #Login shell interface
6.mysql has no password by default. Just enter. Create a new hive database and configure mysql to allow hive access. The code is as follows:
mysql> create database hive;
mysql> grant all on *.* to hive@localhost identified by 'hive';
mysql> flush privileges;
Back to hadoop, the user starts hdfs and hive
start-dfs.sh
hive
Note: when hive is started, the following error NoSuchMethodError will be reported with high probability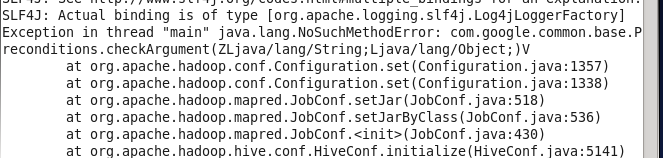
At this time, open the / share/hadoop/common/lib path under the hadoop folder and the / lib path under the hive folder respectively, enter the command ll to check whether the version number of guava.jar is consistent. If not, delete the lower version, copy the higher version and restart hive.