Summer vacation summary
During the summer vacation, I mainly write a small program project and modify another small program. The following mainly introduces the project experience and technology
Start of SC project
- Step 1: get the project and write the development documents first, mainly to design the database (designing the database is the key!!)
- Step 2: first establish the user database, judge whether the user is a new user or an old user (ensure one piece of data for each user), and then keep the user data locally.
- Step 3: you can start writing pages
SC project experience
tips:
- The project is developed using a small program cloud for users to register the company. The function is to add one to another. My database is not well designed and a little messy. It also reminds you that after planning the functions, the data of similar sections can be put into a table. For example, in the two sections of site leasing and site attachment, when we do, after the user selects a site, we will collect the user's name, contact number, micro signal and other information. At this time, the data collected in the two pages can be put into a table, but add a parameter to distinguish, so that the administrator can know which section our user submits information.
- If the bottom is multiple, the same words can be extracted into a separate component, then the bottom sub component is imported from the parent component and the information is transmitted. After the trigger button in the child component is invoked, a method can be invoked in the parent component.
- The background database is connected to CMS content manager, and you can add, delete, modify and query the database.
SC project technical summary
1. The function should be as simple as possible. Call other functions in the main function uploadID. Other functions use promise to return the value, and then execute the next function (similar to the following)
  	async uploadID(e) {
  	const upLoadImg = await this.chooseImage()
    const resId = upLoadImg.fileID
    const getUrlByIdinfo = await this.getUrlById(resId)
    }
      chooseImage() {
    return new Promise((resolve, reject) => {
      wx.chooseImage({
        count: 1,
        sizeType: ['original', 'compressed'],
        sourceType: ['album', 'camera'],
      }).then(res => {
        resolve(res)
      }).catch(err => {
        console.log(err)
        resolve(err)
      })
    })
  },
2. Establishment of CMS data
- Rotation chart, etc. (click to jump to the page): add a picture path when designing the CMS model. Click on the applet page to get the path and jump to the relevant page. You can choose to jump to applet or jump to H5 page. At this time, judge which type to jump to and do the corresponding processing.
- The enumeration type is the same as the template applicable to the database, but the types are different. For example, site leasing and site attachment. The collected data format is the same, but there are two sections.
Jump to H5 page
The url is passed from the previous page that needs to jump
//Main page, transfer parameters to h5 page
   wx.navigateTo({
      url: '../H5Page/H5Page?url=' + url
    })


//h5 page
<web-view src="{{url}}"></web-view>
A similar method can use a function
Similar methods can be handled with a function. Add data xxx = "1" in the xwml page to judge and distinguish according to different xxx values, such as the following page Jump
//xwml
        <view class="item" bindtap="pushTo" data-push="register">
          <view class="title">A</view>
        </view>

        <view class="item" bindtap="pushTo" data-push="agency">
          <view class="title">B</view>
        </view>
//js, jump to different pages according to different push values passed
  async pushTo(e) {
    const push = e.currentTarget.dataset.push
    wx.navigateTo({
      url: '../' + push + '/' + push,
    })
  },
payment
The payment section needs to open a merchant number. Other blogs have detailed introduction, which will not be introduced here
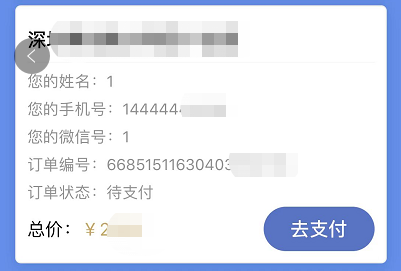
One of the order templates (each order should have at least an order number and order status)
Order No.: randomly generate orders with user-defined digits when submitting orders (methods are not listed here, you can find them online)
Order status: generally divided into unpaid and paid, which is best expressed in English
//Function triggered after clicking payment (js)
  /**
   * Payment click monitoring
   */
  async payTap(e) {
    wx.showLoading()
    const payEvent = {
      type: 'pay',
      body: 'test',
      totalFee: Order price,
      orderTradeNo:Order No,
    }
    const paymentObj = await callCloudFun('wxPay', payEvent)//Cloud function
    const payment = paymentObj.data.result.payment//Put the value returned by the cloud function into the following function
    const payResult = await this.wxPayRequest(payment)
    console.log(payResult,'Payment return function')
    wx.hideLoading()
  },
  /** Payment operation
   * @param {object} payment Parameter object required for payment
   */
   wxPayRequest(payment,siteRorderTradeNo) {
    const _this=this
    return new Promise((resolve, reject) => {
      wx.requestPayment({
          ...payment,
          success(res){
            _this.updataOrder(siteRorderTradeNo)
            resolve({status: true, data: res})
          },
          fail(err){
            resolve({status: false, data: err})
          }
        })
    })
  },
wxpay cloud function
// Cloud function entry file
const cloud = require('wx-server-sdk')
cloud.init({
  env: cloud.DYNAMIC_CURRENT_ENV
})
/**
 *
 * @param {string} event.body Product description
 * @param {number} event.totalFee Payment amount
 */
exports.main = async (event) => {
  const res = await cloud.cloudPay.unifiedOrder({
    "body" : event.body, //Product description
    "outTradeNo" :event.orderTradeNo, // Merchant order number
    "tradeType": "JSAPI", // Transaction type
    "subMchId" : "xxxxx", // Merchant number
    "totalFee" : event.totalFee,
    "envId": "xxxx",
    "functionName": "getOrderInfo", // The transaction application calls back to the cloud function, where you can modify the order payment status
    "spbillCreateIp": "123.12.12.123"
  })
  return res
}
Subsidy section (realizing file preview function)
This section uploads the file on CMS, and then saves it locally after the database gets the link to the file
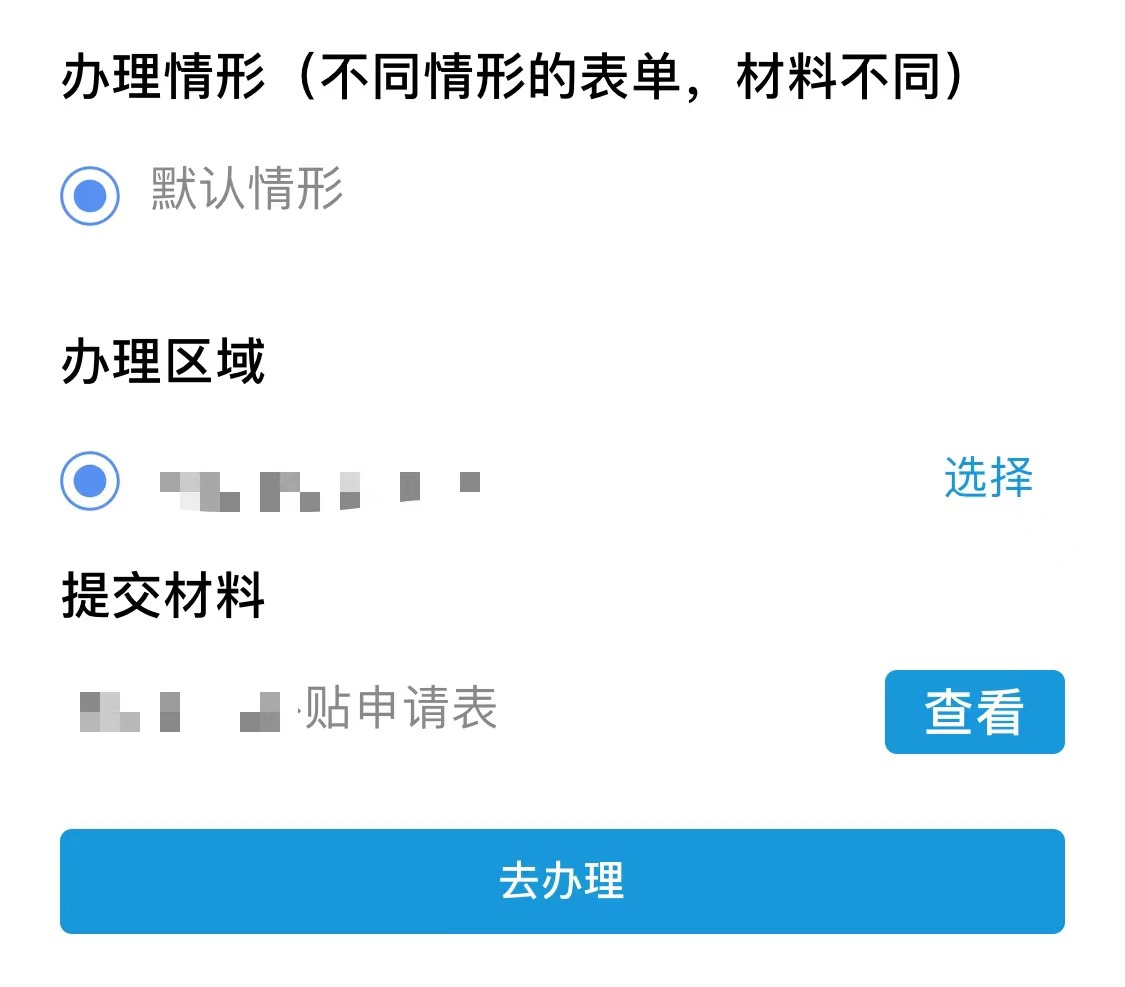
After getting the file link fileUrl of the database, transfer the fileUrl to the toUploadFile function
  async toUploadFile(fileUrl) {
    wx.downloadFile({
      url: fileUrl,
      success(res) {
        // console.log(res)
        //Save to local
        wx.saveFile({
          tempFilePath: res.tempFilePath,
          success: function (res) {
            const savedFilePath = res.savedFilePath;
            // Open file
            wx.openDocument({
              filePath: savedFilePath,
              success: function (res) {
                console.log('The document was opened successfully')
              },
            });
          },
          fail: function (err) {
            console.log('Save failed:', err)
          }
        });
      }
    })
  },
Subscription notification
arrive earlier than Manually configure the acquisition template on the wechat public platform , choose the template that suits you
Because the SC applet wants to notify the administrator after the user submits the order. However, the subscription cannot be sent indefinitely. You need to increase the number of subscriptions yourself.
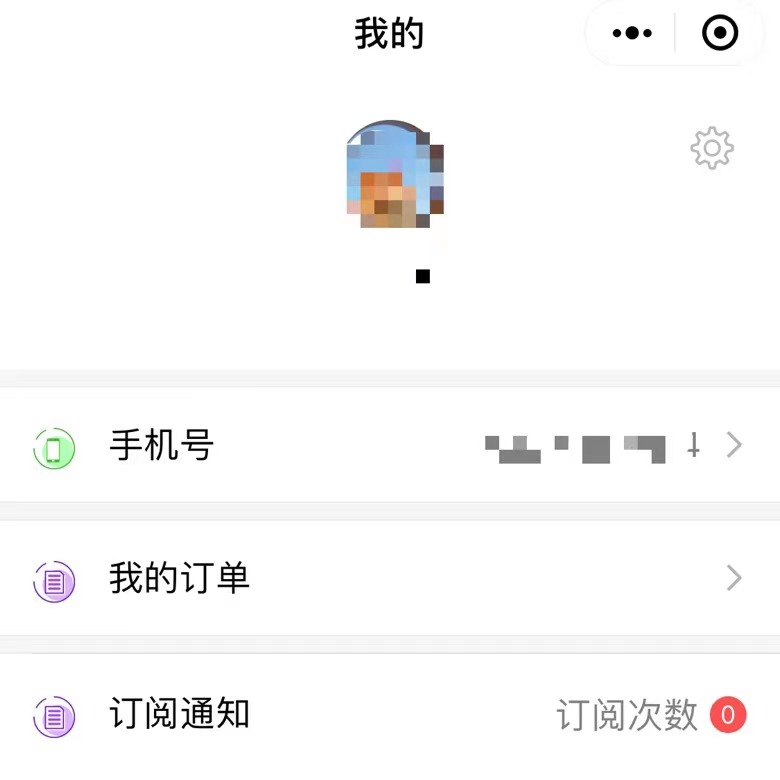
My idea is to save the user information in the database user table (user) when the user first accesses and agrees to the program to obtain his wechat nickname and avatar, add an administrator identity (default admin: false), and add the number of subscriptions (default subNum: 0). The administrator can change the user administrator identity (admin: true) in the background, Only when you open the "my" page of the applet can you see the line of subscription notification, which cannot be seen by non administrators.
Administrators can add subscriptions by clicking subscriptions.
The number of subscriptions to the administrator in the database (user) table is + 1, which can be used at this time Atomic operation,
const _ = db.command
db.collection('user').doc('xxx').update({
  data: {
    subNum: _.inc(1)
  }
})
After sending a message to all administrators (admin: true) in the cloud function, the number of subscriptions to all administrators found is - 1 (also using atomic operation. inc(-1))