Home host running cloud native family bucket KuberSphere 3.1
1.1 project overview
This article records my personal use of the home host, which is as close to the configuration of the production environment as possible in the Intranet environment, and completes the construction of the KubeSphere experimental environment of the k8s platform.
1.2 host configuration
The experiment adopts a single host configuration. The host is installed with Proxmox operating system as the virtualization platform. The host configuration is as follows:
| Hardware | to configure | Total capacity |
|---|---|---|
| Processor (s) | AMD Ryzen 7 3700X | 8-core 16 thread |
| Memory | Pirate ship 32GB *4 | 128 GB |
| a main board | Huaqing B450 steel large Edition | |
| NVME | HP SSD EX920 M2 | 1TB |
| SATA SSD | Guangweiyi Pro 1T *4 | 4 TB |
| SATA SSD(ZFS Cache) | Intel SSD 1T *2 | 2 TB |
| network card | Onboard | 1G |
Among them, guangweiyi Pro SSD forms ZFS Pool, and Intel SSD forms ZFS Pool Cache. Originally, there was an obsolete 10 Gigabit network card in the computer room. Unfortunately, the motherboard inserted a graphics card, and the second PCI-E slot could not be recognized anyway, so we had to give up.
1.3 virtual machine planning
According to my many experiments and experience summary, if Kubernetes is installed according to the requirements of production high availability, the virtual machine planning has the following types, which are sorted according to the resource occupation:

- All in one package: it is implemented on only one host, and there is only one ETCD, Kube master node and Worker node, which are located on the same host.
- Beggar package: ETCD and Kube master are located on a single node, and three Worker nodes are located on three different hosts.
- Entry package: ETCD, Kube master and Worker are located on the same node, with a total of 3 sets.
- Production preparation package: ETCD and Kube master are located on the same node, three nodes each, and three Worker nodes are located on three different hosts.
- Super luxury package: ETCD components are separated from Kube master and deployed on different hosts.
ETCD requires very high network throughput and disk IO. On the premise of not tuning ETCD, single ETCD needs to be deployed on solid state disk;
At the same time, when ETCD forms a cluster, it is required not only to deploy ETCD on solid-state disk, but also to have a network of at least 10 Gigabit. Otherwise, it is prone to cluster brain fissure.
According to the experimental summary of the failure to install KuberSphere for many times, there are many reasons affecting the stability of KuberSphere, but the most important is the ETCD, the basic component of K8s. In addition to network reasons (No 10 Gigabit network card is used and the network is shared with the cluster), the use of virtual machines to complete the deployment of three etcds still requires high disk IO of the virtualization host. Even if the three virtual machines are placed on a single NVME storage or in a ZFSPool composed of multiple SSD s, there is still a certain chance that the cluster brain is easy to crack, resulting in Kubernetes failure.
Therefore, in order to ensure the stability of the cluster, the beggar package is adopted and four virtual machines are used to build the container platform.
| Host type | quantity | CPU | Memory | disk | operating system |
|---|---|---|---|---|---|
| Kube-Master & ETCD | 1 | 2C1T | 8Gb | NVME 64G | Debain 9 |
| Kube-Worker | 3 | 2C2T | 20GB | ZFS-SSD 64G | Debain 9 |
1.4 network planning
In the home environment, I only have a small network device route as the boundary route, but after all, it is only a Gigabit home route. It is impossible to realize functions such as LB and BGP, which can only be realized by software. Because it is a single host, all virtual machines are on the same host. Using ipref to test the network between virtual machines can reach 10GB/s, and 10GB communication can be met.
The network components are as follows:
Kubernetes cluster CNI: Cacilo
Intranet & kubernetes cluster DNS: CoreDNS
LB: PorterLB
IP planning:
| assembly | address |
|---|---|
| Kube-Master&ETCD | 10.0.0.172 |
| Kube-Worker-1 | 10.0.0.30 |
| Kube-Worker-2 | 10.0.0.173 |
| Kube-Worker-3 | 10.0.0.60 |
| EIP | 10.0.0.150-10.0.0.170 |
-
Because home routing does not support BGP protocol, PorterLB can only use Layer2 to realize EIP shared by LB.
-
Moreover, in KubeSphere, each project (Namespace) has its own independent application route (Ingress), so it is recommended that EIP be mainly allocated to application routes to realize the external network access function of services.
-
In order to maximize the reuse of components in the cluster, CoreDNS can be used as DNS in the intranet
1.5 storage planning
Subject to single host, the performance of storage is the biggest obstacle to the realization of cloud native. After many painful lessons and experiments, it is summarized as follows:
-
Ceph is not recommended:
The performance of Ceph realized by a single host in the form of virtual machine is very low. In addition to the high occupation of memory and network, disk IO can not go up. Even the way of 10 Gigabit Network + direct disk + SSD+ZFSPool can not meet the requirements of ETCD, Redis and other components. After all, the SATA3 is limited to 600 MB / s. Although the speed of NVME can meet the speed of PCI-E 3 up to 3500MB/s, the home computer basically has only two M.2 interfaces, which can not be directly connected. It can only be realized by three virtual machines, with less capacity and greatly reduced performance.
-
NFS is not recommended:
NFS has a single point of failure. It needs to adopt DRBD or ZFS to realize redundancy. In the process of practice, simulate the working condition of a k8s virtual machine Down. After the virtual machine is restarted, it cannot be written in the business, so NFS service needs to be restarted. In addition, observational components such as Prometheus and ElasticSearch are not recommended to be deployed on NFS.
-
Adopt LongHorn mode:
The measured performance of LongHorn mode is much higher than Ceph and NFS.
-
Adopt the local volume mode of OpenEBS:
The closest way to local storage performance, and kubekey, the official installation tool of KubeSphere, supports this mode by default.
2. KubeSphere construction
The installation steps of KubeSphere have been clearly written by the official. There are many similar tutorials on the Internet, but there is no more description here.
The construction steps are recommended as follows:
- Download KubeKey
- Install the necessary installation packages for each host
- Install Kubernetes
- Install third-party distributed storage or CSI plug-ins (such as LongHorn, Rook, etc.)
- Minimize KubeSphere installation
- Enable pluggable components
3. Kubernetes common supporting basic plug-ins
3.1 load balancing PorterLB
The LoadBalance plug-in is the first supporting plug-in I need to install after installing Kubernetes and storage plug-ins.
Generally speaking, both MetalLB and PorterLB support BGP mode and Layer2 mode. The two components have been tested and there is little difference. Although MetalLB was launched earlier, considering the platform unity, the PorterLB supporting Qingyun was finally selected.
3.1. 1. Porterlb installation and configuration
PorterLB installation can be installed with only a single command. (recommended)
kubectl apply -f https://raw.githubusercontent.com/kubesphere/porter/master/deploy/porter.yaml
It can also be installed in Helm mode or KubeSphere built-in application mode
3.1. 2. Porterlb configuration (important)
Due to network constraints, my PorterLB can only run in Layer2 mode, and the configuration of Kube proxy needs to be changed
kubectl edit configmap kube-proxy -n kube-system
Find the option strictARP of ipvs in the configuration and set it to True (important, otherwise the setting will not take effect)
ipvs:
  strictARP: true
When there are multiple network cards on a node, you need to label the node with the specified network card ip
kubectl annotate nodes master1 layer2.porter.kubesphere.io/v1alpha1="network card IP"
The next step is to configure EIP according to the network planning. Here, because the network card needs to be specified, the benefits of virtualization deployment are reflected.
apiVersion: network.kubesphere.io/v1alpha2
kind: Eip
metadata:
  name: porter-layer2-eip
spec:
  address: 10.0.0.150-10.0.0.170
  #For a single network card, you do not need to select the network card
  #interface: eth0
  protocol: layer2
3.1. 3. Use of porterlb
If you use PorterLB, in addition to changing the Tpye of the Service to LoadBalancer, you also need to add two parameters in annotations:
kind: Service
apiVersion: v1
metadata:
  name: porter-layer2-svc
  annotations:
  # Must add
    lb.kubesphere.io/v1alpha1: porter
  # Must be added. If BGP is used, fill in BGP
    protocol.porter.kubesphere.io/v1alpha1: layer2
  # It must be added. The name is the same as the EIP configuration. It tells PorterLB which EIP configuration to use
    eip.porter.kubesphere.io/v1alpha2: porter-layer2-eip
spec:
  selector:
    app: porter-layer2
  type: LoadBalancer
  ports:
    - name: http
      port: 80
      targetPort: 8080
  externalTrafficPolicy: Cluster
3.1. 4. Using PorterLB and application routing in KubeSphere
Due to the limited number of EIPs, it is unrealistic to assign an IP to each Service. You can assign an IP unified exposure Service to Ingress to reduce the use of EIPs.
By opening the project (NameSpace) gateway in KubeSphere, KubeSphere will generate a KubeSphere router dev NameSpace Deployment and Service (actually a magic modified nginx ingress controller) in KubeSphere controls system. We can set the Service to be exposed using LB through kubectl or KS console interface. The setting method is as follows:
-
The left navigation bar enters the advanced settings page under project settings, and then click Set gateway.
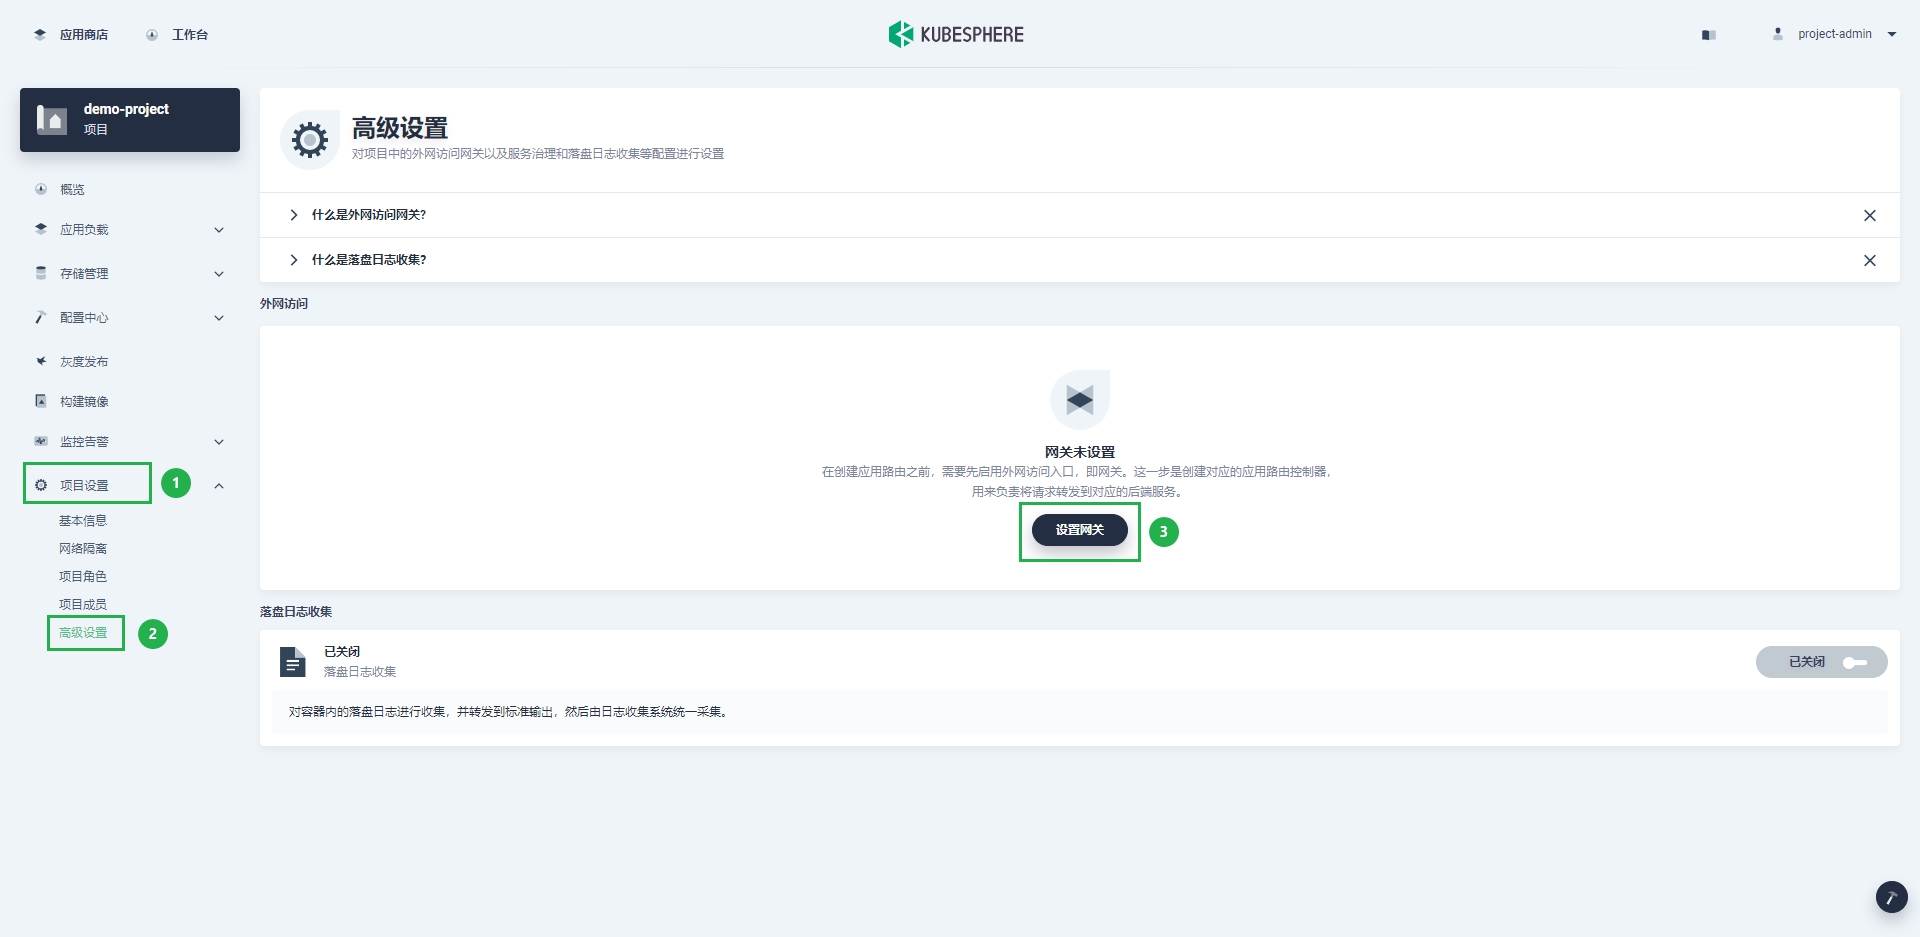
-
In the pop-up dialog box, select the gateway access method as LoadBalancer.

-
Add two annotations to the set gateway annotation:
protocol.porter.kubesphere.io/v1alpha1 value layer2
eip.porter.kubesphere.io/v1alpha2 value: portal-layer2-eip
- After clicking save, you can see that the external address has been assigned.
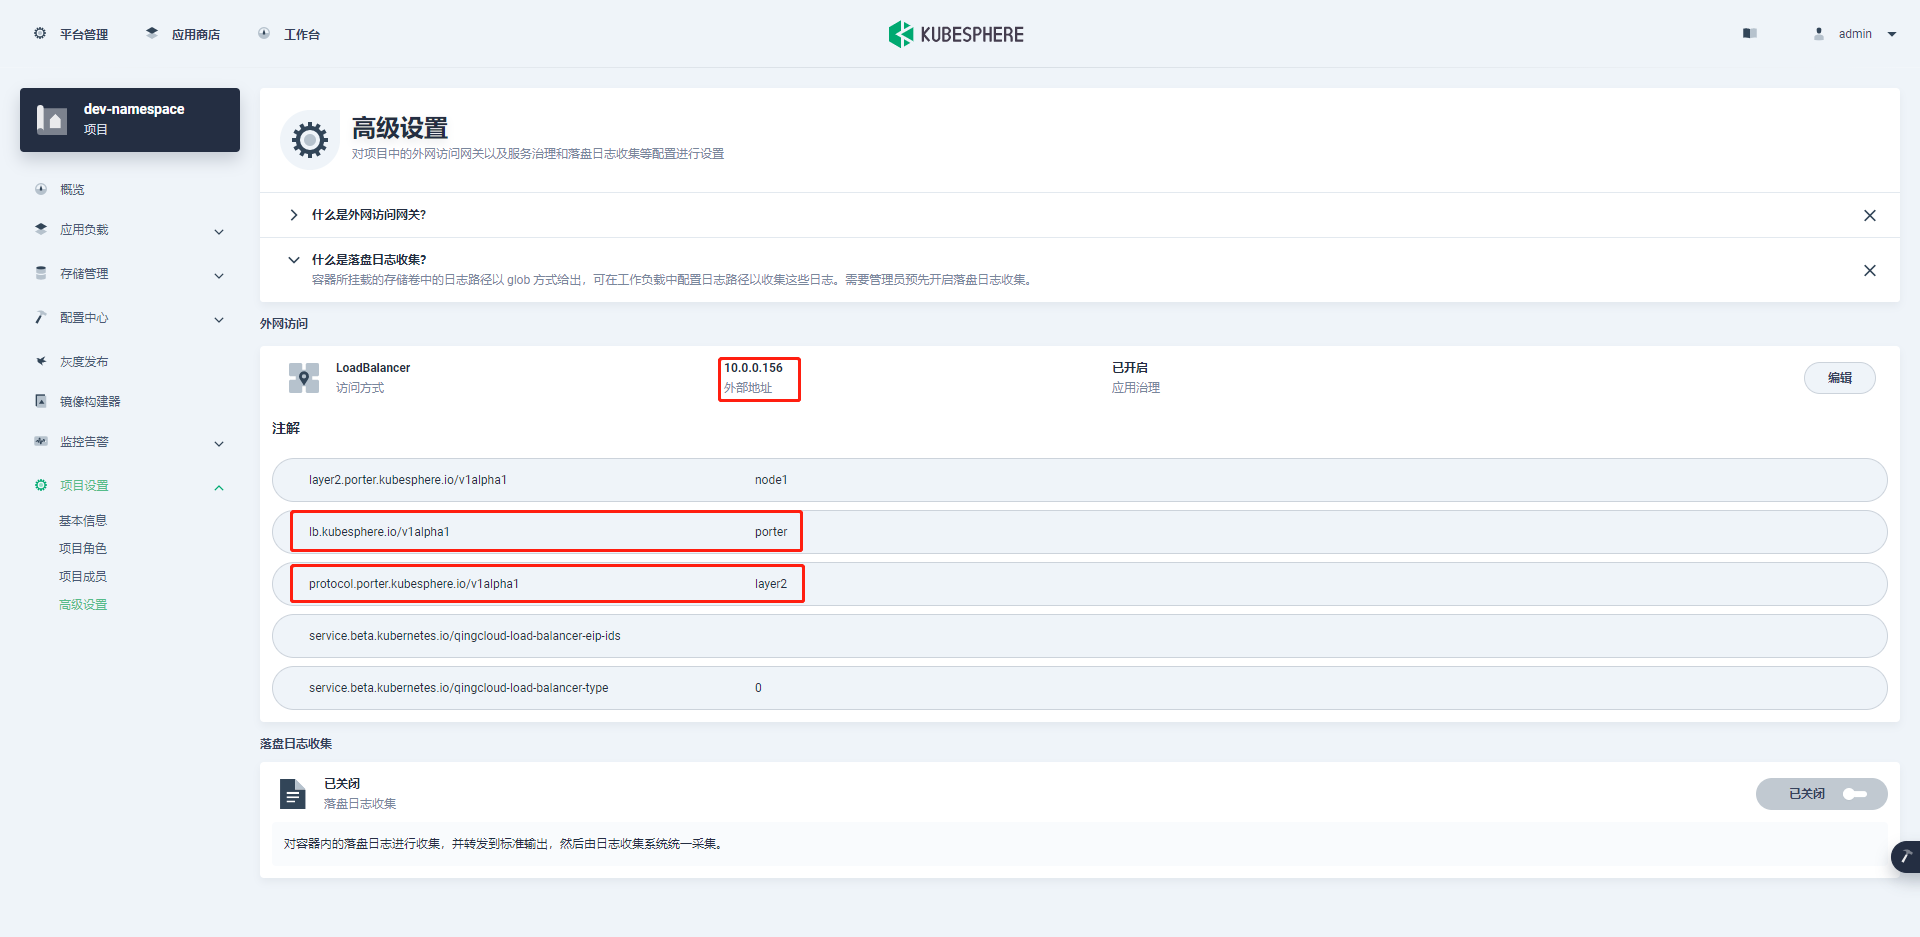
At this time, if you access 10.0.0 in the form of application domain name 0.156 will jump to the corresponding service.
3.2 core DNS transformation
Every time you configure business progress, configuring the nip domain name is not beautiful, and configuring the custom domain name requires changing the host file of each host, which is very cumbersome. After building lb, we can expose CoreDNS through LB and uniformly configure the host to use CoreDNS, saving the trouble of changing the host file.
Because CoreDNS is in Kube system namespace, this part belongs to kubeSphere's system workspace and cannot be operated on the graphical interface. You can only modify it with Kubectl command.
3.2. 1. Core DNS service transformation
The transformation of CoreDNS Service is very simple. You only need to add annotations and change Tpye to LoadBalancer
kubectl -n kube-system edit svc coredns
kind: Service
apiVersion: v1
metadata:
  name: coredns
  namespace: kube-system
  labels:
    addonmanager.kubernetes.io/mode: Reconcile
    eip.porter.kubesphere.io/v1alpha2: eip-sample-pool
    k8s-app: kube-dns
    kubernetes.io/cluster-service: 'true'
    kubernetes.io/name: coredns
  annotations:
    prometheus.io/port: '9153'
    prometheus.io/scrape: 'true'
    #Add comments
    lb.kubesphere.io/v1alpha1: porter
    protocol.porter.kubesphere.io/v1alpha1: layer2
  finalizers:
    - finalizer.lb.kubesphere.io/v1alpha1
spec:
  ports:
    - name: dns
      protocol: UDP
      port: 53
      targetPort: 53
      nodePort: 32560
    - name: dns-tcp
      protocol: TCP
      port: 53
      targetPort: 53
      nodePort: 31864
    - name: metrics
      protocol: TCP
      port: 9153
      targetPort: 9153
      nodePort: 31888
  selector:
    k8s-app: kube-dns
  clusterIP: 10.233.0.3
  clusterIPs:
    - 10.233.0.3
  #Type modification
  type: LoadBalancer
  sessionAffinity: None
  externalTrafficPolicy: Cluster
3.2. 2. Coredns configmap transformation
kubectl -n kube-system edit svc coredns
We can add the domain name of the ingress configuration in the hosts plug-in by adding the host and rewrite configurations. Here, take ingress as an example and point to ingress deerjoe. com 10.0. 0.156 address, and configure the harbor domain name to rewrite to ingress.
Here is only for reference. For more detailed configuration, please refer to the official CoreDNS documentation
...
    host{
    10.0.0.156 ingress.deerjoe.com.
    fallthrough
    }
    kubernetes cluster.local in-addr.arpa ip6.arpa {
       pods insecure
       fallthrough in-addr.arpa ip6.arpa
       ttl 30
    }

    rewrite name harbor.deerjoe.com. ingress.deerjoe.com.
...
We can also modify the Corefile in the configmap of coredns to configure deerjoe COM domain name resolution, and use the file plug-in to reference the configuration file.
.:53 {
    errors
    health {
       lameduck 5s
    }
    ready
    kubernetes cluster.local in-addr.arpa ip6.arpa {
       pods insecure
       fallthrough in-addr.arpa ip6.arpa
       ttl 30
    }
    ### rewrite is equivalent to the function of CNAME. When accessing the service, XXX deerjoe. Go to ingress.com deerjoe. com
    ### Then jump from the progress of K8s to the corresponding service


    prometheus :9153
    forward . /etc/resolv.conf {
       max_concurrent 1000
    }
    cache 30
    loop
    reload
    loadbalance
}
## Configure deerjoe domain name access and reference deerjoe DB file
deerjoe.com:53  {
    errors
    health {
       lameduck 5s
    }
    file /etc/coredns/deerjoe.db deerjoe.com
    forward . /etc/resolv.conf {
       max_concurrent 1000
    }
}
At the same time, deerjoe is added to the same configmap DB, which is written in strict accordance with RFC 1035 style format
deerjoe.com.            IN      SOA     sns.dns.icann.org. noc.dns.icann.org. 2015082541 7200 3600 1209600 3600
deerjoe.com.            IN      NS      b.iana-servers.net.
deerjoe.com.            IN      NS      a.iana-servers.net.
www.deerjoe.com.            IN      A       10.0.0.191
ingress.deerjoe.com.            IN      A       10.0.0.156
harbor.deerjoe.com.      IN      CNAME   ingress.deerjoe.com.
The final yaml is
kind: ConfigMap
apiVersion: v1
metadata:
  name: coredns
  namespace: kube-system
data:
  Corefile: |-
    .:53 {
        errors
        health {
           lameduck 5s
        }
        ready
        kubernetes cluster.local in-addr.arpa ip6.arpa {
           pods insecure
           fallthrough in-addr.arpa ip6.arpa
           ttl 30
        }
        prometheus :9153
        forward . /etc/resolv.conf {
           max_concurrent 1000
        }
        cache 30
        loop
        reload
        loadbalance
    }

    deerjoe.com:53  {
        errors
        health {
           lameduck 5s
        }
        file /etc/coredns/deerjoe.db deerjoe.com
        forward . /etc/resolv.conf {
           max_concurrent 1000
        }
    }
  deerjoe.db: >+
    deerjoe.com.            IN      SOA     sns.dns.icann.org.
    noc.dns.icann.org. 2015082541 7200 3600 1209600 3600

    deerjoe.com.            IN      NS      b.iana-servers.net.

    deerjoe.com.            IN      NS      a.iana-servers.net.

    www.deerjoe.com.            IN      A       10.0.0.191

    ingress.deerjoe.com.            IN      A       10.0.0.156

    harbor.deerjoe.com.      IN      CNAME   ingress.deerjoe.com.
3.2. 3 test CoreDNS
Get EXTERNAL-IP by viewing coredns Service
kubectl -n kube-system get svc coredns

NAME      TYPE           CLUSTER-IP   EXTERNAL-IP   PORT(S)           AGE
coredns   LoadBalancer   10.233.0.3   10.0.0.157 53:32560/UDP,53:31864/TCP,9153:31888/TCP   56d
It can be seen that the address of CoreDNS is EXTERNAL-IP address, and the PC host DNS 10.0 is configured 0.157.
Use dig or ping to test harbor deerjoe. COM domain name, finally pointing to 10.0 0.156, the configuration is successful.
3.2. 4. Access CoreDNS custom domain name in pod
After configuring the above steps, the personal host can access the customized domain name through CoreDNS, but at this time, there is a certain probability that the customized domain name in CoreDNS can not be resolved when accessing it in any pod. Trying to change CoreDNS and / etc / resolv After conf failed, we found a daemon set named nodelocaldns in the namespace of Kube system. Baidu nodelocal DNS,
This is because KubeSphere uses the NodeLocal DNS Cache scheme to improve the performance and reliability of CoreDNS.
By analyzing the configmap it hangs on, there is such a section of configuration
...
.:53 {
    errors
    cache 30
    reload
    loop
    bind 169.254.25.10
    forward . /etc/resolv.conf  #Note this configuration
    prometheus :9253
}
It can be seen that nodelocaldns jumps to / etc / resolv. In addition to resolving DNS in k8s cluster conf. And / etc / resolv Conf does not configure DNS to point to coredns by default. Naturally, the domain name defined by coredns cannot be resolved. Is it in / etc / resolv Conf can be resolved by adding the address of the coredns exposed by the Porter
What happened? No, practice has proved that coredns is reusing the host * / etc / resolv Conf *, if the domain name is not resolved in strict accordance with the order of nameserver, there is a certain probability that it will not be resolved correctly in Pod.
The final solution will be nodelocaldns's configmap
Change to forward$ CoreDNS_ IP.
...
.:53 {
    errors
    cache 30
    reload
    loop
    bind 169.254.25.10
    #forward . /etc/resolv.conf
    forward . $CoreDNS_IP #Replace $CoreDNS_IP is the real IP
    prometheus :9253
}
$CoreDNS_ The IP can be the Cluster IP of the CoreDNS Service in the cluster or the EIP exposed by the coredns through the loadlocker
3.3 cert manager certificate management
Because there is no external IP in the Intranet environment, domain name verification cannot be done, and Let's Encrypt cannot be used to issue and automatically update certificates. Please refer to here CERT manager management intranet k8s development environment certificate One document management self signed certificate.
3.3. 1 install cert Manager
Since the Secret configured by default for cert manager is placed in the namespace where the cert manager pod is located by default, it is recommended to install it in the project (namespace) of the corresponding enterprise space.
-
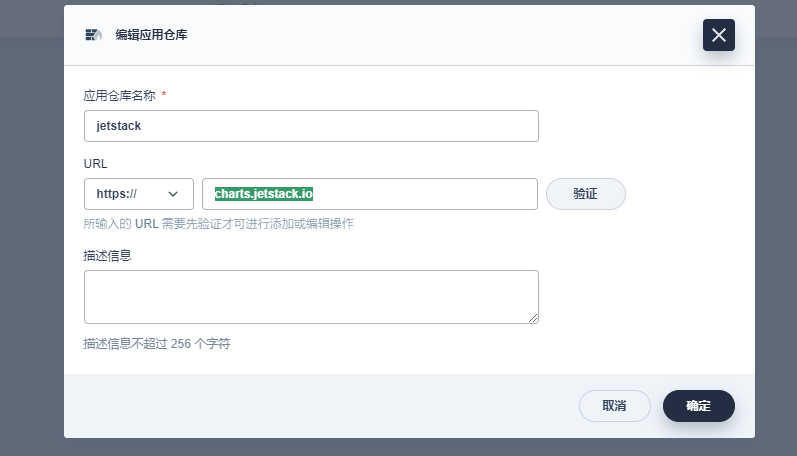
Go to enterprise space > Application Management > Application warehouse > Add warehouse

-
Create a new warehouse jetstack at https://charts.jetstack.io
-
Go back to the project, deploy cert manager, and modify value Yaml profile
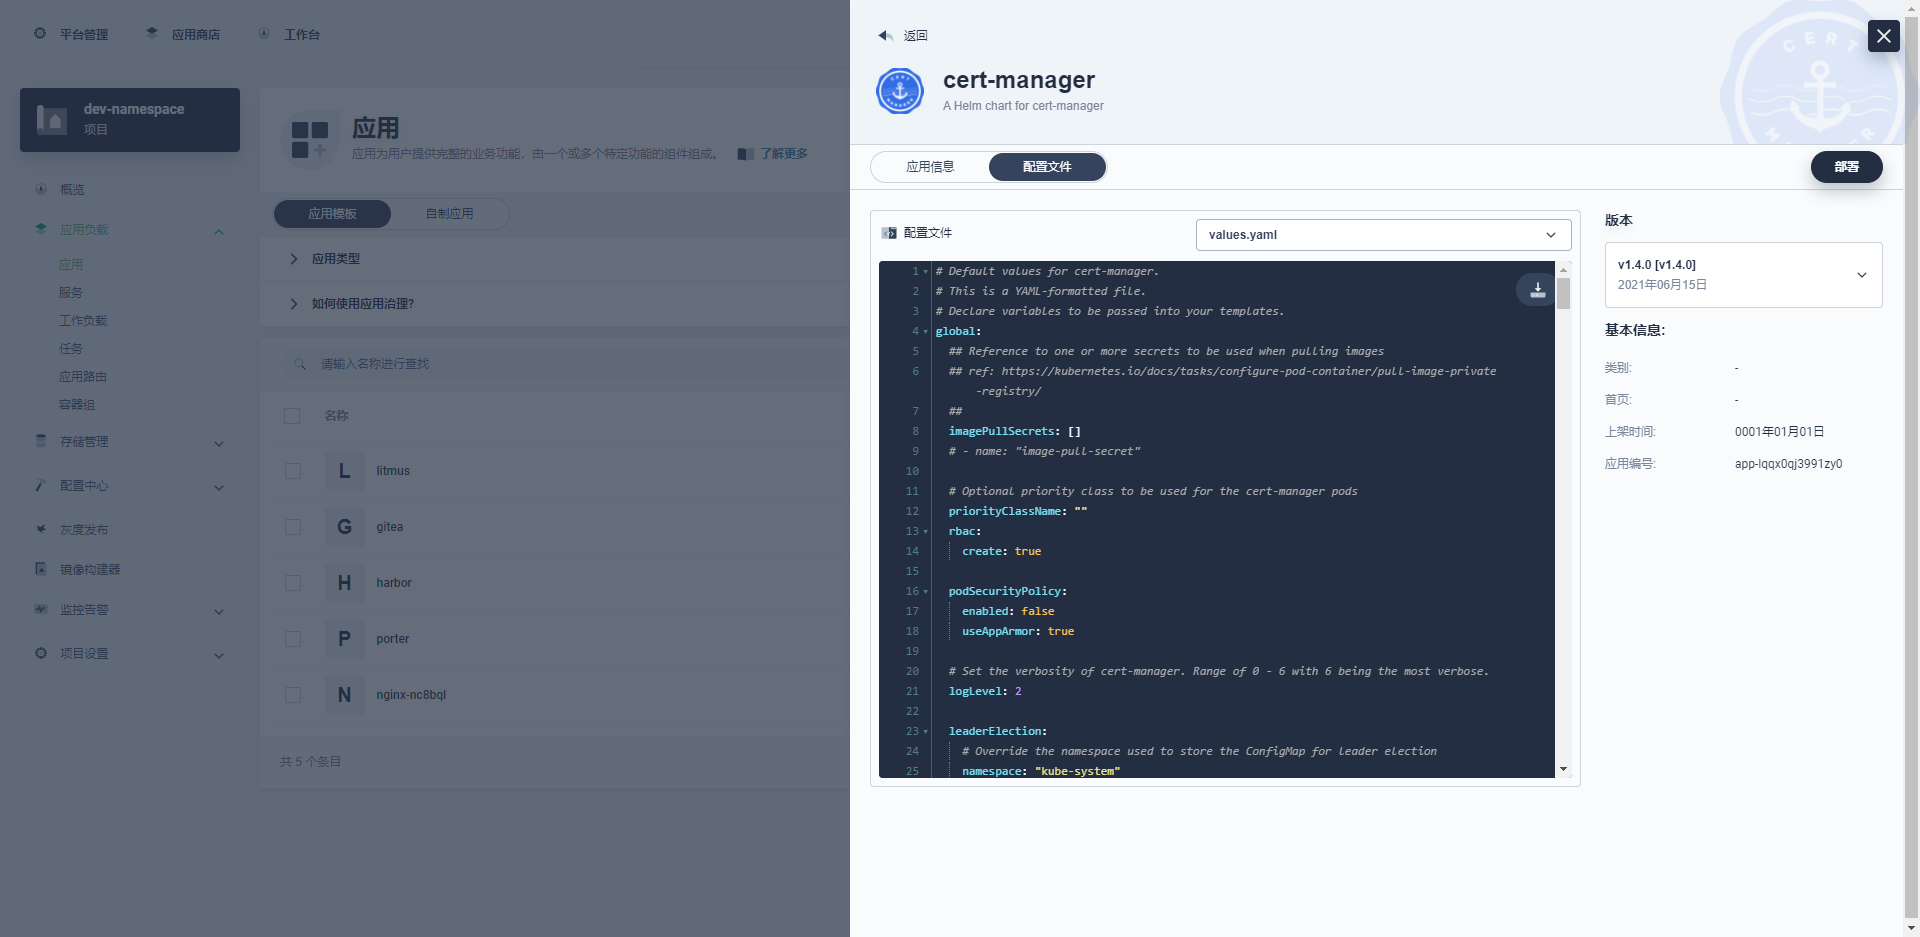
-
In the configuration file, you need to modify installCRDs: True, and then deploy.
-
Check if CRD exists, otherwise install it manually
kubectl apply -f https://github.com/jetstack/cert-manager/releases/download/v1.4.0/cert-manager.crds.yaml
3.3. 2 configure cert Manager
-
Configure self signed Issuer
### Namespace based apiVersion: cert-manager.io/v1 kind: Issuer metadata: name: selfsigned-issuer namespace: dev-namespace spec: selfSigned: {} --- ### Cluster based apiVersion: cert-manager.io/v1 kind: ClusterIssuer metadata: name: selfsigned-cluster-issuer spec: selfSigned: {} -
Create publisher
apiVersion: cert-manager.io/v1 kind: ClusterIssuer metadata: name: selfsigned-issuer spec: selfSigned: {} -
Create CA certificate
apiVersion: cert-manager.io/v1 kind: Certificate metadata: name: deerjoe-selfsigned-ca namespace: dev-namespace spec: isCA: true commonName: deerjoe-selfsigned-ca secretName: root-secret #CA saved secret name privateKey: algorithm: RSA size: 4096 issuerRef: name: selfsigned-issuer kind: ClusterIssuer group: cert-manager.io -
Create cluster CA publisher
apiVersion: cert-manager.io/v1 kind: ClusterIssuer metadata: name: deerjoe-ca-issuer namespace: dev-namespace spec: ca: secretName: root-secret -
Create CA publisher
apiVersion: cert-manager.io/v1
kind: Issuer
metadata:
  name: deerjoe-ca-issuer
  namespace: dev-namespace
spec:
  ca:
    secretName: root-secret
3.3. 3 Create certificate and verify
Method 1:
Create wildcard certificate * deerjoe.com, the certificate file is stored in secret: site deerjoe com TLS
# site-example-com.certificate.example-com.yaml
# reference resources: https://cert-manager.io/docs/usage/certificate/
# api reference resources: https://cert-manager.io/docs/reference/api-docs/#cert-manager.io/v1alpha3.Certificate
apiVersion: cert-manager.io/v1
kind: Certificate
metadata:
  name: site-deerjoe-com ###
  namespace: dev-namespace ### Site namespace
spec:
  # Secret names are always required.
  secretName: site-deerjoe-com-tls ### Secret name
  duration: 2160h # 90d
  renewBefore: 360h # 15d
  privateKey:
    algorithm: RSA
    size: 4096
  subject:
    organizations:
    - Deerjoe Inc. ###
  commonName: "*.deerjoe.com" ###
  isCA: false
  dnsNames:
  - "*.deerjoe.com" ###
  - "deerjoe.com"
  issuerRef:
    name: deerjoe-ca-issuer ### Using CA Issuer
    kind: Issuer ### CA Issuer
    group: cert-manager.io
When using Ingress, you can directly reference secret.
kind: Ingress
apiVersion: extensions/v1beta1
metadata:
  name: test
  namespace: dev-namespace
  annotations:
    kubesphere.io/creator: admin
    nginx.ingress.kubernetes.io/service-upstream: 'true'
spec:
  tls:
    - hosts:
        - nginx.deerjoe.com
      ### Direct reference to secret
      secretName: site-deerjoe-com-tls
  rules:
    - host: nginx.deerjoe.com
      http:
        paths:
          - path: /
            pathType: ImplementationSpecific
            backend:
              serviceName: nginx-nc8bql
              servicePort: 80
Method 2:
Add an annotation in ingress. This method does not need to create a wildcard certificate. Cert manager will automatically issue the certificate of the host in ingress according to the secretName given by ingress and write it into the corresponding secret.
kind: Ingress
apiVersion: extensions/v1beta1
metadata:
  name: test
  namespace: dev-namespace
  annotations:
    kubesphere.io/creator: admin
    nginx.ingress.kubernetes.io/service-upstream: 'true'
    cert-manager.io/issuer: deerjoe-ca-issuer           # Tell cert manager to use the issued issuer
    #cert-manager.io/cluster-issuer: deerjoe-ca-issuer # Cluster issuer uses this annotation
spec:
  tls:
    - hosts:
        - nginx.deerjoe.com
      secretName: nginx-cert # At this time, the secret name is the secret name created and stored by cert manager
  rules:
    - host: nginx.deerjoe.com
      http:
        paths:
          - path: /
            pathType: ImplementationSpecific
            backend:
              serviceName: nginx-nc8bql
              servicePort: 80
Use Google browser to access nginx deerjoe. COM, view the certificate.
Note:
- Check the generated secret. If the secretName is nginx cert and there is a secret named nginx cert XXX under the NameSpace, it indicates that the certificate generation failed. Please check whether the issuer or Clusterissuer configured by yaml is correct, and use kubectl describecertificate & & kubectl describe certificaterequest to view the status of the certificate.
- When Chrome and Edge cannot skip TLS authentication when accessing https, please enter "thisisunsafe" on the current page to skip. This problem does not exist in Firefox.
3.3. 4 save the certificate locally
Suppose the domain name of Harbor is Harbor deerjoe. COM, we set the site deerjoe com TLS certificate of dev namespace as the docker ssl certificate.
create folder
mkdir -p /etc/docker/certs.d/harbor.deerjoe.com
Get CA
kubectl -n dev-namespace get secret site-deerjoe-com-tls -ojson | jq -r '.data | ."ca.crt"' | base64 -d > /etc/docker/certs.d/harbor.deerjoe.com/ca.crt
Get TLS key
kubectl -n dev-namespace get secret site-deerjoe-com-tls -ojson | jq -r '.data | ."tls.key"' | base64 -d > /etc/docker/certs.d/harbor.deerjoe.com/harbor.deerjoe.com.key
Get TLS crt
kubectl -n dev-namespace get secret site-deerjoe-com-tls -ojson | jq -r '.data | ."tls.crt"' | base64 -d > /etc/docker/certs.d/harbor.deerjoe.com/harbor.deerjoe.com.cert
After copying to the docker folder, restart docker and use the docker login test
systemctl restart docker
docker login harbor.deerjoe.com

# The following words show that the configuration is successful
#Username: admin
#Password:
#WARNING! Your password will be stored unencrypted in /root/.docker/config.json.
#Configure a credential helper to remove this warning. See
#https://docs.docker.com/engine/reference/commandline/login/#credentials-store

#Login Succeeded