This article is excerpted from the OHOZ team's OpenHarmony source code guide project, which can be read online( Tencent cloud,Github Pages )Contains the latest content.
Hongmengzhong can use a variety of tools to compile, which can be divided into three layers: high, medium and low:
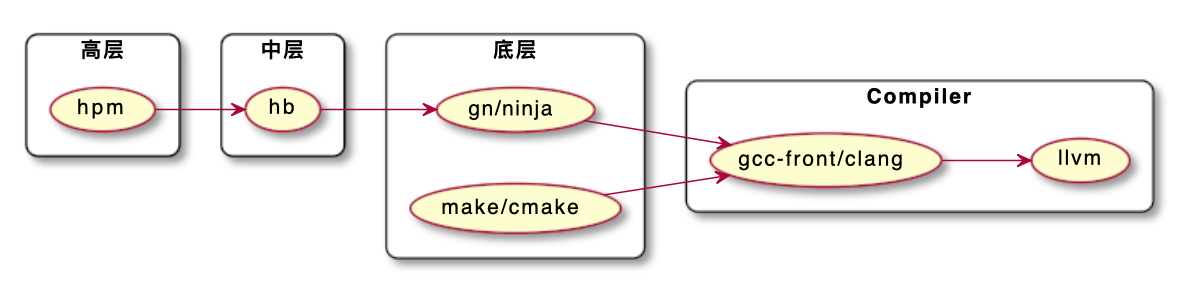
Comparison of several tools:
| Build Tool | development language | Developer | resources |
|---|---|---|---|
| hpm | js | HW | |
| hb | python | HW | gitee |
| gn | C++/Python | o-lim | github |
| ninja | C++/Python/C | ninja | github,Doc |
Let's start at the bottom.
gn and ninja
To be honest, it is difficult to understand gn and ninja for students who have not been in contact with make and cmake. It is difficult to understand the real significance of these cross platform tools and the problems to be solved. Not to mention students who have long used mature ides such as VS, Eclipse and XCode, these processes are shielded by the IDE, but in Linux and embedded development, it exists like air and water, so, um... Try your best.
The compiler system from make to cmake to gn+ninja, and the compiler (front and back tools) from gcc to gcc+llmv to clang+llvm have not experienced many changes over the years, at least less than the changes of various programming languages.
ninja (ninja), produced by the google chromium team, is committed to a faster compilation system than make. ninja is like the preprocessor of the Compiler. Its main purpose is to recursively find dependencies and establish a dependency tree in advance. gcc can compile in turn according to the dependency tree, greatly reducing the search and repetition time caused by the chaotic compilation sequence during compilation. ninja was first used in Android N in 2016. Currently, it is widely used in large projects that want to free themselves from compilation time.
GN means generate ninja, that is, the file (meta data) required to generate ninja. Therefore, GN calls itself the meta build system, which is also produced by google chromium team. The file suffix of GN is gn,. gni.
gn is similar to cmake, and ninja is similar to make. Cmake eventually generates makefile s, and gn generates ninja files to reduce the workload of writing make/ninja files manually.
If you use docker provided by harmony, gn and ninja are already installed:
root@90065f887932:/home/openharmony# gn --version
1717 (2f6bc197)
root@90065f887932:/home/openharmony# ninja --version
1.9.0
gn
Due to special reasons, the following resources need scientific Internet access:
- GN official website: https://gn.googlesource.com/
- Git Library: git clone https://gn.googlesource.com/gn
- Online documentation: docs,reference
- Version download: Linux,macOS,windows
If it is not convenient to access the Internet scientifically, you can search gn or generate ninja on gitee, and you can see what netizens have carried, such as what the author has carried gn , where the docs and examples directories can be referenced.
Command and process
The preparatory work of gn is as follows:
- First, you should write a in the root directory according to the grammar of gn GN file, which has no file name but only an extension, and at least defines the buildconfig variable. The value of this variable is the path of a config file
- Of course, you also wrote this config file by hand. This file mainly completes two things:
- By set_ The defaults function defines default configuration parameters for four types of compilation targets (executable, static_library, shared_library, source_set)
- By set_default_toolchain, tool()... Functions define the default toolchain
- Finally, you have to write another build in the root directory GN file, which is mainly used to accomplish one thing: specify the compilation target, that is, one or more of the above four types of targets, including:
- Specifies the file to compile
- Specifies the path to the include file
- Specifies the dependent compilation target
After the preparation is completed, you can perform compilation on the command line:
- gn gen out/xxx: generate build files that ninja can use
- Search in the current directory (look up if you can't find it) or -- root specified directory or -- dotfile specified file GN, set its path to root or The path specified by root in GN is set to root. Harmony is usually root = specify the root directory as build / LITE / gn.
- Parse the gn file under root to get the name of the buildconfig file, and execute the buildconfig file to get toolchain and its configurations.
- Resolve build. Under root GN file, and load build in other directories it depends on GN file
- BUILD.gn is generally used as the project entry file of the module, which can cooperate with gni file to divide the source code or module.
- When the difference between multiple modules is very small, build can be used GN to manage the settings of these modules gni is exclusively responsible for the source file management of each module.
- The convention uses out/xxx to store compiled data ninja files, such as: out/debug, out / v0 1.
- The compiled ninja file can use ninja -C out/xxx to complete the real version compilation.
- Tips
- gn gen can also generate project files for IDE, which can be specified through -- IDE, for example: gn gen --ide [vs|xcode|eclipse|qtcreator|json]
- check: Check header dependencies.
- ls: List matching targets.
- format: Format .gn files.
- refs: Find stuff referencing a target or file.
- clean: Cleans the output directory.
See gn help Commands for more detailed subcommands.
Let's look at the syntax of the gn file:
Types and variables
gn is a simple dynamic type language with variables. The data types supported by variables include Boolean, signed number, string, list and scope (similar to dictionary). In addition to user-defined variables, gn also has built-in 20 + variables, such as:
- current_cpu,current_os,current_toolchain
- target_cpu,target_os,target_name,target_out_dir
- gn_version
- python_path
For more detailed gn variables, see the gn help build in predefined variables section.
The definition and use of gn variables are straightforward:
board_arch = "arm"                          # Define variables
if (board_arch != "") {                     # Use variables
    cflags += [ "-march=$board_arch" ]      # Using variables in strings
    cflags_cc += [ "-march=${board_arch}" ] # Plus {} is equivalent
}
The identifier is a string with format requirements. All elements (Target, configuration and tool chain) in the final dependency diagram are uniquely identified by the identifier. Its format requirements are:
"//<path>[:<name>][(<toolchain>)]"
Except that path cannot be omitted, all other fields can be saved. If name is omitted, the identifier with the same name as the last field of path is identified. For example:
- "/ / base/test:test_support(//build/toolchain/win:msvc)" is the most complete format. Locate root / base / test / build Test in GN file_ support
- "//base/test:test_support"
- "/ / base/test" is equivalent to "/ / base/test:test"
function
gn supports simple control statements, such as if... else, foreach, etc. gn also supports functions, and there are many built-in functions. Generally, user-defined functions are rare. It is estimated that the built-in functions are enough.
gn's function naming and parameter passing are different from c, python and other programming languages. invoker is used for parameter passing.
gn has 30 + built-in functions, including:
- Import: import a file, but unlike c/c + + include, the import file will be executed independently and the execution results will be put into the current file.
- getenv: get environment variable
- print: no explanation
- read_file,write_file
- foreach: iterate over a list
- config: defines the configuration object
- set_defaults: defines the default value of the member variable of a target
- template: define a set of rules. Calling rules can generate a target
For more detailed built-in functions, see gn help Buildfile functions.
For example, if we want to define some configuration data (and nested) and assign it to a variable, we can do this:
# build/config/BUILD.gn
config("cpu_arch") {                    # Use the config function to define a named CPU_ Configuration object of arch
  cflags = [ "-march=$board_arch" ]
}

config("ohos") {                        # Define a configuration object named ohos
  configs = [
    ":cpu_arch",                        # Including the CPU above_ Configuration object of arch
    ":stack_protector",
  ]
}
You can then assign the configuration object to the variable using the ID
default_target_configs = [ "//build/config:ohos" ]
Target / function block / target
There is another important concept in gn: target, which is translated into target in some places. I don't think it is very accurate. It is a node in the construction table. It contains some variables to complete some operations. Variables are like configuration data of operations, and target is like a encapsulated operation module - so I think it is more appropriate to translate successfully. Target is written as follows:
<target>("<name>") {
    <var> = ...
}
For example, copy target can copy files according to the sources and outputs variables:
copy("compiler") {
    sources = [
      "//prebuilts/gcc/linux-x86/arm/arm-linux-ohoseabi-gcc/arm-linux-musleabi",
      "//prebuilts/gcc/linux-x86/arm/arm-linux-ohoseabi-gcc/arm-linux-ohoseabi",
    ]
    outputs = [ "$ndk_linux_toolchains_out_dir/{{source_file_part}}" ]
  }
For example, action target can complete the script specified by the script variable, and build / LITE / build. In Harmony GN generates operations related to the file system, using action target:
  action("gen_rootfs") {
    deps = [ ":ohos" ]

    script = "//build/lite/gen_rootfs.py "# execute this python file
    outputs = [ "$target_gen_dir/gen_rootfs.log" ]  # Output log file
    out_dir = rebase_path("$root_out_dir")

    args = [                                        # Command line arguments that python files can accept
      "--path=$out_dir",
      "--kernel=$ohos_kernel_type",
      "--storage=$storage_type",
      "--strip_command=$ohos_current_strip_command",
      "--dmverity=$enable_ohos_security_dmverity",
    ]
  }
Because gn is written in python, it can be perfectly compatible with python scripts to perform operations.
Example: source_set is a key target, which defines the source code set and gn will generate it one by one o file, where the configs variable defines the parameters sent to the compiler at compile time. For example, default has been defined earlier_ target_ Configs variable, you can now use set_ Define source in the defaults function_ The configs variable in set target.
set_defaults("source_set") {
  configs = default_target_configs
}
As for which compilers to use, gn use set_default_toolchain function definition:
set_default_toolchain("//build/lite/toolchain:gcc-arm-none-eabi")
Example: gn help template gives an example, which is very typical
- Functions: template, assert, get_target_outputs
- Target: action_foreach,source_set,executable
First, use the template to define a rule called my_idl:
template("my_idl") {
    # First, make a judgment on the input parameter to avoid reporting errors. Throwing error to the user is elegant without giving an error prompt.
    assert(defined(invoker.sources),
           "Need sources in $target_name listing the idl files.")

    # Define a process variable
    code_gen_target_name = target_name + "_code_gen"

    # action_foreach is a target that can be based on {...} Execute the script specified by script with the parameters in script
    # This action is to generate the idl file cc and h file
    action_foreach(code_gen_target_name) {
      sources = invoker.sources
      script = "//tools/idl/idl_code_generator.py"
      # Tell gn how to store the output file, "gn help source_expansion" has more details
      outputs = [ "$target_gen_dir/{{source_name_part}}.cc",
                  "$target_gen_dir/{{source_name_part}}.h" ]
    }

    source_set(target_name) {
      sources = get_target_outputs(":$code_gen_target_name")
      deps = [ ":$code_gen_target_name" ] # Specify the action on which it depends_ foreach(code_gen_target_name)
    }
  }
Then see how to use the (invoking) template:
my_idl is a rule defined in the above template. A rule is like a function, but do not understand the corresponding position as the input parameter and the function body. The two positions of the rule are placed respectively: target name and input parameter.
  # Generate a rule named foo_ idl_ target of files
  my_idl("foo_idl_files") {
    # The variables defined here will be forwarded to the rule definition, using invoker XXX reference, so this is an input parameter
    sources = [ "foo.idl", "bar.idl" ] # Corresponding to the invoker. In the template sources
  }
We can gn use the built-in target, which is also < target_ type>(<target_name>) { <target_invoker>}:
  executable("my_exe") {
    deps = [ ":foo_idl_files" ] # my_exe this target depends on foo_idl_files target
  }
gn defines many Target (function blocks) by default, such as:
- Perform an action or group of actions
- Action: the action of a single run
- action_foreach: run the target of the script in sequence in multiple files
- Copy: execute copy action
- Generate the final goal - the following four are very necessary and must be defined by selecting one or more
- excutable: Specifies that target is an executable file
- source_set: defines the source code set, which will be generated one by one o files, that is, files that have not been link ed
- shared_library,static_library: declare a dynamic (win=.dll, linux=.so) and static library (win=.lib, linux=.a)
- Auxiliary class
- group: declare a target
Each targte has its own usage. Check Ge help < target > and there will be a demo code that can be used directly.
See gn help Target declarations for more details.
args pass parameter
How do users pass project custom parameters to gn? There are several ways:
$ gn gen out/debug --args="key=int_value key1=\"str_value\" key3=\"$(PWD)\""
gn gen is passed in through -- args. Since the following whole is regarded as a parameter, it needs to be surrounded by "" quotation marks. If value is a number, you can not add \ "and if it is a string or shell variable, you need to add \".
$ gn args out/debug [--args=...]
gn args will first create args under out/debug GN file, and then open it with an editor (just open an editor with git commit to let the user fill in the log), waiting for the user to add key = value. At the same time -- args can also be added to the command line, and the rules are the same as above.
gn has six built-in variables, that is, even if the user does not make any assignment or assignment gn and XXX gni,xxx.gn can be used, and gn will customize the assignment:
- host_cpu
- host_os
- current_cpu
- current_os
- target_cpu
- target_os
Under root The gn file can also use default_ The args variable assigns default values to these six variables, such as specifying different targets_ cpu:
default_args = {
    target_os = "freertos"
    target_cpu = "cortex-m4"
}
For user-defined arg, one more step is required in buildconfig GN or build Declare is used in GN (depending on the scope that the user wants to work)_ Args() function and assign default values, such as:
declare_args() {
    ohos_build_type = "debug"
}
Then gn and XXX gni,xxx. In gn, you can always these args like ordinary variables:
if (target_os == "linux") {
    ...
}
if (ohos_build_type == "debug") {
    ...
}
After mastering the concepts of gn, such as commands, functions, variables, identifiers, targets, etc., you can basically use gn to complete tasks. We will analyze the specific Harmony code in the subsequent hb chapters.
ninja
gn will generate build under out / < target > / < board > / Ninja file is an ordinary text file. After opening it, it even feels like a log file. This is probably the minimalist philosophy said by the founder of ninja.
$Ninja - C out / < target > / < board > / can compile target files or executable files.
reference resources:
build_lite and hb
The components parsed in this chapter and their corresponding directories and git libraries are as follows:
| hpm component name | Source directory | gitee url |
|---|---|---|
| @ohos/build_lite | build/lite | https://openharmony.gitee.com/openharmony/build_lite |
Harmony also has another open source build component:
| hpm component name | Source directory | gitee url |
|---|---|---|
| @ohos/build | build | https://openharmony.gitee.com/openharmony/build |
build_lite is prepared for compiling embedded boards, and build is prepared for compiling smart terminals such as Phone.
build_lite implements a Python package named hb, which can be installed into the Python environment. In addition, it also includes:
- Description file (. json)
- components: component description file
- Script (. sh)
- make_rootfs: file system scripting
- Configuration files (. gn,. gni)
- config: compile related configuration items (components, kernel, subsystem)
- ndk: compilation scripts and configuration parameters related to Native API
- toolchain
- xx file (. ld)
- platform:
gn main entrance
Hongmeng built / Lite as an open source project and designed it as the root of gn. We have generated the relevant gn files for us, build/lite / gn file is the general entry for gn to compile Harmony. Let's explore its source code.
. gn and buildconfig gn
There are only two sentences:
buildconfig = "//build/lite/config/BUILDCONFIG.gn"
root = "//build/lite"
BUILDCONFIG.gn code key architecture:
import("//build/lite/ohos_var.gni")
import("${device_path}/config.gni")

  target_os = "ohos"        # This is a gn built-in variable. Assign a value to it
  target_cpu = board_cpu    # This is a gn built-in variable. Assign a value to it

# Configure toolchain
if (board_toolchain != "" && use_board_toolchain) { # Use the toolchain specified by device
    # Board will be used_ toolchain,board_toolchain_path,board_toolchain_prefix and other variables
    # These variables are derived from import("${device_path}/config.gni")
    # Finally, several core variables are initialized
    ohos_current_cc_command = "${compile_prefix}gcc"
    ohos_current_cxx_command = "${compile_prefix}g++"
    ohos_current_ar_command = "${compile_prefix}ar"
} else {                                            # Use default toolchain
}
The above paragraph defines how to compile Hongmeng's toolchain, where ${device_path} is sent by the hb command in the following chapter, which generally corresponds to the device /..... In the whole project source code directory/ config. GNI, such as device/hisilicon/hispark_pegasus/sdk_litos/config.gni, where you can see the personalized definition of toolchain by device.
BUILDCONFIG. Set is used below the GN file_ The defaults function completes the executable and static functions_ library,shared_library,source_set the creation of four target s.
# Define the temporary variable default_target_configs
default_target_configs += [
  "//build/lite/config:board_config",
  "//build/lite/config:cpu_arch",
  "//build/lite/config:common",
  "//build/lite/config:default_link_path",
  # Here are dozens of lines of code to continue the default_target_configs append assignment
]

# Create source_set target, other executable, static_library,shared_ The same is true for library
set_defaults("source_set") {
  configs = default_target_configs
}
"/ / build/lite/config:cpu_arch" is the above-mentioned ID, which means build.config under build/lite/config Extracting CPU from GN file_ Arch object, its definition
config("cpu_arch") {
  cflags = []
  if (board_arch != "") {
    cflags += [ "-march=$board_arch" ]
  }
  if (board_cpu != "") {
    cflags += [ "-mcpu=$board_cpu" ]
  }
  cflags_cc = cflags
  ldflags = cflags
}
This is an object defined using the config function. The purpose is to use the board_arch defines different -mcpu parameters.
The entire buildconfig GN file mainly completes two things:
- Define toochain
- Define four target s: executable and static_library,shared_library,source_set
Prepare the most basic content for subsequent gn operations.
BUILD.gn
Recall gn the general process and finish it After gn, execute build under root gn file. The overall structure of the file is also very simple: four target s are defined: two group s and two action s.
import("//build/lite/ndk/ndk.gni")

# Define 2 group target s
group("ohos") {...}
group("ndk") {...}

# Define 2 action target s
if (ohos_build_target == "") {
  action("gen_rootfs") {...}
if (ohos_build_type == "debug" && product != "") {
  action("gen_testfwk_info") {...}
After reading this, we can see that gn is a very flexible language. It is much more convenient to write like python than makefile. if... else... Can be embedded in object. Using identification can quickly introduce a code segment defined by other files like url positioning.
OK, gn let's finish here, build gn and * The gni files should be understood. There is still a problem: what else did Hongmeng do before he first entered the root of gn? That's what hb to do next. Let's read on.
python package hb and its command line
build_lite/hb is a Python Package whose setup Py can be seen that it generates an hb command, and the entry address is build/lib/hb/__main__.py file.
setup(
    name='ohos-build',
    package_dir={'hb': 'hb'},
    entry_points={'console_scripts': ['hb=hb.__main__:main',]},
)
Since build_lite is an ordinary Python package, so there are many ways in the actual scene:
- Get build_lite source code
- git clone https://openharmony.gitee.com/openharmony/build_lite
- hpm i @ohos/hispark_pegasus and build/lite have been downloaded
- Installing hb
- You can install hb into the Python environment of the system: pip install [--user] build/lite
- You can install hb into the python virtual environment: Python 3 - M venv venv; source venv/bin/activate; pip install build/lite
- Since hb is already a distribution package on Pypi and its name is ohos build, you can also install PIP install [-- user] ohos build in this way
- If you use docke run, Then hb has been installed
- Using hb
- Source code usage: python 3 - C 'import inspect, hb; Print (inspect. GetFile (hb)) 'view the path of hb installation. If you can query it correctly, it means that hb can be imported. Later, you can develop it according to python rules.
- Command line usage: hb [set|env|build]
- python build.py [build|clean|debug|release] directly use build. Under the build/lite directory Py file
$ ls build/lite/hb
__init__.py __pycache__ clean       cts         env
__main__.py build       common      deps        set
hb put the implementation of each subcommand in a folder: set, build, clean, env
When executing hb set and hb build, enter each folder and execute exec_command() function.
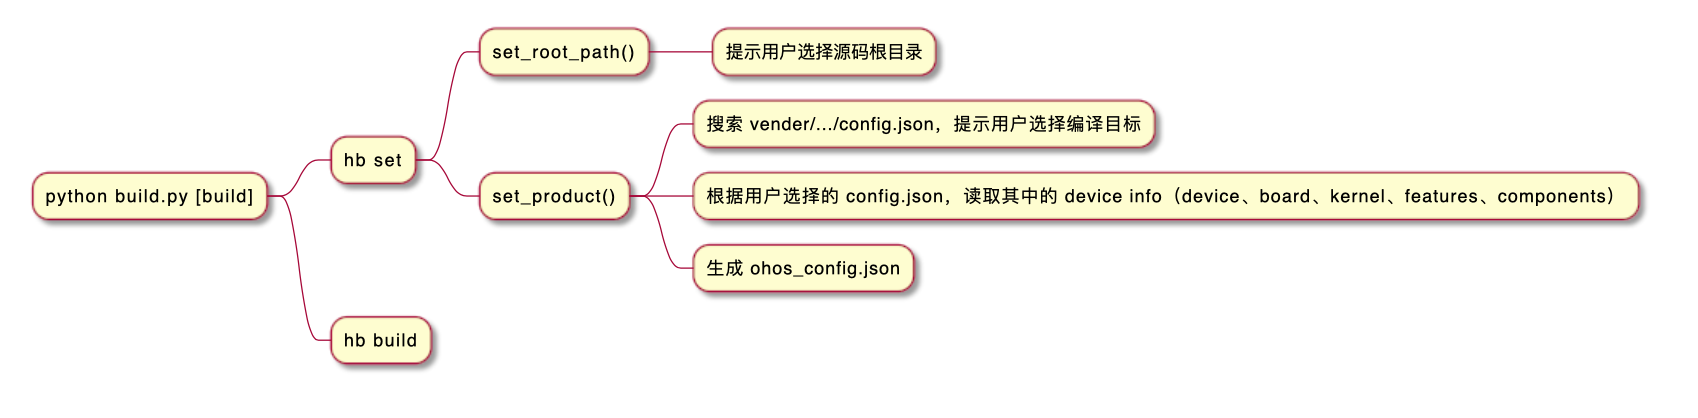
hb set
Execute build / LITE / Hb / set / set Exec in PY_ Command() function:
def exec_command(args):
    return set_root_path() == 0 and set_product() == 0
set_root_path() and set_product() parses the root path and product related information, and writes them to ohos_config.json file.
def set_root_path(root_path=None):
    config = Config()
    if root_path is None:
        root_path = get_input('[OHOS INFO] Input code path: ')
    config.root_path = root_path
    return 0
Execute the prompt given by hb set on the command line, that is, the above function prints. Config is a singleton class (that is, the config instance value configured by this function can be obtained by other functions):
class Config(metaclass=Singleton):
The Config singleton defines multiple attributes: root_path,board,kernel,product,product_path,device_path,out_path... Will be written to ohos when it is used as an lvalue_ Config. JSON file.
Another function is set_product() is to configure product. Product is a class defined by hb for the product and contains several static methods. Basically, it parses the configuration value and writes it to ohos_config.json file:
$ cat common/product.py|grep -B1 'def '
    @staticmethod
    def get_products():
--
    @staticmethod
    def get_device_info(product_json):
--
    @staticmethod
    def get_features(product_json):
--
    @staticmethod
    def get_components(product_json, subsystems):
The static method is based on the text:
- get_products(): obtain Product information and recursively find config. In the vender / The directory of the JSON file. Every time you find one, it is a Product, and the config JSON usually includes a predefined distribution configuration for vender.
$ find vendor/ -name config.json
vendor/hisilicon/hispark_aries/config.json
vendor/hisilicon/hispark_pegasus/config.json
vendor/hisilicon/hispark_taurus/config.json
The above is the vender in the source code obtained by repo sync, so three options will be prompted when executing hb set:
$ hb set
[OHOS INFO] Input code path: .
OHOS Which product do you need?  (Use arrow keys)

hisilicon
 ❯ ipcamera_hispark_aries
   wifiiot_hispark_pegasus
   ipcamera_hispark_taurus
- get_device_info(),get_features(),get_components(): get the config. Of the vender definition Various information in JSON, such as:
$ cat vendor/hisilicon/hispark_pegasus/config.json | head -n18
{
    "product_name": "wifiiot_hispark_pegasus",
    "ohos_version": "OpenHarmony 1.0",
    "device_company": "hisilicon",
    "board": "hispark_pegasus",
    "kernel_type": "liteos_m",
    "kernel_version": "",
    "subsystems": [
      {
        "subsystem": "applications",
        "components": [
          { "component": "wifi_iot_sample_app", "features":[] }
        ]
      },
      {
        "subsystem": "iot_hardware",
        "components": [
          { "component": "iot_controller", "features":[] }
The three options given in the previous hb set are product here_ name. device_info includes the above device, board and kernel; features and components are the information in each subsystem.
Each subsystem corresponds to a directory of source code, and component is the module it depends on, which is uniformly placed in ohos_ Under bundles.
hb build
Execute build / LITE / Hb / build / build Exec in PY_ Command() function, which mainly handles user input parameters, such as:
- -b: debug or release
- -c: Specifies the compiler. The default is clang
- -t: Compile test suit
- -f: full, compile all the code
- -t: Whether to compile ndk and local development package, which is also @ ohos / build_ Part of a lite component
- -T: Single module compilation
- -v: verbose
Instantiate the Build class with these arguments:
class Build():
    def __init__(self):
        self.config = Config()
        ......

    def build(self, full_compile, ninja=True, cmd_args=None):
        ......

    def check_in_device(self):
        ......

    def gn_build(self, cmd_args):
        ......

    def ninja_build(self, cmd_args):
        ......
After instantiation, call build.. Build (), which calls check in turn_ in_ device(),gn_build() and ninja_build().
- check_in_device(): read the compiled configuration, and read the development board config. According to the development board selected by the product GNI file content, mainly including compilation tool chain, compilation link commands and options.
- gn_build(): call the gn gen command to read the product configuration and generate the out directory and ninja file of the product solution. The core code is as follows:
gn_cmd = [gn_path, '--root={}'.format(self.config.root_path), '--dotfile={}/.gn'.format(self.config.build_path), 'clean', self.config.out_path] exec_command(gn_cmd, log_path=self.config.log_path) - ninja_build(): call ninja -C out/board/product to start compilation. The core code is as follows:
ninja_cmd = [ninja_path, '-w', 'dupbuild=warn', '-C', self.config.out_path] + ninja_args exec_command(ninja_cmd, log_path=self.config.log_path, log_filter=True) - System image packaging: package component compilation products, set file attributes and permissions, and create file system images.
python build.py
Build. In the root directory Py is usually build / LITE / build Py soft connection, execute Python build Py will run to build build() function of Py:
def build(path, args_list):
    cmd = ['python3', 'build/lite/hb/__main__.py', 'build'] + args_list
    return check_output(cmd, cwd=path)
It can be seen that hb build is still executed, and the input parameters can also be translated, so it can be used as follows:
python build.py ipcamera_hi3518ev300 -b debug # Full compilation to debug version
python build.py ipcamera_hi3518ev300 -T applications/sample/camera/app:camera_app # Single module compilation
It can be said that build Py realizes the purpose of "compiling without installing hb", and it seems that nothing else has been done.
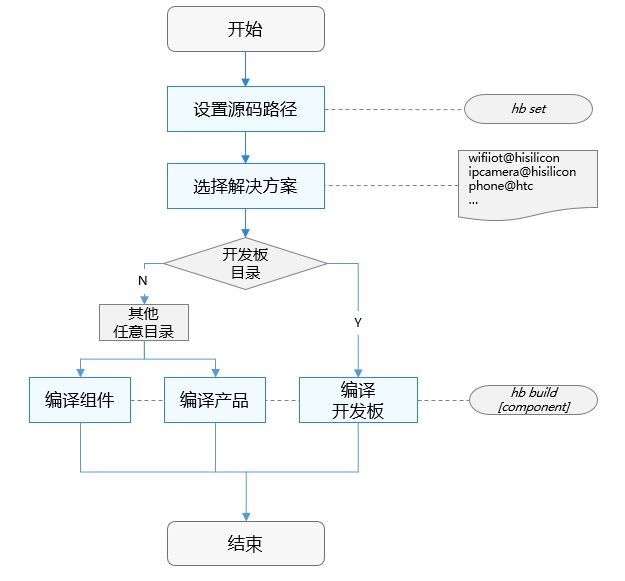
Brief process
History
- 2020.12.05: kernel from liteos_riscv was renamed liteos_m. build for adaptation.
$ git -P log -n1 897188
commit 8971880bd4f08a2ea01e83dfaadcf7cda7aae858
Author: p00452466 <p00452466@notesmail.huawei.com>
Date:   Sat Dec 5 03:07:19 2020 +0800

    Description:add Change kernel type from liteos_riscv to liteos_m
    Reviewed-by:liubeibei
- 20210318: support independent external device driver component compilation
$ git -P log -n1 814c81
commit 814c816f9b7f900113bed0f75a8122dba5555f65
Merge: 3dc5b1d 5353b23
Author: openharmony_ci <7387629+openharmony_ci@user.noreply.gitee.com>
Date:   Thu Mar 18 19:58:42 2021 +0800

    !44 Component decoupling modification--Support independent external device driver component compilation
    Merge pull request !44 from kevin/0316_release_build
- 2021.03.20: This module has been submitted to pypi, link
$ git -P log -n1  958189
commit 95818940a0bc47d25e7454c4d37732e90f7d2df8
Author: pilipala195 <yangguangzhao1@huawei.com>
Date:   Sat Mar 20 12:35:48 2021 +0800

    Upload ohos_build to Pypi
- 2021.04.03: it is no longer necessary to build hb set first. You can directly hb build.
$ git -P log -n1 32d740
commit 32d7402125db0c46c43b05322e588a692f96827a
Author: SimonLi <likailong@huawei.com>
Date:   Sat Apr 3 08:55:13 2021 +0800

    IssueNo: #I3EPRJ
    Description: build device with no need to hb set
    Sig: build
    Feature or Bugfix: Feature
    Binary Source: No
hpm
hpm is a package management platform developed by HW from the second half of 2020, js language, npm installation and update:
$ npm install -g @ohos/hpm-cli # install
$ npm update  -g @ohos/hpm-cli # to update
$ npm rm      -g @ohos/hpm-cli # uninstall
Basic command
- hpm init [-t template] initializes an hpm package in a folder, mainly to create a bundle JSON file
$ hpm init -t dist
Initialization finished.
$ cat bundle.json
{
  "name": "dist",
  "version": "1.0.0",
  "publishAs": "distribution",
  "description": "this is a distribution created by template",
}
- hpm i|install [name] download the dependency and install it. It must be executed in the directory where hpm init has been installed
$ hpm i @ohos/hispark_pegasus
- hpm d|download [name] only downloads the specified package (tgz file) without download dependency. It can be executed in any directory
$ hpm d @ohos/hispark_pegasus
$ ls @ohos-hispark_pegasus-1.0.3.tgz
@ohos-hispark_pegasus-1.0.3.tgz
- hpm list print dependency graph
$ hpm list
+--dist@1.0.0
│ +--@ohos/hispark_pegasus@1.0.3
│ │ +--@ohos/bootstrap@1.1.1
│ │ +--@ohos/bounds_checking_function@1.1.1
- hpm pack packages components (bundle s) to generate tgz files.
$ hpm pack
> Packing dist-1.0.0.tgz /home/kevin/workspace/harmony/src/hpm.i/@hihope-neptune_iot
>   directory .
>     . . bundle.json
>     . . README.md
>     . . LICENSE
> Packing dist-1.0.0.tgz finished.
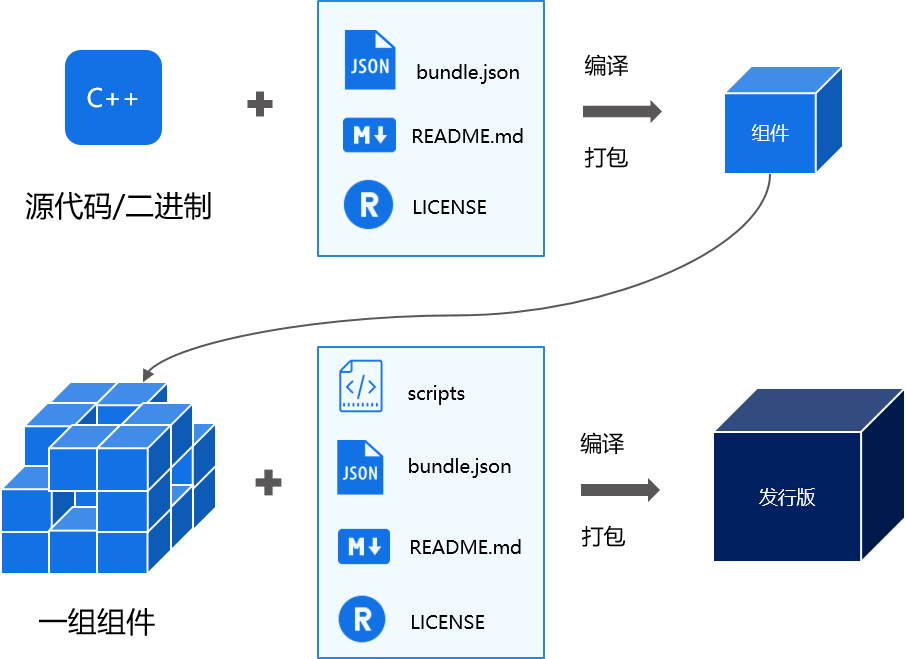
harmony's component (bundle) and distribution are inclusive. The component consists of code + bundle JSON + readme + license. The distribution version consists of multiple components + scripts. The official diagram is as follows:
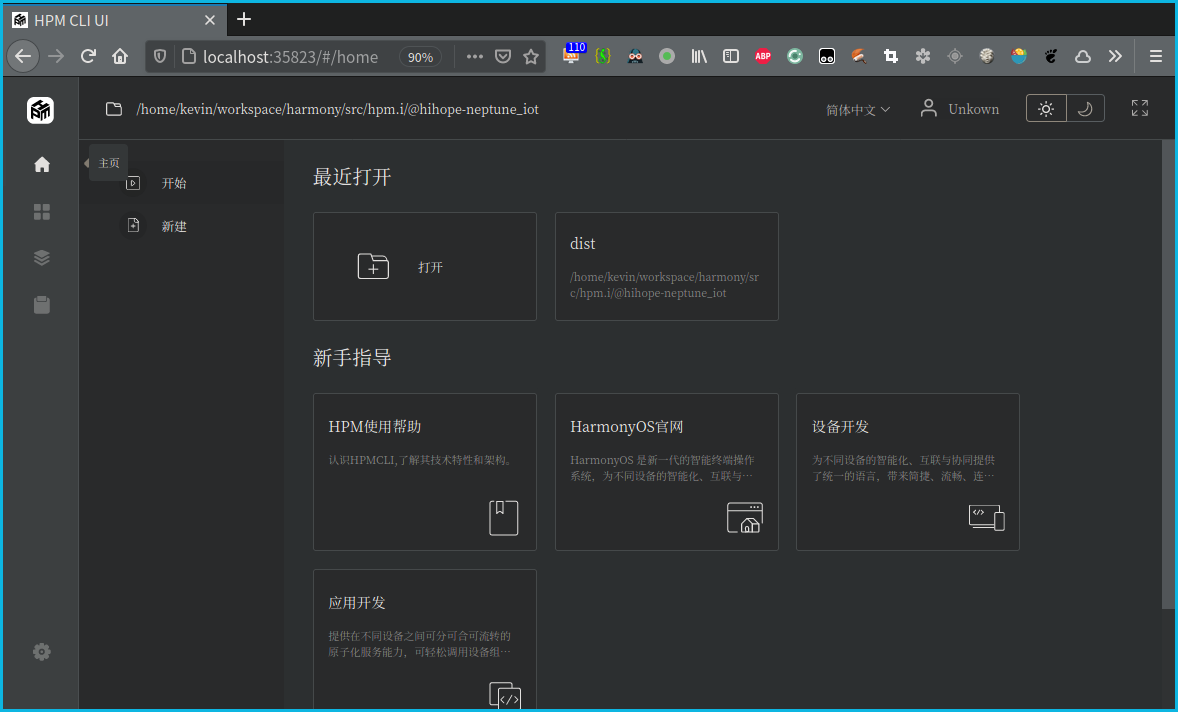
- hpm ui creates a front-end for http access. You can view a variety of information and execute a variety of commands in the browser, or execute them in docker and access them in the browser in host.
hpm iterations are fast, especially with the release of harmony 2.0 on June 2, 2021 After 0, it will be updated every few days. Therefore, even if the docker container is used, it is recommended to upgrade hpm first to obtain the features of the latest version.
Source code analysis
Compared with hb, hpm adds the concept of package management and is no longer a pure compilation framework. hb cannot manage the dependencies between packages and multi version control of the same package. hpm is similar to pip and npm to solve these problems.
from HPM cli on npm official website In fact, version 0.0.1 was submitted in August 2020, but there was no download until 2021.5. The source code is not found yet. You can only see some from its installation path:
$ hpm -V
1.2.6
$ which hpm
/home/kevin/.nvm/versions/node/v14.15.0/bin/hpm
$ ls ~/.nvm/versions/node/v14.15.0/lib/node_modules/@ohos/hpm-cli
bin  hpm-debug-build.js  lib  LICENSE  node_modules  package.json  README.md  README_ZH.md
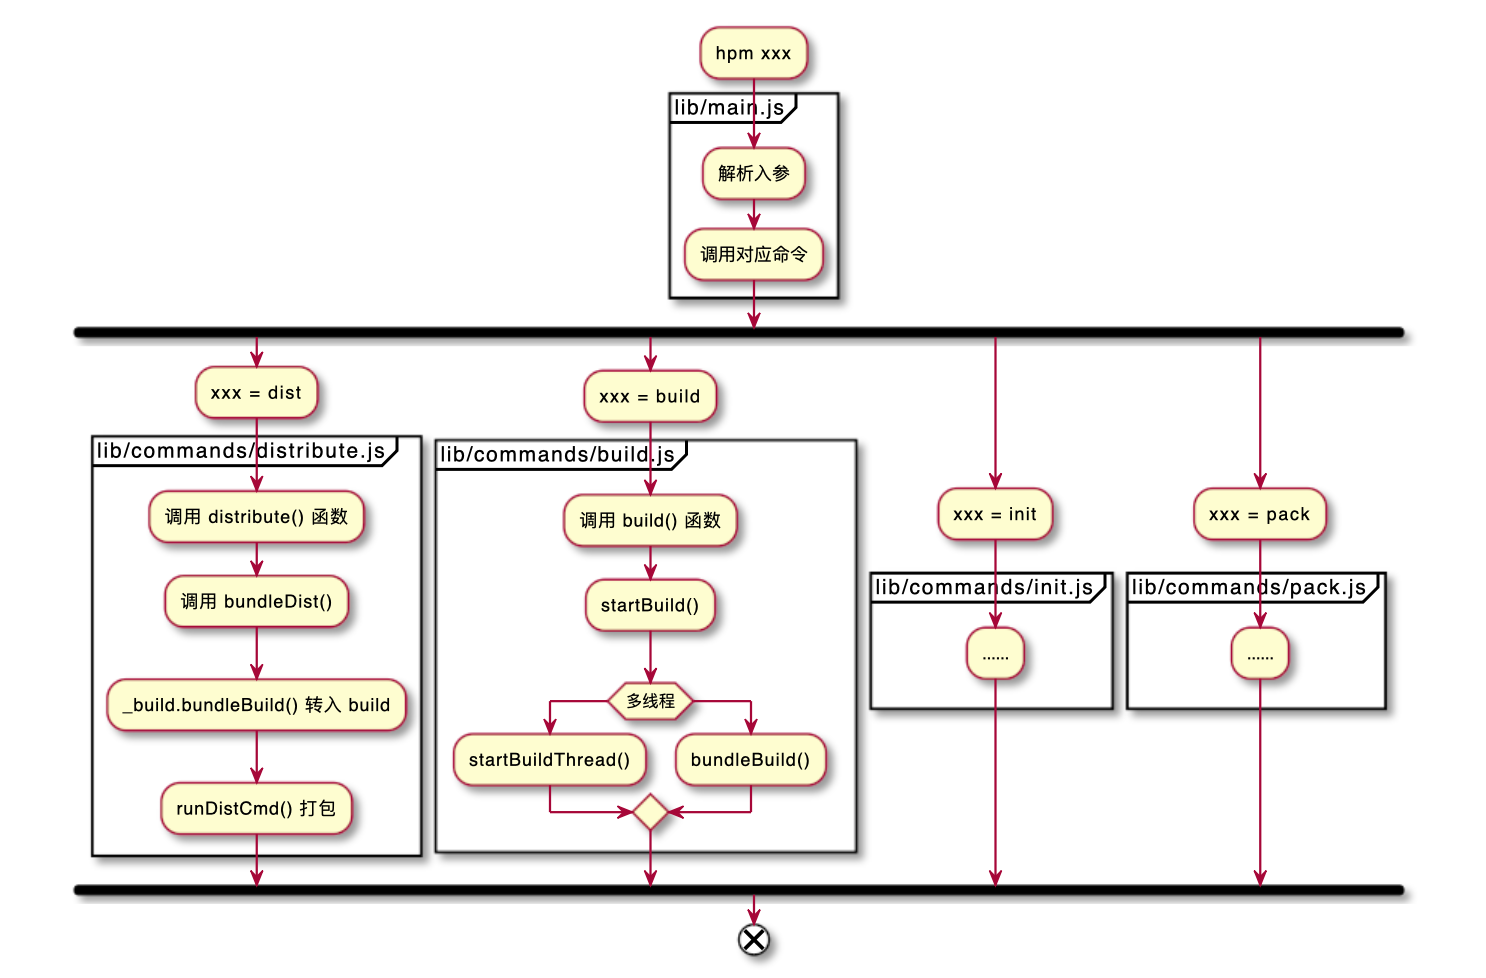
hpm defines a js file for each subcommand
$ ls ~/.nvm/versions/node/v14.15.0/lib/node_modules/@ohos/hpm-cli/lib/commands
build.js        download.js      init.js     publish.js  uninstall.js
checkUpdate.js  extract.js       install.js  run.js      update.js
code.js         fetch.js         lang.js     script.js
config.js       generateKeys.js  list.js     search.js
distribute.js   index.js         pack.js     ui.js
Each time you execute the hpm xxx command, main JS parses the input parameters and transfers them to the corresponding commands (LIB / commands / xxx. JS). The execution logic of each command can refer to the code. For example, dist will check the build framework, and then give the right to the build command. Build will check the dependencies first, and then conduct single thread or multi-threaded compilation. gn and ninja will still be used for the compilation here. After compilation, dist will package.
History
- 1.1.0 (202104): new GUI, hpm ui startup
- 1.2.3 (202106): add fetch, download and code subcommands
DevEco Device Tool
HUAWEI DevEco Device Tool (hereinafter referred to as DDT) is a one-stop integrated development environment provided by HarmonyOS for intelligent device developers. It provides more functions than hpm: on-demand customization of components, and supports code editing, burning and debugging.
Therefore, DDT is no longer limited to the compilation discussed in this paper, but the compilation process of DDT is relatively special. It uses hb, hpm and other tools more flexibly, and develops a hos. When you use DDT build, execute this command:
/home/kevin/.deveco-device-tool/core/deveco-venv/bin/hos run --project-dir /home/kevin/workspace/harmony/src/bearpi --environment bearpi_hm_nano
DDT is installed in ~ / Deveco device tool, mainly including three folders: core, platforms and plugins
core includes compiling, debugging, burning tools, and python virtual environment:
$ ls .deveco-device-tool/core
arm_noneeabi_gcc  deveco-venv                     tool_hiburn                 tool_openocd
contrib_pysite    feature-toggling-manifest.json  tool_lldb                   tool_scons
deveco-home       tool_burn                       tool_openlogic_openjdk_jre  tool_trace
platforms contains compilation tools for different SoC manufacturers, including Hisilicon, lianshengde, NXP... Each has a folder, most of which are implemented in python, some of which contain hb Py, some don't have hb. It seems that customization has made the compilation tools diverse, and HW doesn't care. Let's play separately.
$ ls .deveco-device-tool/platforms
asrmicro  bestechnic  blank  bouffalo  hisilicon  nxp  realtek  winnermicro  xradio
Among them, asrmicro (Aojie Technology), bestechnic (hengxuan Technology), bouffalo (Bolu Technology) and xradio (core link) have not seen their development boards yet. They should be under development or in alpha status.
plugins contains VSCode extension files
$ ls .deveco-device-tool/plugins
deveco-device-tool-2.2.0+285431.76f4090e.vsix
Because DDT is neither open source nor lack of documentation, it is difficult to interpret it for the time being. We will talk about it later.
Official resources:
summary
Overall flow chart

Comparison table between download method and compilation method
| Comparison item | HarmonyOS (repo) | neptune (hpm) | pegasus (hpm) | 3861 (DDT) | bearpi (DDT) | 3516/8 (DDT) |
|---|---|---|---|---|---|---|
| Nickname | * | HH-SLNPT10x | Hi3861V100 | |||
| SoC | * | WinnerMicro W800 | Hi3861 | Hi3861 | Hi3861 | Hi3516/18 |
| SoC Kernel | * | Xuantie 804(RISC-V) | RISC-V | Same left | Same left | Cortex-A7 |
| peripheral | * | 2MB(F)+288KB® | ||||
| characteristic | * | WiFi,BT | 2.4GHz WiFi | Same left | ||
| Vendor | * | Hihope | Hisili | Same left | Little bear pie | |
| /build.py | Y | - | - | |||
| /.deveco | - | - | - | Y | Y | |
| /.vscode | - | - | - | Y | Y | |
| /device | Y | [Y] | - | |||
| /vendor | Y | - | Y | |||
| /build/ | Y | Y | Y | Y | - | - |
| /build/lite/hb | Y | - | Y | - | - | - |
| hb build | Y | |||||
| python build.py | Y | |||||
| hpm dist | Y | Y | ||||
| DDT build | Y | Y | Y |
- DDT downloads are Deveco and vscode folder, compilation also needs deveco.
- DDT can use the build tool in the installed platforms, so build/lite is not required. hb build and python build Py is not available.
reference resources
- pegasus: pegasus, pegasus
- neptune: neptune
- taurus: taurus
- aries: aries
- Winner micro: Beijing lianshengde micro electronics