Author: Wang Chenyan
When we are developing applications, we usually introduce SDKs, and most SDKs require us to initialize in the Application. When we introduce more and more SDKs, the Application will become longer and longer. If the initialization tasks of the SDK depend on each other, we have to deal with many condition judgments. At this time, if we have another asynchronous initialization, I believe everyone will crash.
Some people may say that it's OK for me to initialize in order in the main thread. Of course, as long as the boss doesn't bother you.
"Xiao Wang, why does our APP take so long to start?"
Just kidding, we can see how important an excellent startup framework is for APP startup performance!
1, Why not use Google's StartUp?
When it comes to the StartUp framework, I have to mention StartUp. After all, it is an official product of Google. The existing StartUp framework has more or less reference to StartUp, which will not be introduced in detail here. If you don't know about StartUp, you can refer to this article. App Startup of Jetpack series, from getting started to becoming a monk.
https://juejin.cn/post/7023643365048582174
StartUp provides a simple dependent task initialization function, but for a complex project, StartUp has the following shortcomings:
1. Asynchronous tasks are not supported
If it is started through the ContentProvider, all tasks are executed in the main thread. If it is started through the interface, all tasks are executed in the same thread.
2. Componentization is not supported
Specify dependent tasks through Class and reference dependent modules.
3. Multi process is not supported
The process that the task needs to execute cannot be configured separately.
4. Startup priority is not supported
Although you can set priorities by specifying dependencies, it is too complex.
2, What is a qualified startup framework?
1. Support asynchronous tasks
Effective means to reduce start-up time.
2. Support componentization
In fact, it is decoupling. On the one hand, it decouples task dependencies, and on the other hand, it decouples app and module dependencies.
3. Support task dependency
It can simplify our task scheduling.
4. Support priority
When there is no dependency, tasks are allowed to be executed first.
5. Support multi process
Only executing the initialization task in the required process can reduce the system load and improve the APP startup speed on the side.
3, Collection task
If we want to achieve complete decoupling, we can use APT to collect tasks.
First, define annotations, that is, some attributes of the task.
@Target(AnnotationTarget.CLASS)
@Retention(AnnotationRetention.RUNTIME)
annotation class InitTask(
    /**
     * Task name, unique
     */
    val name: String,
    /**
     * Whether to execute in the background thread
     */
    val background: Boolean = false,
    /**
     * The lower the priority, the higher the priority
     */
    val priority: Int = PRIORITY_NORM,
    /**
     * Task execution process, supporting main process, non main process, all processes,: xxx and specific process name
     */
    val process: Array<String> = [PROCESS_ALL],
    /**
     * Dependent tasks
     */
    val depends: Array<String> = []
)
name = as the unique identifier of the task, the type is String, which is mainly used to decouple the task dependency.
Background is whether to execute in the background.
priority , is the execution order in the main thread and no dependency scenario.
Process specifies the process of task execution, and supports main process, non main process, all processes,: xxx and specific process name.
Dependencies: Specifies the tasks that depend on.
If the attributes of the task are well defined, an interface for executing the task is also required:
interface IInitTask {
    fun execute(application: Application)
}
The information that the task needs to collect has been defined, so let's take a look at what a real task looks like.
@InitTask(
    name = "main",
    process = [InitTask.PROCESS_MAIN],
    depends = ["lib"]
)
class MainTask : IInitTask {
    override fun execute(application: Application) {
        SystemClock.sleep(1000)
        Log.e("WCY", "main1 execute")
    }
}
It's still relatively simple and clear.
Next, you need to collect tasks through the Annotation Processor, and then write files through kotlin poet.
class TaskProcessor : AbstractProcessor() {

    override fun process(annotations: MutableSet<out TypeElement>?, roundEnv: RoundEnvironment): Boolean {
        val taskElements = roundEnv.getElementsAnnotatedWith(InitTask::class.java)
        val taskType = elementUtil.getTypeElement("me.wcy.init.api.IInitTask")

        /**
         * Param type: MutableList<TaskInfo>
         *
         * There's no such type as MutableList at runtime so the library only sees the runtime type.
         * If you need MutableList then you'll need to use a ClassName to create it.
         * [https://github.com/square/kotlinpoet/issues/482]
         */
        val inputMapTypeName =
            ClassName("kotlin.collections", "MutableList").parameterizedBy(TaskInfo::class.asTypeName())

        /**
         * Param name: taskList: MutableList<TaskInfo>
         */
        val groupParamSpec = ParameterSpec.builder(ProcessorUtils.PARAM_NAME, inputMapTypeName).build()

        /**
         * Method: override fun register(taskList: MutableList<TaskInfo>)
         */
        val loadTaskMethodBuilder = FunSpec.builder(ProcessorUtils.METHOD_NAME)
            .addModifiers(KModifier.OVERRIDE)
            .addParameter(groupParamSpec)

        for (element in taskElements) {
            val typeMirror = element.asType()
            val task = element.getAnnotation(InitTask::class.java)
            if (typeUtil.isSubtype(typeMirror, taskType.asType())) {
                val taskCn = (element as TypeElement).asClassName()

                /**
                 * Statement: taskList.add(TaskInfo(name, background, priority, process, depends, task));
                 */
                loadTaskMethodBuilder.addStatement(
                    "%N.add(%T(%S, %L, %L, %L, %L, %T()))",
                    ProcessorUtils.PARAM_NAME,
                    TaskInfo::class.java,
                    task.name,
                    task.background,
                    task.priority,
                    ProcessorUtils.formatArray(task.process),
                    ProcessorUtils.formatArray(task.depends),
                    taskCn
                )
            }
        }

        /**
         * Write to file
         */
        FileSpec.builder(ProcessorUtils.PACKAGE_NAME, "TaskRegister\$$moduleName")
            .addType(
                TypeSpec.classBuilder("TaskRegister\$$moduleName")
                    .addKdoc(ProcessorUtils.JAVADOC)
                    .addSuperinterface(ModuleTaskRegister::class.java)
                    .addFunction(loadTaskMethodBuilder.build())
                    .build()
            )
            .build()
            .writeTo(filer)

        return true
    }
}
See what the generated file looks like.
public class TaskRegister$sample : ModuleTaskRegister {
  public override fun register(taskList: MutableList<TaskInfo>): Unit {
    taskList.add(TaskInfo("main2", true, 0, arrayOf("PROCESS_ALL"), arrayOf("main1","lib1"),MainTask2()))
    taskList.add(TaskInfo("main3", false, -1000, arrayOf("PROCESS_ALL"), arrayOf(), MainTask3()))
    taskList.add(TaskInfo("main1", false, 0, arrayOf("PROCESS_MAIN"), arrayOf("lib1"), MainTask()))
  }
}
The sample module collects three tasks, and TaskInfo aggregates the task information.
We know that APT can generate code, but we cannot modify the bytecode. That is to say, when we want to get the injected task at runtime, we also need to inject the collected task into the source code.
Here, we can complete the injection with the help of AutoRegister.
https://github.com/luckybilly/AutoRegister
Before injection:
internal class FinalTaskRegister {
    val taskList: MutableList<TaskInfo> = mutableListOf()

    init {
        init()
    }

    private fun init() {}

    fun register(register: ModuleTaskRegister) {
        register.register(taskList)
    }
}
Inject the collected tasks into the init method, and the injected bytecode:
/* compiled from: FinalTaskRegister.kt */
public final class FinalTaskRegister {
    private final List<TaskInfo> taskList = new ArrayList();

    public FinalTaskRegister() {
        init();
    }

    public final List<TaskInfo> getTaskList() {
        return this.taskList;
    }

    private final void init() {
        register(new TaskRegister$sample_lib());
        register(new TaskRegister$sample());
    }

    public final void register(ModuleTaskRegister register) {
        Intrinsics.checkNotNullParameter(register, "register");
        register.register(this.taskList);
    }
}
The classes generated by APT have been successfully injected into the code.
Summary
So far, we have completed the task collection. APT and bytecode modification are common class collection schemes. Compared with reflection, bytecode modification has no performance loss.
Later, it was found that Google had launched a new annotation processing framework ksp, which was faster, so it made a decisive attempt. Therefore, there are two annotation processing options, which are described in detail on GitHub.
4, Task scheduling
Task scheduling is the core of the startup framework, which you may have heard.
To deal with dependent tasks, we must first build a "directed acyclic graph".
What is a directed acyclic graph? Take a look at Wikipedia:
In graph theory, if a directed graph starts from any vertex and cannot return to that point through several edges, the graph is a directed acyclic graph (DAG).
It sounds very simple, so how to implement it? Today, let's put aside the high-level concept and use code to lead you to realize task scheduling.
First, tasks need to be divided into two categories: dependent tasks and non dependent tasks.
If there is a dependency, first check whether there is a ring. If there is a circular dependency, throw it directly. This can apply the formula - how to judge whether the linked list has a ring.
If there is no circular dependency, collect the dependent tasks of each task, which we call subtasks, and continue to execute subtasks after the current task is completed.
No dependency is the simplest. It can be executed directly according to the priority.
I wonder if you have any questions: when do dependent tasks start?
For dependent tasks, the leaf end point of the dependency chain must be a non dependent task. Therefore, after the non dependent task is completed, the dependent task can be executed.
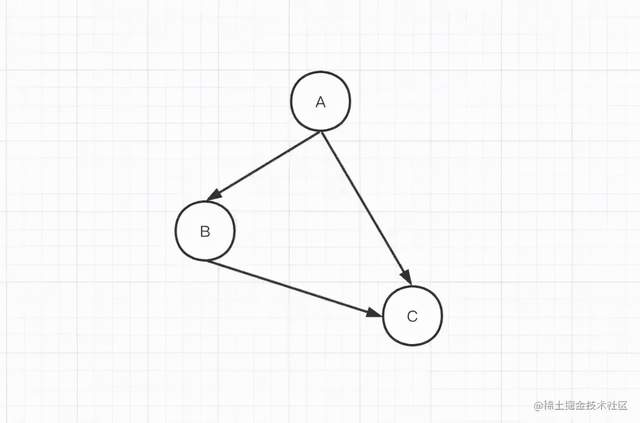
Here is a small example:
- A depends on B and C
- B depends on C
- C no dependency
Tree structure:
1. Group and sort out subtasks.
- Dependent:
A: No subtasks
B: Subtask: [A]
- No dependency:
C: Subtask: [A, B]
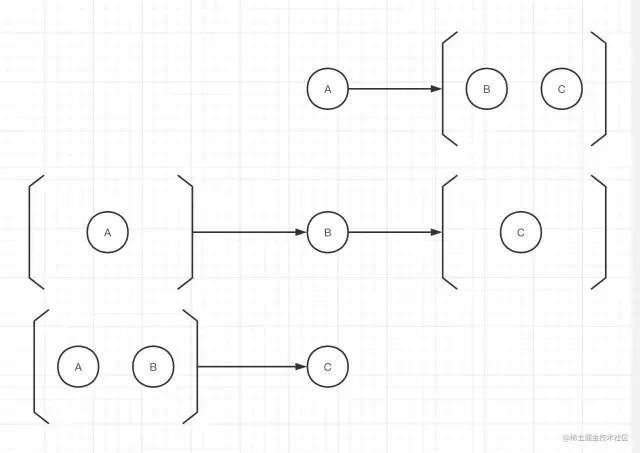
2. Perform dependent task C.
3. Update completed tasks: [C].
4. Check whether the subtasks of C can be executed.
A: Dependent on [B, C], the completed task does not contain B and cannot be started
B: Dependent on [C], the completed task contains C, which can be executed
5. Perform task B.
6. Repeat step 3 until all tasks are completed.
Let's implement it with code:
Use recursion to check for circular dependencies:
private fun checkCircularDependency(
    chain: List<String>,
    depends: Set<String>,
    taskMap: Map<String, TaskInfo>
) {
    depends.forEach { depend ->
        check(chain.contains(depend).not()) {
            "Found circular dependency chain: $chain -> $depend"
        }
        taskMap[depend]?.let { task ->
            checkCircularDependency(chain + depend, task.depends, taskMap)
        }
    }
}
Sorting subtasks:
task.depends.forEach {
    val depend = taskMap[it]
    checkNotNull(depend) {
        "Can not find task [$it] which depend by task [${task.name}]"
    }
    depend.children.add(task)
}
Perform tasks:
private fun execute(task: TaskInfo) {
    if (isMatchProgress(task)) {
        val cost = measureTimeMillis {
            kotlin.runCatching {
                (task.task as IInitTask).execute(app)
            }.onFailure {
                Log.e(TAG, "executing task [${task.name}] error", it)
            }
        }
        Log.d(
            TAG, "Execute task [${task.name}] complete in process [$processName] " +
                    "thread [${Thread.currentThread().name}], cost: ${cost}ms"
        )
    } else {
        Log.w( TAG, "Skip task [${task.name}] cause the process [$processName] not match")
    }
    afterExecute(task.name, task.children)
}
If the processes do not match, skip directly.
Proceed to the next task:
private fun afterExecute(name: String, children: Set<TaskInfo>) {
    val allowTasks = synchronized(completedTasks) {
        completedTasks.add(name)
        children.filter { completedTasks.containsAll(it.depends) }
    }
    if (ThreadUtils.isInMainThread()) {
        // If it is the main thread, put the asynchronous task into the queue first, and then execute the synchronous task
        allowTasks.filter { it.background }.forEach {
            launch(Dispatchers.Default) { execute(it) }
        }
        allowTasks.filter { it.background.not() }.forEach { execute(it) }
    } else {
        allowTasks.forEach {
            val dispatcher = if (it.background) Dispatchers.Default else Dispatchers.Main
            launch(dispatcher) { execute(it) }
        }
    }
}
If the dependent tasks of subtasks have been executed, they can be executed.
Finally, you need to provide an interface to start tasks. In order to support multiple processes, ContentProvider cannot be used here.
Summary
Through layer upon layer disassembly, the complex dependencies are sorted out clearly, and the task scheduling is realized in an easy to understand way.
Source code
https://github.com/wangchenyan/init
In addition, I also released alpha version on JitPack. Welcome to try:
kapt "com.github.wangchenyan.init:init-compiler:1-alpha.1"
implementation "com.github.wangchenyan.init:init-api:1-alpha.1"
Please move to {GitHub for detailed use.
https://github.com/wangchenyan/init
last
Taking StartUp as an introduction, this paper expounds what capabilities the dependent task StartUp framework needs to have, decouples through APT + bytecode injection, supports modularization, and describes the specific implementation of task scheduling through a simple model.
I hope this article can let you understand the core idea of the dependent task initiation framework. If you have good suggestions, please comment and exchange.
Here you can also share the necessary skills and knowledge brain map of Android senior engineer and the notes and documents of core knowledge points! It can not only consolidate the core technical points of the underlying principles, but also master the architecture design methodology that is difficult for ordinary developers to touch. In your work, team and interview, you will have the core competitiveness that your peers are difficult to copy.
Some relevant knowledge points have been collected, sorted and uploaded to Public account: Android development home , you can visit it by yourself.