1: What is Dockerfile
Dockerfile is a text document that can be built into an image through the docker build command.
We can define a series of commands in Dockerfile to build the image we want.
Dockerfile is necessary to create a new image.
2: Explanation of Dockerfile related commands
Just give a brief introduction to the more important commands. For details, please see the official website.
Dockerfile official document: https://docs.docker.com/engine/reference/builder/#entrypoint
2.1: FROM
Format:
FROM [--platform=<platform>] <image> [AS <name>]
Or
FROM [--platform=<platform>] <image>[:<tag>] [AS <name>]
Or
FROM [--platform=<platform>] <image>[@<digest>] [AS <name>]
Represents the image source. For example, FROM centos:7 means that the basic image of the current image is centos7.
If the basic image is not required, it can be written as FROM scratch
2.2: RUN
Format:
RUN /bin/bash -c 'source $HOME/.bashrc; \
echo $HOME'
It can also be written as:
RUN /bin/bash -c 'source $HOME/.bashrc; echo $HOME'
\Represents a newline splice execution statement.
To use a different shell than "/ bin/sh", use the exec form passed in to the desired shell. For example:
RUN ["/bin/bash", "-c", "echo hello"]
The docker image will RUN the commands defined later in RUN during the build process.
2.3: CMD
Format:
FROM ubuntu
CMD echo "This is a test." | wc -
or
FROM ubuntu
CMD ["/usr/bin/wc","--help"]
For example:
CMD netstat -ntpl can be written as CMD ["netstat","ntpl"]
The CMD command does not execute any commands during image construction, but refers to the expected commands of the image.
For example, the contents in Dockerfile are:
FROM centos:7

CMD echo "hello docker"
No error will be reported after docker build, and no error will be reported after docker run, because the shell command echo "hello word" is supported in centos:7 itself.
However, if the content in Dockerfile is:
FROM centos:7

CMD ["netstat","-ntpl"]
No error will be reported after docker build, and an error will be reported after docker run,

Because the shell command netstat -ntpl is not supported in the basic image centos:7.
2.4: LABEL
Mirror LABEL. A mirror can have multiple labels. To include spaces in the LABEL value when labeling, use quotation marks and backslashes as in command-line parsing.
Format:
LABEL "com.example.vendor"="ACME Incorporated"
LABEL com.example.label-with-value="foo"
LABEL version="1.0"
LABEL description="This text illustrates \
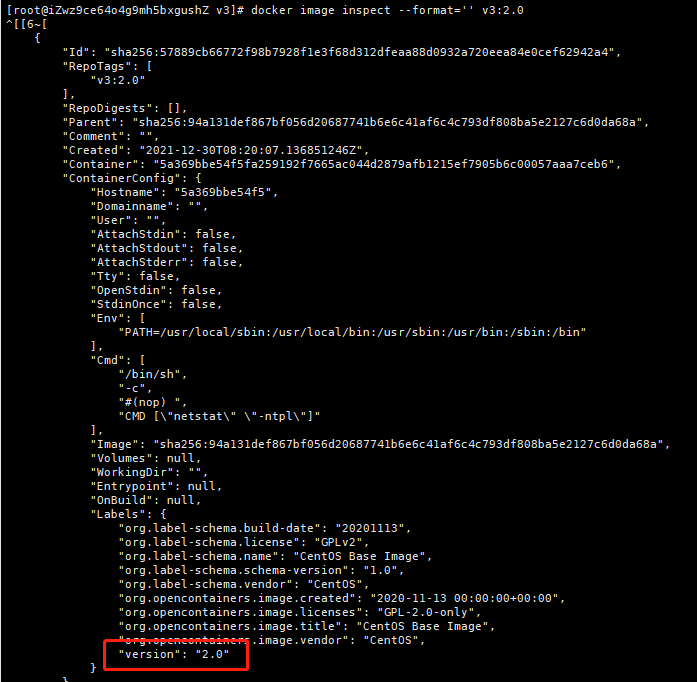
You can view it through docker image inspect --format = '' {image name}: {image tag}.
For example:
FROM centos:7

LABEL version=2.0

CMD ["netstat","-ntp
Port mode occupied after operation 80.

2.5: EXPOSE
Format:
EXPOSE 80/tcp
This is used to tell the Docker container to listen on the specified network port at run time. You can specify whether the port listens to TCP or UDP. If no protocol is specified, it defaults to TCP.
However, the port occupied by the container can still be specified when the docker run -p port:port command is performed without how to set the export.
For example:
docker run -dit v3:3.0
The port expected to be occupied in the later stage of operation is 80 (so the port will not be occupied in the actual operation).

But if you run
docker run -dit -p 8081:8081 v3:3.0
Then the port occupied by the container after operation is 8081.

2.6: EVN
Format:
ENV <key>=<value>
Simply put, it is to define environment variables for the built image (effective after running as a container), such as jdk version and database connection configuration.
2.7: ADD
Format:
ADD [--chown=<user>:<group>] <src>... <dest>
ADD [--chown=<user>:<group>] ["<src>",... "<dest>"]
This feature is only supported on dockerfiles used to build linux containers, not Windows containers. Since the concept of user and group ownership does not apply to Linux and Windows, it is feasible to use / etc/passwd for conversion and / etc/group to limit the user and group name ID S used for conversion. This function is only applicable to containers based on Linux operating system.
ADD command can ADD local files or ADD files through remote links.
If the ADD file is a local tar file, it will be automatically decompressed after adding to the image.
2.8: COPY
Format:
COPY [--chown=<user>:<group>] <src>... <dest>
COPY [--chown=<user>:<group>] ["<src>",... "<dest>"]
This feature is only supported on dockerfiles used to build linux containers, not Windows containers. Since the concept of user and group ownership does not apply to Linux and Windows, it is feasible to use / etc/passwd for conversion and / etc/group to limit the user and group name ID S used for conversion. This function is only applicable to containers based on Linux operating system.
The COPY command adds a local file to the image, and no file is automatically decompressed.
2.9: ENTRYPOINT
Format:
ENTRYPOINT ["executable", "param1", "param2"]
or
ENTRYPOINT command param1 param2
The purpose of ENTRYPOINT, like CMD, is to start the program and parameters in the specified container.
For example:
FROM centos:7

ENTRYPOINT echo "hello docker"
The effect after operation is:

Some relationships and differences among dockerfile entry point, CMD and RUN.
2.10: VOLUME
Format:
VOLUME ["/data"]
After running the image, create an anonymous data volume inside the container and mount it under the file system of the host.
However, the mounted directory is a random default and cannot be specified in the specific location of the host file system.
For example:
FROM centos:7

VOLUME /application/dockerfile/volume

CMD ["/bin/bash"]
After running the image, a data volume with directory address of / application/dockerfile/volume will be generated inside the container.
View all data volumes through docker volume ls. (the specific folder location can be found through the start time of the container and the creation time of the host anonymous folder)
Through docker volume inspect {volume_name}, you can see where the host is mounted.

The files in this location of the host are interconnected with the data volumes mounted in the container. Operations such as creating, editing and deleting files on the host will be synchronized to the container.
The detailed official document of docker volume is: https://docs.docker.com/storage/volumes/
The blog document is:
- https://www.cnblogs.com/edisonchou/p/docker_volumes_introduction.html
- https://blog.csdn.net/qq32933432/article/details/120944205
2.11: WORKDIR
Format:
WORKDIR /path/to/workdir
After WORKDIR is known, the RUN, CMD, ENTRYPOINT, COPY and ADD commands in Dockerfile will be based on this folder.
For example:
FROM centos:7

WORKDIR /home

CMD ["/bin/bash"]
After running the image, the location of the container is in the / home location.
For other relevant commands, please refer to the official documents.
3: How to build a new image
3.1: how to build a mirror from 0-1
1: Let's take a look at how centos officials build images
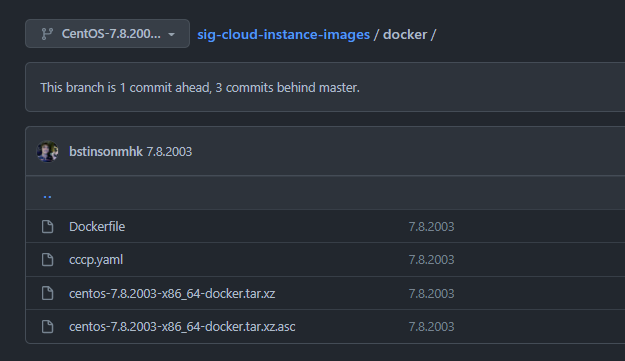
github address: https://github.com/CentOS/sig-cloud-instance-images/tree/CentOS-7.8.2003-x86_64/docker
Structure diagram:

The contents in Dockerfile are:
es (13 sloc)  523 Bytes

FROM scratch
ADD centos-7.8.2003-x86_64-docker.tar.xz /

LABEL \
    org.label-schema.schema-version="1.0" \
    org.label-schema.name="CentOS Base Image" \
    org.label-schema.vendor="CentOS" \
    org.label-schema.license="GPLv2" \
    org.label-schema.build-date="20200504" \
    org.opencontainers.image.title="CentOS Base Image" \
    org.opencontainers.image.vendor="CentOS" \
    org.opencontainers.image.licenses="GPL-2.0-only" \
    org.opencontainers.image.created="2020-05-04 00:00:00+01:00"

CMD ["/bin/bash"]
The basic image also needs a binary file. If you have done system tailoring and transplantation, it is easy to make your own smaller system package (at present, the smaller images include busybox, alpine, etc.).
docker official also provides articles on building basic images
2: Start trying to build your own basic image
The basic mirror environments I build include:
- centos7
- jdk8
- Net tools (network tools)
Dockerfile content:
# Empty Mirror
FROM scratch
# Add the official binary file to (it will be decompressed automatically)
ADD centos-7.8.2003-x86_64-docker.tar.xz /
# Create a folder
RUN mkdir -p /application/jdk
# Add jdk8's
COPY jdk-8u261-linux-x64.tar.gz /application/jdk
# Install net tools and remove the jdk tar package to reduce the footprint of the image
RUN yum install net-tools -y && \
        cd /application/jdk && \
        tar -zxvf jdk-8u261-linux-x64.tar.gz && \
        rm -rf jdk-8u261-linux-x64.tar.gz
# Setting environment variables for jdk
ENV JAVA_HOME=/application/jdk/jdk1.8.0_261
ENV CLASSPATH=.:$JAVA_HOME/lib/dt.jar:$JAVA_HOME/lib/tools.jar
ENV PATH=$JAVA_HOME/bin:$PATH

CMD ["/bin/bash"]
Centos-7.8.2003-x86 is required under the folder where Dockerfile is located_ 64-docker. tar. xz,jdk-8u261-linux-x64.tar.gz two files.
Build:
docker build -t centos7-jdk8:v1.0 .
function:
docker run -dit --name centos7-jdk8 centos7-jdk8:v1.0
After entering the container, run the java -version and netstat -ntpl commands.

3.2: how to build an image based on the basic image
After the previous step, a basic image has been built, and then I want to deploy a SpringBoot project.
So how should I write?
Because my basic image already has all the environments where I want to run the project, I just need to throw the executable jar package into it to run.
Dockerfile content:
# base image
FROM centos7-jdk8:v1.0
# working space
WORKDIR /application/webapp
# Copy jr package and startup script
COPY demo.jar .
COPY app.sh .
# Declare the port number required by the container
EXPOSE 8022
# Give the startup script executable permission
RUN chmod a+x app.sh
# Execute script after container starts
ENTRYPOINT ["./app.sh","start"]
Demo is required in Dockerfile folder jar,app.sh two files.
Build:
docker build -t demo:v1.0 .
function:
# Because the port occupied by the jar package after running is 8022, a port mapping needs to be done between the host and the docker container
docker run -dit -p 8022:8022 --name dmeo demo:v1.0 /bin/bash
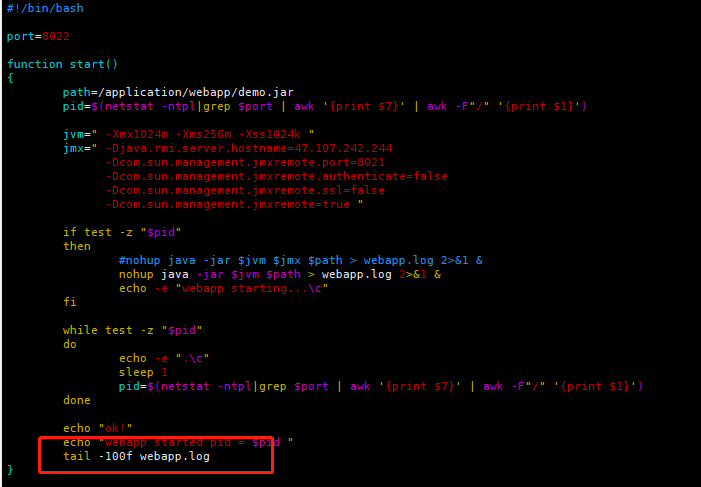
Because if no foreground process executes the ENTRYPOINT command after executing the command, the container will exit automatically if it thinks it is idle.
So I'm on app SH specially added a sentence:

In this way, the container will not exit automatically after startup.
When the host executes curl -i 127.0.0.1:8022 '\w', you can see that request 404 can be accessed (indicating that the service is started).

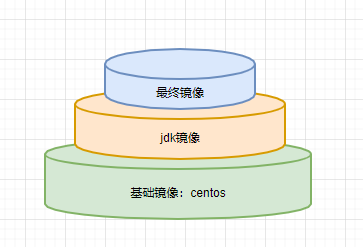
4: Mirror diagram

With the accumulation of images, the image volume will become larger and larger.