preface
This article belongs to the column "1000 problems to solve big data technology system", which is original by the author. Please indicate the source of quotation. Please help point out the deficiencies and errors in the comment area. Thank you!
Please refer to table of contents and references for this column 1000 problems to solve the big data technology system
text
Preparation for deployment and installation:
Close the firewall, close selinux, install jdk, change the host name, change the mapping relationship between host name and IP address, ssh password free login, etc
1. Flink's local mode deployment and installation
In the local mode, you do not need to start any process, but only use the local thread to simulate the flink process, which is suitable for testing, development and debugging. In this mode, you do not need to change any configuration, but only need to ensure the normal installation of jdk8
Step 1: upload the installation package and unzip it
Upload our compiled compressed package to the / opt/bigdata/soft path of node01 server, and then decompress it
cd /opt/bigdata/soft/
tar -zxf flink-1.8.1.tar.gz  -C /opt/bigdata/install/
Step 2: start directly with script
When flink is in local mode, you don't need to change any configuration. Just unzip it and start it
Execute the following command to start the local mode directly
cd /opt/bigdata/install/flink-1.8.1
bin/start-cluster.sh
After successful startup, execute jps to see that two processes have been started
18180 StandaloneSessionClusterEntrypoint
18614 TaskManagerRunner
Step 3: Web UI interface access
After the two processes are started successfully, you can access the web management interface of flink by accessing the 8081 port number
http://node01:8081/#/overview
Step 4: run the built-in test of flink
node01 uses the nc command of linux to send some words to the socket
sudo yum -y install nc
nc -lk 9000
node01 starts the built-in word statistics program of flink, accepts the input socket data and makes statistics
cd /opt/bigdata/install/flink-1.8.1
bin/flink run examples/streaming/SocketWindowWordCount.jar   --hostname localhost  --port 9000
View statistics:
The statistical results of the test cases provided with the flink are under the log folder
node01 execute the following command to view the statistical results
cd /opt/bigdata/install/flink-1.8.1/log
tail -200f flink-hadoop-taskexecutor-0-node01.kaikeba.com.out
After the local mode runs successfully, turn off the local mode, and then run the standAlone mode
cd /opt/bigdata/install/flink-1.8.1
bin/stop-cluster.sh
2. Flink's standAlone mode environment installation
Please refer to my blog to complete the installation of three node pseudo distributed big data environment
Detailed installation tutorial of three node big data environment
To use the standalone mode, you need to start the master node JobManager and the slave node taskManager of flink
| Services and ip | 192.168.52.100 | 192.168.52.110 | 192.168.52.120 |
|---|---|---|---|
| JobManager | yes | no | no |
| TaskManager | yes | yes | yes |
Step 1: change the configuration file
Stop the two processes in local mode on the node01 server, and then modify the node01 server configuration file
node01 server changes the flink-conf.yaml configuration file
The node01 server executes the following command to change the flick configuration file
cd /opt/bigdata/install/flink-1.8.1/conf/
vim flink-conf.yaml
Change this configuration to specify that the server where jobmanager is located is node01
jobmanager.rpc.address: node01
node01 server changes slave configuration file
node01 executes the following command to change Slave Slave configuration file
cd /opt/bigdata/install/flink-1.8.1/conf
vim slaves

node01
node02
node03
Step 2: install package distribution
Distribute the flex installation package of node01 server to other machines
The node01 server executes the following command to distribute the installation package
cd /opt/bigdata/install
scp -r flink-1.8.1/ node02:$PWD
scp -r flink-1.8.1/ node03:$PWD
Step 3: start the flink cluster
node01 executes the following command to start the flink cluster
cd /opt/bigdata/install/flink-1.8.1
bin/start-cluster.sh
Step 4: page access
Step 5: run the test case provided by flink
node01 executes the following command to start the socket service and enter the word
nc -lk 9000
node01 starts the built-in word statistics program of flink, accepts the input socket data and makes statistics
cd /opt/bigdata/install/flink-1.8.1
bin/flink run examples/streaming/SocketWindowWordCount.jar   --hostname node01  --port 9000
The node01 server executes the following command to view the statistics
cd /opt/bigdata/install/flink-1.8.1/log
tail -200f flink-hadoop-taskexecutor-0-node01.kaikeba.com.out
3. Flink's standAlone mode HA environment
In the previous section, we implemented the environment installation of the standAlone mode of flynk, and can submit tasks to the cluster normally. Our primary node is jobmanager, but the only problem is that jobmanager is a single node, and there will be a single node failure. Therefore, we can also use zk in the standAlone mode, Implement our jobmanager into a highly available pattern
First, stop Flink's stand alone mode and start zk and hadoop cluster services
Step 1: modify the configuration file
node01 executes the following command to modify the profile of Flink
node01 modify the flex-conf.yaml configuration file
cd /opt/bigdata/install/flink-1.8.1/conf

vim flink-conf.yaml
jobmanager.rpc.address: node01
high-availability: zookeeper
high-availability.storageDir: hdfs://node01:8020/flink
high-availability.zookeeper.path.root: /flink
high-availability.zookeeper.quorum: node01:2181,node02:2181,node03:218
node01 modifying the master configuration file
node01 executes the following command to modify the master configuration file
cd /opt/bigdata/install/flink-1.8.1/conf
vim masters

node01:8081
node02:8081
node01 modifying the slave configuration file
node01 executes the following command to modify the slave configuration file
cd /opt/bigdata/install/flink-1.8.1/conf
vim slaves

node01
node02
node03
Step 2: create the folder corresponding to the flink on hdfs
node01 executes the following command to create a folder on hdfs
hdfs dfs -mkdir -p /flink
Step 3: copy the configuration file
Copy the modified configuration file of node01 server to other servers
node01 executes the following command to copy the configuration file
cd /opt/bigdata/install/flink-1.8.1/conf
scp flink-conf.yaml  masters  slaves  node02:$PWD
scp flink-conf.yaml  masters  slaves  node03:$PWD
Step 4: start the flink cluster
node01 executes the following command to start the flink cluster
cd /opt/bigdata/install/flink-1.8.1
bin/start-cluster.sh
Step 5: page access
Accessing the web interface of node01 server
http://node01:8081/#/overview
Accessing the web interface of node02 server
http://node02:8081/#/overview
Note: once you access the web interface of node02, you will find that our web interface will automatically jump to the web interface of node01, because at this time, our node01 server is the real active node
Step 6: simulate failure and downtime to realize automatic switching
Kill the jobManager process of node01 server, and then check whether the jobManager of node02 can access it after a period of time
Note: when the JobManager is switched, the TaskManager will be restarted, which is actually a hidden problem
Step 7: submit tasks under HA in the stand alone mode of flynk
In HA mode, submitting tasks is the same as that in standAlone single node mode. Even if the JobManager server goes down, it doesn't matter. It will switch automatically
node01 executes the following command to start the socket service and enter the word
nc -lk 9000
node01 starts the built-in word statistics program of flink, accepts the input socket data and enters
Row statistics
cd /opt/bigdata/install/flink-1.8.1
bin/flink run examples/streaming/SocketWindowWordCount.jar   --hostname node01  --port 9000
The node01 server executes the following command to view the statistics
cd /opt/bigdata/install/flink-1.8.1/log
tail -200f flink-hadoop-taskexecutor-0-node01.kaikeba.com.out
4. Fly on yarn mode
flink's tasks can also run on yarn, submit flnk's tasks to yarn platform, and realize the unified resource scheduling and management of our tasks through yarn platform, which is convenient for us to manage CPU, memory and other resources in the cluster
Dependent Environment Description:
At least Hadoop 2 Version 2 and above
hdfs and yarn services start normally
flink on yarn is divided into two modes:
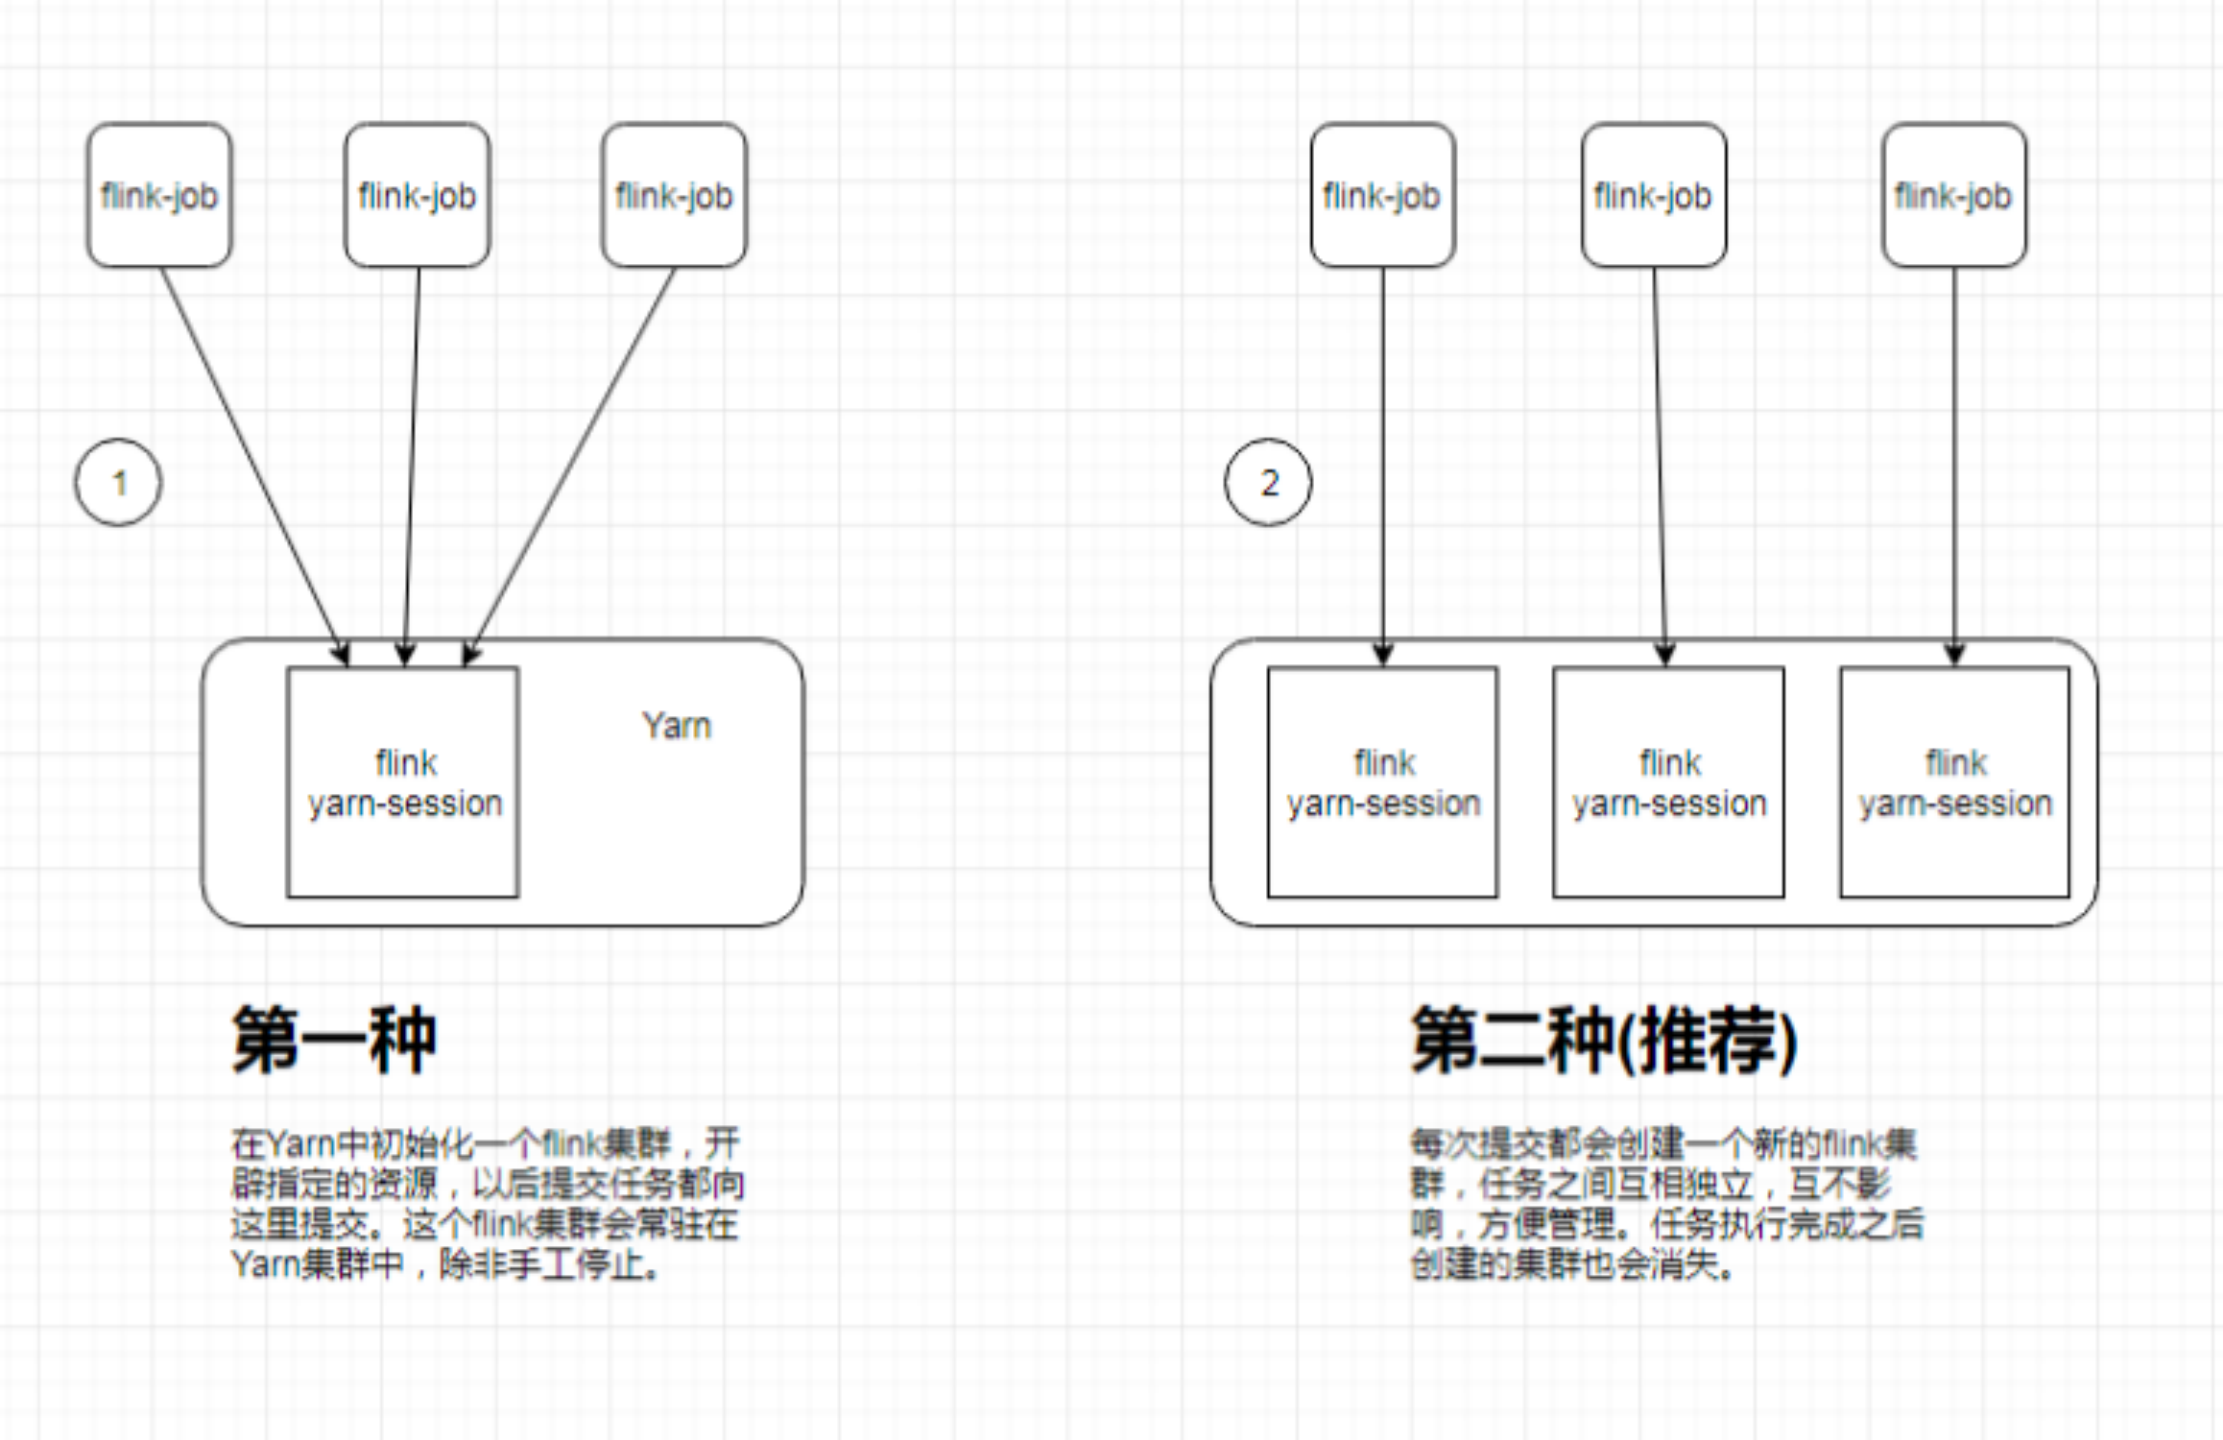
1. The first mode: single yarn session mode
In this way, you need to start the cluster first, then submit the job, and then apply for a resource space from yarn. The resources will remain unchanged forever. If the resources are full, the next job cannot be submitted. You can only wait until one of the jobs in yarn is completed and the resources are released, then the next job will be submitted normally. This mode is generally not used in actual work
In this mode, we do not need to make any configuration. We can directly raise the price of tasks to the yarn cluster. We need to start hdfs and yarn cluster in advance
Start single Yan session mode
Step 1: modify the yen site XML configuration as file
node01 executes the following command to modify yen - site XML, add the following configuration attributes
cd /opt/bigdata/install/hadoop-2.6.0-cdh5.14.2/etc/hadoop
vim yarn-site.xml
<property>
<name>yarn.resourcemanager.am.max-attempts</name>
<value>4</value>
<description>
The maximum number of application master execution attempts.
</description>
</property>
Then copy the modified configuration file to node02 and node03 servers
node01 executes the following command to copy the configuration file
cd /opt/bigdata/install/hadoop-2.6.0-cdh5.14.2/etc/hadoop
scp yarn-site.xml  node02:$PWD
scp yarn-site.xml  node03:$PWD
Then restart the yarn cluster
Step 2: modify the flink configuration file
node01 executes the following command to change the flick configuration file
cd /opt/bigdata/install/flink-1.8.1/conf

vim flink-conf.yaml
high-availability: zookeeper
high-availability.storageDir: hdfs://node01:8020/flink_yarn_ha
high-availability.zookeeper.path.root: /flink-yarn
high-availability.zookeeper.quorum: node01:2181,node02:2181,node03:2181
yarn.application-attempts: 10
Create a folder on hdfs
node01 creates the hdfs folder by executing the following command
hdfs dfs -mkdir -p /flink_yarn_ha
Step 3: start the flink cluster in yarn
Directly execute the following command in node01 to start a new flink cluster in yarn. You can directly use yarn session SH this script to start
cd /opt/bigdata/install/flink-1.8.1/
bin/yarn-session.sh -n 2 -jm 1024 -tm 1024 [-d]
We can also use -- help to see more parameter settings
bin/yarn-session.sh –help

Usage:
   Required
     -n,--container <arg>   Number of YARN container to allocate (=Number of Task Managers)
   Optional
     -D <property=value>             use value for given property
     -d,--detached                   If present, runs the job in detached mode
     -h,--help                       Help for the Yarn session CLI.
     -id,--applicationId <arg>       Attach to running YARN session
     -j,--jar <arg>                  Path to Flink jar file
     -jm,--jobManagerMemory <arg>    Memory for JobManager Container with optional unit (default: MB)
     -m,--jobmanager <arg>           Address of the JobManager (master) to which to connect. Use this flag to connect to a different JobManager than the one specified in the configuration.
     -n,--container <arg>            Number of YARN container to allocate (=Number of Task Managers)
     -nl,--nodeLabel <arg>           Specify YARN node label for the YARN application
     -nm,--name <arg>                Set a custom name for the application on YARN
     -q,--query                      Display available YARN resources (memory, cores)
     -qu,--queue <arg>               Specify YARN queue.
     -s,--slots <arg>                Number of slots per TaskManager
     -sae,--shutdownOnAttachedExit   If the job is submitted in attached mode, perform a best-effort cluster shutdown when the CLI is terminated abruptly, e.g., in response to a user interrupt, such
                                     as typing Ctrl + C.
     -st,--streaming                 Start Flink in streaming mode
     -t,--ship <arg>                 Ship files in the specified directory (t for transfer)
     -tm,--taskManagerMemory <arg>   Memory per TaskManager Container with optional unit (default: MB)
     -yd,--yarndetached              If present, runs the job in detached mode (deprecated; use non-YARN specific option instead)
     -z,--zookeeperNamespace <arg>   Namespace to create the Zookeeper sub-paths for high availability mode
Note: if yarn's memory is too small at startup, the following error may be reported
Diagnostics: Container [] is running beyond virtual memory limits. Current usage: 250.5 MB of 1 GB physical memory used; 2.2 GB of 2.1 GB virtual memory used. Killing containerpid=6386,containerID=container_1521277661809_0006_01_000001
We need to modify the yen site XML, add the following configuration, and then restart yarn
<property>
    <name>yarn.nodemanager.vmem-check-enabled</name>
    <value>false</value>
</property>
Step 4: view the yarn management interface 8088
Visit the 8088 management interface of yarn and find an application in yarn
http://node01:8088/cluster
There will be a resident application in yarn, which is a session started separately for our flick
Step 5: submit task
Use the jar package provided by flink to realize the function of word counting and statistics
node01 prepare files and upload hdfs
cd /opt/bigdata
vim wordcount.txt
The contents are as follows
hello world
flink hadoop
hive spark
Create folders and upload files on hdfs
hdfs dfs -mkdir -p /flink_input
hdfs dfs -put wordcount.txt  /flink_input
node01 executes the following command to submit the task to the flink cluster
cd /opt/bigdata/install/flink-1.8.1
bin/flink run ./examples/batch/WordCount.jar -input hdfs://node01:8020/flink_input -output hdfs://node01:8020/flink_output/wordcount-result.txt
Step 6: verify high availability of Yan session
Through the node01:8088 interface, check the machine on which the yarn session is started, and then kill the yarn session process. We will find that the yarn session will restart on another machine
Find the server where YarnSessionClusterEntrypoint is located, and then kill the process
[hadoop@node02 ~]$ jps
10065 QuorumPeerMain
10547 YarnSessionClusterEntrypoint
10134 DataNode
10234 NodeManager
10652 Jps
[hadoop@node02 ~]$ kill -9 10547
After killing the YarnSessionClusterEntrypoint process, you will find that the YarnSessionClusterEntrypoint process will restart on other machines
2. The second mode: multiple yarn session mode
The advantage of this method is that a task will correspond to a job, that is, each job submitted will apply for resources from yarn according to its own situation until the job execution is completed, which will not affect the normal operation of the next job, unless there are no resources on yarn.
Note: YARN must be set on the client side_ CONF_ Dir or HADOOP_CONF_DIR or HADOOP_HOME environment variable, which is used to read the configuration information of YARN and HDFS, otherwise the startup will fail
You don't need to start any cluster in yarn, just submit the task directly
Step 1: directly execute the command and submit the task
cd /opt/bigdata/install/flink-1.8.1/
bin/flink run -m yarn-cluster -yn 2 -yjm 1024 -ytm 1024 ./examples/batch/WordCount.jar -input hdfs://node01:8020/flink_input -output hdfs://node01:8020/out_result/out_count.txt
Step 2: view the output results
hdfs executes the following command to view the output
hdfs dfs -text hdfs://node01:8020/out_result/out_count.txt
Step 3: view the help document of flynk run
We can use – help to see which parameters can be added to the help document
cd /opt/bigdata/install/flink-1.8.1/
bin/flink run --help
The results are as follows
Action "run" compiles and runs a program.

  Syntax: run [OPTIONS] <jar-file> <arguments>
  "run" action options:
     -c,--class <classname>               Class with the program entry point
                                          ("main" method or "getPlan()" method.
                                          Only needed if the JAR file does not
                                          specify the class in its manifest.
     -C,--classpath <url>                 Adds a URL to each user code
                                          classloader  on all nodes in the
                                          cluster. The paths must specify a
                                          protocol (e.g. file://) and be
                                          accessible on all nodes (e.g. by means
                                          of a NFS share). You can use this
                                          option multiple times for specifying
                                          more than one URL. The protocol must
                                          be supported by the {@link
                                          java.net.URLClassLoader}.
     -d,--detached                        If present, runs the job in detached
                                          mode
     -n,--allowNonRestoredState           Allow to skip savepoint state that
                                          cannot be restored. You need to allow
                                          this if you removed an operator from
                                          your program that was part of the
                                          program when the savepoint was
                                          triggered.
     -p,--parallelism <parallelism>       The parallelism with which to run the
                                          program. Optional flag to override the
                                          default value specified in the
                                          configuration.
     -q,--sysoutLogging                   If present, suppress logging output to
                                          standard out.
     -s,--fromSavepoint <savepointPath>   Path to a savepoint to restore the job
                                          from (for example
                                          hdfs:///flink/savepoint-1537).
     -sae,--shutdownOnAttachedExit        If the job is submitted in attached
                                          mode, perform a best-effort cluster
                                          shutdown when the CLI is terminated
                                          abruptly, e.g., in response to a user
                                         interrupt, such as typing Ctrl + C.
  Options for yarn-cluster mode:
     -d,--detached                        If present, runs the job in detached
                                          mode
     -m,--jobmanager <arg>                Address of the JobManager (master) to
                                          which to connect. Use this flag to
                                          connect to a different JobManager than
                                          the one specified in the
                                          configuration.
     -sae,--shutdownOnAttachedExit        If the job is submitted in attached
                                          mode, perform a best-effort cluster
                                          shutdown when the CLI is terminated
                                          abruptly, e.g., in response to a user
                                          interrupt, such as typing Ctrl + C.
     -yD <property=value>                 use value for given property
     -yd,--yarndetached                   If present, runs the job in detached
                                          mode (deprecated; use non-YARN
                                          specific option instead)
     -yh,--yarnhelp                       Help for the Yarn session CLI.
     -yid,--yarnapplicationId <arg>       Attach to running YARN session
     -yj,--yarnjar <arg>                  Path to Flink jar file
     -yjm,--yarnjobManagerMemory <arg>    Memory for JobManager Container with
                                          optional unit (default: MB)
     -yn,--yarncontainer <arg>            Number of YARN container to allocate
                                          (=Number of Task Managers)
     -ynl,--yarnnodeLabel <arg>           Specify YARN node label for the YARN
                                          application
     -ynm,--yarnname <arg>                Set a custom name for the application
                                          on YARN
     -yq,--yarnquery                      Display available YARN resources
                                          (memory, cores)
     -yqu,--yarnqueue <arg>               Specify YARN queue.
     -ys,--yarnslots <arg>                Number of slots per TaskManager
     -yst,--yarnstreaming                 Start Flink in streaming mode
     -yt,--yarnship <arg>                 Ship files in the specified directory
                                          (t for transfer)
     -ytm,--yarntaskManagerMemory <arg>   Memory per TaskManager Container with
                                          optional unit (default: MB)
     -yz,--yarnzookeeperNamespace <arg>   Namespace to create the Zookeeper
                                          sub-paths for high availability mode
     -z,--zookeeperNamespace <arg>        Namespace to create the Zookeeper
                                          sub-paths for high availability mode

  Options for default mode:
     -m,--jobmanager <arg>           Address of the JobManager (master) to which
                                     to connect. Use this flag to connect to a
                                     different JobManager than the one specified
                                     in the configuration.
     -z,--zookeeperNamespace <arg>   Namespace to create the Zookeeper sub-paths
                                     for high availability mode
3. flink run script analysis
The following parameters can be added when we submit the flick task
1. By default, find jobmanager [/ TMP /. Yarn properties root] in the existing yarn session information in the current yarn cluster:
bin/flink run ./examples/batch/WordCount.jar -input hdfs://hostname:port/hello.txt -output hdfs://hostname:port/result1
2. jobmanager connecting the specified host and port:
bin/flink run -m node01:8081 ./examples/batch/WordCount.jar -input hdfs://hostname:port/hello.txt -output hdfs://hostname:port/result1
3. Start a new yarn session:
bin/flink run -m yarn-cluster -yn 2 ./examples/batch/WordCount.jar -input hdfs://hostname:port/hello.txt -output hdfs://hostname:port/result1
Note: the options of the yarn session command line can also be used/ Obtained by the bin/flink tool. They all have a prefix of y or yarn
For example:
bin/flink run -m yarn-cluster -yn 2 ./examples/batch/WordCount.jar