start
Open the next theme profile_ config.yml
Search Busuanzi_ Modify count to
busuanzi_count:
  # count values only if the other configs are false
  enable: true
  # custom uv span for the whole site
  site_uv: true
  site_uv_header: <i class="fa fa-user"></i> Number of visits to this site
  site_uv_footer: people
  # custom pv span for the whole site
  site_pv: true
  site_pv_header: <i class="fa fa-eye"></i> Total visits of this site
  site_pv_footer: second
  # custom pv span for one page only
  page_pv: false
  page_pv_header: <i class="fa fa-file-o"></i> Total reading volume of this article
  page_pv_footer: second
After that, you will find that you can't count. Why? I was confused at that time
Later, I sent a letter to Du Niang. It turned out to be Official website address Changed
Then change it. There's no way but to do it yourself
themes\next\layout\_third-party\analytics\busuanzi-counter.swig
Find the address of your project and open this file
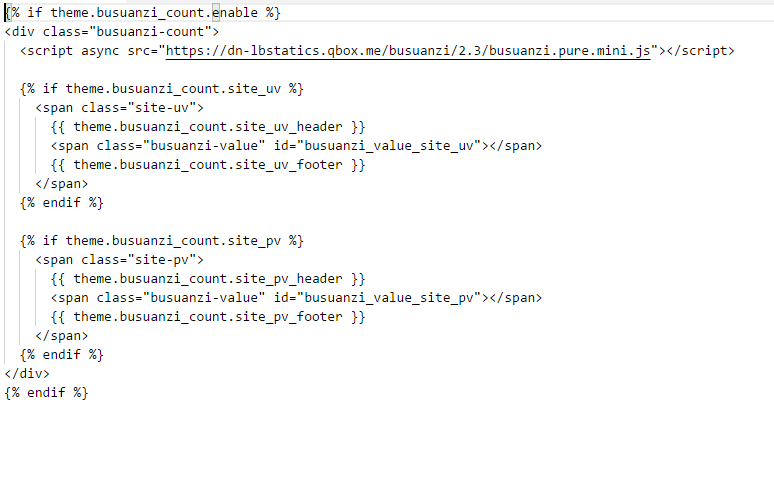
We found that it is different from the official website. Replace the white link with
https://busuanzi.ibruce.info/busuanzi/2.3/busuanzi.pure.mini.js
after
word count
It is used to count the number of words in the article and analyze the reading time.
In the topic configuration file, search wordcount and set it to the following:
# Post wordcount display settings
# Dependencies: https://github.com/willin/hexo-wordcount
post_wordcount:
  item_text: true
  min2read: true
  wordcount: true
  separated_meta: true
Open \ themes \ next \ layout again\_ macro\post. Swig file, add a delimiter after leancloud visitors count|
In addition, in / themes / next / layout/_ partials/footer. The swig file endif%} is preceded by the following code to count the number of words in the whole site at the bottom of the site:
<div class="theme-info">
  <span class="post-count">Total Words:{{ totalcount(site) }}</span>
</div>
If it cannot be displayed, it may be that the hexo wordcount plug-in is not installed. git bash can be installed in the root directory of the website:
npm install hexo-wordcount --save
Add copyright information
In the directory themes / next / layout/_ Add my copyright under macro / Swig, the code is as follows:
{% if page.copyright %}
<div class="my_post_copyright">
  <script src="//cdn.bootcss.com/clipboard.js/1.5.10/clipboard.min.js"></script>

  <!-- JS library sweetalert Modifiable path -->
  <script src="https://cdn.bootcss.com/jquery/2.0.0/jquery.min.js"></script>
  <script src="https://unpkg.com/sweetalert/dist/sweetalert.min.js"></script>
  <p><span>Article title:</span><a href="{{ url_for(page.path) }}">{{ page.title }}</a></p>
  <p><span>Article author:</span><a href="/" title="visit {{ theme.author }} Personal blog">{{ theme.author }}</a></p>
  <p><span>Release time:</span>{{ page.date.format("YYYY year MM month DD day - HH:MM") }}</p>
  <p><span>Last update:</span>{{ page.updated.format("YYYY year MM month DD day - HH:MM") }}</p>
  <p><span>Original link:</span><a href="{{ url_for(page.path) }}" title="{{ page.title }}">{{ page.permalink }}</a>
    <span class="copy-path"  title="Click the copy article link"><i class="fa fa-clipboard" data-clipboard-text="{{ page.permalink }}"  aria-label="Copy succeeded!"></i></span>
  </p>
  <p><span>license agreement:</span><i class="fa fa-creative-commons"></i> <a rel="license" href="https://creativecommons. org/licenses/by-nc-nd/4.0/" target="_ Blank "title =" attribute noncommercial noderivatives 4.0 International (CC by-nc-nd 4.0) "> signature - non-commercial use - no deduction of 4.0 international < / a > reprint, please keep the original link and author</p>
</div>
<script>
    var clipboard = new Clipboard('.fa-clipboard');
    $(".fa-clipboard").click(function(){
      clipboard.on('success', function(){
        swal({
          title: "",
          text: 'Copy successful',
          icon: "success",
          showConfirmButton: true
          });
    });
    });
</script>
{% endif %}
In the directory themes / next / source / CSS/_ Add my post copyright under common / components / post / styl:
.my_post_copyright {
  width: 85%;
  max-width: 45em;
  margin: 2.8em auto 0;
  padding: 0.5em 1.0em;
  border: 1px solid #d3d3d3;
  font-size: 0.93rem;
  line-height: 1.6em;
  word-break: break-all;
  background: rgba(255,255,255,0.4);
}
.my_post_copyright p{margin:0;}
.my_post_copyright span {
  display: inline-block;
  width: 5.2em;
  color: #b5b5b5;
  font-weight: bold;
}
.my_post_copyright .raw {
  margin-left: 1em;
  width: 5em;
}
.my_post_copyright a {
  color: #808080;
  border-bottom:0;
}
.my_post_copyright a:hover {
  color: #a3d2a3;
  text-decoration: underline;
}
.my_post_copyright:hover .fa-clipboard {
  color: #000;
}
.my_post_copyright .post-url:hover {
  font-weight: normal;
}
.my_post_copyright .copy-path {
  margin-left: 1em;
  width: 1em;
  +mobile(){display:none;}
}
.my_post_copyright .copy-path:hover {
  color: #808080;
  cursor: pointer;
}
Modify themes/next/layout/_macro/post.swig, in Code:
 {% if theme.wechat_subscriber.enabled and not is_index %}
      <div>
        {% include 'wechat-subscriber.swig' %}
      </div>
    {% endif %}
add to
<div>
      {% if not is_index %}
        {% include 'my-copyright.swig' %}
      {% endif %}
</div>
Modify themes/next/source/css/_common/components/post/post.styl file, add code on the last line:
@import "my-post-copyright"
Finally, go to the site root directory / Scaffolding / post MD, add a line between the two -: copyright: true
Personalized optimization
Set font
Set in the theme profile, for example:
font:
  enable: true

  # Uri of fonts host. E.g. //fonts.googleapis.com (Default).
  host: https://fonts.cat.net

  # Font options:
  # `external: true` will load this font family from `host` above.
  # `family: Times New Roman`. Without any quotes.
  # `size: xx`. Use `px` as unit.

  # Global font settings used on < body > element
  global:
    external: true
    family: Monda
    size:

  # Font settings for Headlines (h1, h2, h3, h4, h5, h6).
  # Fallback to `global` font settings.
  headings:
    external: true
    family: Roboto Slab
    size:

  # Font settings for posts.
  #  Article font Fallback to `global` font settings
  posts:
    external: true
    family:

  # Font settings for Logo.
  # Fallback to `global` font settings.
  logo:
    external: true
    family: Lobster Two
    size:

  # Font settings for < code > and code blocks
  codes:
    external: true
    family: PT Mono
    size:
Set code highlight theme
NexT uses the normal theme by default. The optional values are normal, night, night blue, night bright, night eighties:
# Code Highlight theme
# Available value:
#    normal | night | night eighties | night blue | night bright
# https://github.com/chriskempson/tomorrow-theme
highlight_theme: normal
Small block color setting
Modify \ themes \ next \ source \ CSS\_ variables\base. Style files, modifying c o d e − b a c k g r o u n d and Code background and Values of code − background and code foreground:
$black-deep   = #222
$red          = #ff2a2a
$blue-bright  = #87daff
$blue         = #0684bd
$blue-deep    = #262a30
$orange       = #fc6423
// Custom colors
$my-code-foreground = #dd0055 / / font color of code block enclosed with ` `
$my-code-background = #eee / / the background color of the code block enclosed with ` `
// Code & Code Blocks
// --------------------------------------------------
$code-font-family               = $font-family-monospace
$code-font-size                 = 13px
$code-font-size                 = unit(hexo-config('font.codes.size'), px) if hexo-config('font.codes.size') is a 'unit'
$code-border-radius             = 3px
//$code-foreground                = $black-light
//$code-background                = $gainsboro

$code-background = $my-code-background
$code-foreground = $my-code-foreground
Modify themes \ next \ source \ CSS\_ custom\custom. Style file, adding custom styles
// Article ` ` custom style of code block
code {
    margin: 0px 3px;
    border: 1px solid #999;
}
Modify themes \ next \ source \ CSS\_ custom\custom. Style file, adding custom styles
//Link text style in Article
.post-body p a{
  color: #0593d3;
  border-bottom: none;
  border-bottom: 1px solid #0593d3;
  &:hover {
    color: #fc6423;
    border-bottom: none;
    border-bottom: 1px solid #fc6423;
  }
}
Modify themes \ next \ source \ CSS\_ custom\custom. Style file, adding custom styles
// [Read More] button style
.post-button .btn {
    color: #555 !important;
    background-color: rgb(255, 255, 255);
    border-radius: 3px;
    font-size: 15px;
    box-shadow: inset 0px 0px 10px 0px rgba(0, 0, 0, 0.35);
    border: none !important;
    transition-property: unset;
    padding: 0px 15px;
}

.post-button .btn:hover {
    color: rgb(255, 255, 255) !important;
    border-radius: 3px;
    font-size: 15px;
    box-shadow: inset 0px 0px 10px 0px rgba(0, 0, 0, 0.35);
    background-image: linear-gradient(90deg, #a166ab 0%, #ef4e7b 25%, #f37055 50%, #ef4e7b 75%, #a166ab 100%);
}
Github style in the upper left or right corner
The specific implementation method is to Style 1 perhaps Style 2 Select your favorite style from your website and copy the code to themes/next/layout/_layout.swig file (under < div class = "headband" > < / div >), and change the href to your github address.
Add background animation
NexT comes with a variety of background animation effects. You only need to modify one of them to true in the theme configuration file according to your needs.
# Canvas-nest
canvas_nest: true

# three_waves
three_waves: false

# canvas_lines
canvas_lines: false

# canvas_sphere
canvas_sphere: false

# Only fit scheme Pisces
# Canvas-ribbon
canvas_ribbon: false
Add top loading bar
Search for s pace in the topic profile:
# Progress bar in the top during page loading.
pace: true
# Themes list:
#pace-theme-big-counter
#pace-theme-bounce
#pace-theme-barber-shop
#pace-theme-center-atom
#pace-theme-center-circle
#pace-theme-center-radar
#pace-theme-center-simple
#pace-theme-corner-indicator
#pace-theme-fill-left
#pace-theme-flash
#pace-theme-loading-bar
#pace-theme-mac-osx
#pace-theme-minimal
# For example
# pace_theme: pace-theme-center-simple
pace_theme: pace-theme-flash
Modify the text style of links in Articles
Modify the file themes \ next \ source \ css\_ common\components\post\post. Style, add the following css style at the end
// Link text style in Article
.post-body p a{
  color: #0593d3;
  border-bottom: none;
  border-bottom: 1px solid #0593d3;
  &:hover {
    color: #fc6423;
    border-bottom: none;
    border-bottom: 1px solid #fc6423;
  }
}
Modify the label style at the bottom of the article
Modify / themes/next/layout/_macro/post.swig, search rel = "tag" > #, replace # with < I class = "Fa FA tag" > < / I >
Add the "end of this article" mark at the end of the article
In the path \ themes \ next \ layout\_ Create a new passage end tag in macro Swig file and add the following:
<div>
    {% if not is_index %}
        <div style="text-align:center;color: #555;font-size:14px;">-------------The End-------------</div>
    {% endif %}
</div>
Then open \ themes\next\layout_macro\post.swig file, in this location wechat subscriber Add code above swig:
<div>
  {% if not is_index %}
    {% include 'passage-end-tag.swig' %}
  {% endif %}
</div>
Then open the topic profile and add at the end:
# Add the "end of this article" mark at the end of the article
passage_end_tag:
  enabled: true
Modify the author's Avatar and rotate it
Open \ themes\next\source\css\_common\components\sidebar\sidebar-author.styl, add the following code:
.site-author-image {
  display: block;
  margin: 0 auto;
  padding: $site-author-image-padding;
  max-width: $site-author-image-width;
  height: $site-author-image-height;
  border: $site-author-image-border-width solid $site-author-image-border-color;
  /* Head round */
  border-radius: 80px;
  -webkit-border-radius: 80px;
  -moz-border-radius: 80px;
  box-shadow: inset 0 -1px 0 #333sf;
  /* Set cycle animation [animation: (play) animation name (2s) animation playback duration unit: second or microsecond (ASE out) the speed curve of animation playback ends at low speed
    (1s)Wait 1 second and start animation (1) animation playback times (infinite is loop playback)]*/

  /* The mouse rotates 360 degrees through the avatar */
  -webkit-transition: -webkit-transform 1.0s ease-out;
  -moz-transition: -moz-transform 1.0s ease-out;
  transition: transform 1.0s ease-out;
}
img:hover {
  /* Stop the head image rotation after the mouse passes
  -webkit-animation-play-state:paused;
  animation-play-state:paused;*/
  /* The mouse rotates 360 degrees through the avatar */
  -webkit-transform: rotateZ(360deg);
  -moz-transform: rotateZ(360deg);
  transform: rotateZ(360deg);
}
/* Z Axis rotation animation */
@-webkit-keyframes play {
  0% {
    -webkit-transform: rotateZ(0deg);
  }
  100% {
    -webkit-transform: rotateZ(-360deg);
  }
}
@-moz-keyframes play {
  0% {
    -moz-transform: rotateZ(0deg);
  }
  100% {
    -moz-transform: rotateZ(-360deg);
  }
}
@keyframes play {
  0% {
    transform: rotateZ(0deg);
  }
  100% {
    transform: rotateZ(-360deg);
  }
}
Add shadow effect to the article
Open \ themes\next\source\css\_custom\custom.styl, add:
// Add shadow effect to home page article
 .post {
   margin-top: 60px;
   margin-bottom: 60px;
   padding: 25px;
   -webkit-box-shadow: 0 0 5px rgba(202, 203, 203, .5);
   -moz-box-shadow: 0 0 5px rgba(202, 203, 204, .5);
  }
Modify the font animation of reward part
The animation of the Next reward part is like a ghost animal. It keeps shaking and looks very uncomfortable, so the blogger changed it to cycle only three times and opened the file themes/next/source/css/_common/components/post/post-reward.styl, WeChat and Alipay are changed as follows:
#wechat:hover p{
    animation: roll 0.1s 3 linear;
    -webkit-animation: roll 0.1s 3 linear;
    -moz-animation: roll 0.1s 3 linear;
}
#alipay:hover p{
    animation: roll 0.1s 3 linear;
    -webkit-animation: roll 0.1s 3 linear;
    -moz-animation: roll 0.1s 3 linear;
}
Customize mouse style
Open themes / next / source / CSS/_ custom/custom. Style, add code:
// Mouse style
  * {
      cursor: url("http://om8u46rmb.bkt.clouddn.com/sword2.ico"),auto!important
  }
  :active {
      cursor: url("http://om8u46rmb.bkt.clouddn.com/sword1.ico"),auto!important
  }
There must be ico pictures in the url. ico pictures can be uploaded to the Internet (qiniu cloud picture bed is recommended), and then get the external chain and copy it to the url.
Modify article page width
Open themes / next / source / CSS/_ variables/base. Style, find the following fields and change them to the appropriate width:
//$content-desktop-large          = 900px
$content-desktop-large          = 1000px
Modify themes / next / layout / page Swig file, add custom style:
{{ tagcloud({min_font: 13, max_font: 31, amount: 1000, color: true, start_color: '#9733EE', end_color: '#FF512F'}) }}
Hide the "power drive" content at the bottom
Modify themes/next/_config.yml file, set powered and enable to false
last
hexo g
hexo d
After the update, you will find that it is OK