In normal development, we often receive such a demand: before uploading pictures, we need to compress the pictures to less than 100KB and make them as clear as possible.
As an intuitive developer, we immediately divide three into five and get a compression factor:
NSData *imageData = UIImageJPEGRepresentation(image, 0.8);
(Why not UIImagePNGRepresentation And use UIImageJPEGRepresentation sure Google,There is no explanation here (HA)
It is found that users may choose 10MB images, and the compression factor of 0.8 can only be pressed to 3MB, which is definitely not possible.
Then let's have a circulating pressure! Until it reaches the target!
    NSData *imageData = UIImageJPEGRepresentation(image, imageCompressRate);;
    while (imageData.length  > 100 * 1024) {
        imageCompressRate -= 0.1;
        imageData = UIImageJPEGRepresentation(image, imageCompressRate);
    }
After writing the above code, you tested several pictures and submitted the code with satisfaction, but a few days later, you found that someone was stuck when uploading pictures! This is swollen, fat four!
It turns out that the while loop just written is crushing the loop! What?! Take the image fed back by the user and reproduce it. It is found that if it is a large image, the compression factor can not be pressed even if it is too small.
Let's take an 11MB picture as an example to see the relationship between the compression result and the compression factor:

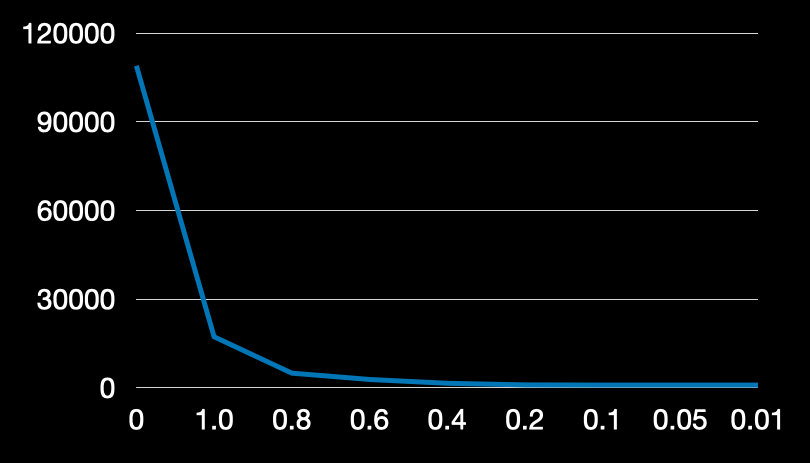
From this result, we can draw two conclusions:
- You can't press a picture infinitely close to 0 just by pressing
- The compression factor changes significantly from 1 to 0.8, and there is little difference after 0.8
Good guy, it can't be pressed to 0. Then there may be a dead cycle in our while cycle pressure cliff. What should we do?
The solution will definitely be said at the end. Before introducing the solution, let's think about why uiimage jpegrepresentation is "stuck"?
The size of the picture is calculated by width x Height x bit depth. The compression method of UIImageJPEGRepresentation actually represents several pixels with one pixel, that is, writing on the bit depth will not affect the bitmap of the picture,
Therefore, if the picture is relatively large, it will be pressed to a threshold value no matter how it is pressed with UIImageJPEGRepresentation, which will not be close to 0.
The principle is clear. Let's think about how to compress a picture gracefully! First, go directly to the code:
/*
 Obtain the image compression factor according to the image size
 */
+ (CGFloat)getCompressRateByImageSize:(CGFloat)imageSize targetSize:(CGFloat)targetSize {
    NSUInteger rate = (NSUInteger)(imageSize / targetSize);
    rate = (rate == 0) ? 1 : rate;

    // Default 0.8 compression factor
    CGFloat maxCompressRate = 0.8;
    CGFloat minCompressRate = 0.2;

    // Inverse proportional compression function
    CGFloat compressRate = 0.8 / rate;

    compressRate = MIN(MAX(compressRate, minCompressRate), maxCompressRate);
    return compressRate;
}

/*!
 *  @brief Make the picture just smaller than the specified size after compression
 *
 *  @param image The maxLength of the graph to be compressed is the compressed size
 *
 *  @return Picture object
 */
+ (NSData *)compressImageSize:(UIImage *)image toByte:(NSUInteger)maxLength {
    // Press
    NSData *data = UIImageJPEGRepresentation(image, 1);
    if (data.length < maxLength) {
        return data;
    }

    CGFloat compressRate = [self.class getCompressRateByImageSize:data.length targetSize:maxLength];
    data = UIImageJPEGRepresentation(image, compressRate);
    if (data.length < maxLength) {
        return data;
    }

    // shrink
    UIImage *resultImage = [UIImage imageWithData:data];
    NSUInteger lastDataLength = 0;
    while (data.length > maxLength && data.length != lastDataLength) {
        lastDataLength = data.length;
        CGFloat ratio = (CGFloat)maxLength / data.length;
        CGSize size = CGSizeMake((NSUInteger)(resultImage.size.width * sqrtf(ratio)), (NSUInteger)(resultImage.size.height * sqrtf(ratio)));
        if (CGSizeEqualToSize(size, CGSizeZero) || size.width < 10 || size.height < 10) {
            break;
        }
        UIGraphicsBeginImageContext(size);
        [resultImage drawInRect:CGRectMake(0, 0, size.width, size.height)];
        resultImage = UIGraphicsGetImageFromCurrentImageContext();
        UIGraphicsEndImageContext();
        data = UIImageJPEGRepresentation(resultImage, compressRate);
    }

    return data;
}
The logic is not complicated. Since the pressure will not move if it is simply pressed, we will press first and then shrink. In view of the rapid loss of UIImageJPEGRepresentation compression (after reaching the threshold, the effect of pressing once and twice is the same),
Therefore, we directly build an inverse scale function getCompressRateByImageSize:, and calculate a compression factor that is more suitable for the current image compression. We can only press it once. Of course, if it is still large after pressing, we will shrink the image until it reaches the target size.
First article: Ask my community
The official account will continue to update the technology plan and focus on the technology trends in the industry, and pay close attention to the low cost and miss the dry cargo loss. ↓↓↓