
Hello, I'm CodingLong~~
This article mainly describes the concept and naming specification of Spring Boot Starter and how to customize a Starter. Let's start today.
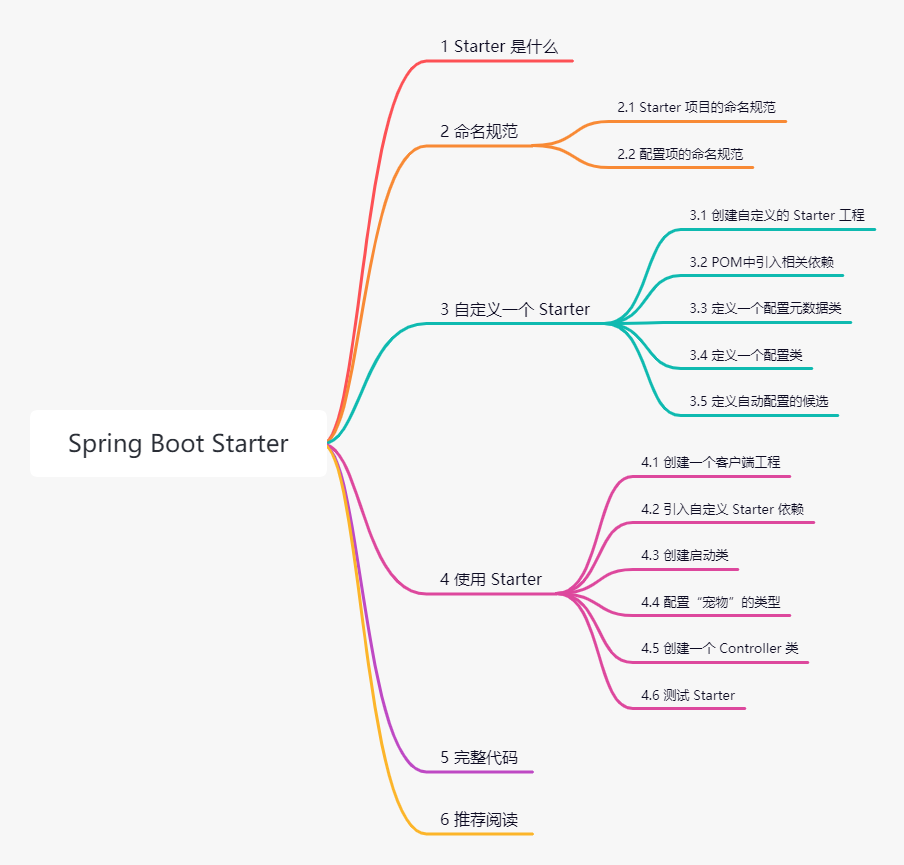
1 what is starter
The Starter of Spring Boot is a set of convenient dependency descriptors, which can be made into jar packages through Maven and directly referenced in your project.
Through Starter, you can get all the dependencies and unified configuration of this function, avoiding the trouble of copying and pasting code and dependency.
Starter mainly uses automatic configuration, so all its components will be used by Spring Boot through meta-inf / spring The factories file is injected into the IOC container.
2 naming conventions
2.1 naming specification of starter project
All starters officially provided by Spring will follow the naming convention of Spring boot Starter - *, where * represents a specific type of application.
For all third-party starters, it is officially recommended to start with the project name and follow the naming specification of * - spring boot Starter, where * represents the name of the third-party project.
2.2 naming specification of configuration items
If the customized Starter contains configuration items, please use a unique namespace for it and do not conflict with Spring Boot or other components, such as server, management, spring, etc
3. Customize a Starter
A typical Starter contains automatic configuration and custom core code. For the convenience of demonstration, the core code in this example is a "pet" class, which can obtain the corresponding "pet" according to the configured "type". See the specific implementation process below.
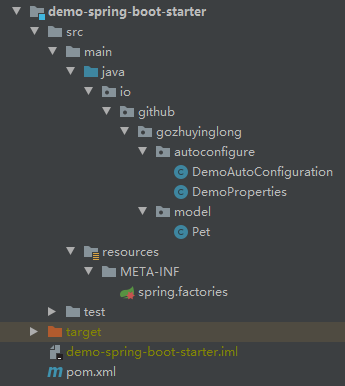
3.1 create a custom Starter project
Create a Spring Boot project and name it demo Spring Boot starter. The following figure shows the complete directory structure of the project, which will be introduced one by one later.
3.2 introducing related dependencies into POM
Two dependencies are introduced into POM:
- Spring boot Starter: this dependency is the core of Starter, including automatic configuration, logging and YAML support. All our customized starters should introduce this dependency directly or indirectly.
- Spring boot configuration processor: contains a Java annotation processor. This dependency needs to be introduced when configuring your metadata with @ ConfigurationProperties annotation.
<dependency>
    <groupId>org.springframework.boot</groupId>
    <artifactId>spring-boot-starter</artifactId>
</dependency>
<dependency>
    <groupId>org.springframework.boot</groupId>
    <artifactId>spring-boot-configuration-processor</artifactId>
    <optional>true</optional>
</dependency>
3.3 define a configuration metadata class
Customize a configuration metadata class DemoProperties to map the configuration in YAML. Use @ ConfigurationProperties annotation to specify the prefix of the configuration item. The prefix here is demo. The current configuration item has only one type field, which is used to configure the type of pet, so the Key of the configuration item is: demo type.
@ConfigurationProperties(prefix = "demo")
public class DemoProperties {

    /**
     * type
     */
    private String type;

    public String getType() {
        return type;
    }

    public void setType(String type) {
        this.type = type;
    }
}
3.4 define a configuration class
Let's first look at the custom Pet entity class Pet, which is very simple. It has only one name attribute (this class is purely for the demonstration of Starter, not it).
public class Pet {

    /**
     * name
     */
    private String name;

    public Pet(String name) {
        this.name = name;
    }

    public String getName() {
        return name;
    }

    public void setName(String name) {
        this.name = name;
    }
}
Add a configuration class DemoAutoConfiguration, which is also very simple:
- Use the @ Configuration annotation to declare this class as a Configuration class;
- Use the @ EnableConfigurationProperties annotation to introduce custom configuration metadata DemoProperties
- Declare a Pet Bean, and return different pets according to the type in the configuration item. The purpose of using this Bean is mainly to demonstrate the automatic configuration of Starter.
@Configuration(proxyBeanMethods = false)
@EnableConfigurationProperties(DemoProperties.class)
public class DemoAutoConfiguration {

    private final DemoProperties demoProperties;

    public DemoAutoConfiguration(DemoProperties demoProperties) {
        this.demoProperties = demoProperties;
    }

    @Bean
    public Pet pet() {
        if (!StringUtils.hasText(demoProperties.getType())) {
            return new Pet("Empty");
        }
        switch (demoProperties.getType()) {
            case "cat":
                return new Pet("kitten");
            case "dog":
                return new Pet("puppy");
            default:
                return new Pet("unknown");
        }
    }
}
3.5 define candidates for automatic configuration
Add the file meta-inf / spring in the resources directory Factories, and add the custom configuration class DemoAutoConfiguration to the list of automatic configuration classes, as shown in the following code:
org.springframework.boot.autoconfigure.EnableAutoConfiguration=\
io.github.gozhuyinglong.autoconfigure.DemoAutoConfiguration
This step is critical and needs to be highlighted.
The relevant components of our customized Starter are certainly not in the target of automatic scanning by users (different directory structure), so Spring Boot provides this mechanism to enable third-party users to discover these components.
Spring Boot will check whether meta-inf / spring.exe is included in all published jar s Factories file, and inject the target class in the file into the IOC container. The automatic configuration class is loaded in this way.
In the previous article< Principle of Spring Boot automatic configuration The principle of automatic configuration has been mentioned in the old fellow railway.
4 using Starter
We create a project again to test whether Starter works. Note that the directory structure of the project should be different from that of Starter, so that it can be tested that the components in Starter are used by meta-inf / spring Factories files are imported, not automatically scanned.
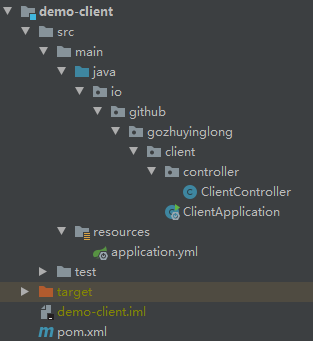
4.1 create a client project
Create a Spring Boot project and name it demo client. The following figure shows the complete directory structure of the project, which will be introduced one by one later.
4.2 import custom Starter dependency
In the POM file, the Starter dependency defined by the rigid user is introduced. To facilitate testing, spring boot Starter web is also introduced.
<dependency>
    <groupId>io.github.gozhuyinglong</groupId>
    <artifactId>demo-spring-boot-starter</artifactId>
    <version>1.0-SNAPSHOT</version>
</dependency>

<dependency>
    <groupId>org.springframework.boot</groupId>
    <artifactId>spring-boot-starter-web</artifactId>
</dependency>
4.3 create startup class
Create the main startup class ClientApplication. Note that the directory of this class is different from that of Starter, that is, the current project will not automatically scan the components in Starter through @ ComponentScan.
@SpringBootApplication
public class ClientApplication {

    public static void main(String[] args) {
        SpringApplication.run(ClientApplication.class, args);
    }
}
4.4 configure the type of "pet"
In the customized Starter, you can configure the type of pet and configure it as dog.
demo:
  type: dog
4.5 create a Controller class
Create a ClientController class to test whether Starter is effective
@RestController
@RequestMapping("/client")
public class ClientController {

    @Autowired
    private Pet pet;

    @GetMapping("/test")
    public String test() {
        return pet.getName();
    }
}
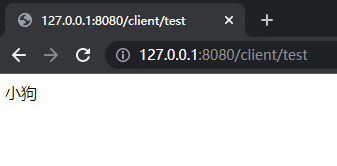
4.6 test Starter
After starting the project, use Postman or enter the address directly in the browser: http://127.0.0.1:8080/client/test , you will find that "puppy" is output, indicating success.
5 complete code
Please visit my Github for the complete code. If it is helpful to you, please give me a reply ⭐, Thank you~~ 🌹🌹🌹
https://github.com/gozhuyinglong/blog-demos/tree/main/springboot-family
6 recommended reading
- @Import annotation: four ways to import configuration classes & source code analysis
- Principle of Spring Boot automatic configuration
- How does Spring Data Redis switch between Jedis and lattice?
- Developing with Spring Boot #1.5. Starters
- Core Features #9.5 Creating Your Own Starter
❤️ Wechat search: Menon StayUp
⭐ Homepage address: https://gozhuyinglong.github.io
🌸 Source code sharing: https://github.com/gozhuyinglong/blog-demos
🚀 Three company support: like 👍, Collection ⭐, Leaving a message. 💬