1. Process
Develop front-end and back-end programs.
Buying Servers and Domain Names
Install the required environment on the server (this project is node and mongodb)
Open Port on Server and Setting Rules
Provide HTTP services or set up proxies with nginx, apache, or tomcat
Upload project code or use code cloud or gihub to pull your code to the server
Start the express server
Optimizing Page Loading
2. Content details
2.1 Develop front-end and back-end programs
Develop front-end and back-end programs, this is nothing to say, is the development! Development! Development! Re-development!
2.2 Purchase Server and Domain Name
I have always felt that programmers should have their own personal website and own domain names and servers. It can be used for testing when learning knowledge or testing projects.
Aliyun is the largest cloud server in China, so it is recommended to use Aliyun's server. Aliyun has a special page for the latest activities: https://www.aliyun.com/activity There are the latest activities of Aliyun servers. They are all active servers. It's very economical to pay attention to them.
You can ping which node is better in Aliyun: https://ping.gaomeluo.com/aliyun/
Server pre-installed environment can choose CentOS or windows server, in order to experience and learn linux system, I chose CentOS.
The second is to buy the domain name Ali domain name purchase, I also bought in Aliyun. If the server you buy is overseas, you don't need to file. If it's a domestic host, you have to file to use it. But I still recommend that you use the domestic mainframe, and then file, otherwise a lot of things will not be used, how to file the domain name, please find the tutorial online.
Of course, if your website is only for your own use, you don't need to buy a domain name, because you can access the content of the website through the server's public network ip.
Domain name resolution, do not explain one by one, Baidu itself.
3. The environment needed to install on the server (this project is node and mongodb)
3.1 Login Server
Because I use MacBook Pro, I open the mac terminal directly and connect to the server through the following command line. root is the default account name of Aliyun server. When you connect, you will be asked to enter a password, which you set when you buy or later.
ssh root@47.106.20.666 //Your server public network ip, such as 47.106.20.666
As shown in the figure: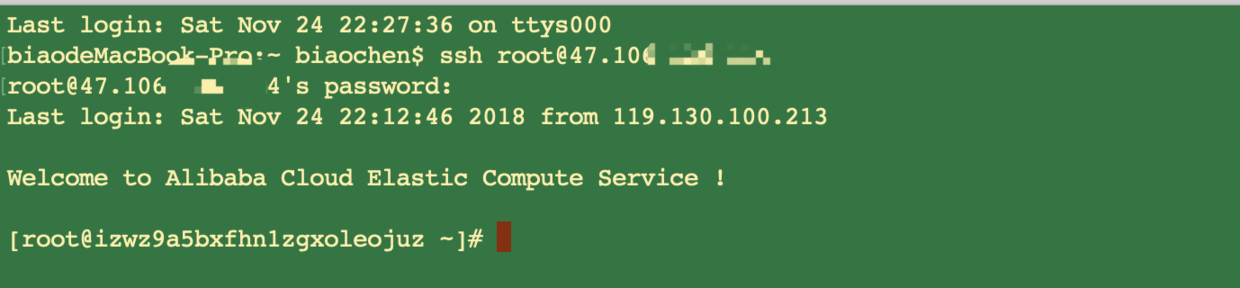
Windows system, please use Putty or X shell to login.
Generally, after a new server is created, it is recommended to upgrade CentOS:
yum -y update
Common Linux commands
cd enters directory
 cd... Returns to the previous directory
 Ls-a View Current Directory
 mkdir abc creates abc folder
 mv move or rename
 rm deletes a file or directory
3.2 Install node
Upgrading common library files and installing node.js requires compiling through g++.
yum -y install gcc gcc-c++ autoconf
Jump to the directory: / usr/local/src, which is usually used to store software source code:
cd /usr/local/src
Download the node.js source code, or upload it directly using the scp command, because the download is too slow:
Download address: https://nodejs.org/en/download/ Please download the latest version of the source code for download, I downloaded version v10.13.0.
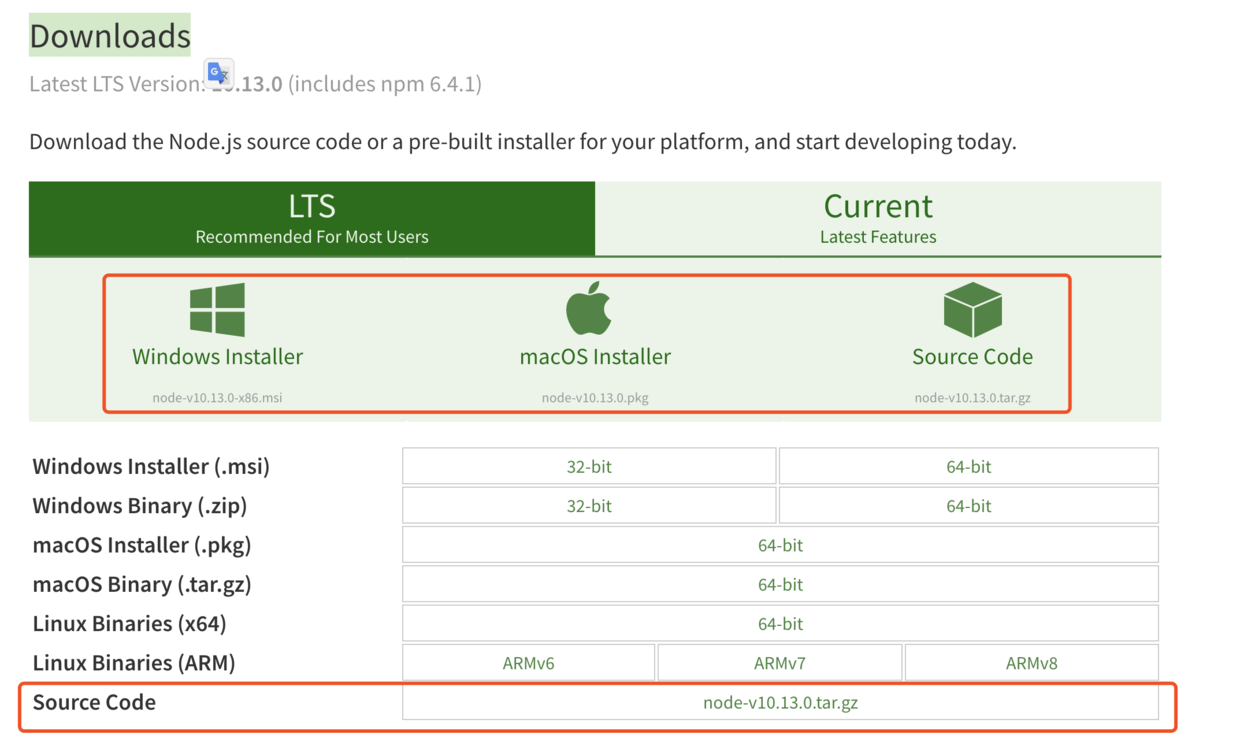
https://nodejs.org/dist/v10.13.0/node-v10.13.0.tar.gz
After downloading, decompress:
tar -xzvf node-v10.13.0.tar.gz
Enter the decompressed folder:
cd node-v10.13.0
Execute configuration scripts for precompiled processing:
./configure
Compiling source code takes a long time. It takes about 5 to 10 minutes:
make
After compiling, execute the installation command to make it available within the system:
make install
Installing express recommends global installation
npm -g install express
Create hyperlinks, or sudo node will report "command not found"
sudo ln -s /usr/local/bin/node /usr/bin/node
sudo ln -s /usr/local/lib/node /usr/lib/node
sudo ln -s /usr/local/bin/npm /usr/bin/npm
sudo ln -s /usr/local/bin/node-waf /usr/bin/node-waf
View node and npm versions through instructions:
node -v
npm -v
node.js is basically installed here.
3.2 Installation of mongodb
Download address: https://www.mongodb.com/download-center/community
When downloading, please select the appropriate environment and version, because my server is CentOS, in fact, the essence of linux system, so choose the following environment and the latest version.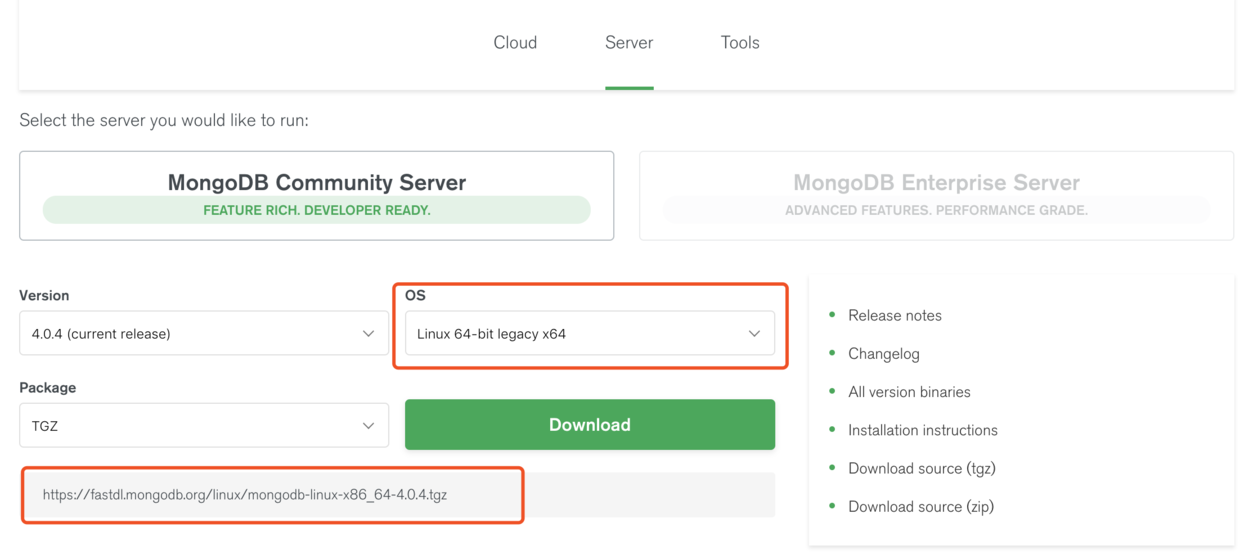
mongodb :
Software installation location: / usr/local/mongodb
 Data storage location: / home/mongodb/data
 Data backup location: / home/mongodb/bak
 Log location: / home/mongodb/logs
Download the installation package
> cd /usr/local
> wget https://fastdl.mongodb.org/linux/mongodb-linux-x86_64-4.0.4.tgz
Unzip the installation package and rename the folder to mongodb
tar zxvf mongodb-linux-x86_64-4.0.4.tgz
mv mongodb-linux-x86_64-4.0.4 mongodb
Create mongodb folder in var folder, and separate folder data for storing data, logs for storing logs
mkdir /var/mongodb
mkdir /var/mongodb/data
mkdir /var/mongodb/logs
Open the rc.local file and add the CentOS startup entry:
vim /etc/rc.d/rc.local
// If you don't understand the operation of vim, please check the corresponding document tutorials. For example, in VIM mode, you can insert content only by pressing i. After input, you can save and exit by pressing shift plus: wq.
Append the mongodb startup command to this document and let mongodb start itself:
/usr/local/mongodb/bin/mongod --dbpath=/var/mongodb/data --logpath /var/mongodb/logs/log.log -fork
Start mongodb
/usr/local/mongodb/bin/mongod --dbpath=/var/mongodb/data --logpath /var/mongodb/logs/log.log -fork
See the following information to indicate that the installation has been completed and started successfully:
forked process: 18394
all output going to: /var/mongodb/logs/log.log
The default port number for mongodb is 27017.
If your database connection requires an account and password, create a database administrator, or connect directly.
Create administrators and databases in the mongo shell.
Switch to admin database to create super administrator account
use admin
db.createUser({ user: "User name", pwd:"Login password", roles:[{ role: "userAdminAnyDatabase", db: "admin" }] })
Switch to the database you want to use, such as the taodb database, and create an administrator account for the database
use taodb
db.createUser({ user: "User name", pwd:"Login password", roles:[ { role: "readWrite", db: "taodb" }] //Read and write permissions}
Repeat press control+c twice to exit the mongo shell.
At this point, mongodb has basically been installed and set up.
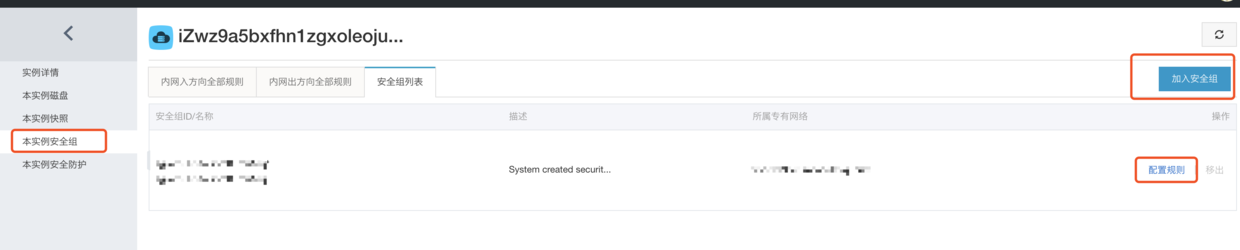
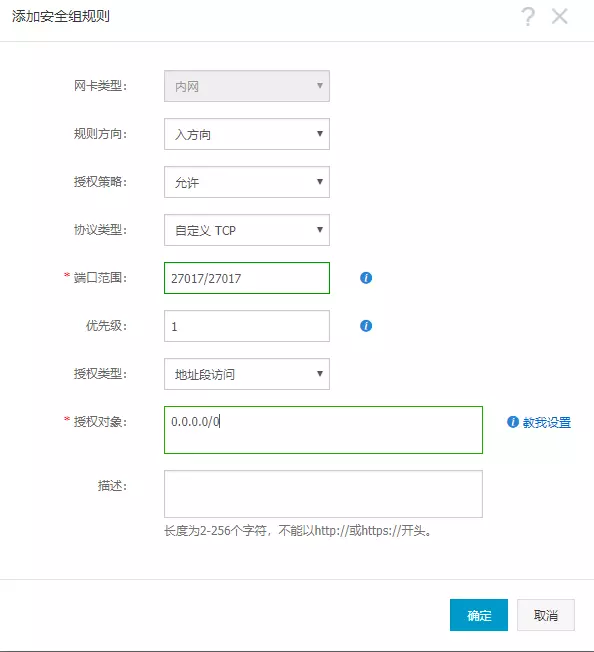
3.3 Open Ports on Servers and Setting up Security Group Rules
What is the security group rule?
Authorization security group rules can allow or prohibit access to the direction of entry and exit of public and intranet of ECS instances associated with security groups.
Aliyun Security Group Application Case Document
Port 80 is open for HTTP(HyperText Transport Protocol), that is, hypertext transport protocol. When browser HTTP accesses port 80 of IP or domain name, port 80 can be omitted.
If we do not open the corresponding port,
For example, if we want to use 3000 for our service, we must open 3000 ports, otherwise we can't access them; other ports are the same.

The ports are all configured correctly. Do you think you can use public IP to access them?
There is also a firewall, if the firewall is not closed or the relevant ports are not open, it can not use public network IP to access website content.
Similar to security group ports, for example, if our service uses 3000 ports, we must open 3000 ports, otherwise it will not be accessible; the same is true for other ports.
3.4 Use nginx, apache or tomcat to provide HTTP services or set up proxies
I use nginx, so I only introduce nginx here.
Open ngnx proxy
- Enter directory location
cd /usr/local/nginx
- There is a sbin directory in the nginx directory and an nginx executable program in the sbin directory.
./nginx
- Close nginx
./nginx -s stop
- restart
./nginx -s reload
That's the basic use.
The settings of my nginx proxy are given below.
My two projects are on / home/blog/blog-react/build /; and / home/blog/blog-react-admin/dist /; next, if your path is not this, please change it to your path.
#user  nobody;
worker_processes  1;
#error_log  logs/error.log;
#error_log  logs/error.log  notice;
#error_log  logs/error.log  info;
#pid        logs/nginx.pid;

events {
    worker_connections  1024;
}

http {
    include       mime.types;
    default_type  application/octet-stream;

    #log_format  main  '$remote_addr - $remote_user [$time_local] "$request" '
    #                  '$status $body_bytes_sent "$http_referer" '
    #                  '"$http_user_agent" "$http_x_forwarded_for"';

    #access_log  logs/access.log  main;

    sendfile        on;
    #tcp_nopush     on;

    #keepalive_timeout  0;
    keepalive_timeout  65;

    #gzip  on;

    # If port_in_redirect is off, always follow the default port 80; if this instruction is opened, then the port currently being listened on will be returned.
    port_in_redirect off;

    # Front Desk Show Open Service Agent
    server {
        listen       80;
        server_name  localhost;

        #charset koi8-r;

        #access_log  logs/host.access.log  main;
        #root /home/blog;

        location  / {
            root   /home/blog/blog-react/build/;
            index  index.html;
            try_files $uri $uri/ @router;
            autoindex on;
        }

        location @router{
            rewrite ^.*$ /index.html last;
        }

        location /api/ {
            proxy_set_header X-Real-IP $remote_addr;
            proxy_pass http://47.106.136.114:3000/ ;
        }
        gzip on;

        gzip_buffers 32 4k;

        gzip_comp_level 6;

        gzip_min_length 200;

        gzip_types text/css text/xml application/javascript;

        gzip_vary on;

        #error_page  404              /404.html;
        # redirect server error pages to the static page /50x.html
        #
        error_page   500 502 503 504  /50x.html;
        location = /50x.html {
            root   html;
        }
    }


    # HTTPS server
    # Managing Background Open Service Agents
    server {
        listen       4444;
        server_name  localhost;
        #   charset koi8-r;
        #   ssl_certificate      cert.pem;
        #   ssl_certificate_key  cert.key;

        #   ssl_session_cache    shared:SSL:1m;
        #    ssl_session_timeout  5m;

        #    ssl_ciphers  HIGH:!aNULL:!MD5;
        #    ssl_prefer_server_ciphers  on;

        location / {
            root   /home/blog/blog-react-admin/dist/;
            index  index.html index.htm;
            try_files $uri $uri/ @router;
            autoindex on;
        }
        location @router{
            rewrite ^.*$ /index.html last;
        }

        location /api/ {
            proxy_set_header X-Real-IP $remote_addr;
            proxy_pass http://47.106.136.114:3000/ ;
        }
        gzip on;

        gzip_buffers 32 4k;

        gzip_comp_level 6;

        gzip_min_length 200;

        gzip_types text/css text/xml application/javascript;

        gzip_vary on;

        error_page   500 502 503 504  /50x.html;
    }
}
I have two agents: the front desk shows the open service agent and the back desk opens the service agent. This project is accessed by separate ports.
For example: my public network ip is 47.106.20.666, then through http://47.106.20.666 Visit the front desk display. http://47.106.20.666:4444 You can access the login interface of the management background.
As for why to write such a configuration:
try_files $uri $uri/ @router;

location @router{
        rewrite ^.*$ /index.html last;
    }
Because when you enter the article details or the front-end routing changes, you refresh the browser and find that the browser appears 404. The resources accessed when refreshing the page are not found on the server side, because the path set by react-router is not a real path.
So it's set up so that it can refresh and hit the corresponding path.
3.5 Upload project code, or use code cloud, gihub to pull your code to the server
I created a code cloud account to manage the project code, because the code cloud can create a free private warehouse, I upload the code to Gitee.com locally, and then enter the server to pull the code down with git, which is very convenient.
See: Code Cloud (Gitee.com) Help Document V1.2 http://git.mydoc.io/?t=180676
Installation of git: CentOS 7.4 System Installation of GIT https://www.cnblogs.com/hglibin/p/8627975.html
If you don't want to use git for code management, use other software that can connect to the server to upload files, such as FileZilla.
3.6 Start express Service
Start express service, I use pm2, can run permanently on the server, and express service will not hang up as soon as the error is reported, and other operations can be carried out in operation.
Installation:
npm install -g pm2
Switch the current working directory to the express application folder and execute the pm2 command to start the express service:
pm2 start ./bin/www
For example, when I operate the basic operation of the project:
cd /home/blog/blog-node
pm2 start ./bin/www // open
pm2 stop ./bin/www // Close
pm2 list //View the startup project used:
3.7 Page Loading Optimization
Look at the configuration of nginx just now:
server {
        gzip on;
        gzip_buffers 32 4k;
        gzip_comp_level 6;
        gzip_min_length 200;
        gzip_types text/css text/xml application/javascript;
        gzip_vary on;
    }
This is the use of ngonx to open gzip, after the pro-test opens, compressed nearly two-thirds of the file size, originally more than 1M files, open compression, into about 300k.
After a series of optimization processing, under normal network conditions, the first screen rendering of the page changed from nearly 5 seconds to 3 seconds, and the loading before the first screen rendering was visible in 1 second.