Note: the version of traifik used in this article is 1.x
In the production environment, we often need to control the external access from the Internet to the cluster, which happens to be the responsibility of Ingress.
The main purpose of Ingress is to expose HTTP and HTTPS from outside the cluster to the services running in the cluster. This is similar to how Ingress control routes external traffic to the cluster. Next, let's give a practical example to illustrate the concept of Ingress more clearly.
First, imagine a number of microservices (small applications communicating with each other) in your Kubernetes cluster. These services can be accessed within the cluster, but we want our users to be able to access them from outside the cluster. Therefore, what we need to do is to use a reverse proxy to associate each HTTP (S) (for example, service.yourdomain.com) route with the corresponding backend, and load balance between different instances of the service (for example, POD). At the same time, due to the changing nature of Kubernetes, we want to track changes to the service backend so that we can re associate these HTTP routes to the new pod instance when adding or removing new pods.
Using the Ingress resource and the associated Ingress Controller, you can achieve the following goals:
-
Point your domain app.domain.com to the microservice application in your private network
-
Point the path domain.com/web to the microservice web in your private network
- Point your domain backend.domain.com to the microservice backend in your private network, and load balance multiple instances of the microservice (Pod)
Now you understand the importance of Ingress. It helps to route HTTP to specific microservices in the Kubernetes cluster.
However, traffic routing is not the only function of Ingress in Kubernetes. For example, you can also configure Ingress to load balance traffic to your application, terminate SSL, execute a name based virtual host, distribute traffic between different services, set service access rules, and so on.
Kubernetes has a special Ingress API resource that supports all of the above functions. However, simply creating an Ingress API resource has no effect. You also need an ingress controller. At present, kubernetes supports many ingress controllers, such as Contour, HAProxy, NGINX, and traifik.
In this article, I'll create Ingress using the traifik Ingres controller. It can realize the functions of modern HTTP reverse proxy and load balancer, thus simplifying the deployment of microservices. In addition, traifik provides strong support for Docker, Marathon, Consul, Kubernetes, Amazon ECS and other systems and environments.

Traefik is useful for systems with more flexibility, such as Kubernetes. In Kubernetes, you need to add, delete or upgrade services several times a day, and traefik can listen to the service image warehouse / choreographer API and generate or update routes immediately, so your microservices can connect to the outside world without manual configuration.
In addition, traifik supports multiple load balancing algorithms, HTTPS of Let's Encrypt (supporting generic certificate), circuit breaker, websocket, GRPC and multiple monitoring programs (Rest, Prometheus, Statsd, Datadog, InfluxDB, etc.). For more information on the features available in Traefik, refer to its official documentation:
https://docs.traefik.cn/
Ingress resource
Before we start the tutorial, let's briefly discuss how the Ingress resource works. The following is an example of the implicit use of the nginx Ingres controller.
apiVersion: extensions/v1beta1
kind: Ingress
metadata:
  name: ingress-example
  annotations:
    nginx.ingress.kubernetes.io/rewrite-target: /
spec:
  rules:
  - http:
      paths:
      - path: /microservice1
        backend:
          serviceName: test
          servicePort: 80
The Ingres manifest above contains a series of HTTP rules that specify how the controller routes traffic.
Optional host. If no host is specified (as shown above), this rule applies to all inbound HTTP traffic through the specified IP address. If a host (such as yourhost.com) is provided, the rule applies only to that host.
A list of paths (for example, / microservice1) to the associated backend defined by serviceName and servicePort.
A back end. HTTP (and HTTPS) requests to Ingress will match the host and path of the given rule and then route it to the back-end service specified in the rule.
In the above example, we configured a backend named "test" that will receive all traffic from the / microservice path. However, we can also configure a default backend that will serve any user request that does not conform to the path in the specification. At the same time, if no rules are defined, Ingress routes all traffic to the default backend. For example:
apiVersion: extensions/v1beta1
kind: Ingress
metadata:
  name: test-ingress
spec:
  backend:
    serviceName: defaultbackend
    servicePort: 80
In this case, all traffic is forwarded to the default backend. Now that we understand the basic concept of Ingress resources, let's take a look at some specific examples.
Step 0: preparation
As we said above, defining an Ingress resource has no effect unless you use the Ingres controller. In this tutorial, we set Traefik as the Ingres controller in the Kubernetes cluster.
To complete the tutorial, you need to prepare for:
-
A running Kubernetes cluster.
- An installed command line tool, kubectl. And configured to communicate with the cluster.
Note: the following examples assume that you are running a Kubernetes cluster on a local computer using Minikube.
Step 1: enable RBAC
First, we need to grant Traefik some permissions to access the Pod, endpoint, and services running in the cluster. To do this, we will use the ClusterRole and ClusterRoleBinding resources. However, you can also use the least privileged method for RoleBindings in the namespace scope. In general, this is the preferred method if the namespace of a cluster does not change dynamically, and traifik cannot monitor the namespaces of all clusters.
Let's create a new service account to provide Traefik with the identity in the cluster.
apiVersion: v1
kind: ServiceAccount
metadata:
  name: traefik-ingress
  namespace: kube-system
To create a ServiceAccount, you need to save the above manifest in tracefik-service-acc.yaml and run it:
kubectl create -f traefik-service-acc.yaml
serviceaccount "traefik-ingress" created
Next, let's create a ClusterRole with a set of permissions that will be applied to the traifik serviceaccount. With ClusterRole, traifik can manage and monitor resources in all namespaces in the cluster, such as services, endpoint s, secret s, and Ingress.
kind: ClusterRole
apiVersion: rbac.authorization.k8s.io/v1beta1
metadata:
  name: traefik-ingress
rules:
  - apiGroups:
      - ""
    resources:
      - services
      - endpoints
      - secrets
    verbs:
      - get
      - list
      - watch
  - apiGroups:
      - extensions
    resources:
      - ingresses
    verbs:
      - get
      - list
      - watch
Save this specification to the file tracefik-cr.yaml and run:
kubectl create -f traefik-cr.yaml
clusterrole.rbac.authorization.k8s.io "traefik-ingress" created
Finally, with these permissions enabled, we should bind the ClusterRole to the traifik serviceaccount. Use ClusterRoleBinding manifest to do this:
kind: ClusterRoleBinding
apiVersion: rbac.authorization.k8s.io/v1beta1
metadata:
  name: traefik-ingress
roleRef:
  apiGroup: rbac.authorization.k8s.io
  kind: ClusterRole
  name: traefik-ingress
subjects:
- kind: ServiceAccount
  name: traefik-ingress
  namespace: kube-system
Save this specification to tracefik-crb.yaml and run the following command:
kubectl create -f traefik-crb.yaml
clusterrolebinding.rbac.authorization.k8s.io "traefik-ingress" created
Step 2: deploy traifik to cluster
Next, we will deploy the traifik to Kubernetes cluster. The official traifik documentation supports three types of Deployment: using a Deployment object, using a DaemonSet object, or using Helm Chart.
In this tutorial, we will use the Deployment manifest. Deployment has many advantages over other options. For example, they ensure better scalability and provide good support for rolling updates.
Let's take a look at the Deployment manifest:
kind: Deployment
apiVersion: extensions/v1beta1
metadata:
  name: traefik-ingress
  namespace: kube-system
  labels:
    k8s-app: traefik-ingress-lb
spec:
  replicas: 1
  selector:
    matchLabels:
      k8s-app: traefik-ingress-lb
  template:
    metadata:
      labels:
        k8s-app: traefik-ingress-lb
        name: traefik-ingress-lb
    spec:
      serviceAccountName: traefik-ingress
      terminationGracePeriodSeconds: 60
      containers:
      - image: traefik
        name: traefik-ingress-lb
        ports:
        - name: http
          containerPort: 80
        - name: admin
          containerPort: 8080
        args:
        - --api
        - --kubernetes
        - --logLevel=INFO
The Deployment will create a copy of the traifik in the Kube system namespace. The traifik container will use ports 80 and 8080 specified in this manifest.
Save the manifest to the tracefik-Deployment.yaml file and run the following command to create the Deployment:
kubectl create -f traefik-deployment.yaml
deployment.extensions "traefik-ingress" created
Now, let's check whether the traifik pod has been successfully created:
kubectl --namespace=kube-system get pods
NAME                         READY     STATUS    RESTARTS   AGE
....
storage-provisioner           1/1       Running   3          23d
traefik-ingress-54d6d8d9cc-ls6cs 1/1       Running   0          1m
As you can see, the Deployment Controller starts a copy of the traifik, and it's running, knocking!
Step 3: create NodePorts for external access
Let's create a service to access Traefik from outside the cluster. To do this, we need a service that exposes two NodePorts.
kind: Service
apiVersion: v1
metadata:
  name: traefik-ingress-service
  namespace: kube-system
spec:
  selector:
    k8s-app: traefik-ingress-lb
  ports:
    - protocol: TCP
      port: 80
      name: web
    - protocol: TCP
      port: 8080
      name: admin
  type: NodePort
Save the manifest to traefik-svc.yaml and create the service:
kubectl create -f traefik-svc.yaml
service "traefik-ingress-service" created
Now, let's verify that the service creates:
kubectl describe svc traefik-ingress-service --namespace=kube-system
Name:                     traefik-ingress-service
Namespace:                kube-system
Labels:                   <none>
Annotations:              <none>
Selector:                 k8s-app=traefik-ingress-lb
Type:                     NodePort
IP:                       10.102.215.64
Port:                     web  80/TCP
TargetPort:               80/TCP
NodePort:                 web  30565/TCP
Endpoints:                172.17.0.6:80
Port:                     admin  8080/TCP
TargetPort:               8080/TCP
NodePort:                 admin  30729/TCP
Endpoints:                172.17.0.6:8080
Session Affinity:         None
External Traffic Policy:  Cluster
Events:                   <none>
As you can see, we now have two NodePorts (web and admin), which are routed to the 80 and 8080 container ports of the traifik Ingress controller respectively. The "admin" NodePort will be used to access the traifik Web UI, and the "Web" NodePort will be used to access services exposed through Ingress.
Step 4: visit traifik
In order to access the traifik Web UI in the browser, you can use the "admin" NodePort 30729 (note that your NodePort values may vary). Because we haven't added any front ends yet, the UI should be empty at this time.
Since we haven't configured Traefik in any way, we will receive a 404 response.
curl $(minikube ip):30565
404 page not found
Step 5: add Ingress to the cluster
Now we have Traefik as the Ingres controller in the Kubernetes cluster. However, we still need to define Ingress resources and services that expose the Traefik Web UI.
First, we create a service:
apiVersion: v1
kind: Service
metadata:
  name: traefik-web-ui
  namespace: kube-system
spec:
  selector:
    k8s-app: traefik-ingress-lb
  ports:
  - name: web
    port: 80
    targetPort: 8080
Save the manifest to traefik-webui-svc.yaml and run:
kubectl create -f traefik-webui-svc.yaml
service "traefik-web-ui" created
Let's verify that the service has been created:
kubectl describe svc traefik-web-ui --namespace=kube-system
Name:              traefik-web-ui
Namespace:         kube-system
Labels:            <none>
Annotations:       <none>
Selector:          k8s-app=traefik-ingress-lb
Type:              ClusterIP
IP:                10.98.230.58
Port:              web  80/TCP
TargetPort:        8080/TCP
Endpoints:         172.17.0.6:8080
Session Affinity:  None
Events:            <none>
As you can see, the ClusterIP of the service is 10.98.230.58, and the specified port is assigned in the manifest.
Next, we need to create an Ingress resource to point to the traifik Web UI backend:
apiVersion: extensions/v1beta1
kind: Ingress
metadata:
  name: traefik-web-ui
  namespace: kube-system
spec:
  rules:
  - host: traefik-ui.minikube
    http:
      paths:
      - path: /
        backend:
          serviceName: traefik-web-ui
          servicePort: web
In essence, Ingress routes all requests to traifik-ui.minikube, and the services created in the above steps expose the traifik Web UI.
Save the specification to tracefik-ingress.yaml and run:
kubectl create -f traefik-ingress.yaml
ingress.extensions "traefik-web-ui" created
In order to be able to access the Traefik Web UI through traefik-ui.minikube in the browser, we need to add new entries to our / etc/hosts file. The entry will contain the minikube IP and host name. You can get the IP address of minkube instance by running minikube IP, and then save the name of the new host to the / etc/hosts file, as follows:
echo "$(minikube ip) traefik-ui.minikube" | sudo tee -a /etc/hosts
192.168.99.100 traefik-ui.minikube
You should now be able to access http://traifik-ui.minikube: & lt; adminnodeport & gt; and view the traifik Web UI in your browser. Don't forget to attach the "admin" NodePort to the host address.

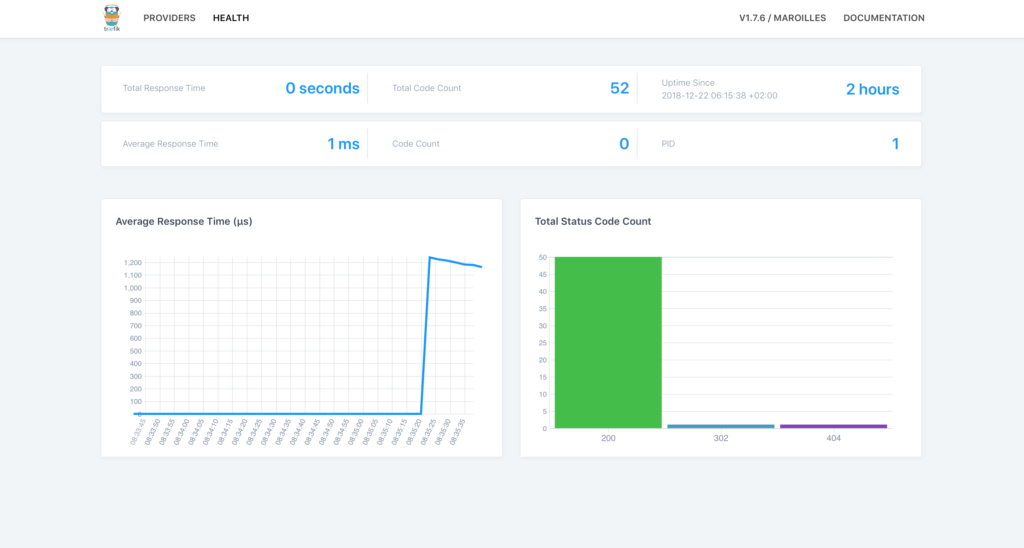
In the dashboard, you can click the Health link to view the Health status of the application:
Step 6: implement name based routing
Now, let's show you how to use the traifik ingress controller to set name based routing for the front-end list. We will use a simple one page website to create three deployments and display animal images: bear, hare and moose.
---
kind: Deployment
apiVersion: extensions/v1beta1
metadata:
  name: bear
  labels:
    app: animals
    animal: bear
spec:
  replicas: 2
  selector:
    matchLabels:
      app: animals
      task: bear
  template:
    metadata:
      labels:
        app: animals
        task: bear
        version: v0.0.1
    spec:
      containers:
      - name: bear
        image: supergiantkir/animals:bear
        ports:
        - containerPort: 80
---
kind: Deployment
apiVersion: extensions/v1beta1
metadata:
  name: moose
  labels:
    app: animals
    animal: moose
spec:
  replicas: 2
  selector:
    matchLabels:
      app: animals
      task: moose
  template:
    metadata:
      labels:
        app: animals
        task: moose
        version: v0.0.1
    spec:
      containers:
      - name: moose
        image: supergiantkir/animals:moose
        ports:
        - containerPort: 80
---
kind: Deployment
apiVersion: extensions/v1beta1
metadata:
  name: hare
  labels:
    app: animals
    animal: hare
spec:
  replicas: 2
  selector:
    matchLabels:
      app: animals
      task: hare
  template:
    metadata:
      labels:
        app: animals
        task: hare
        version: v0.0.1
    spec:
      containers:
      - name: hare
        image: supergiantkir/animals:hare
        ports:
        - containerPort: 80
Each Deployment will have two copies of the Pod, and each Pod will serve the animals website on containerPort 80.
Let's save the Deployment manifest to animals-deployment.yaml and run:
kubectl create -f animals-deployment.yaml
deployment.extensions "bear" created
deployment.extensions "moose" created
deployment.extensions "hare" created
Now, let's create a service for each Deployment so that the Pod can access:
---
apiVersion: v1
kind: Service
metadata:
  name: bear
spec:
  ports:
  - name: http
    targetPort: 80
    port: 80
  selector:
    app: animals
    task: bear
---
apiVersion: v1
kind: Service
metadata:
  name: moose
spec:
  ports:
  - name: http
    targetPort: 80
    port: 80
  selector:
    app: animals
    task: moose
---
apiVersion: v1
kind: Service
metadata:
  name: hare
  annotations:
    traefik.backend.circuitbreaker: "NetworkErrorRatio() > 0.5"
spec:
  ports:
  - name: http
    targetPort: 80
    port: 80
  selector:
    app: animals
    task: hare
Please note that the third service uses circuit breaker annotation. Circuit breaker is a function of traifik, which can prevent the failed server from bearing high load. In this case, we prevent the high load on the server from exceeding 50%. When this condition matches, the CB enters the "trip" state, in which it responds or redirects to another front end using a predefined HTTP status code.
Save these services manifest to animals-svc.yaml and run:
kubectl create -f animals-svc.yaml
service "bear" created
service "moose" created
service "hare" created
Finally, create an Ingres with three front and back end pairs for each Deployment. Bear. Minihub, moose. Minihub and hare. Minihub will be the front end of the corresponding back-end services.
The Ingress manifest is as follows:
apiVersion: extensions/v1beta1
kind: Ingress
metadata:
  name: animals
  annotations:
    kubernetes.io/ingress.class: traefik
spec:
  rules:
  - host: hare.minikube
    http:
      paths:
      - path: /
        backend:
          serviceName: hare
          servicePort: http
  - host: bear.minikube
    http:
      paths:
      - path: /
        backend:
          serviceName: bear
          servicePort: http
  - host: moose.minikube
    http:
      paths:
      - path: /
        backend:
          serviceName: moose
          servicePort: http
Save the specification to animals-ingress.yaml and run:
kubectl create -f animals-ingress.yaml
ingress.extensions "animals" created
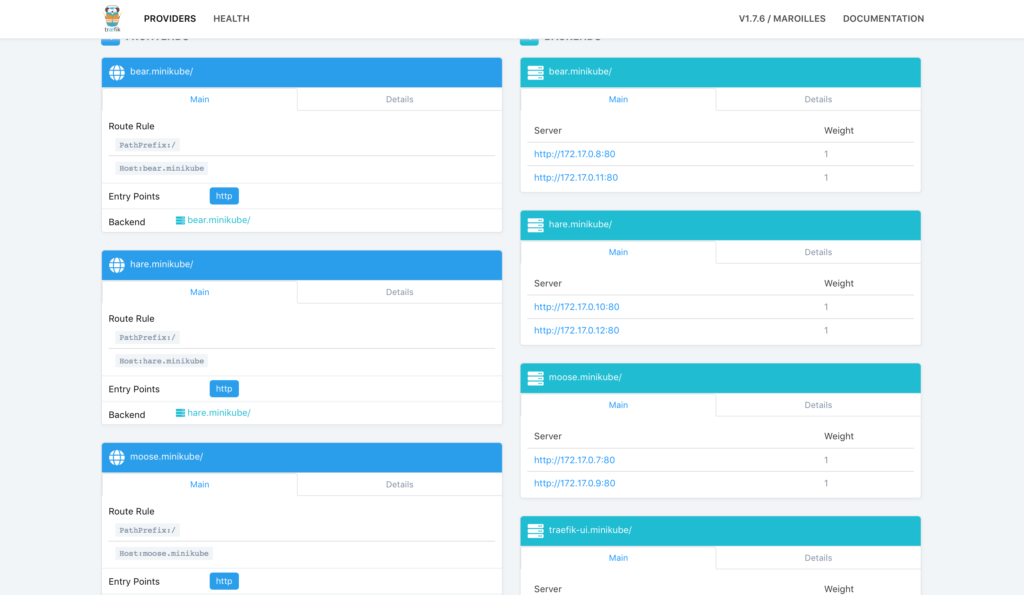
Now, in the traifik dashboard, you can see the front end of each host and the corresponding back end list:
If you edit etc/hosts again, you should be able to access the animals page in your browser:
echo "$(minikube ip) bear.minikube hare.minikube moose.minikube" | sudo tee -a /etc/hosts
You should use the "Web" NodePort to access specific web pages. For example, http://bear.minikube: & lt; webnodeport & gt;
We can also reconfigure the three front ends to provide services under one domain, as follows:
apiVersion: extensions/v1beta1
kind: Ingress
metadata:
  name: all-animals
  annotations:
    kubernetes.io/ingress.class: traefik
    traefik.frontend.rule.type: PathPrefixStrip
spec:
  rules:
  - host: animals.minikube
    http:
      paths:
      - path: /bear
        backend:
          serviceName: bear
          servicePort: http
      - path: /moose
        backend:
          serviceName: moose
          servicePort: http
      - path: /hare
        backend:
          serviceName: hare
          servicePort: http
If you activate this Ingres, use the corresponding path, and all three animals can access it under one domain - animals.minikube. Don't forget to add this domain to / etc/hosts.
echo "$(minikube ip) animals.minikube" | sudo tee -a /etc/hosts
Please note: we are configuring traifik to remove the prefix from the URL path using the traifik.frontend.rule.type annotation. This way we can use the container in the previous example directly. Because of the traifik.frontend.rule.type: pathprefixstrip rule, you have to use http://animals.minikub: 32484/moose/ instead of http://animals.minikub: 32484/moose
Step 7: realize flow distribution
With traifik, users can use service weights to allocate Ingress traffic among multiple deployment s in a controlled manner. This feature can be used for Canary releases, which should initially get a small but growing amount of traffic.
Let's use the following manifest to allocate a traifik between two microservices:
apiVersion: extensions/v1beta1
kind: Ingress
metadata:
  annotations:
    traefik.ingress.kubernetes.io/service-weights: |
      animals-app: 99%
      animals-app-canary: 1%
  name: animals-app
spec:
  rules:
  - http:
      paths:
      - backend:
          serviceName: animals-app
          servicePort: 80
        path: /
      - backend:
          serviceName: animals-app-canary
          servicePort: 80
        path: /
Note the comments for traifik.ingress.kubernetes.io/service-weights. It specifies how traffic is allocated between specified back-end services (animals app and animals app Canary). Traifik will route 99% of the user requests to the Pod supported by the animals app deployment, and 1% of the user requests to the Pod supported by the animals app Canary deployment.
For this setting to work properly, there are several conditions that need to be met:
-
All service back ends must share the same path and host.
-
The total number of requests shared across the service backend should total 100%.
- The percentage value should be within the supported accuracy range. Currently, Traefik supports the weight of 3 decimal places.
summary
As you can see, Ingress is a powerful tool for routing external traffic to the corresponding back-end services in the Kubernetes cluster. Users can use many of the Ingress controller s supported by Kubernetes to implement Ingress. In this tutorial, we focus on the traifik Ingres controller, which supports name based routing, load balancing, and other common tasks of Ingres controller.