As the most popular stream batch unified computing engine, Apache Flink is widely used in real-time ETL, event processing, data analysis, CEP, real-time machine learning and other fields. Starting from Flink 1.9, Apache Flink community began to provide support for Python language based on the original programming languages such as Java, Scala and SQL. After the development of several versions of Flink 1.9 ~ 1.12 and the upcoming version 1.13, the functions of PyFlink API have been improved day by day, which can meet the needs of Python users in most cases. Next, we take Flink 1.12 as an example to introduce how to use Python language to develop Flink jobs through PyFlink API. The contents include:
- Environmental preparation
- Job development
- Job submission
- Troubleshooting
- summary
GitHub address
https://github.com/apache/flink
Welcome to like Flink and send star~
Environmental preparation
Step 1: install Python
PyFlink only supports Python 3.5 +. You first need to confirm whether Python 3.5 + has been installed in your development environment. If not, you first need to install Python 3.5 +.
Step 2: install JDK
We know that the runtime of Flink is developed in Java language, so in order to execute Flink jobs, you also need to install JDK. If JDK 11 is not fully installed in your development environment, first confirm whether you need to install JDK 11.
Step 3: install PyFlink
Next, you need to install PyFlink, which can be installed through the following command:
# Creating a Python virtual environment
python3 -m pip install virtualenv
virtualenv -p `which python3` venv

# Use the Python virtual environment created above
./venv/bin/activate

# Install PyFlink 1.12
python3 -m pip install apache-flink==1.12.2
Job development
PyFlink Table API job
Let's first introduce how to develop the PyFlink Table API job.
■ 1) create TableEnvironment object
For the Table API job, the user first needs to create a TableEnvironment object. The following example defines a TableEnvironment object. The job defined by this object runs in flow mode and is executed by blink planner.
env_settings = EnvironmentSettings.new_instance().in_streaming_mode().use_blink_planner().build()
t_env = StreamTableEnvironment.create(environment_settings=env_settings)
■ 2) configure the execution parameters of the job
You can configure the execution parameters of a job in the following ways. The following example sets the default concurrency of a job to 4.
t_env.get_config().get_configuration().set_string('parallelism.default', '4')■ 3) create data source table
Next, you need to create a data source table for the job. PyFlink provides a variety of ways to define data source tables.
Method 1: from_elements
PyFlink enables users to create source tables from a given list. The table has the following data types: "hello", column "varcink", column "varcink", and column "varcink", column "varcink" and column "b", respectively.
tab = t_env.from_elements([("hello", 1), ("world", 2), ("flink", 3)], ['a', 'b'])explain:
- This method is usually used in the test phase. You can quickly create a data source table to verify the job logic
- from_ The elements method can receive multiple parameters. The first parameter is used to specify the data list. Each element in the list must be of tuple type; The second parameter specifies the schema of the table
Mode 2: DDL
In addition, the data can also come from an external data source. The following example defines a name called my_source, a table of datagen type. There are two fields of VARCHAR type in the table.
t_env.execute_sql("""
        CREATE TABLE my_source (
          a VARCHAR,
          b VARCHAR
        ) WITH (
          'connector' = 'datagen',
          'number-of-rows' = '10'
        )
    """)

tab = t_env.from_path('my_source')
explain:
- Defining data source tables through DDL is the most recommended method at present, and all connectors supported in Java table API & SQL can be used in PyFlink Table API jobs through DDL. For a detailed list of connectors, please refer to the official Flink document [1].
- At present, only some of the connector implementations are included in the distribution package officially provided by Flink, such as FileSystem, DataGen, Print, BlackHole, etc. most of the connector implementations are not included in the distribution package officially provided by Flink, such as Kafka, ES, etc. For connectors that are not included in the official distribution package provided by Flink, if they need to be used in PyFlink job, users need to explicitly specify the corresponding FAT JAR. For example, for Kafka, JAR package [2] needs to be used. JAR package can be specified in the following way:
# Note: the file: / / / prefix cannot be omitted
t_env.get_config().get_configuration().set_string("pipeline.jars", "file:///my/jar/path/flink-sql-connector-kafka_2.11-1.12.0.jar")
Method 3: catalog
hive_catalog = HiveCatalog("hive_catalog")
t_env.register_catalog("hive_catalog", hive_catalog)
t_env.use_catalog("hive_catalog")

# Suppose a name named source has been defined in hive catalog_ Table of table
tab = t_env.from_path('source_table')
This method is similar to that of DDL, except that the definition of the table has been registered in the catalog in advance, and there is no need to redefine it in the job.
■ 4) define the calculation logic of the operation
Method 1: through Table API
After obtaining the source table, you can use various operations provided in the Table API to define the calculation logic of the job and make various transformations to the table, such as:
@udf(result_type=DataTypes.STRING())
def sub_string(s: str, begin: int, end: int):
   return s[begin:end]

transformed_tab = tab.select(sub_string(col('a'), 2, 4))
Method 2: through SQL statement
In addition to using various operations provided in the Table API, the table can also be transformed directly through SQL statements. For example, the above logic can also be realized through SQL statements:
t_env.create_temporary_function("sub_string", sub_string)
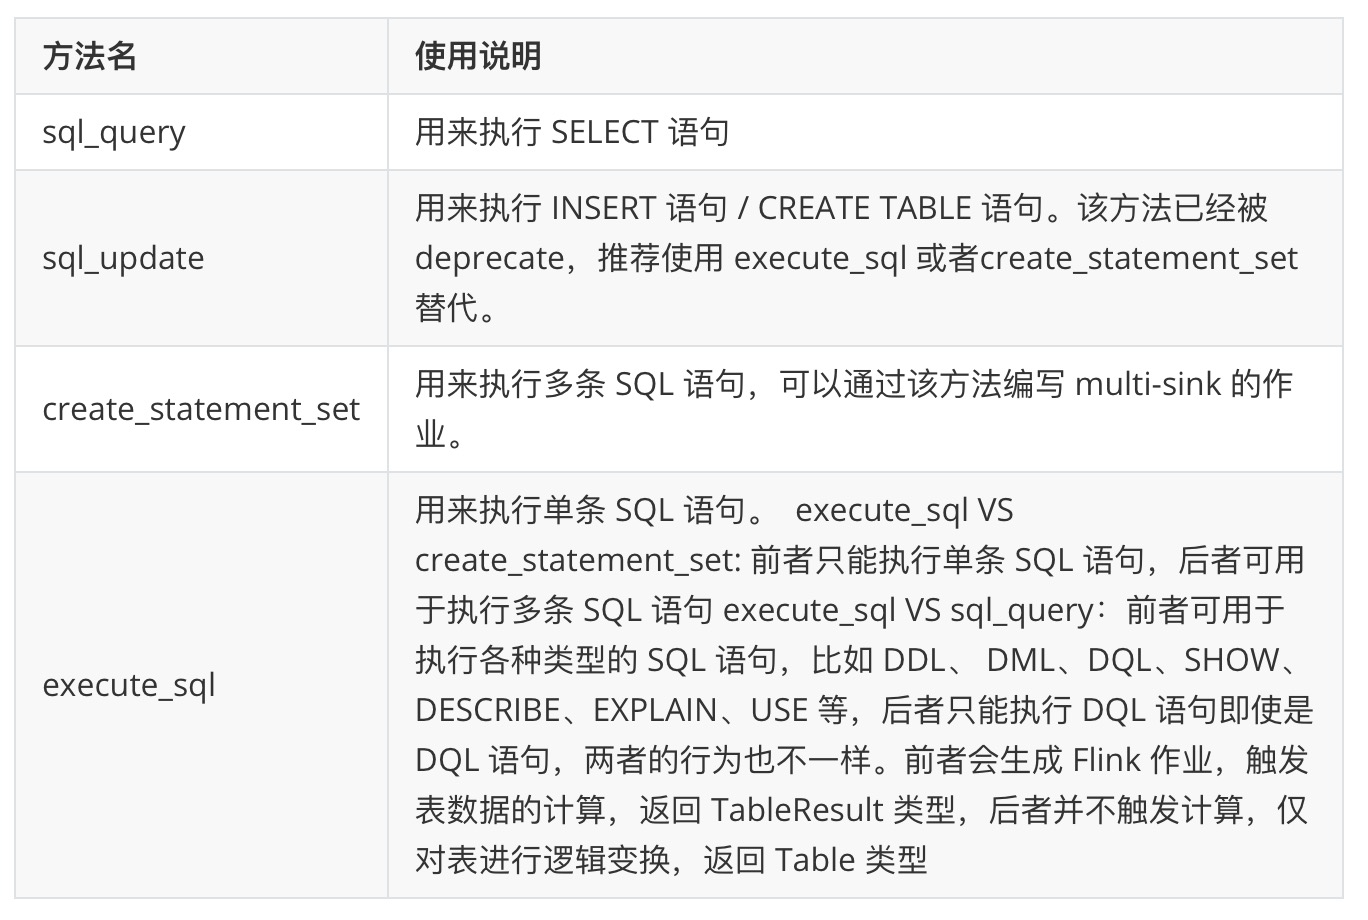
transformed_tab = t_env.sql_query("SELECT sub_string(a, 2, 4) FROM %s" % tab)explain:
- TableEnvironment provides a variety of ways to execute SQL statements, with slightly different purposes:
■ 5) view the execution plan
In the process of developing or debugging a job, you may need to view the execution plan of the job in the following ways.
Method 1: table explain
For example, when we need to know transformed_ When executing the current tab plan, you can execute: print(transformed_tab.explain()), and you can get the following output:
== Abstract Syntax Tree ==
LogicalProject(EXPR$0=[sub_string($0, 2, 4)])
+- LogicalTableScan(table=[[default_catalog, default_database, Unregistered_TableSource_582508460, source: [PythonInputFormatTableSource(a)]]])

== Optimized Logical Plan ==
PythonCalc(select=[sub_string(a, 2, 4) AS EXPR$0])
+- LegacyTableSourceScan(table=[[default_catalog, default_database, Unregistered_TableSource_582508460, source: [PythonInputFormatTableSource(a)]]], fields=[a])

== Physical Execution Plan ==
Stage 1 : Data Source
    content : Source: PythonInputFormatTableSource(a)

    Stage 2 : Operator
        content : SourceConversion(table=[default_catalog.default_database.Unregistered_TableSource_582508460, source: [PythonInputFormatTableSource(a)]], fields=[a])
        ship_strategy : FORWARD

        Stage 3 : Operator
            content : StreamExecPythonCalc
            ship_strategy : FORWARD
Method 2: tableenvironment explain_ sql
Method 1 is applicable to viewing the execution plan of a table. Sometimes there is no ready-made table object available, such as:
print(t_env.explain_sql("INSERT INTO my_sink SELECT * FROM %s " % transformed_tab))Its implementation plan is as follows:
== Abstract Syntax Tree ==
LogicalSink(table=[default_catalog.default_database.my_sink], fields=[EXPR$0])
+- LogicalProject(EXPR$0=[sub_string($0, 2, 4)])
   +- LogicalTableScan(table=[[default_catalog, default_database, Unregistered_TableSource_1143388267, source: [PythonInputFormatTableSource(a)]]])

== Optimized Logical Plan ==
Sink(table=[default_catalog.default_database.my_sink], fields=[EXPR$0])
+- PythonCalc(select=[sub_string(a, 2, 4) AS EXPR$0])
   +- LegacyTableSourceScan(table=[[default_catalog, default_database, Unregistered_TableSource_1143388267, source: [PythonInputFormatTableSource(a)]]], fields=[a])

== Physical Execution Plan ==
Stage 1 : Data Source
    content : Source: PythonInputFormatTableSource(a)

    Stage 2 : Operator
        content : SourceConversion(table=[default_catalog.default_database.Unregistered_TableSource_1143388267, source: [PythonInputFormatTableSource(a)]], fields=[a])
        ship_strategy : FORWARD

        Stage 3 : Operator
            content : StreamExecPythonCalc
            ship_strategy : FORWARD

            Stage 4 : Data Sink
                content : Sink: Sink(table=[default_catalog.default_database.my_sink], fields=[EXPR$0])
                ship_strategy : FORWARD
■ 6) write out the result data
Method 1: through DDL
Similar to creating a data source table, you can also create a result table through DDL.
t_env.execute_sql("""
        CREATE TABLE my_sink (
          `sum` VARCHAR
        ) WITH (
          'connector' = 'print'
        )
    """)

table_result = transformed_tab.execute_insert('my_sink')
explain:
- When print is used as sink, the job results are printed to standard output. If you don't need to view the output, you can also use blackhole as sink.
Method 2: collect
You can also use the collect method to collect the results of table to the client and view them one by one.
table_result = transformed_tab.execute()
with table_result.collect() as results:
    for result in results:
        print(result)
explain:
- This method can easily collect the results of table to the client and view them
- Since the data will eventually be collected to the client, it is best to limit the number of data, such as:
transformed_tab.limit(10).execute() limits the collection of only 10 pieces of data to the client
Method 3: to_pandas
You can also use to_pandas method to convert the result of table into pandas Dataframe and view.
result = transformed_tab.to_pandas()
print(result)
You can see the following output:
  _c0
0  32
1  e6
2  8b
3  be
4  4f
5  b4
6  a6
7  49
8  35
9  6b
explain:
- Similar to collect, this method also collects the results of table to the client, so it's best to limit the number of result data
■ 7) summary
Complete job examples are as follows:
from pyflink.table import DataTypes, EnvironmentSettings, StreamTableEnvironment
from pyflink.table.expressions import col
from pyflink.table.udf import udf


def table_api_demo():
    env_settings = EnvironmentSettings.new_instance().in_streaming_mode().use_blink_planner().build()
    t_env = StreamTableEnvironment.create(environment_settings=env_settings)
    t_env.get_config().get_configuration().set_string('parallelism.default', '4')

    t_env.execute_sql("""
            CREATE TABLE my_source (
              a VARCHAR,
              b VARCHAR
            ) WITH (
              'connector' = 'datagen',
              'number-of-rows' = '10'
            )
        """)

    tab = t_env.from_path('my_source')

    @udf(result_type=DataTypes.STRING())
    def sub_string(s: str, begin: int, end: int):
        return s[begin:end]

    transformed_tab = tab.select(sub_string(col('a'), 2, 4))

    t_env.execute_sql("""
            CREATE TABLE my_sink (
              `sum` VARCHAR
            ) WITH (
              'connector' = 'print'
            )
        """)

    table_result = transformed_tab.execute_insert('my_sink')

    # 1) Wait for the completion of job execution, which is used for local execution. Otherwise, the job may not have been completed and the script has exited, which will cause minicluster to exit prematurely
    # 2) When a job is submitted to the remote cluster through the detach mode, such as YARN/Standalone/K8s, this method needs to be removed
    table_result.wait()


if __name__ == '__main__':
    table_api_demo()
The results are as follows:
4> +I(a1)
3> +I(b0)
2> +I(b1)
1> +I(37)
3> +I(74)
4> +I(3d)
1> +I(07)
2> +I(f4)
1> +I(7f)
2> +I(da)
PyFlink DataStream API job
■ 1) create a StreamExecutionEnvironment object
For DataStream API jobs, users first need to define a StreamExecutionEnvironment object.
env = StreamExecutionEnvironment.get_execution_environment()
■ 2) configure the execution parameters of the job
You can configure the execution parameters of a job in the following ways. The following example sets the default concurrency of a job to 4.
env.set_parallelism(4)
■ 3) create data source
Next, you need to create a data source for the job. PyFlink provides a variety of ways to define data sources.
Method 1: from_collection
PyFlink enables users to create source tables from a list. The following example defines a table with three rows of data: [(1, 'aaa|bb'), (2, 'bb|a'), (3, 'aaa|a')]. The table has two columns, the column names are a and b, and the types are VARCHAR and BIGINT.
ds = env.from_collection(
        collection=[(1, 'aaa|bb'), (2, 'bb|a'), (3, 'aaa|a')],
        type_info=Types.ROW([Types.INT(), Types.STRING()]))
explain:
- This method is usually used in the test phase and can easily create a data source
- from_ The collection method can receive two parameters, of which the first parameter is used to specify the data list; The second parameter specifies the type of data
Method 2: use the connector defined in PyFlink DataStream API
In addition, you can also use the connector already supported in PyFlink DataStream API. It should be noted that only Kafka connector support is provided in 1.12.
deserialization_schema = JsonRowDeserializationSchema.builder() \
    .type_info(type_info=Types.ROW([Types.INT(), Types.STRING()])).build()

kafka_consumer = FlinkKafkaConsumer(
    topics='test_source_topic',
    deserialization_schema=deserialization_schema,
    properties={'bootstrap.servers': 'localhost:9092', 'group.id': 'test_group'})

ds = env.add_source(kafka_consumer)
explain:
- Kafka connector is not currently included in the distribution package officially provided by Flink. If it needs to be used in PyFlink job, the user needs to explicitly specify the corresponding FAT JAR [2]. JAR package can be specified in the following way:
# Note: the file: / / / prefix cannot be omitted
env.add_jars("file:///my/jar/path/flink-sql-connector-kafka_2.11-1.12.0.jar")- Even for PyFlink DataStream API jobs, fat jars packaged in Table & SQL connector are recommended to avoid the problem of recursive dependency.
Method 3: use the connector defined in PyFlink Table API
The following example defines how to use connector s supported in Table & SQL for PyFlink DataStream API jobs.
t_env = StreamTableEnvironment.create(stream_execution_environment=env)

t_env.execute_sql("""
        CREATE TABLE my_source (
          a INT,
          b VARCHAR
        ) WITH (
          'connector' = 'datagen',
          'number-of-rows' = '10'
        )
    """)

ds = t_env.to_append_stream(
    t_env.from_path('my_source'),
    Types.ROW([Types.INT(), Types.STRING()]))
explain:
- Since there are few types of connectors supported by build in in the PyFlink DataStream API at present, it is recommended to create the data source table used in the PyFlink DataStream API job in this way. In this way, all connectors that can be used in the PyFlink DataStream API can be used in the PyFlink DataStream API job.
- It should be noted that the TableEnvironment needs to create streamtableenvironment in the following ways Create (stream_execution_environment = Env) so that the PyFlink DataStream API and the PyFlink Table API share the same StreamExecutionEnvironment object.
■ 4) define calculation logic
After generating the DataStream object corresponding to the data source, you can use various operations defined in the PyFlink DataStream API to define the calculation logic and transform the DataStream object, such as:
def split(s):
    splits = s[1].split("|")
    for sp in splits:
       yield s[0], sp

ds = ds.map(lambda i: (i[0] + 1, i[1])) \
       .flat_map(split) \
       .key_by(lambda i: i[1]) \
       .reduce(lambda i, j: (i[0] + j[0], i[1]))
■ 5) write out the result data
Method 1: print
You can call the print method on the DataStream object to print the results of DataStream into standard output, such as:
ds.print()
Method 2: use the connector defined in PyFlink DataStream API
You can directly use the connectors already supported in PyFlink DataStream API. It should be noted that 1.12 provides support for FileSystem, JDBC and Kafka connector s. Take Kafka as an example:
serialization_schema = JsonRowSerializationSchema.builder() \
    .with_type_info(type_info=Types.ROW([Types.INT(), Types.STRING()])).build()

kafka_producer = FlinkKafkaProducer(
    topic='test_sink_topic',
    serialization_schema=serialization_schema,
    producer_config={'bootstrap.servers': 'localhost:9092', 'group.id': 'test_group'})

ds.add_sink(kafka_producer)
explain:
- JDBC and Kafka connector are not currently included in the official distribution package provided by Flink. If they need to be used in PyFlink job, users need to explicitly specify the corresponding FAT JAR. For example, Kafka connector can use JAR package [2], and JAR package can be specified in the following way:
# Note: the file: / / / prefix cannot be omitted
env.add_jars("file:///my/jar/path/flink-sql-connector-kafka_2.11-1.12.0.jar")- Fat jars packaged in Table & SQL connector are recommended to avoid the problem of recursive dependency.
Method 3: use the connector defined in PyFlink Table API
The following example shows how to use the connector supported in Table & SQL as the sink of PyFlink DataStream API job.
# Writing method 1: ds type is types ROW
def split(s):
    splits = s[1].split("|")
    for sp in splits:
        yield Row(s[0], sp)

ds = ds.map(lambda i: (i[0] + 1, i[1])) \
       .flat_map(split, Types.ROW([Types.INT(), Types.STRING()])) \
       .key_by(lambda i: i[1]) \
       .reduce(lambda i, j: Row(i[0] + j[0], i[1]))

# Writing method 2: ds type is types TUPLE
def split(s):
    splits = s[1].split("|")
    for sp in splits:
        yield s[0], sp

ds = ds.map(lambda i: (i[0] + 1, i[1])) \
       .flat_map(split, Types.TUPLE([Types.INT(), Types.STRING()])) \
       .key_by(lambda i: i[1]) \
       .reduce(lambda i, j: (i[0] + j[0], i[1]))

# Write ds to sink
t_env.execute_sql("""
        CREATE TABLE my_sink (
          a INT,
          b VARCHAR
        ) WITH (
          'connector' = 'print'
        )
    """)

table = t_env.from_data_stream(ds)
table_result = table.execute_insert("my_sink")
explain:
- It should be noted that T_ env. from_ data_ The result type type of ds object in stream (ds) must be compound type types Row or types Tuple, which is why it is necessary to explicitly declare the flat in the job calculation logic_ Result type of map operation
- Job submission needs to be done through the job submission method provided in PyFlink Table API
- Since there are few types of connectors supported in the PyFlink DataStream API at present, it is recommended to define the data source table used in the PyFlink DataStream API job in this way. In this way, all connectors that can be used in the PyFlink Table API can be used as the sink of the PyFlink DataStream API job.
■ 7) summary
Complete job examples are as follows:
Mode 1 (suitable for debugging):
from pyflink.common.typeinfo import Types
from pyflink.datastream import StreamExecutionEnvironment


def data_stream_api_demo():
    env = StreamExecutionEnvironment.get_execution_environment()
    env.set_parallelism(4)

    ds = env.from_collection(
        collection=[(1, 'aaa|bb'), (2, 'bb|a'), (3, 'aaa|a')],
        type_info=Types.ROW([Types.INT(), Types.STRING()]))

    def split(s):
        splits = s[1].split("|")
        for sp in splits:
            yield s[0], sp

    ds = ds.map(lambda i: (i[0] + 1, i[1])) \
           .flat_map(split) \
           .key_by(lambda i: i[1]) \
           .reduce(lambda i, j: (i[0] + j[0], i[1]))

    ds.print()

    env.execute()


if __name__ == '__main__':
    data_stream_api_demo()
The results are as follows:
3> (2, 'aaa')
3> (2, 'bb')
3> (6, 'aaa')
3> (4, 'a')
3> (5, 'bb')
3> (7, 'a')
Mode 2 (suitable for online operation):
from pyflink.common.typeinfo import Types
from pyflink.datastream import StreamExecutionEnvironment
from pyflink.table import StreamTableEnvironment


def data_stream_api_demo():
    env = StreamExecutionEnvironment.get_execution_environment()
    t_env = StreamTableEnvironment.create(stream_execution_environment=env)
    env.set_parallelism(4)

    t_env.execute_sql("""
            CREATE TABLE my_source (
              a INT,
              b VARCHAR
            ) WITH (
              'connector' = 'datagen',
              'number-of-rows' = '10'
            )
        """)

    ds = t_env.to_append_stream(
        t_env.from_path('my_source'),
        Types.ROW([Types.INT(), Types.STRING()]))

    def split(s):
        splits = s[1].split("|")
        for sp in splits:
            yield s[0], sp

    ds = ds.map(lambda i: (i[0] + 1, i[1])) \
           .flat_map(split, Types.TUPLE([Types.INT(), Types.STRING()])) \
           .key_by(lambda i: i[1]) \
           .reduce(lambda i, j: (i[0] + j[0], i[1]))

    t_env.execute_sql("""
            CREATE TABLE my_sink (
              a INT,
              b VARCHAR
            ) WITH (
              'connector' = 'print'
            )
        """)

    table = t_env.from_data_stream(ds)
    table_result = table.execute_insert("my_sink")

    # 1) Wait for the completion of job execution, which is used for local execution. Otherwise, the job may not have been completed and the script has exited, which will cause minicluster to exit prematurely
    # 2) When a job is submitted to the remote cluster through the detach mode, such as YARN/Standalone/K8s, this method needs to be removed
    table_result.wait()


if __name__ == '__main__':
    data_stream_api_demo()
Job submission
Flink provides a variety of job deployment methods, such as local, standalone, YARN, K8s, etc. PyFlink also supports the above job deployment methods. Please refer to Flink official document [3] for more details.
local
Note: when using this method to execute a job, a minicluster will be started, and the job will be submitted to minicluster for execution. This method is suitable for the job development stage.
Example: python3 table_api_demo.py
standalone
Note: when using this method to execute a job, the job will be submitted to a remote standalone cluster.
Example:
./bin/flink run --jobmanager localhost:8081 --python table_api_demo.py
YARN Per-Job
Note: when using this method to execute a job, the job will be submitted to a remote YARN cluster.
Example:
./bin/flink run --target yarn-per-job --python table_api_demo.py
K8s application mode
Note: when using this method to execute a job, the job will be submitted to the K8s cluster and executed in application mode.
Example:
./bin/flink run-application \
--target kubernetes-application \
--parallelism 8 \
-Dkubernetes.cluster-id**=**<ClusterId> \
-Dtaskmanager.memory.process.size**=**4096m \
-Dkubernetes.taskmanager.cpu**=**2 \
-Dtaskmanager.numberOfTaskSlots**=**4 \
-Dkubernetes.container.image**=**<PyFlinkImageName> \
--pyModule table_api_demo \
--pyFiles file:///path/to/table_api_demo.py
Parameter description
In addition to the parameters mentioned above, there are other parameters related to PyFlink job when submitting through flick run.
| Parameter name | Purpose description | Examples |
|---|---|---|
| -py / --python | Specifies the entry file for the job | -py file:///path/to/table_api_demo.py |
| -pym / --pyModule | The function of specifying the entry module of the job is similar to -- python. It can be used when the python file of the job is a zip package and cannot be specified through -- python. It is more general than -- python | -pym table_api_demo -pyfs file:///path/to/table_api_demo.py |
| -pyfs / --pyFiles | Specify one or more Python files (. py/.zip, etc., comma separated). These Python files will be placed in PYTHONPATH of Python process when the job is executed, which can be accessed in Python custom functions | -pyfs file:///path/to/table_api_demo.py,file:///path/to/deps.zip |
| -pyarch / --pyArchives | Specify one or more archive files (separated by commas). When the job is executed, these archive files will be decompressed and placed in the workspace directory of the Python process, which can be accessed through relative paths | -pyarch file:///path/to/venv.zip |
| -pyexec / --pyExecutable | Specifies the path of the Python process when the job is executed | -pyarch file:///path/to/venv.zip -pyexec venv.zip/venv/bin/python3 |
| -pyreq / --pyRequirements | Specify the requirements file, which defines the dependency of the job | -pyreq requirements.txt |
Troubleshooting
When we just started PyFlink job development, we will inevitably encounter various problems. It is very important to learn how to troubleshoot problems. Next, we will introduce some common troubleshooting methods.
client side exception output
PyFlink job also follows the submission method of Flink job. The job will first be compiled into JobGraph on the client side, and then submitted to the Flink cluster for execution. If there is a problem with job compilation, it will cause an exception to be thrown when submitting the job on the client side. At this time, you can see such output on the client side:
Traceback (most recent call last):
  File "/Users/dianfu/code/src/github/pyflink-usecases/datastream_api_demo.py", line 50, in <module>
    data_stream_api_demo()
  File "/Users/dianfu/code/src/github/pyflink-usecases/datastream_api_demo.py", line 45, in data_stream_api_demo
    table_result = table.execute_insert("my_")
  File "/Users/dianfu/venv/pyflink-usecases/lib/python3.8/site-packages/pyflink/table/table.py", line 864, in execute_insert
    return TableResult(self._j_table.executeInsert(table_path, overwrite))
  File "/Users/dianfu/venv/pyflink-usecases/lib/python3.8/site-packages/py4j/java_gateway.py", line 1285, in __call__
    return_value = get_return_value(
  File "/Users/dianfu/venv/pyflink-usecases/lib/python3.8/site-packages/pyflink/util/exceptions.py", line 162, in deco
    raise java_exception
pyflink.util.exceptions.TableException: Sink `default_catalog`.`default_database`.`my_` does not exists
     at org.apache.flink.table.planner.delegation.PlannerBase.translateToRel(PlannerBase.scala:247)
     at org.apache.flink.table.planner.delegation.PlannerBase$$anonfun$1.apply(PlannerBase.scala:159)
     at org.apache.flink.table.planner.delegation.PlannerBase$$anonfun$1.apply(PlannerBase.scala:159)
     at scala.collection.TraversableLike$$anonfun$map$1.apply(TraversableLike.scala:234)
     at scala.collection.TraversableLike$$anonfun$map$1.apply(TraversableLike.scala:234)
     at scala.collection.Iterator$class.foreach(Iterator.scala:891)
     at scala.collection.AbstractIterator.foreach(Iterator.scala:1334)
     at scala.collection.IterableLike$class.foreach(IterableLike.scala:72)
     at scala.collection.AbstractIterable.foreach(Iterable.scala:54)
     at scala.collection.TraversableLike$class.map(TraversableLike.scala:234)
     at scala.collection.AbstractTraversable.map(Traversable.scala:104)
     at org.apache.flink.table.planner.delegation.PlannerBase.translate(PlannerBase.scala:159)
     at org.apache.flink.table.api.internal.TableEnvironmentImpl.translate(TableEnvironmentImpl.java:1329)
     at org.apache.flink.table.api.internal.TableEnvironmentImpl.executeInternal(TableEnvironmentImpl.java:676)
     at org.apache.flink.table.api.internal.TableImpl.executeInsert(TableImpl.java:572)
     at sun.reflect.NativeMethodAccessorImpl.invoke0(Native Method)
     at sun.reflect.NativeMethodAccessorImpl.invoke(NativeMethodAccessorImpl.java:62)
     at sun.reflect.DelegatingMethodAccessorImpl.invoke(DelegatingMethodAccessorImpl.java:43)
     at java.lang.reflect.Method.invoke(Method.java:498)
     at org.apache.flink.api.python.shaded.py4j.reflection.MethodInvoker.invoke(MethodInvoker.java:244)
     at org.apache.flink.api.python.shaded.py4j.reflection.ReflectionEngine.invoke(ReflectionEngine.java:357)
     at org.apache.flink.api.python.shaded.py4j.Gateway.invoke(Gateway.java:282)
     at org.apache.flink.api.python.shaded.py4j.commands.AbstractCommand.invokeMethod(AbstractCommand.java:132)
     at org.apache.flink.api.python.shaded.py4j.commands.CallCommand.execute(CallCommand.java:79)
     at org.apache.flink.api.python.shaded.py4j.GatewayConnection.run(GatewayConnection.java:238)
     at java.lang.Thread.run(Thread.java:748)

Process finished with exit code 1
For example, the name used in the above error reporting instructions is "my_" The table for does not exist.
TaskManager log file
Some errors do not occur until the job is running, such as dirty data or the implementation of Python custom functions. For such errors, you usually need to check the log file of TaskManager. For example, the following errors reflect that the opencv library accessed by users in Python custom functions does not exist.
Caused by: java.lang.RuntimeException: Error received from SDK harness for instruction 2: Traceback (most recent call last):
  File "/Users/dianfu/venv/pyflink-usecases/lib/python3.8/site-packages/apache_beam/runners/worker/sdk_worker.py", line 253, in _execute
    response = task()
  File "/Users/dianfu/venv/pyflink-usecases/lib/python3.8/site-packages/apache_beam/runners/worker/sdk_worker.py", line 310, in <lambda>
    lambda: self.create_worker().do_instruction(request), request)
  File "/Users/dianfu/venv/pyflink-usecases/lib/python3.8/site-packages/apache_beam/runners/worker/sdk_worker.py", line 479, in do_instruction
    return getattr(self, request_type)(
  File "/Users/dianfu/venv/pyflink-usecases/lib/python3.8/site-packages/apache_beam/runners/worker/sdk_worker.py", line 515, in process_bundle
    bundle_processor.process_bundle(instruction_id))
  File "/Users/dianfu/venv/pyflink-usecases/lib/python3.8/site-packages/apache_beam/runners/worker/bundle_processor.py", line 977, in process_bundle
    input_op_by_transform_id[element.transform_id].process_encoded(
  File "/Users/dianfu/venv/pyflink-usecases/lib/python3.8/site-packages/apache_beam/runners/worker/bundle_processor.py", line 218, in process_encoded
    self.output(decoded_value)
  File "apache_beam/runners/worker/operations.py", line 330, in apache_beam.runners.worker.operations.Operation.output
  File "apache_beam/runners/worker/operations.py", line 332, in apache_beam.runners.worker.operations.Operation.output
  File "apache_beam/runners/worker/operations.py", line 195, in apache_beam.runners.worker.operations.SingletonConsumerSet.receive
  File "pyflink/fn_execution/beam/beam_operations_fast.pyx", line 71, in pyflink.fn_execution.beam.beam_operations_fast.FunctionOperation.process
  File "pyflink/fn_execution/beam/beam_operations_fast.pyx", line 85, in pyflink.fn_execution.beam.beam_operations_fast.FunctionOperation.process
  File "pyflink/fn_execution/coder_impl_fast.pyx", line 83, in pyflink.fn_execution.coder_impl_fast.DataStreamFlatMapCoderImpl.encode_to_stream
  File "/Users/dianfu/code/src/github/pyflink-usecases/datastream_api_demo.py", line 26, in split
    import cv2
ModuleNotFoundError: No module named 'cv2'

    at org.apache.beam.runners.fnexecution.control.FnApiControlClient$ResponseStreamObserver.onNext(FnApiControlClient.java:177)
    at org.apache.beam.runners.fnexecution.control.FnApiControlClient$ResponseStreamObserver.onNext(FnApiControlClient.java:157)
    at org.apache.beam.vendor.grpc.v1p26p0.io.grpc.stub.ServerCalls$StreamingServerCallHandler$StreamingServerCallListener.onMessage(ServerCalls.java:251)
    at org.apache.beam.vendor.grpc.v1p26p0.io.grpc.ForwardingServerCallListener.onMessage(ForwardingServerCallListener.java:33)
    at org.apache.beam.vendor.grpc.v1p26p0.io.grpc.Contexts$ContextualizedServerCallListener.onMessage(Contexts.java:76)
    at org.apache.beam.vendor.grpc.v1p26p0.io.grpc.internal.ServerCallImpl$ServerStreamListenerImpl.messagesAvailableInternal(ServerCallImpl.java:309)
    at org.apache.beam.vendor.grpc.v1p26p0.io.grpc.internal.ServerCallImpl$ServerStreamListenerImpl.messagesAvailable(ServerCallImpl.java:292)
    at org.apache.beam.vendor.grpc.v1p26p0.io.grpc.internal.ServerImpl$JumpToApplicationThreadServerStreamListener$1MessagesAvailable.runInContext(ServerImpl.java:782)
    at org.apache.beam.vendor.grpc.v1p26p0.io.grpc.internal.ContextRunnable.run(ContextRunnable.java:37)
    at org.apache.beam.vendor.grpc.v1p26p0.io.grpc.internal.SerializingExecutor.run(SerializingExecutor.java:123)
    at java.util.concurrent.ThreadPoolExecutor.runWorker(ThreadPoolExecutor.java:1149)
    at java.util.concurrent.ThreadPoolExecutor$Worker.run(ThreadPoolExecutor.java:624)
    ... 1 more
explain:
- In local mode, the log of TaskManager is located in the installation directory of PyFlink: site packages / PyFlink / log /, which can also be found through the following command:
\>>> import pyflink
\>>> print(pyflink.__path__)
['/ users / Dianfu / venv / pyflink usecases / lib / python3.8 / site packages / pyflink'], then the log file is located in / users / Dianfu / venv / pyflink usecases / lib / python3 8 / site packages / pyflink / log
Custom log
Sometimes, the content of the exception log is not enough to help us locate the problem. At this time, we can consider printing some log information in Python custom functions. PyFlink supports users to output logs through logging in Python custom functions, such as:
def split(s):
    import logging
    logging.info("s: " + str(s))
    splits = s[1].split("|")
    for sp in splits:
        yield s[0], sp
In the above way, the input parameters of the split function will be printed into the log file of the task manager.
Remote debugging
During the operation of PyFlink job, an independent Python process will be started to execute Python custom functions. Therefore, if you need to debug Python custom functions, you need to do it through remote debugging. See [4] to learn how to do Python remote debugging in pychar.
1) To install pydevd pycharm in a Python environment:
pip install pydevd-pycharm~=203.7717.65
2) Set remote debugging parameters in Python custom functions:
def split(s):
    import pydevd_pycharm
    pydevd_pycharm.settrace('localhost', port=6789, stdoutToServer=True, stderrToServer=True)
    splits = s[1].split("|")
    for sp in splits:
        yield s[0], sp
3) Follow the steps of remote debugging in pychar. Please refer to [4], or refer to the introduction of "code debugging" in blog [5].
Note: Python remote debugging function is only supported in professional version of pychar.
Community user mailing list
If the problem is not solved in step 6, the user can also send the email to the [Flink] list. It should be noted that when sending the problem to the mailing list, try to describe the problem clearly. It is best to have reproducible codes and data. You can refer to this email [7].
summary
In this article, we mainly introduce the environment preparation, job development, job submission, problem troubleshooting and other information of PyFlink API job, hoping to help users quickly build a Flink job using Python language, hoping to be helpful to you. Next, we will continue to launch a series of PyFlink articles to help PyFlink users have an in-depth understanding of various functions, application scenarios and best practices in PyFlink.
To this end, we launched a questionnaire. I hope you can actively participate in this questionnaire to help us better sort out the relevant learning materials of PyFlink. After completing the questionnaire, you can participate in the lucky draw, and Flink custom Polo shirt is sent! At 12:00 noon on April 30, the prize will be opened on time~
Reference link
[1] https://ci.apache.org/projects/flink/flink-docs-release-1.12/dev/table/connectors/
[4] https://www.jetbrains.com/help/pycharm/remote-debugging-with-product.html#remote-debug-config
[6] https://flink.apache.org/community.html#mailing-lists
Activity recommendation:
For only 99 yuan, you can experience Alibaba cloud's enterprise level product based on Apache Flink - real time computing Flink version! Click the link below to learn more about the event: https://www.aliyun.com/product/bigdata/sc?utm_content=g_1000250506

Original link: https://developer.aliyun.com/article/783823?
Copyright notice: the content of this article is spontaneously contributed by Alibaba cloud real name registered users, and the copyright belongs to the original author. Alibaba cloud developer community does not own its copyright or bear corresponding legal liabilities. Please refer to Alibaba cloud developer community user service agreement and Alibaba cloud developer community intellectual property protection guidelines for specific rules. If you find any content suspected of plagiarism in the community, fill in the infringement complaint form to report. Once verified, the community will immediately delete the content suspected of infringement.