z-index attributes, although so much has been written, are still widely misunderstood and mishandled. Stacking problems in complex single-page web applications can become a major problem. Sticking to some principles, however, we can easily avoid these problems.
If you've ever had any complex Web UI development, you might sometimes go crazy trying to set the z-index of elements to thousands or large numbers, only to find that it doesn't help you put it on top of other elements, which have lower z-index or no definition at all.
Why? More importantly, how to avoid these problems?
In this article, I'll talk about what z-index actually is, and how to stop speculating about its applicability to any particular situation and start treating it like any other convenient tool.
Hierarchical structure of cascading context
If you think of a web page as three-dimensional, z-index is the z-coordinate (also known as its cascade order) property that defines an element: the larger the value, the closer the element is to the observer. You can also think of it as an attribute that affects the order of rendering, because the screen is a two-dimensional grid of pixels. Therefore, the larger the z-index value, the later the elements are drawn on the page.
However, one of the main complications is the spatial inequality of z-index values - it is stratified. Elements can create a cascading context that becomes the root of the z-index value of their descendants. An example is then used to explain the concept of cascading context.
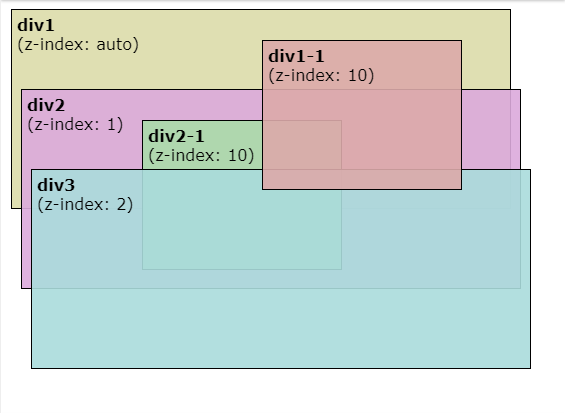
The document body has five div nodes: div1, div2, div3, div1-1 and div2-1. They are absolutely positioned and overlap with each other. Div1-1 is the sub-node of div1, and div2-1 is the sub-node of div2.
html
<body>
  <div class="div1">
    <strong>div1</strong>
    <br/>
    (z-index: auto)
    <div class="div1-1">
      <strong>div1-1</strong>
      <br/>
      (z-index: 10)
    </div>
  </div>
  <div class="div2">
    <strong>div2</strong>
    <br/>
    (z-index: 1)
    <div class="div2-1">
      <strong>div2-1</strong>
      <br/>
      (z-index: 10)
    </div>
  </div>
  <div class="div3">
    <strong>div3</strong>
    <br/>
    (z-index: 2)
  </div>
</body>
css
div {
  box-sizing: border-box;
  border: 1px solid black;
  padding: 5px;
  position: absolute;
  font-family: Verdana;
}

.div1, .div2, .div3 {
  width: 500px;
  height: 200px;
}

.div1-1, .div2-1 {
  width: 200px;
  height: 150px;
}

.div1 {
  left: 10px;
  top: 10px;
  background-color: rgba(220, 220, 170, 0.9);
}

.div1-1 {
  left: 250px;
  top: 30px;
  background-color: rgba(220, 170, 170, 0.9);

  z-index: 10;
}

.div2 {
  left: 20px;
  top: 90px;
  background-color: rgba(220, 170, 220, 0.9);

  z-index: 1;
}

.div2-1 {
  left: 120px;
  top: 30px;
  background-color: rgba(170, 220, 170, 0.9);

  z-index: 10;
}

.div3 {
  left: 30px;
  top: 170px;
  background-color: rgba(170, 220, 220, 0.9);

  z-index: 2;
}
Then we explain what we see. Here There's a detailed drawing order, but here we just need to compare two things.
-
z-index value
If the element has a higher z-index, the drawing will be later than the value.
-
Style resource order
If the z-index values are the same, the more backward you appear in the style file, the more sparse you draw.
Therefore, according to our CSS file, if we do not consider the cascading context, the order should be as follows:
- div1
- div2
- div3
- div1-1
- div2-1
Note that div 2-1 is actually behind div 3. Why?
Note: The z-index value of auto does not create a cascade context
If an element wants to create a cascade context, it creates a foundation or local box for its z-index value of its child elements, so when determining the drawing order, they will never compare with anything outside the cascade context. In other words, when an element creating a cascading context is drawn, all the child elements under the element are drawn after it and before any of its brothers.
Back in the example, the actual drawing order of the body descendant div is
- div1
- div2
- div3
- div1-1
Notice that there is no div2-1 in the list, it is a child of div2, and it creates a cascading context (because it is an absolutely positioned element and has Z-index in addition to the default value of auto), so it is drawn after div2, but before div3.
Div1 does not create a cascading context because its z-index value is auto, so div1-1 (the sub-element of div1) is drawn after div2 and div3 because the z-index value of div1-1 is 10 larger than div2 and div3.
If you don't understand, don't worry. Here are some resources to better explain these concepts:
- "The Stacking Context" MDN document
- "What No One Told You About Z-Index" Philip Walton
However, this article focuses on how to deal with Z-index when a page is composed of dozens and hundreds of components, each component may define a sub-component of z-index.
Suggestions for the most popular article on z-index Grouping all z-index values in one place But if these values do not belong to the same cascading context (which may not be easy to implement in large applications), then comparing these values is meaningless.
Here is an example. Suppose we have a page with header and main sections. For some reason, the content style in main must be set: position: relation and z-index: 1.
// html
<div class="header">
  Header
</div>

<div class="main">
  Main Content
</div>
// css
body {
  margin: 0;
  font-family: Verdana;
  text-align: center;
  background-color: white;
}

div {
  display: flex;
  align-items: center;
  justify-content: center;
}

.header {
  background-color: rgba(255, 255, 220, 0.5);
  font-size: 10vmin;
  position: relative;
  height: 30vh;
}

.main {
  background-color: rgba(220, 255, 255, 0.5);
  font-size: 10vmin;
  height: 70vh;
  position: relative;
  z-index: 1;
}
Operation effect:

The component architecture is used here, so the CSS of the root component and each sub-component is defined in the dedicated part. In fact, components will reside in separate files, and tags will be generated using the JavaScript Library of your choice, such as React, but for demonstration purposes, it's okay to put everything together.
Now, suppose our task is to create a drop-down menu in the header. Of course, it must be above main, so let's give it a z-index:10.
// html
<div class="header">
  Header
  <div class="overlay">
    Overlay
  </div>
</div>

<div class="main">
  Main Content
</div>
// css
body {
  margin: 0;
  font-family: Verdana;
  text-align: center;
  background-color: white;
}

div {
  display: flex;
  align-items: center;
  justify-content: center;
}

.header {
  background-color: rgba(255, 255, 220, 0.8);
  font-size: 10vmin;
  position: relative;
  height: 30vh;
}

.overlay {
  position: absolute;
  z-index: 10;
  background-color: rgba(255, 220, 255, 0.8);
  left: 10vw;
  top: 25vh;
  width: 50vw;
  height: 50vh;
  filter: drop-shadow(0 0 3px rgba(0, 0, 0, 0.3));
}

.overlay::after {
  content: "";
  position: absolute;
  left: 50%;
  transform: translateX(-50%);
  bottom: 100%;
  width: 0;
  height: 0;
  border-top: 10px solid transparent;
  border-right: 10px solid transparent;
  border-left: 10px solid transparent;
  border-bottom: 10px solid rgba(255, 220, 255, 0.8);
}

.main {
  background-color: rgba(220, 255, 255, 0.8);
  font-size: 10vmin;
  height: 70vh;
  position: relative;
  z-index: 1;
}
Operation effect:

Now, a few months later, in order to make something irrelevant work better, we need to add an additional transform: translateZ(0) to the header style.
// Part of code
.header {
  background-color: rgba(255, 255, 220, 0.8);
  font-size: 10vmin;
  position: relative;
  height: 30vh;
  transform: translateZ(0);
}
As you can see, the layout has now been broken. In the absence of the Z-index rule, the element z-index:1 is located at the top of the element with z-index:10. The reason is that header uses the transform attribute to create a cascading context with its own Z-index by default, with a value of 0 lower than that of z-index (1) in main.
The solution is simple: give the header a z-index value of 2.
// Part of code
.header {
  background-color: rgba(255, 255, 220, 0.8);
  font-size: 10vmin;
  position: relative;
  height: 30vh;
  transform: translateZ(0);
  z-index: 2;
}
Operation effect:

The question is, if we have components in components within components, and each component has different z-index elements, how do we do this? How do we make sure that changing z-index of header doesn't break anything else?
The answer is to need an agreement that eliminates the need for guessing: Changing z-index within a component should affect only that component, without affecting anything else. In other words, when dealing with z-index values in a CSS file, ideally we should only care about other values in that file.
It's easy to implement. We should simply ensure that the root of each component creates a cascading context. The simplest way is to provide it with exact position s and z-index values, rather than using their own default values by default.
Here's a way to build an application. It uses more elements than the previous one, but is cost-effective relative to the calculation associated with additional DOM elements, saving developers time in dealing with cascading context problems.
// html
<!-- root component starts -->
<div class="root__container">

  <div class="root__header">

    <!-- header component starts -->

    <div class="header__container">
      Header
      <div class="header__overlay">
        Overlay
      </div>
    </div>

    <!-- header component ends -->

  </div>

  <div class="root__main">

    <!-- main component starts -->

    <div class="main__container">
      Main Content
    </div>

    <!-- main component ends -->

  </div>

</div>

<!-- root component ends -->
// css
body {
  margin: 0;
  font-family: Verdana;
  text-align: center;
  background-color: white;
}


/* Root styles */

.root__container {
  position: relative;
  z-index: 0;
}

.root__header {
  position: relative;
  z-index: 2;
}

.root__main {
  position: relative;
  z-index: 1;
}


/* Header styles */

.header__container {
  background-color: rgba(255, 255, 220, 0.8);
  font-size: 10vmin;
  position: relative;
  height: 30vh;
  transform: translateZ(0);

  display: flex;
  align-items: center;
  justify-content: center;

  z-index: 0;
}

.header__overlay {
  position: absolute;
  z-index: 1;
  background-color: rgba(255, 220, 255, 0.8);
  left: 10vw;
  top: 25vh;
  width: 50vw;
  height: 50vh;
  filter: drop-shadow(0 0 3px rgba(0, 0, 0, 0.3));

  display: flex;
  align-items: center;
  justify-content: center;
}

.header__overlay::after {
  content: "";
  position: absolute;
  left: 50%;
  transform: translateX(-50%);
  bottom: 100%;
  width: 0;
  height: 0;
  border-top: 10px solid transparent;
  border-right: 10px solid transparent;
  border-left: 10px solid transparent;
  border-bottom: 10px solid rgba(255, 220, 255, 0.8);
}

/* Main section styles */

.main__container {
  background-color: rgba(220, 255, 255, 0.8);
  font-size: 10vmin;
  height: 70vh;

  display: flex;
  align-items: center;
  justify-content: center;

  position: relative;
  z-index: 0;
}
Operation effect:

- header__container and main__container have position: relation and z-index: 0
- header overlay has an existing z-index: 1 (we don't need a large value because it only compares to other elements in the header)
- The root__header has an existing z-index: 2, while root__main keeps its z-index: 1, which is why the two brothers stack correctly.
(Also note that both have position: relative, because z-index does not apply to position:static elements.)
If we look at the header code now, we will notice that we can completely remove the z-index attribute from the container and overlay layers because The overlay layer is the only location element there. . Similarly, Z-index is not required on the main container. The best benefit of this classification is that when you look at z-index, you focus only on the component itself, not its context.
// Delete the z-index mentioned above
body {
  margin: 0;
  font-family: Verdana;
  text-align: center;
  background-color: white;
}


/* Root styles */

.root__container {
  position: relative;
  z-index: 0;
}

.root__header {
  position: relative;
  z-index: 2;
}

.root__main {
  position: relative;
  z-index: 1;
}


/* Header styles */

.header__container {
  background-color: rgba(255, 255, 220, 0.8);
  font-size: 10vmin;
  position: relative;
  height: 30vh;
  transform: translateZ(0);

  display: flex;
  align-items: center;
  justify-content: center;
}

.header__overlay {
  position: absolute;
  background-color: rgba(255, 220, 255, 0.8);
  left: 10vw;
  top: 25vh;
  width: 50vw;
  height: 50vh;
  filter: drop-shadow(0 0 3px rgba(0, 0, 0, 0.3));

  display: flex;
  align-items: center;
  justify-content: center;
}

.header__overlay::after {
  content: "";
  position: absolute;
  left: 50%;
  transform: translateX(-50%);
  bottom: 100%;
  width: 0;
  height: 0;
  border-top: 10px solid transparent;
  border-right: 10px solid transparent;
  border-left: 10px solid transparent;
  border-bottom: 10px solid rgba(255, 220, 255, 0.8);
}


/* Main section styles */

.main__container {
  background-color: rgba(220, 255, 255, 0.8);
  font-size: 10vmin;
  height: 70vh;

  display: flex;
  align-items: center;
  justify-content: center;
}
Operation effect:

This architecture is not without drawbacks. It makes applications more predictable at the expense of some flexibility. For example, you will not be able to create such overlays in header and main section:
// html
<div class="header">
  Header
  <div class="header-overlay">
    Header Overlay
  </div>
</div>

<div class="main">
  Main Content
  <div class="main-overlay">
    Main Overlay
  </div>
</div>
// css
body {
  margin: 0;
  font-family: Verdana;
  text-align: center;
  background-color: white;
}

div {
  display: flex;
  align-items: center;
  justify-content: center;
}

.header {
  background-color: rgba(255, 255, 220, 0.8);
  font-size: 10vmin;
  position: relative;
  height: 30vh;
}

.header-overlay {
  position: absolute;
  z-index: 10;
  background-color: rgba(255, 220, 255, 0.8);
  left: 2vw;
  top: 25vh;
  width: 47vw;
  height: 50vh;
  filter: drop-shadow(0 0 3px rgba(0, 0, 0, 0.3));
}

.header-overlay::after {
  content: "";
  position: absolute;
  left: 50%;
  transform: translateX(-50%);
  bottom: 100%;
  width: 0;
  height: 0;
  border-top: 10px solid transparent;
  border-right: 10px solid transparent;
  border-left: 10px solid transparent;
  border-bottom: 10px solid rgba(255, 220, 255, 0.8);
}

.main {
  background-color: rgba(220, 255, 255, 0.8);
  font-size: 10vmin;
  height: 70vh;
  position: relative;
}

.main-overlay {
  position: absolute;
  z-index: 10;
  background-color: rgba(255, 255, 255, 0.8);
  left: 51vw;
  bottom: 40vh;
  width: 47vw;
  height: 50vh;
  filter: drop-shadow(0 0 3px rgba(0, 0, 0, 0.3));
}

.main-overlay::after {
  content: "";
  position: absolute;
  left: 50%;
  transform: translateX(-50%);
  top: 100%;
  width: 0;
  height: 0;
  border-top: 10px solid rgba(255, 255, 255, 0.8);
  border-right: 10px solid transparent;
  border-left: 10px solid transparent;
  border-bottom: 10px solid transparent;
}
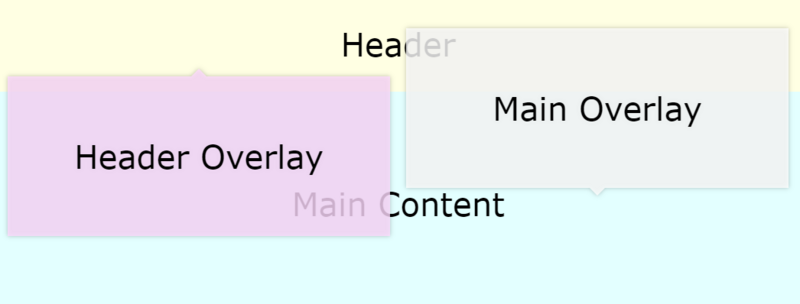
However, in my experience, this is rarely a problem. You can use the overlay layer in the main section to go down rather than up so that it does not intersect with the header. Or, if you really need it, you can add HTML at the end of the text and give it a large z-index value ("big" is larger than the rest of the top).
Explain again
- By making the root of each component a cascade context, components are isolated according to the z-index value of the element.
- If the element in the component does not need a z-index value other than auto, this operation is not necessary.
- In the component's CSS file, you can maintain z index values in the way you like. It could be continuous values, or you could give them a 10-step size, or you could use variables -- depending on your project conventions and the size of your components. It's better to assign z-index only to peer elements. Otherwise, you may inadvertently introduce more cascading contexts into a component.
- Debugging becomes easy. Find the first ancestor component of two elements that do not stack correctly, and change the z-index in that component as needed.
Your compliments are the motivation for me to keep sharing good things. Welcome to my compliments! __________.
Welcome to the front-end family, which will often share some technical resources.
