Network security is one of the most concerned issues in modern society. It becomes extremely important to ensure that only specific people can access devices. This is one of the main reasons why our smart phones have a two-level security system. This is to ensure that our privacy is maintained and that only real owners can access their devices. Intelligent face recognition technology based on face recognition is such a security measure. In this paper, we will study how to use the deep learning and transfer learning of VGG-16 to build our own face recognition system.
brief introduction
If the access to the face model provided by the owner or voice recognition is denied, the access to the face model provided by the owner will be denied. The user will have three attempts to verify the same, and when the third attempt fails, the whole system will shut down to keep it safe. If the correct face is recognized, access is granted and the user can continue to control the device. The full code will provide a Github download link at the end of the article.
Construction method
First, we will study how to collect the owner's face image. Then, if we want to add more people who can access our system, we will create an additional folder. Our next step is to resize the image to (224, 224, 3) shape so that we can pass it through the VGG-16 architecture. Note that the VGG-16 architecture is pre trained on the net weight of the image with the above shape. We will then create changes in the image by performing image data enhancement on the dataset. After that, we can freely create our custom model on the VGG-16 architecture by excluding the top layer. The next step is to compile, train and use the basic callback fitting model accordingly.

Image acquisition
In this step, we will write a simple Python code to collect images by clicking the spacebar button. We can click the "q" button to exit the graphics window. Image collection is an important step. This step will grant the device access to face information collection. Executing the following code will complete this step:
import cv2
import os

capture = cv2.VideoCapture(0)
directory = "Bharath/"
path = os.listdir(directory)
count = 0
We will "turn on" our default webcam and then continue to capture the facial images required by the dataset. This is done by the VideoCapture command. Then we will create a path to our specific directory and initialize the count to 0. This count variable will be used to mark our images from 0 to the total number of photos we clicked. Code required to execute the whole image acquisition process:
while True:
    ret, frame = capture.read()
    cv2.imshow('Frame', frame)

    key = cv2.waitKey(1)

    if key%256 == 32:
        img_path = directory + str(count) + ".jpeg"
        cv2.imwrite(img_path, frame)
        count += 1

    elif key%256 == 113:
        break

capture.release()
cv2.destroyAllWindows()
We ensure that the code only runs when the webcam is captured and activated, and then the video will be captured and returned to the frame. Then we will assign the variable "key" to get the command to press the button. This button gives us two choices:
- When we press the spacebar on the keyboard, click the picture.
- Exit the program when "q" is pressed.
After exiting the program, we will release the video capture from the webcam and destroy the cv2 graphics window.
Resize image
In the next code block, we will resize the image accordingly. We hope to reshape our collected images to fit the size of VGG-16 architecture, which pre trains the weight of imagenet.
import cv2
import os

directory = "Bharath/"
path = os.listdir(directory)

for i in path:
    img_path = directory + i
    image = cv2.imread(img_path)
    image = cv2.resize(image, (224, 224))
    cv2.imwrite(img_path, image)
We rescale all images captured from the default frame size to (224, 224) pixels because we want to try a migration learning model like VGG-16 and have captured the image in RGB format. So we already have three channels, and we don't need to specify them. The number of channels required for VGG-16 is 3, and the ideal shape of the architecture is (224, 224, 3). After the resizing step is completed, we can move the owner's directory to the image folder.
Image data enhancement
We collected and created our images, and the next step is to perform image data enhancement on the dataset to replicate and increase the size of the dataset. You can do this using the following code blocks:
train_datagen = ImageDataGenerator(rescale=1./255,
                                   rotation_range=30,
                                   shear_range=0.3,
                                   zoom_range=0.3,
                                   width_shift_range=0.4,
                                   height_shift_range=0.4,
                                   horizontal_flip=True,
                                   fill_mode='nearest')

train_generator = train_datagen.flow_from_directory(directory,
                                                    target_size=(Img_Height, Img_width),
                                                    batch_size=batch_size,
                                                    class_mode='categorical',
                                                    shuffle=True)
Rescale the image and update all parameters to suit our model, the parameters are as follows: 1, readjustment = rescaling normalizes the value of each pixel by 1 / 255 2 rotation_range = Specifies the random range of rotation 3. shear_range = Specifies the strength of each angle within the counterclockwise range 4. zoom_range = specify the zoom range 5. width_shift_range = Specifies the width of the extension 6. height_shift_range = Specifies the height of the extension 7. horizontal_flip = flip image horizontally 8. fill_mode = fill based on nearest boundary
train_datagen.flow_from_directory gets the path of the directory and generates batch enhancement data. The callable properties are as follows: 1. train dir = specify the directory where we store image data 2. color_mode = image grayscale or RGB format, which is RGB by default 3. target_size = size of the image 4.batch_size = number of operation data batches 5. class_mode = determines the type of label array returned 6.shuffle= shuffle: whether to shuffle data (default: True)
Build model
In the next code block, we will add vgg16 in the variable_ Import VGG-16 model into model and ensure that the model we input has no top level. Using the VGG-16 architecture without the top layer, we can now add our custom layer. In order to avoid training VGG-16 layer, we give the following command: layers.trainable = False. We will also print out these layers and make sure their training is set to false.
VGG16_MODEL = VGG16(input_shape=(Img_width, Img_Height, 3), include_top=False, weights='imagenet')

for layers in VGG16_MODEL.layers:
    layers.trainable=False

for layers in VGG16_MODEL.layers:
    print(layers.trainable)
Build our custom model on the VGG-16 architecture:
# Input layer
input_layer = VGG16_MODEL.output

# Convolutional Layer
Conv1 = Conv2D(filters=32, kernel_size=(3,3), strides=(1,1), padding='valid',
               data_format='channels_last', activation='relu',
               kernel_initializer=keras.initializers.he_normal(seed=0),
               name='Conv1')(input_layer)

# MaxPool Layer
Pool1 = MaxPool2D(pool_size=(2,2),strides=(2,2),padding='valid',
                  data_format='channels_last',name='Pool1')(Conv1)

# Flatten
flatten = Flatten(data_format='channels_last',name='Flatten')(Pool1)

# Fully Connected layer-1
FC1 = Dense(units=30, activation='relu',
            kernel_initializer=keras.initializers.glorot_normal(seed=32),
            name='FC1')(flatten)

# Fully Connected layer-2
FC2 = Dense(units=30, activation='relu',
            kernel_initializer=keras.initializers.glorot_normal(seed=33),
            name='FC2')(FC1)

# Output layer
Out = Dense(units=num_classes, activation='softmax',
            kernel_initializer=keras.initializers.glorot_normal(seed=3),
            name='Output')(FC2)

model1 = Model(inputs=VGG16_MODEL.input,outputs=Out)
The face recognition model will be trained using transfer learning, and we will use VGG-16 model without top layer. A custom layer will be added at the top level of the VGG-16 model, and then we will use this migration learning model to predict whether it is the face of the authorized owner. The custom layer is composed of input layer, which is basically the output of VGG-16 model. We added a convolution layer with 32 filters, kernel_ The size is (3,3), and the default stride is (1,1). We use activation as relu, he_normal as initializer. We will use pooled layers to down sample the layers in the convolution layer. Two fully connected layers are used as relu together with activation, that is, the dense architecture after the sample passes through the flattened layer. The output layer has a num_ softmax activation with classes 2, which predicts num_ The probability of classes, that is, authorized owners or additional participants or rejected faces. The final model takes the input as the beginning of VGG-16 model and the output as the final output layer.
Callback function
In the next code block, we will look at the callbacks required for the face recognition task.
from tensorflow.keras.callbacks import ModelCheckpoint
from tensorflow.keras.callbacks import ReduceLROnPlateau
from tensorflow.keras.callbacks import TensorBoard

checkpoint = ModelCheckpoint("face_rec.h5", monitor='accuracy', verbose=1,
    save_best_only=True, mode='auto', period=1)

reduce = ReduceLROnPlateau(monitor='accuracy', factor=0.2, patience=3, min_lr=0.00001, verbose = 1)

logdir='logsface'
tensorboard_Visualization = TensorBoard(log_dir=logdir, histogram_freq=True)
We will import three necessary callbacks to train our model: ModelCheckpoint, reducerlonplateau and Tensorboard.
- ModelCheckpoint - this callback is used to store the weight of the model after training. We specify save_best_only=True only saves the best weight of the model.
- Reducerlonplateau - this callback is used to reduce the learning rate of the optimizer after the specified number of epochs. Here, we specify patience as 10. If the accuracy is not improved after 10 epochs, our learning rate will be reduced by 0.2 times accordingly.
- Tensorboard - the tensorboard callback is used to draw the visualization of graphics, that is, graphics with precision and loss.
Compile and fit the model
model1.compile(loss='categorical_crossentropy',
              optimizer=Adam(lr=0.001),
              metrics=['accuracy'])

epochs = 20

model1.fit(train_generator,
           epochs = epochs,
           callbacks = [checkpoint, reduce, tensorboard_Visualization])
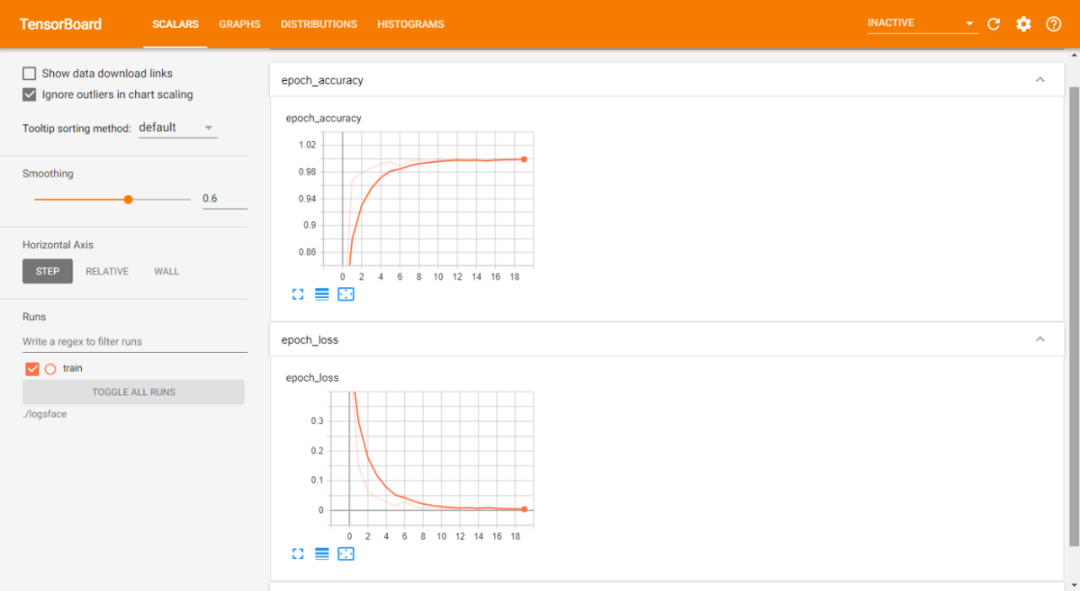
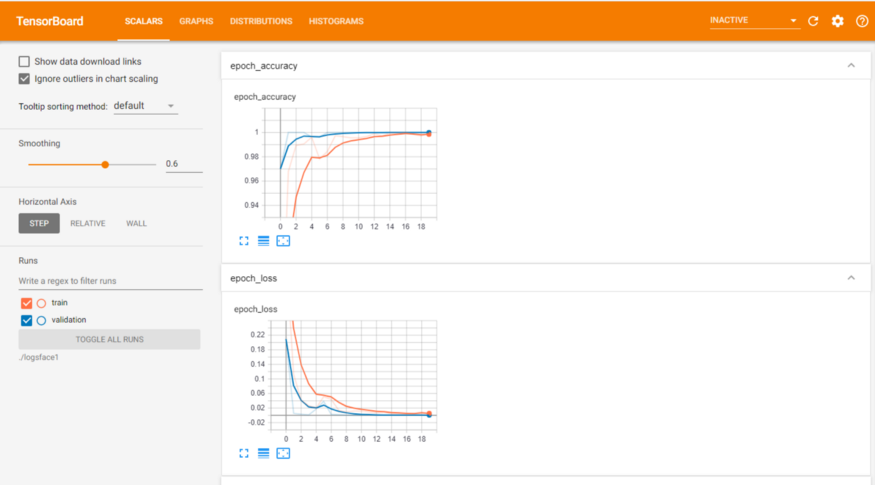
Compile and fit our model. Train the model and save the best weights to face_rec.h5, so there is no need to retrain the model repeatedly, and we can use the saved model when necessary. The loss used in this article is categorical_crossentropy, which calculates the cross entropy loss between the tag and the prediction. The optimizer we will use is Adam with a learning rate of 0.001. We will compile our model according to the measurement accuracy. We will fit the data on the enhanced training image. After the fitting step, these are the results we can achieve in terms of training loss and accuracy:

Chart
Training data sheet:

Training and validation data sheet:

GITHUB code link in this article:
https://github.com/Bharath-K3/Smart-Face-Lock-System