1. Foreword
Python is a very easy-to-use explanatory language. Its main features are as follows:
- Easy to learn and use
- Scalable and portable
- Rich third-party library
It is precisely because of these characteristics that Python is widely used in some scenes with simple logic and complex functions. In recent years, with the rapid development of artificial intelligence, the advantages of Python have been fully reflected, so it has become the preferred language for AI development.
On the basis of retaining the main features of Python language, micro python (mpy) also encapsulates the bottom layer of embedded system very well. Its features are as follows:
- Use python syntax and basic data structure to keep it easy to learn and use
- Provide hardware function library encapsulation based on embedded system to make embedded development simple and convenient
Today, I want to introduce how HaaS100 uses micro Python to connect to Alibaba cloud's Internet of things platform and control the LED light of the device through the cloud.
2. Scheme introduction
Alibaba cloud Internet of things platform provides safe and reliable device connection and communication capabilities, supports device data collection, cloud access, rule engine flow data and cloud data distribution to devices. In addition, it also provides convenient and fast equipment management capability, support model definition, data structured storage, and remote debugging, monitoring, operation and maintenance.
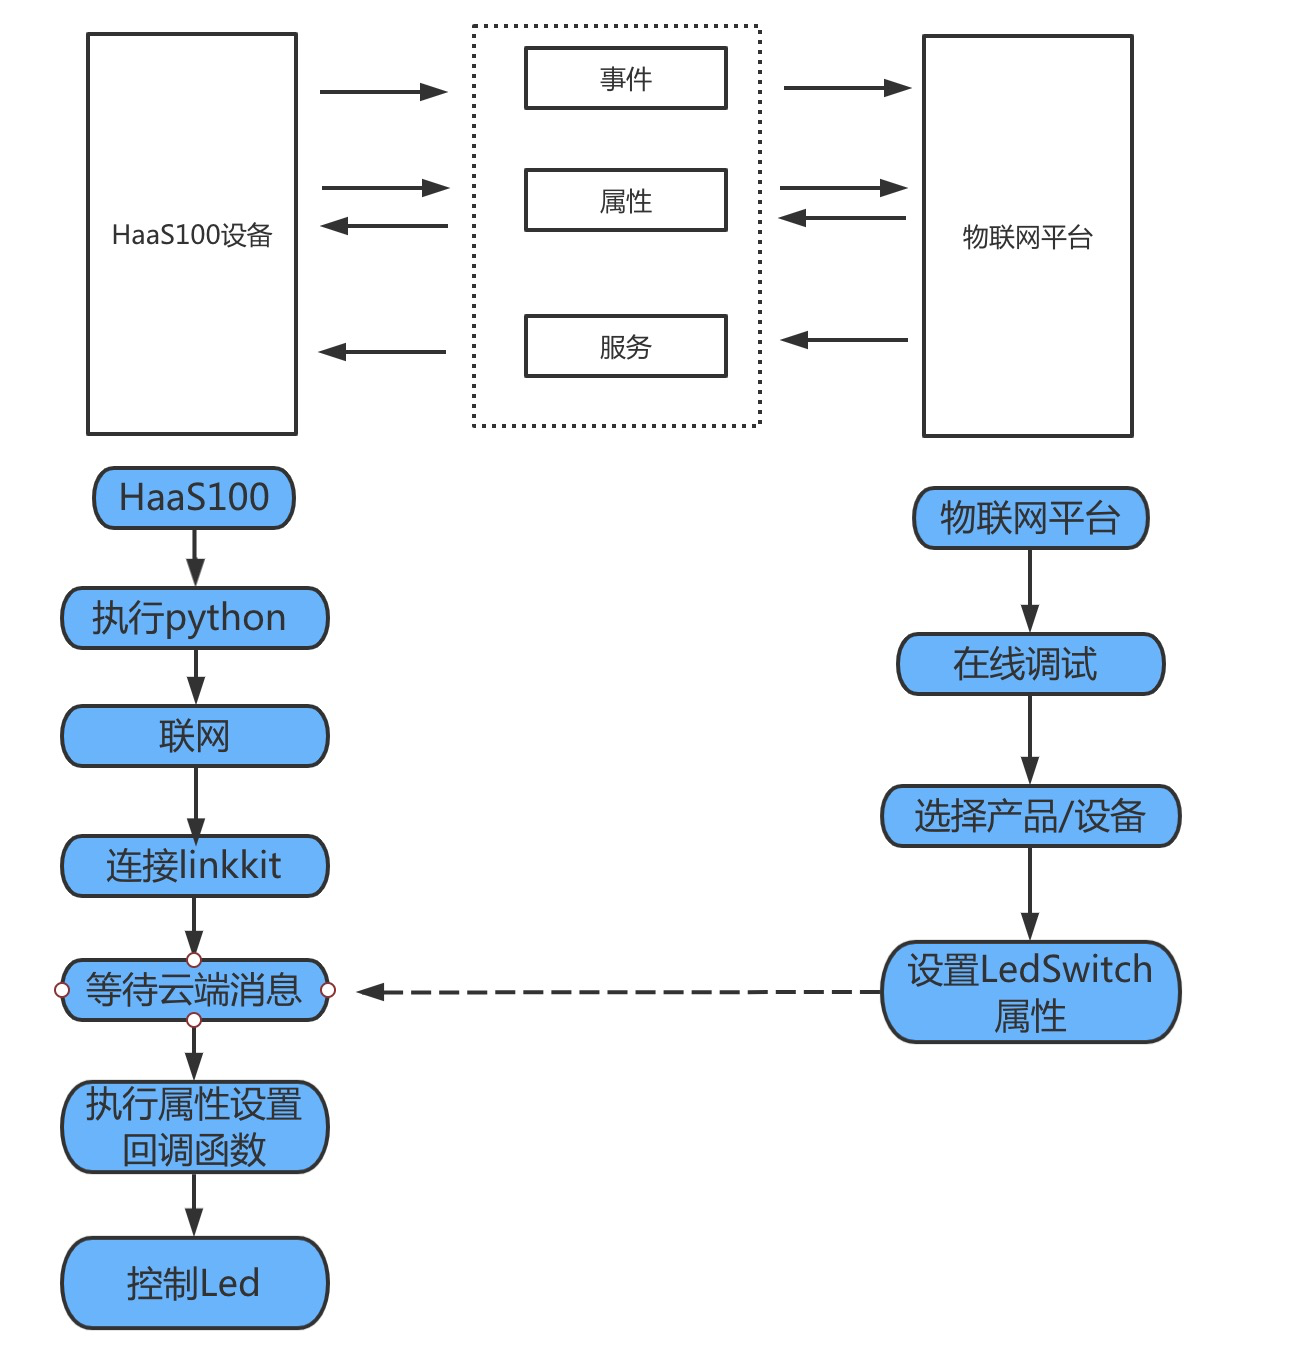
This paper issues the command to modify the LED state of HaaS100 through the Internet of things platform. The Python program on HaaS100 receives the command and controls the LED light. The specific interaction scheme is designed as follows:
3. Effect video
LinkKit control HaaS100
4. Code list
# -*- coding: UTF-8 -*-

import iot

import utime

# Please replace the product and equipment information applied for by the Internet of things platform. Please refer to the article: https://blog.csdn.net/HaaSTech/article/details/114360517

productKey = "xxxxx"

productSecret = "xxxxx"

deviceName  =    "xxxxx"

deviceSecret  =   "xxxx"


on_connected = False

# Initialize linkkit sdk

key_info = {

    'region' : 'cn-shanghai' ,

    'productKey': productKey ,

    'deviceName': deviceName ,

    'deviceSecret': deviceSecret ,

    'productSecret': productSecret

}

device = iot.Device(key_info)

# Callback function for successful connection of Internet of things platform

def on_connect():

    global on_connected

    on_connected = True


device.on('connect',on_connect)

# Set props event receiving function (this case is cloud controlled led event)

def on_props(request):

    from driver import GPIO

    import ujson

    ON = 0

    OFF = 1

    #Convert the json returned by the server into dict

    payload = ujson.loads(request)

    #Get the led status field in dict

    stat = payload["LEDSwitch"]

    gpio = GPIO()

    # The list of parameters supported by the open function is as follows:

    # led1;led2;led3;led4;led5

    gpio.open('led1')

    if stat == 1:

        gpio.write(ON)

    else:

        gpio.write(OFF)

    utime.sleep_ms(200)

    gpio.close()

device.on('props',on_props)

# Connect Internet of things platform

device.connect()

# Trigger linkit sdk to continuously process server side information

while(True):

    # device.do_yield(200)

    if on_connected:

        print('Internet of things platform connected successfully')

        break

    else:

        utime.sleep(1)


while True:

    utime.sleep(0.2)

# Disconnect

device.close()
The above is the main code of python light application. We save it to the file linkkitcontrolled Py, and then copy it to the root directory of sdcard.
Its main functions are as follows:
- Connect Internet of things platform
- Wait for the cloud message of the Internet of things platform and process it
matters needing attention:
- Please be sure to replace the following information in the code with the relevant information on your own Internet of things platform
PRODUCT_KEY = "a1uTFk4xjko"

PRODUCT_SECRET = "xxxxxxx"

DEVICE_NAME  =    "mpy_001"

DEVICE_SECRET  =   "xxxxxxxxxxxxxxx"
- Before running the code, be sure to ensure the machine networking. The python networking instructions are as follows
python /data/python-apps/wifi/main.py wifi_ssid wifi_password
5. List of items
5.1 hardware
- HaaS100 development board
- One power supply
- micro usb one
- sdcard one
matters needing attention:
- HaaS100 supports external Micro SD card (Micro SD), which can store up to 64GB data. The SD card slot is located on the back of the development board and can be connected with Micro SD memory card
- sdcard format support: FAT16/FAT32
- exFAT format is not supported in this case
5.2 software
- The latest HaaS100 open source code
- Serial port tool
6. Implementation steps
Before starting, be sure to burn the official firmware or compile the firmware yourself according to the quick start chapter in the Python light application official website.
6.1. Create products and equipment
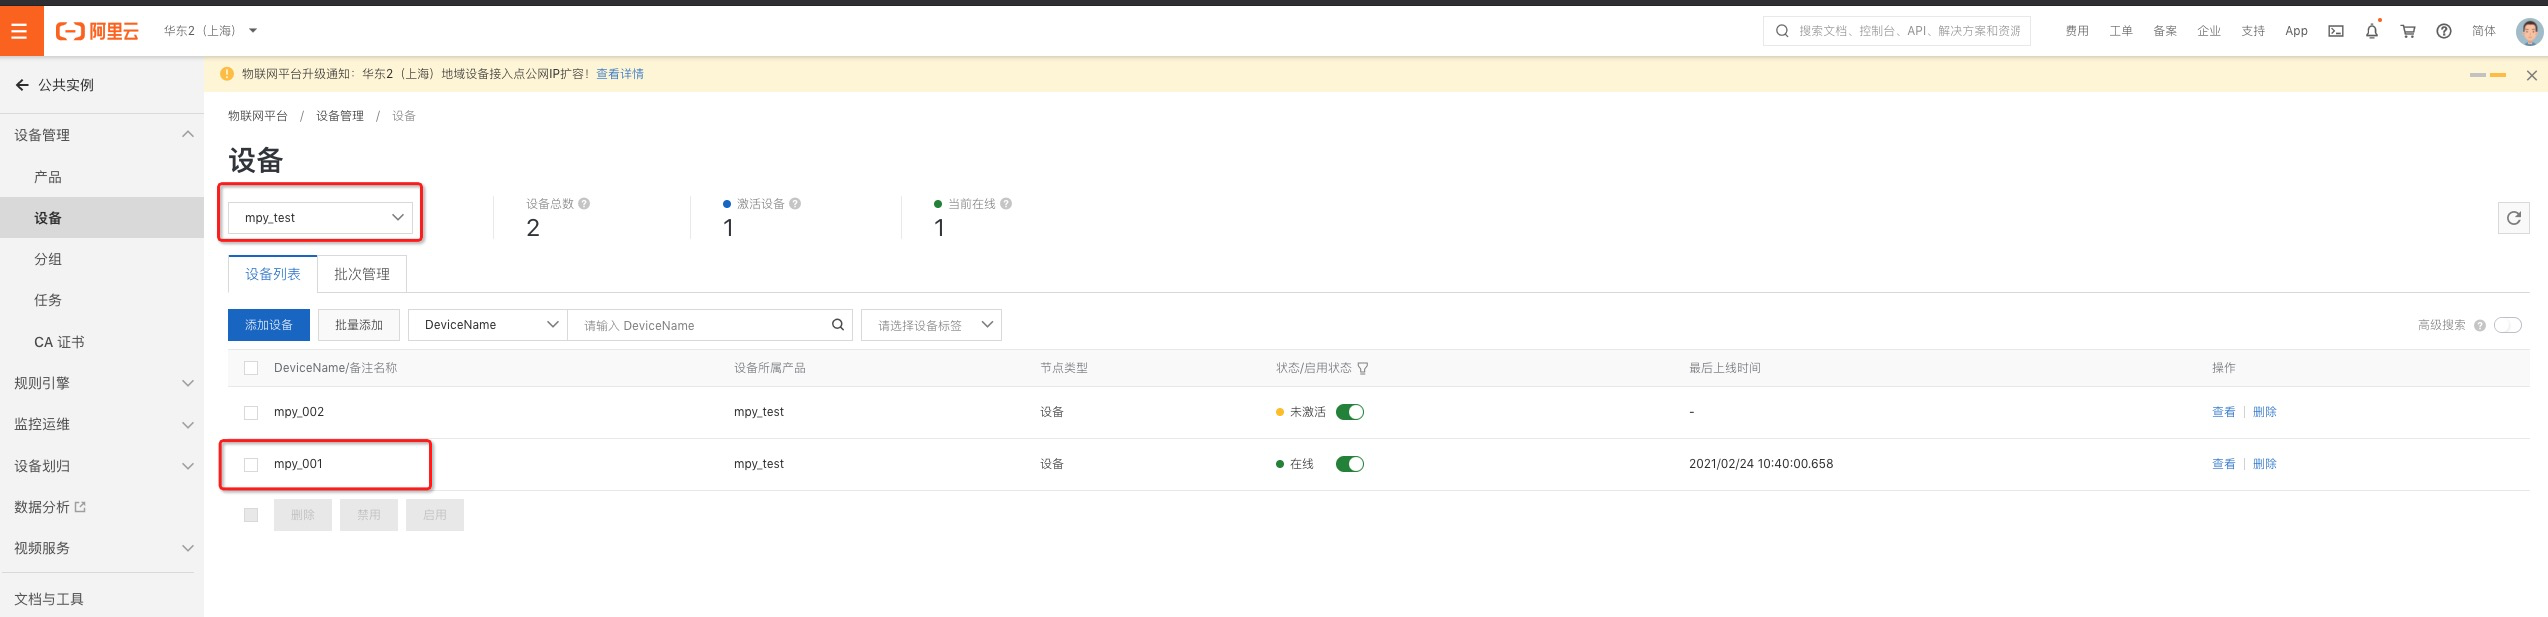
First, refer to the article https://help.aliyun.com/document_detail/189183.html?spm=a2c4g.11174283.6.572.3a8b1668juSbg2 , create your own products and devices
As shown in the figure above, the product created by the author is mpy_test, the device is mpy_001
6.2. Create object model
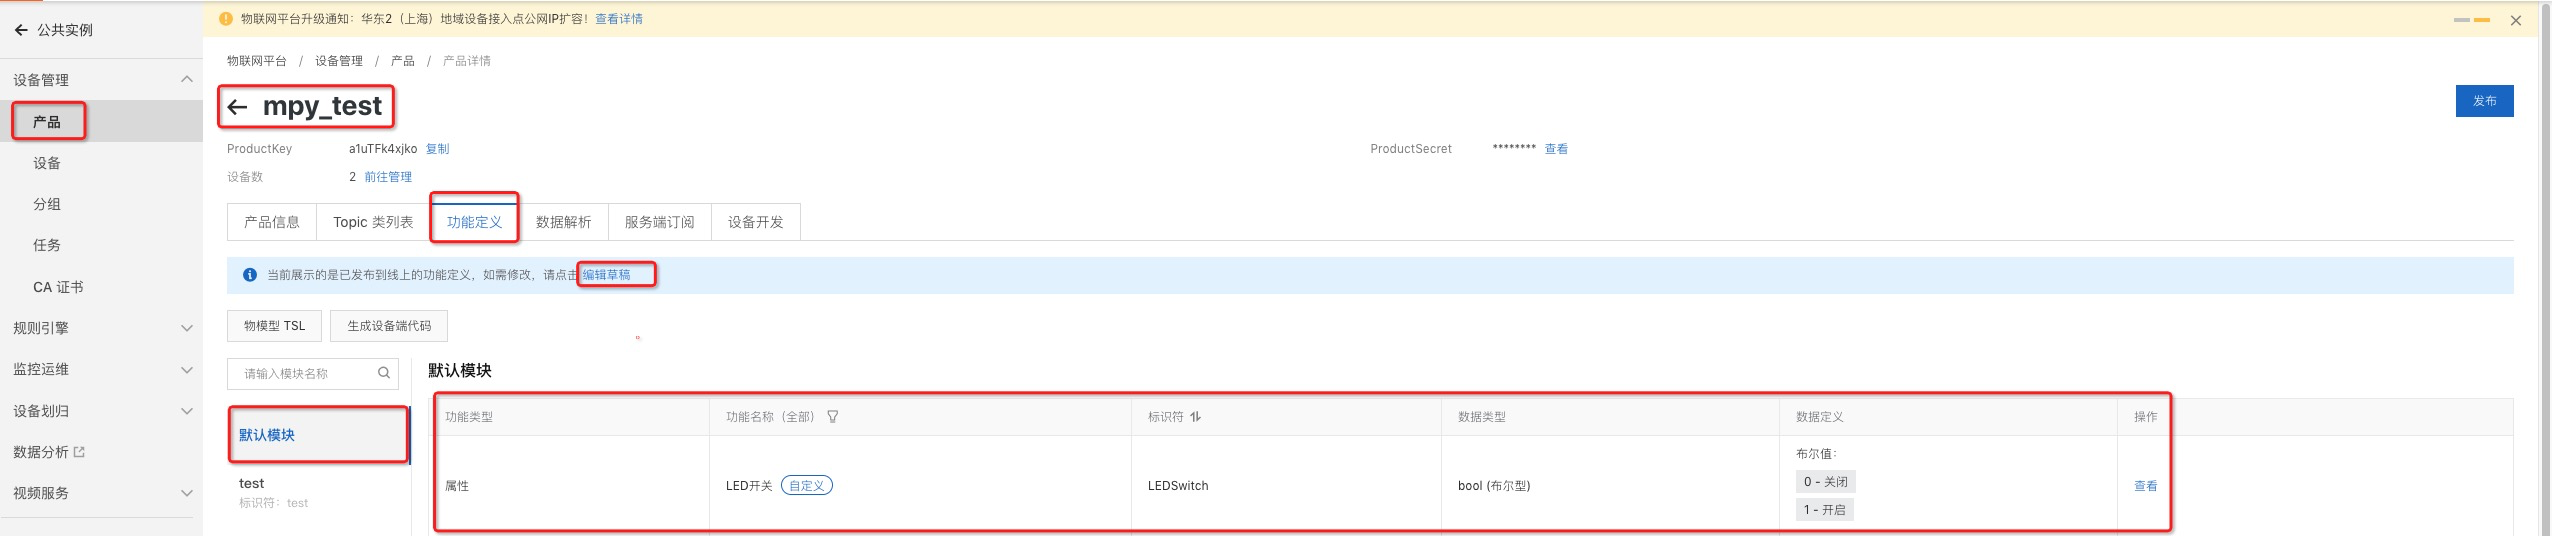
As shown in the figure above, first click the product and select the product MPY created by ourselves_ Test, then click edit draft and add custom function to enter the interface in the figure below

Select the attribute, input the LED switch, select the pop-up default attribute, and click OK to complete the addition of the attribute
You can also completely define an attribute by yourself to ensure that the name of the attribute key in the attribute main program code is consistent with that here.
After creation, click publish.
6.3. Execute light application code
After burning, insert the sdcard, turn it on and connect the serial port
Input through serial port:
python /sdcard/LinkKitControlLed.py
You can start the light application. After successful startup, the serial port will display the following print:
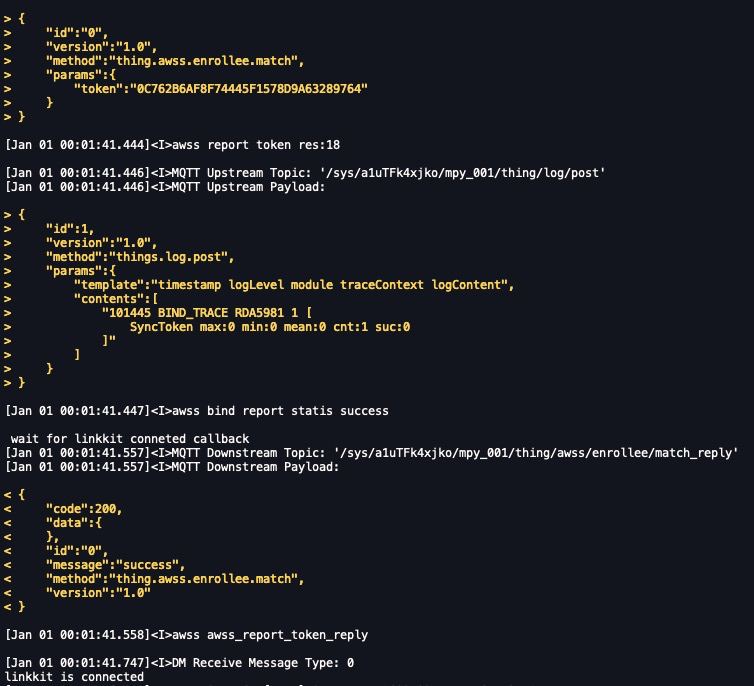
After the connection is successful, the main program will wait for the cloud message to be distributed. After receiving the message, it will pass on_prop_set function processing
6.4. Send cloud control instructions
After the device properties are released, we can start online debugging
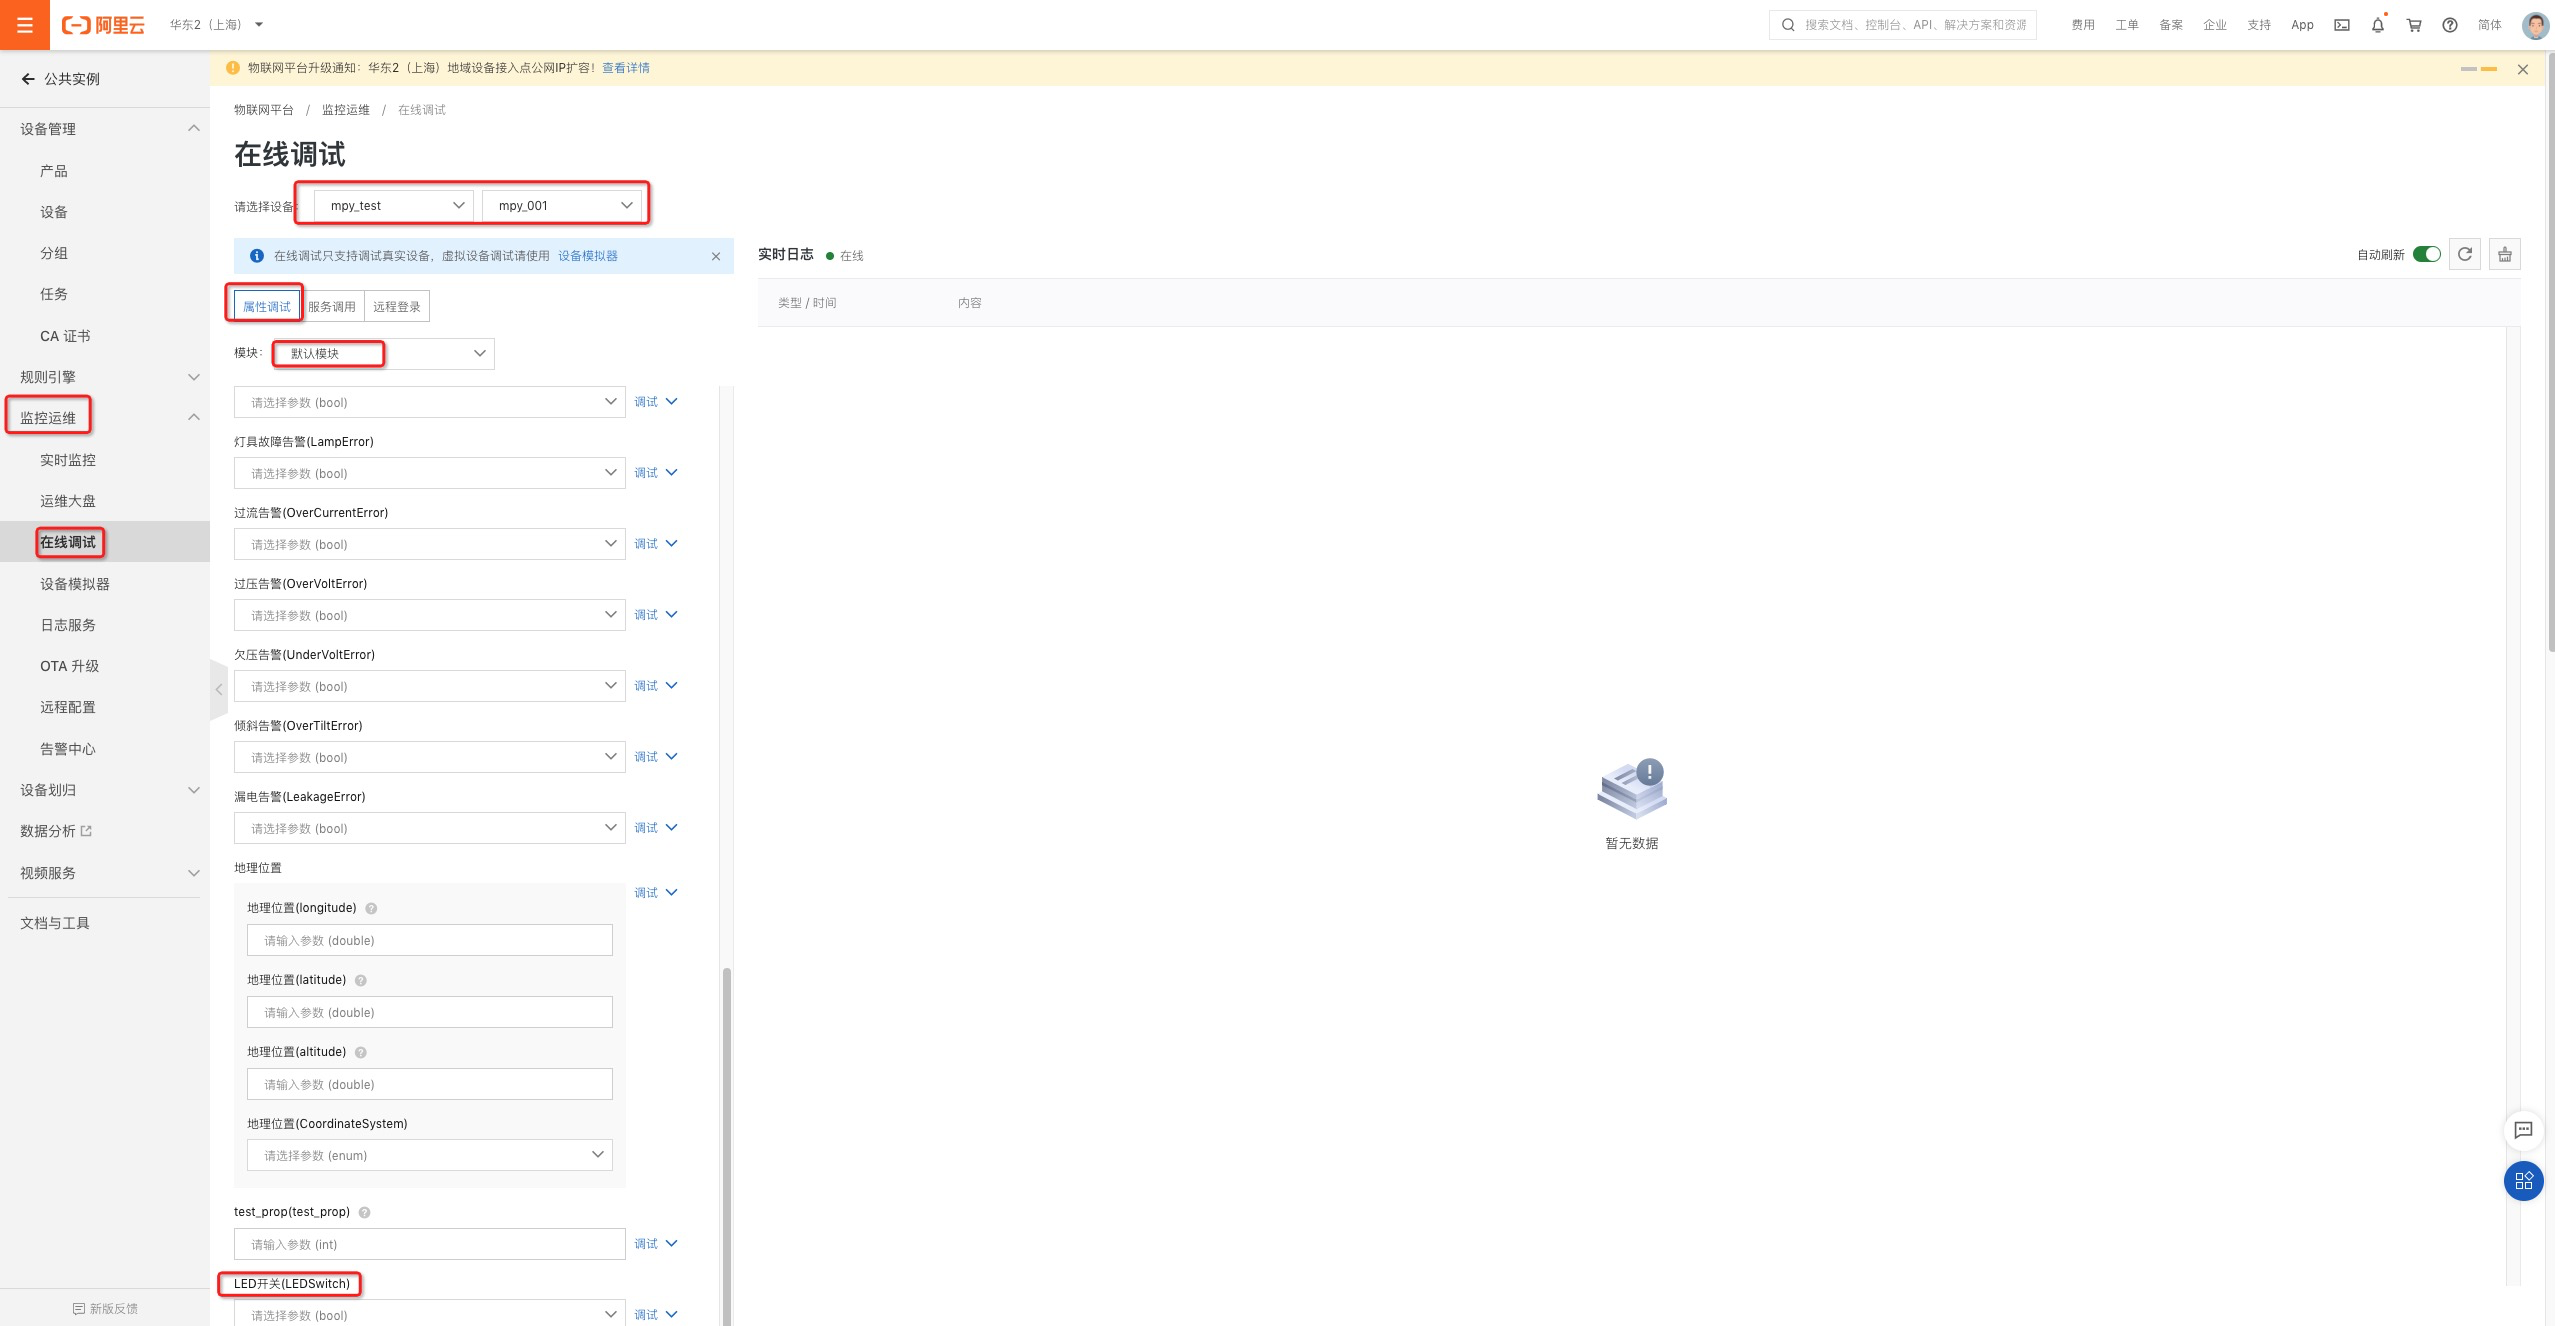
As shown in the figure above:
- Select monitoring operation and maintenance - > online debugging
- Select product mpy_test and equipment mpy_001
- Under normal circumstances, when the equipment is online, we can see the following debugging options
- Select attribute debugging - > Default module - > LED switch
- Select parameter # on - 1
- Click debug to set
After sending successfully, the serial port of the device will receive the following printing, and finally call the callback function to turn on the led light on the device, so as to achieve the effect in the figure above

Technical exchange
Python light application inherits the characteristics of easy learning and easy use of python, and provides the basic library encapsulation based on embedded hardware, so that developers can easily carry out embedded development in real time through an interactive environment, making embedded development simple and convenient.
If you need more technical support, you can join the nail developer group to obtain one-to-one technical support!
--------
Copyright notice: This article is the original article of CSDN blogger "HaaS technology community", which follows the CC 4.0 BY-SA copyright agreement. Please attach the original source link and this notice for reprint.
Original link: https://blog.csdn.net/HaaSTech/article/details/117561136