catalogue
Differences between HSV and HSL
Calculate the slider position of the hue column
When developing the front-end interface, you need to use the color selector when you need to change the color. To solve this problem, the first idea is that H5 provides input color, which can be realized. But not surprisingly, IE does not support it. Moreover, the implementation of chrome is different from that of firefox, as shown in the following figure:
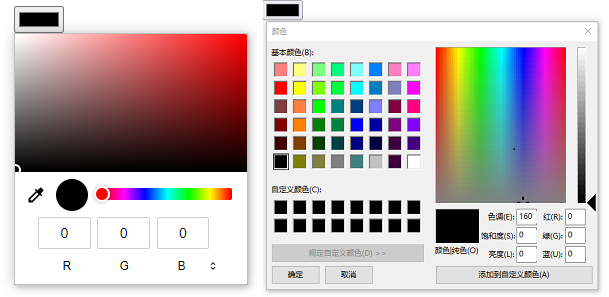
The left figure is a color selector control implemented by chrome browser itself; The figure on the right is the of firefox, which introduces the color selector control of the operating system.
In view of these differences, it is necessary to implement a unified color selector component. For example, we implement a selector similar to the one provided by chrome browser.
To make this component, the first thing you need to know is the color model.
Color model
In our front-end development, the most common color model is RGB, that is, the three primary color model of red, green and blue, while the front-end browser can support only two color models for color display: RGB and HSL.
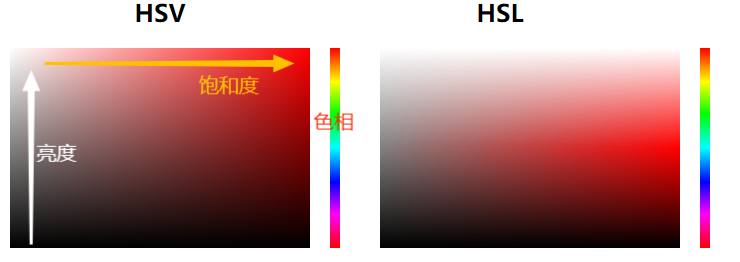
Among them, RGB model is mixed into one color with the value of three colors within the range of 0-255. It is friendly to the machine, but it is not suitable for people to choose colors intuitively. Therefore, common color selectors generally use two other more visual perception oriented models: HSV and HSL. For detailed knowledge of color model, see the above: Basic knowledge of color model .
The chrome browser's own color selector is based on HSV.
Differences between HSV and HSL
HSV is based on hue H(hue), saturation S(saturation) and lightness V(Value); HSL is based on hue H(hue), saturation S(saturation), and brightness L(lightness).
The hue is the same, and the essence is a color value.
In these two models, the hue is based on the six main colors, which are arranged on the ring at an interval of 60 degrees.
The six main colors are: 0 ° red, 60 ° yellow, 120 ° green, 180 ° green, 240 ° blue, 300 ° magenta and 360 ° red.
In the front-end layout design, the ring is often treated as a long square color block, which is segmented through the linear gradient of color, and the angle is converted into a certain proportion, as shown below:

Saturation and brightness are different. In order to understand the color selector, this paper summarizes and briefly describes it as follows:
- The S saturation in HSV reflects the value of mixing white in hue color, showing the change from white to hue color;
- The S saturation in HSL reflects the value of gray mixed in hue color, showing a change from gray to hue color.
- The V lightness in HSV reflects the transition from black to hue (H) color.
- The L brightness in HSL reflects the transition from black to hue (H) color and then to white.
In addition, it should be clear that the value range of each part: Hue hue: 0 - 360; Saturation and brightness are: 0 ~ 100%.
We can continue to look at the specific implementation differences.
Implementation selector
Hue
The principle of hue has been introduced above. HSV is the same as HSL. If it is implemented at the code level, it is also well implemented. In the form of css and div, only linear color gradient is required:
<div class="div-bar">
  <!-- Hue column -->
  <div id="colorBar" class="color-bar"></div>
  <!-- Sliding block -->
  <div id="divSlider" class="div-slider"></div>
</div>
.div-bar {
  position: relative;
  width: 10px;
  height: 200px;
  margin-left:15px;
  cursor: pointer;
}
.color-bar {
  background: linear-gradient(180deg, #f00, #ff0 17%, #0f0 33%, #0ff 50%, #00f 67%, #f0f 83%, #f00);
  width: 10px;
  height: 200px;
  margin-left: 20px;
}
.div-slider {
  ...
  width: 8px;
  height: 8px;
}
Here is the vertical hue column, with width and height of 10 * 200. If you need to change the width and height layout horizontally.
Calculate the slider position of the hue column
To move the slider to obtain position information, you first need to monitor the mouse events on the hue column, as follows:
  colorBar.addEventListener('mousedown', function(e) {
    setHueSlider(e)
    document.addEventListener('mousemove', setHueSlider)
  })

  document.addEventListener('mouseup', function() {
    document.removeEventListener('mousemove', setHueSlider)
  })
The setHueSlider function deals with the position of the slider point on the hue column, and then obtains a hue value by calculating the scale:
  const clientRect = colorBar.getBoundingClientRect()
  // Get location information, color column height - colorBarHEIGHT
  let yDiff = event.clientY - clientRect.top
  yDiff = yDiff > colorBarHEIGHT ? colorBarHEIGHT : (yDiff < 0 ? 0 : yDiff)
  // Set the position of the slider to prevent the slider from falling off the color column
  const yTop = yDiff < 9 ? 0 : (yDiff - 9)
  divSlider.style.top = yTop + 'px'
  // If the hue is within 360 degrees, calculate the corresponding proportional value, 0 - 360
  color.hue = Math.round((yDiff / colorBarHEIGHT) * 360 * 100) / 100 | 0
Through the calculation of the slider position proportion of the hue column, we can get the corresponding hue value.
Saturation and brightness
In addition to the hue column, we also need to set a color panel based on saturation and brightness. At this time, the above introduction to the differences between the two pieces will be useful.
The color panel is generally a rectangular area. Take HSV as an example. As mentioned above, the saturation of HSV can be simplified as the change from white to hue color. If the current hue color is red, the saturation is the change from white to red; The brightness reflects the change from black to red. When designing the panel, we use a rectangular panel area:
- If the background color of the panel is set to hue color - red;
- Set the saturation from left to right. You can set the transparency change from left to right on the white, that is, the leftmost white, to the rightmost fully transparent, linear gradient;
- By setting the brightness from bottom to top, you can have a completely transparent and linear gradient from the bottom black to the top.
In this way, the color panel in the HSV model can be simplified. The specific implementation can be understood through the following figure:
Of course, saturation and brightness can be exchanged horizontally or vertically.
To set the color panel, you can use div+css. There are many ways to implement the code. The following describes how to use only one div to implement a color panel with a width of 300 * 200 (other ways include using two div or pseudo classes):
<div class="div-panel">
  <!-- Color panel -->
  <div id ="colorPanel" class="color-panel" style="background-color: #f00;"></div>
  <!-- slider -->
  <div id="divPicker" class="div-picker"></div>
</div>
.div-panel {
  position: relative;
  width: 300px;
  height: 200px;
  cursor: pointer;
  overflow: hidden;
}
.color-panel {
  position: relative;
  height: 200px;
  width: 300px;
  background: linear-gradient(to top, #000, transparent), linear-gradient(to right, #FFF, transparent);
}
.div-picker {
  ...
  width: 12px;
  height: 12px;
}
Calculate these two values
It is still necessary to monitor mouse events and obtain mouse position information. Event monitoring is basically the same as hue. They are all three events that monitor the mouse, which are omitted here.
Directly look at how to calculate the saturation and brightness. According to the previous introduction and layout implementation, we define that the horizontal X axis of the panel is the saturation and the vertical Y axis of the panel is the brightness, so we can calculate as follows:
  // Calculate the mouse movement position, panel width and height
  const clientRect = colorPanel.getBoundingClientRect()
  let yDiff = event.clientY - clientRect.top
  let xDiff = event.clientX - clientRect.left
  xDiff = xDiff > panelWIDTH ? panelWIDTH : (xDiff < 0 ? 0 : xDiff)
  yDiff = yDiff > panelHEIGHT ? panelHEIGHT : (yDiff < 0 ? 0 : yDiff)

  // Set the slider position to ensure that at least half of the slider is in the panel
  const yTop = yDiff - 6
  const xLeft = xDiff - 6
  divPicker.style.top = yTop + 'px'
  divPicker.style.left = xLeft + 'px'

  // Saturation and lightness are not taken as percentage values here, which should be paid attention to in subsequent conversion
  color.saturation = Math.round(xDiff / panelWIDTH * 100)
  color.value = Math.round((1 - yDiff / panelHEIGHT) * 100)
hsv to rgb
Through such calculation, the three values corresponding to HSV can be obtained, and then they can be converted into corresponding RGB color values.
const hsvToRgb = function (hue, saturation, value) {
    saturation = saturation * 255 / 100 | 0
    value = value * 255 / 100 | 0

    if (saturation === 0) {
      return [value, value, value]
    } else {
      satVal = (255 - saturation) * value / 255 | 0
      ligVal = (value - satVal) * (hue % 60) / 60 | 0
      if (hue === 360) {
        return [value, 0, 0]
      } else if (hue < 60) {
        return [value, satVal + ligVal, satVal]
      } else if (hue < 120) {
        return [value - ligVal, value, satVal]
      } else if (hue < 180) {
        return [satVal, value, satVal + ligVal]
      } else if (hue < 240) {
        return [satVal, value - ligVal, value]
      } else if (hue < 300) {
        return [satVal + ligVal, satVal, value]
      } else if (hue < 360) {
        return [value, satVal, value - ligVal]
      } else {
        return [0, 0, 0]
      }
    }
  }
transparency
In RGB\HSV\HSL color models, transparency is an independent attribute and will not affect the implementation of specific colors. This value can be processed separately.
Therefore, if we need transparency, we can use the long div like the hue column in the layout to calculate the currently selected transparency value by calculating the position proportion. The layout is as follows:
  <div class="div-alpha">
    <!-- Transparent columnar -->
    <div id="alphaBar" class="alpha-bar" style="linear-gradient(180deg, #f00, transparent)"></div>
    <!-- slider -->
    <div id="divAlphaSlider" class="div-slider"></div>
  </div>
.div-alpha {
background-image: linear-gradient(
45deg,#c5c5c5 25%,transparent 0,transparent 75%,#c5c5c5 0,#c5c5c5),linear-gradient(
45deg,#c5c5c5 25%,transparent 0,transparent 75%,#c5c5c5 0,#c5c5c5);
}In terms of calculation, it is basically the same as the hue column, except that the transparency value is 0-100:
color.alpha = Math.round(100 - yDiff / alphaBarHEIGHT * 100) / 100
With the value of transparency, when obtaining the color value, you can add transparency to RGBA or HSLA.
HSL based color selector
The differences between HSV and HSL have been explained above. According to their respective characteristics, only a few changes are needed to realize the selector of HSL.
First, as like as two peas, Hue is not the same as hue and transparency.
Secondly, the color panel of saturation and brightness needs to be changed. HSL only needs to change one point during layout, that is, the css style of the panel:
  .color-panel {
    position: relative;
    height: 200px;
    width: 300px;
    /*The horizontal X-axis saturation is set to a gray gradient, and the vertical Y-axis is set to white to transparent to black*/
    background: linear-gradient(to bottom, #fff 0%, transparent 50%, transparent 50%, #000 100%),
      linear-gradient(to right, #808080 0%, transparent 100%);
  }
After changing the color panel, the way to obtain the hue, saturation, brightness and transparency values of HSL is the same as in HSV mode.
Note that if you want to use RGBA for the HSLA color obtained at this time, you need to convert HSL to RGB. See the conversion function for details Basic knowledge of color model.
To sum up, a color selector is completed.
Using canvas settings panel
In addition to laying out color selectors based on div+css, we can also use canvas to deal with color selectors.
In the layout, hue, panel and transparency are replaced by canvas. Since canvas can also use linear gradient, there is no problem in setting the UI layout of color.
The design of the slider is roughly the same, with only minor changes, because the way to obtain color is different after using canvas.
In the hue and panel of canvas, the pixel at the corresponding position of canvas can be obtained directly, and the pixel itself is an rgba color value.
So the advantage of this is that we can omit the conversion process and directly obtain the available color values.
Of course, whether div or canvas, because the layout method is different from the way to obtain color values, there will be differences in the number of color values, especially the canvas method, which is related to the pixels of the canvas itself.
However, both methods can have color values of more than millions, which fully meet our needs.