In the last article, I introduced my own SpringBoot Starter project, which allows us to easily obtain the operation log by annotation and push it to the specified data source.
Before, my project was open source on Github. If you want to use my project, you have to configure the Github warehouse to Maven's setting XML is not convenient at all.
In this article, I will sort out the process of uploading the project to the public Maven warehouse as a tutorial article.
It has to be said that uploading the public Maven warehouse took a lot of trouble and almost didn't kill people.
The series of articles on mengxinxue open source are continuously updated:
1. How does Mengxin open source 01 use annotations to record operation logs gracefully
2. How to submit the project of Mengxin open source 02 to Maven public warehouse (this article)
3. How does Meng Xinxue open source write a SpringBoot Starter from 0 to 1
Overall process
There are many articles on the Internet, mainly the following steps:
- Submit a release work order (Issue) in sonatype
- Configure gpg key
- Configure POM XML and setting xml
- mvn clean deploy
You must ask, what is the relationship between sonatype and the public Maven warehouse? Why do you need to operate in sonatype?
Maven central warehouse does not support direct release of jar packages. We need to publish the jar package to some designated third-party Maven warehouses, and then the warehouse synchronizes the jar package to the Maven central warehouse. The simplest way is to publish jar packages through the Sonatype OSSRH repository. Next, I will introduce how to publish the jar package to Sonatype OSSRH.
In addition, I would like to reiterate that the tutorials on the Internet are time-effective, This article is also included (this article was written in December 2021). Therefore, the best way is to follow the documents on the official website and solve problems with the online tutorials, because the documents on the official website are always the latest and best solution. If you do it directly according to the blog tutorials, you may take many detours.
Official website document address: (this is one of the documents you should read most)
https://central.sonatype.org/publish/publish-maven/
Well, let's follow the official documents above step by step.
Submit work order in sonatype
First, you need to register an account on the sonatype website:
https://issues.sonatype.org/secure/Signup!default.jspa
After creation, log in and click new at the top of the page to submit a new issue.
The following figure is what I filled in when I created it. You can refer to it.
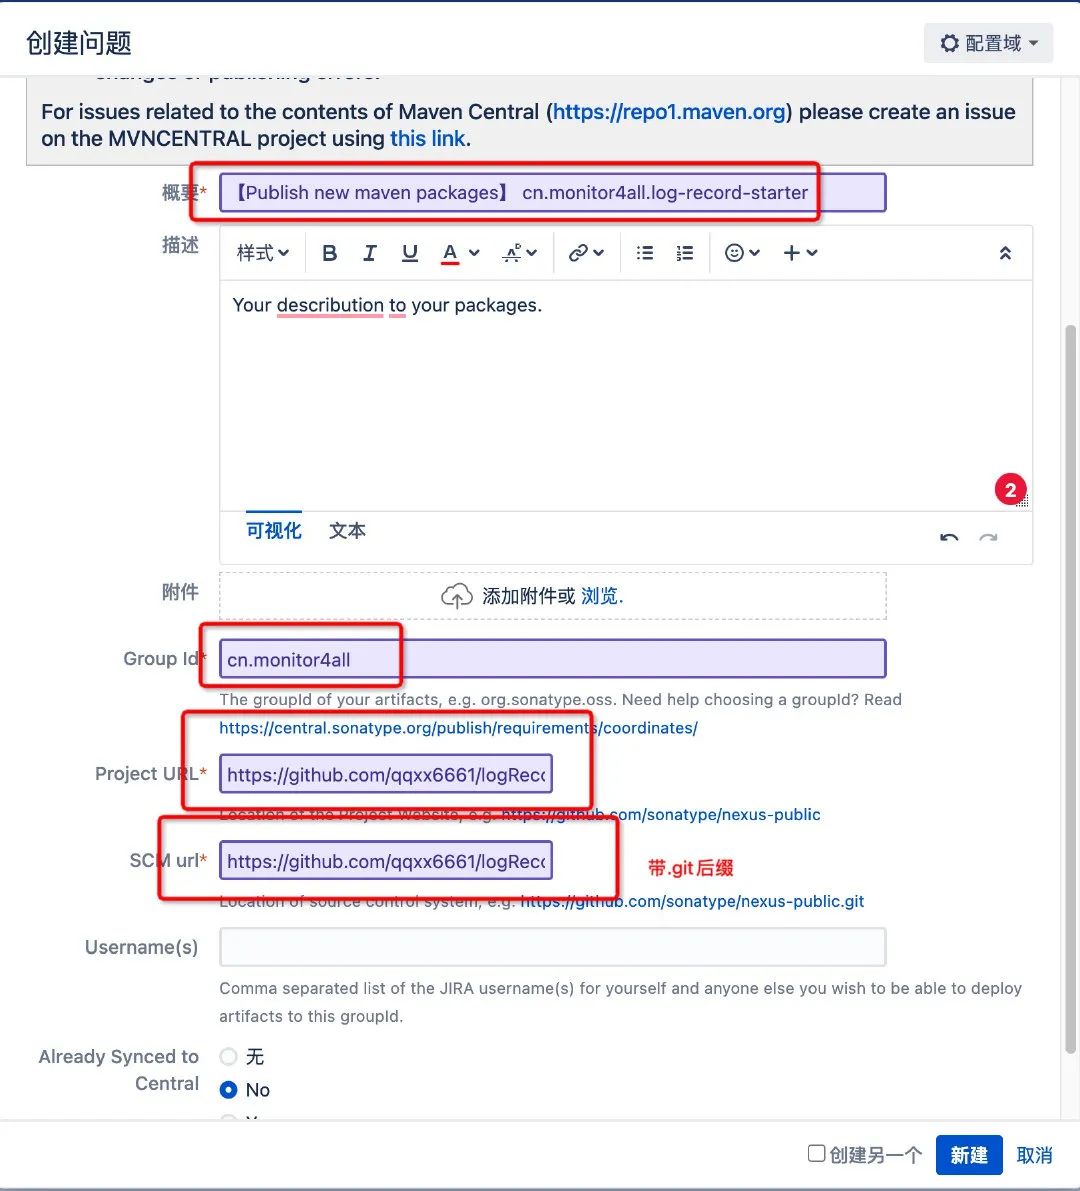
There are several points to pay attention to:
- The name of the question, as long as it roughly expresses the clear meaning
- groupId should be written accurately
- Porject URL fill in Github warehouse address
- SCM url needs git suffix after Github warehouse address
After submission, I thought it was a manual review, but in fact, it was a fully automatic robot that replied to you automatically. It requires you to prove that you have ownership of the website of groupId. For example, I filled in CN Monitor4all, then I'll be in monitor4all Cn, add a TXT resolution to point to this Issue (the value is written as ossrh xxxxx)
If you are a groupId, fill in com github. XXX, the above steps are not required. So if you don't have a domain name or it's troublesome, just use COM github. XXX is enough.
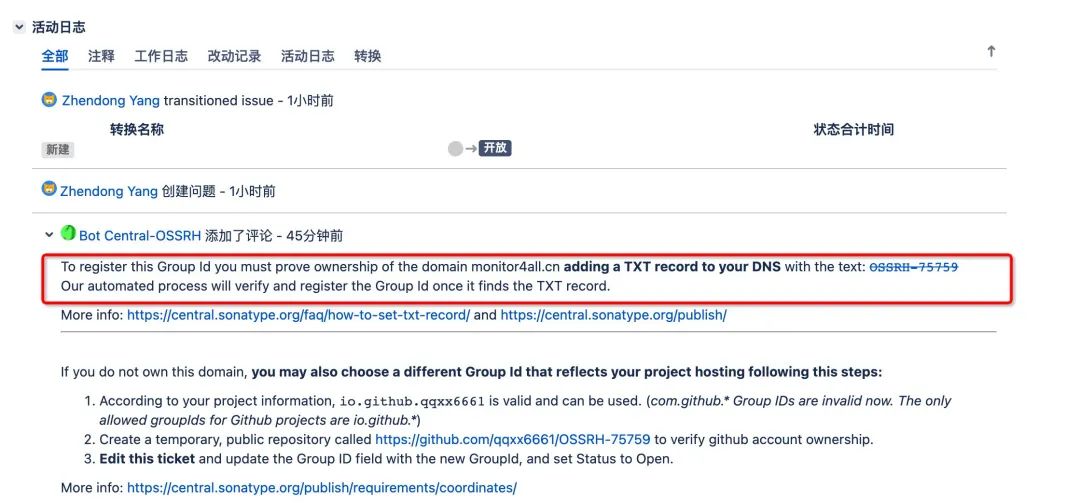
Because my website domain name was bought by myself and resolved by Tencent cloud, I went to Tencent cloud and added a TXT resolution value written as ossrh-759. (my work order address is https://issues.sonatype.org/browse/OSSRH-75759 )

Wait a few minutes and sonatype will detect your domain name ownership.
Configure gpg key
In the second part, you need to set the gpg secret key. The gps secret key signature tutorial on the official website:
https://central.sonatype.org/publish/publish-maven/#gpg-signed-components
You will be curious about what GPG is. GPG is an implementation of RSA algorithm.
In 1991, programmer Phil Zimmermann developed encryption software PGP in order to avoid government surveillance. This software is very easy to use, quickly spread, and has become a necessary tool for many programmers. However, it is commercial software and cannot be used freely. Therefore, the free software foundation decided to develop an alternative to PGP, named GnuPG. This is the origin of GPG.
Since sonatype allows you to upload to the public warehouse, you must be authenticated as a "person". Prevent other malicious people from uploading Jar packages.
Let's go to the official website to download GunPG
https://www.gnupg.org/download/
There are various versions of the system that can be downloaded. I downloaded the MacOS version.
After installation, we open ssh and enter the command:
➜ ~ gpg --generate-key
Then the secret key can be generated by following the operation. The following is my generation result and code:
gpg (GnuPG/MacGPG2) 2.2.32; Copyright (C) 2021 Free Software Foundation, Inc.
This is free software: you are free to change and redistribute it.
There is NO WARRANTY, to the extent permitted by law.

Note: use“ gpg --full-generate-key" To get a fully functional key generation dialog box.

GnuPG You need to build a user ID to identify your key.

Real name: xxxxxxx
 e-mail address: xxxxxxx@foxmail.com
 You have selected this user ID:
    "xxxxxxxx <xxxxx@foxmail.com>"

Change name( N),Notes( C),Email address( E)Or determine( O)/Exit( Q)?u
 Change name( N),Notes( C),Email address( E)Or determine( O)/Exit( Q)?o
 We need to generate a large number of random bytes. Do something else during prime generation (hit the keyboard)
,It would be a good idea to move the mouse, read and write the hard disk, etc; This makes random numbers
 The generator has a better chance of obtaining enough entropy.
We need to generate a large number of random bytes. Do something else during prime generation (hit the keyboard)
,It would be a good idea to move the mouse, read and write the hard disk, etc; This makes random numbers
 The generator has a better chance of obtaining enough entropy.
gpg: Key 54 EC3C8FA3A5B50F Marked as absolute trust
gpg: catalogue'/Users/xxxxxxxxx/.gnupg/openpgp-revocs.d'Created
gpg: The revocation certificate has been stored as'/Users/xxxxxxxxx/.gnupg/openpgp-revocs.d/xxxxxxxxxxxxxxxxxxxxxxxxxxxx.rev'
The public and private keys have been generated and signed.
pub   rsa3072 2021-12-06 [SC] [Valid until: 2023-12-06]
      8BDxxxxxxxxxxxxxxxxxxxxxxxxxxxxB50F
uid                      xxxxxxxx <xxxxxxxx@foxmail.com>
sub   rsa3072 2021-12-06 [E] [Valid until: 2023-12-06]
After the secret key is generated, you need to upload the public key to the public server for sonatype verification.
There are three addresses in the official website tutorial:
- keyserver.ubuntu.com
- keys.openpgp.org
- pgp.mit.edu
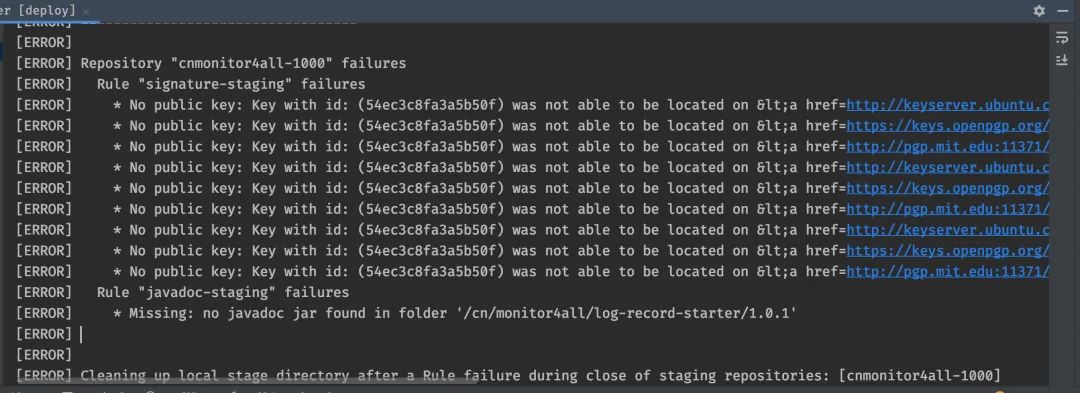
I upload it according to the method given on the official website:
➜  ~ gpg --keyserver pgp.mit.edu:11371 --send-keys 8BD96B0EA18E5162B94EA7F754EC3C8FA3A5B50F
gpg: Sending key 54 EC3C8FA3A5B50F reach pgp.mit.edu:11371
gpg: Failed to send to public key server: end of file
gpg: Failed to send to public key server: end of file
➜  ~ gpg --keyserver keyserver.ubuntu.com --send-keys 8BD96B0EA18E5162B94EA7F754EC3C8FA3A5B50F
gpg: Sending key 54 EC3C8FA3A5B50F reach hkp://keyserver.ubuntu.com
gpg: Failed to send to public key server: Network is unreachable
gpg: Failed to send to public key server: Network is unreachable
➜  ~ gpg --keyserver pgp.mit.edu:11371 --send-keys 54EC3C8FA3A5B50F
gpg: Sending key 54 EC3C8FA3A5B50F reach pgp.mit.edu:11371
gpg: Failed to send to public key server: end of file
gpg: Failed to send to public key server: end of file
However, the report is wrong. After repeatedly trying various online tutorials, the report is still wrong. I thought it was my network problem, or those servers failed. Anyway, I checked them again and again and tossed all night.
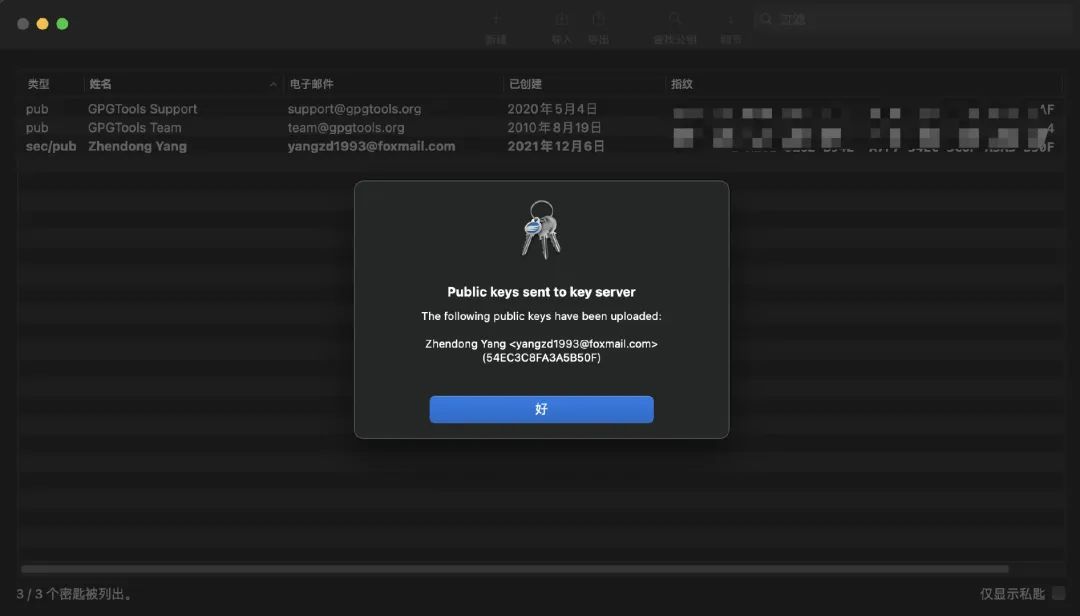
When I was about to crash, I accidentally found that gunpg still had an application to open, that is, a GUI interface, so I went in and looked, and then right-click My secret key to have the option of uploading server:
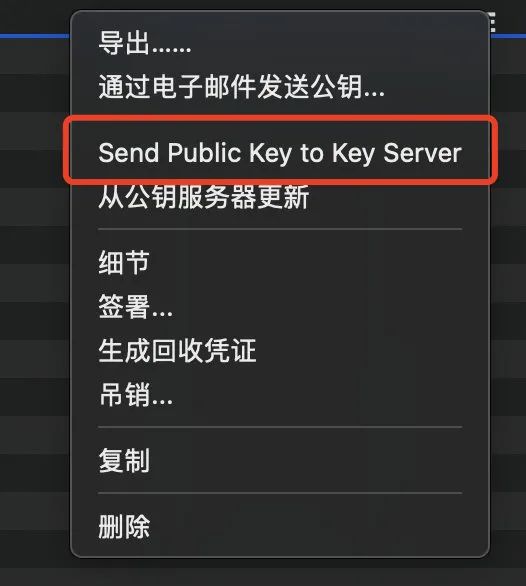
It's really speechless, brothers.
Configure POM XML and setting xml
Step 3, you need to configure your POM according to the tutorial on the official website XML and setting XML file. You are tired to see here. I will not demonstrate step by step according to the official website tutorial. I will directly summarize the configurations that need to be added for success.
The first is setting xml.
You need to add a profile:
<profiles>
    <profile>
      <id>ossrh</id>
      <activation>
        <activeByDefault>true</activeByDefault>
      </activation>
      <properties>
        <gpg.executable>gpg2</gpg.executable>
        <gpg.passphrase>yzdbwj1993</gpg.passphrase>
      </properties>
    </profile>
  </profiles>
You also need a server, which needs to fill in your ossrh account password:
  <servers>
    <server>
      <id>ossrh</id>
      <username>The account you registered above</username>
      <password>The password you registered above</password>
    </server>
  </servers>
</settings>
setting.xml is configured, and then the pom.xml of your project xml.
First, you need to declare a lot of plugin s and a snapshot repository. I posted all of them here.
<distributionManagement>
    <!--  Statement packaged to Maven Public warehouse  -->
    <snapshotRepository>
        <id>ossrh</id>
        <url>https://s01.oss.sonatype.org/content/repositories/snapshots</url>
    </snapshotRepository>
</distributionManagement>

<build>
    <plugins>
        <plugin>
            <groupId>org.sonatype.plugins</groupId>
            <artifactId>nexus-staging-maven-plugin</artifactId>
            <version>1.6.7</version>
            <extensions>true</extensions>
            <configuration>
                <serverId>ossrh</serverId>
                <nexusUrl>https://s01.oss.sonatype.org/</nexusUrl>
                <autoReleaseAfterClose>true</autoReleaseAfterClose>
            </configuration>
        </plugin>
        <plugin>
            <groupId>org.apache.maven.plugins</groupId>
            <artifactId>maven-source-plugin</artifactId>
            <version>2.2.1</version>
            <executions>
                <execution>
                    <id>attach-sources</id>
                    <goals>
                        <goal>jar-no-fork</goal>
                    </goals>
                </execution>
            </executions>
        </plugin>
        <plugin>
            <groupId>org.apache.maven.plugins</groupId>
            <artifactId>maven-javadoc-plugin</artifactId>
            <version>2.9.1</version>
            <configuration>
                <javadocExecutable>${java.home}/../bin/javadoc</javadocExecutable>
            </configuration>
            <executions>
                <execution>
                    <id>attach-javadocs</id>
                    <goals>
                        <goal>jar</goal>
                    </goals>
                </execution>
            </executions>
        </plugin>
        <plugin>
            <groupId>org.apache.maven.plugins</groupId>
            <artifactId>maven-gpg-plugin</artifactId>
            <version>1.5</version>
            <executions>
                <execution>
                    <id>sign-artifacts</id>
                    <phase>verify</phase>
                    <goals>
                        <goal>sign</goal>
                    </goals>
                </execution>
            </executions>
        </plugin>
    </plugins>
</build>
Note that after the maven Javadoc plugin is added, it looks like the above and adds a plug-in that is not mentioned in the official tutorial:
<configuration>
 <javadocExecutable>${java.home}/../bin/javadoc</javadocExecutable>
</configuration>
Otherwise, you may fail to compile and prompt that your Java cannot be found_ Home environment variable, as shown in the following figure:
MavenReportException: Error while creating archive: Unable to find javadoc command: The environment variable JAVA_HOME is not correctly set.
After that, you can also add some of your personal information:
<licenses>
  <license>
    <name>The Apache Software License, Version 2.0</name>
    <url>http://www.apache.org/licenses/LICENSE-2.0.txt</url>
    <distribution>actable</distribution>
  </license>
</licenses>

<developers>
  <developer>
    <name>xxxxxxxxx Yang</name>
    <email>xxxxxxxxx@foxmail.com</email>
    <organization>xxxxxxxxxx</organization>
  </developer>
</developers>

<scm>
  <tag>master</tag>
  <url>git@github.com:qqxx6661/logRecord.git</url>
  <connection>git@github.com:qqxx6661/logRecord.git</connection>
  <developerConnection>git@github.com:qqxx6661/logRecord.git</developerConnection>
</scm>
Officially packaged and released
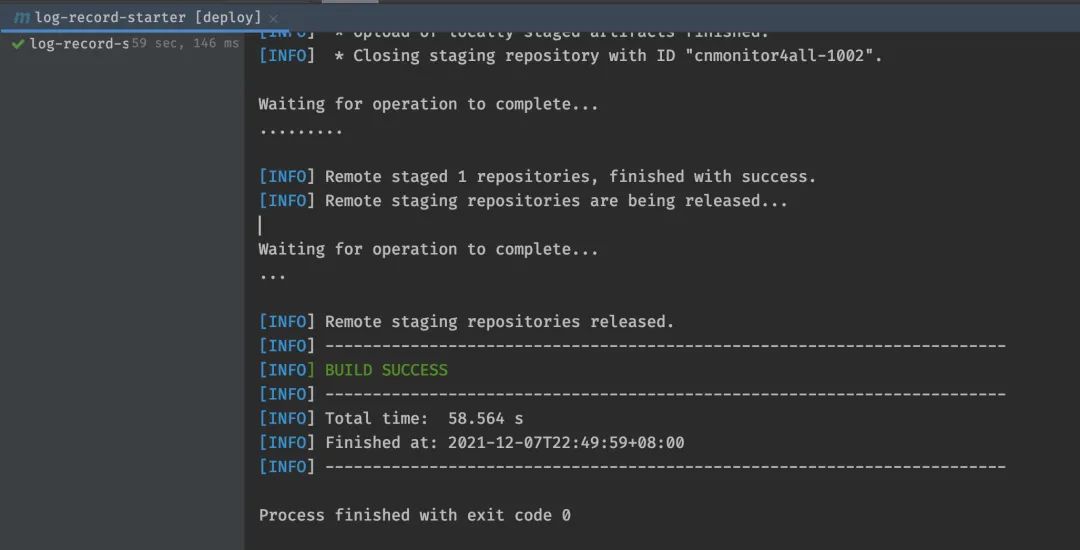
Finally, everything is ready, and you can carry out the most sacred instruction
mvn clean deploy
Then it was uploaded successfully
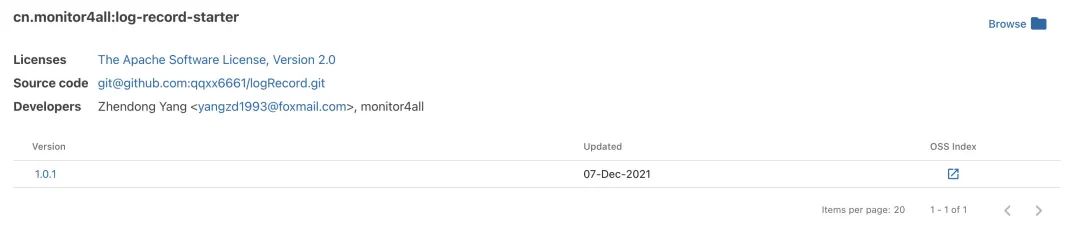
Your work order will also update a message at this time:
Central sync is activated for cn.monitor4all. After you successfully release, your component will be available to the public on Central https://repo1.maven.org/maven2/, typically within 30 minutes, though updates to https://search.maven.org can take up to four hours.
Your Jar bag will be pulled in about 30 minutes.
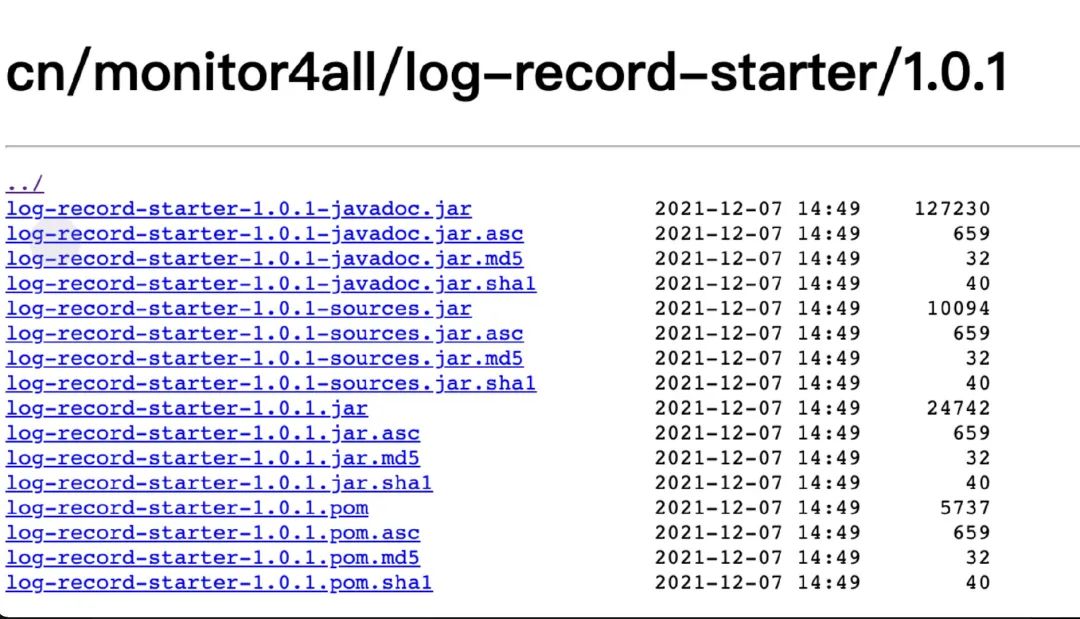
The following figure is a successful screenshot.
Postscript
I don't know. Do you think it's troublesome after reading the article? In fact, I read the written words myself. I feel that the steps are quite simple. But when I couldn't decide before, I still felt very painful.
I hope my detour can help you avoid the pit and complete the upload of your project faster.
reference resources
https://segmentfault.com/a/1190000023781503