xdebug introduction
Xdebug is an extension of PHP to facilitate us to debug the execution process information of PHP applications. After using debug in JavaScript, you should be able to understand Xdebug well. In summary, it has the following functions:
- It contains a debugger for the IDE.
- It upgrades PHP's var_dump() function.
- It adds stack traces for notifications, warnings, errors, and exceptions.
- It has the function of recording each function call and disk variable assignment.
- It contains a parser.
- It provides code coverage for use with PHPUnit.
This article aims at the installation and simple debugging of xdebug on Mac.
environment
The environment runs on Mac, using Apache and PHP.
PHP version: 7.4.20. xdebug version: 3.1.1.
Installation process
PHP installation
The default Mac comes with its own PHP environment. Due to the needs of the version, this version will not be used. We use brew for installation. We use brew to search for PHP versions.
kert@192 /usr/local/Cellar/php@7.4/7.4.20 brew search php ==> Formulae brew-php-switcher php-code-sniffer php-cs-fixer@2 php@7.3 phpbrew phpmd phpstan php php-cs-fixer php@7.2 php@7.4 ✔ phplint phpmyadmin phpunit ==> Casks eclipse-php
We can see the packages related to PHP and directly use brew install php@7.4 Just install it. All operations are completed in one step. After installation, the relevant configuration files are as follows:
kert@192 cd /usr/local/etc/php/7.4 kert@192 /usr/local/etc/php/7.4 ll total 168 drwxr-xr-x 7 kert admin 224 11 14 02:26 . drwxr-xr-x 3 kert admin 96 11 13 23:42 .. drwxr-xr-x 3 kert admin 96 11 13 23:42 conf.d -rw-r--r-- 1 kert admin 1361 11 13 23:42 pear.conf -rw-r--r-- 1 kert admin 5407 11 13 23:42 php-fpm.conf drwxr-xr-x 3 kert admin 96 11 13 23:42 php-fpm.d -rw-r--r-- 1 kert admin 73231 11 14 02:31 php.ini
We can see the php.ini, pear.conf and other related configuration files. In the future, you can modify the PHP configuration file and the PHP FPM process file here. The following are cli tools related to PHP.
cd /usr/local/Cellar/php@7.4/7.4.20/bin kert@192 /usr/local/Cellar/php@7.4/7.4.20/bin ll total 78792 drwxr-xr-x 12 kert admin 384 11 13 23:42 . drwxr-xr-x 16 kert admin 512 11 14 00:19 .. -r-xr-xr-x 1 kert admin 960 11 13 23:42 pear -r-xr-xr-x 1 kert admin 981 11 13 23:42 peardev -r-xr-xr-x 1 kert admin 894 11 13 23:42 pecl lrwxr-xr-x 1 kert admin 9 6 1 23:42 phar -> phar.phar -rwxr-xr-x 1 kert admin 14910 11 13 23:42 phar.phar -r-xr-xr-x 1 kert admin 13398608 11 13 23:42 php -r-xr-xr-x 1 kert admin 13346744 11 13 23:42 php-cgi -r-xr-xr-x 1 kert admin 7095 11 13 23:42 php-config -r-xr-xr-x 1 kert admin 13542824 11 13 23:42 phpdbg -r-xr-xr-x 1 kert admin 4575 11 13 23:42 phpize
After the configuration of PHP, remember to restart the PHP service. Sometimes if it doesn't take effect, it's best to restart the Apache service (written below).
# Restart service
brew services restart php@7.4
# Start service
brew services start php@7.4
# Out of Service
brew services stop php@7.4
Apache installation
Similarly, the MAC comes with its own Apache environment. You can use it directly or install it yourself. However, it is not recommended to use Apache that comes with the Mac. There are several reasons in use:
- If the built-in Apache wants to parse PHP, just release the comment of php.so in the / etc/apache2/httpd.conf configuration file. By default, he parses PHP that comes with the Mac. Later, he will encounter many problems if he wants to change it to the customized PHP version above.
- For the built-in Apache related configuration, many files will encounter permission problems, and the permission is read only.
Therefore, simply use brew to install Apache. First, use the sudo apachectl -k stop command to disable the built-in Apache. Before and after the operation, we can install Apache. Directly use the following command to install.
brew install nghttp2
After installation, the relevant configuration files will be placed in the following directory. If you need to configure later, you can change the following configuration file.
cd /usr/local/etc/httpd kert@192 /usr/local/etc/httpd ll total 200 drwxr-xr-x 8 kert admin 256 11 14 02:06 . drwxrwxr-x 17 kert admin 544 11 14 01:35 .. drwxr-xr-x 14 kert admin 448 11 14 01:39 extra -rw-r--r-- 1 kert admin 21475 11 14 02:06 httpd.conf drwxr-xr-x 6 kert admin 192 11 14 02:14 logs -rw-r--r-- 1 kert admin 13064 11 14 01:35 magic -rw-r--r-- 1 kert admin 60847 11 14 01:35 mime.types drwxr-xr-x 4 kert admin 128 11 14 01:35 original
8080 is used by default. Since the port of my local 8080 has been occupied, you need to modify the default port address. Interface directly to the httpd.conf file.
# Open the file, search listen directly, and change 8080 to 8088.
Listen 8088
# If you need to modify the root directory of the program, you can modify the following configuration. If you don't need it, you can use the default configuration. You can also put your PHP code in the directory of the default configuration later.
DocumentRoot "/Users/kert/code/php_dnmp/www"
<Directory "/Users/kert/code/php_dnmp/www">
    Options Indexes FollowSymLinks
    AllowOverride None
    Require all granted
</Directory>
# Modify the permission, otherwise an error message 403 will appear when accessing the service.
<Directory />
    AllowOverride none
    Require all granted(Put the previous deny Change to granted)
</Directory>
Open the domain name profile. Later, we will create different projects, and each project will be configured with a domain name. You can configure it directly in the following file. The configuration example is as follows:
# First, we need to modify httpd.conf to load the domain name configuration file. Just open the following configuration comments.
# Virtual hosts
Include /usr/local/etc/httpd/extra/httpd-vhosts.conf
# All the following domain name configurations can be operated in httpd-vhosts.conf.
<VirtualHost *:8088>
    ServerAdmin 18228937997@163.com
    DocumentRoot "/Users/kert/code/php_dnmp/www/xdebug"
    ServerName xdebug_dev.com
    ServerAlias xdebug_dev.com
    ErrorLog "/usr/local/etc/httpd/logs/xdebug_dev_logs-error_log.log"
    CustomLog "/usr/local/etc/httpd/logs/xdebug_dev_logs-access_log.log" common
</VirtualHost>
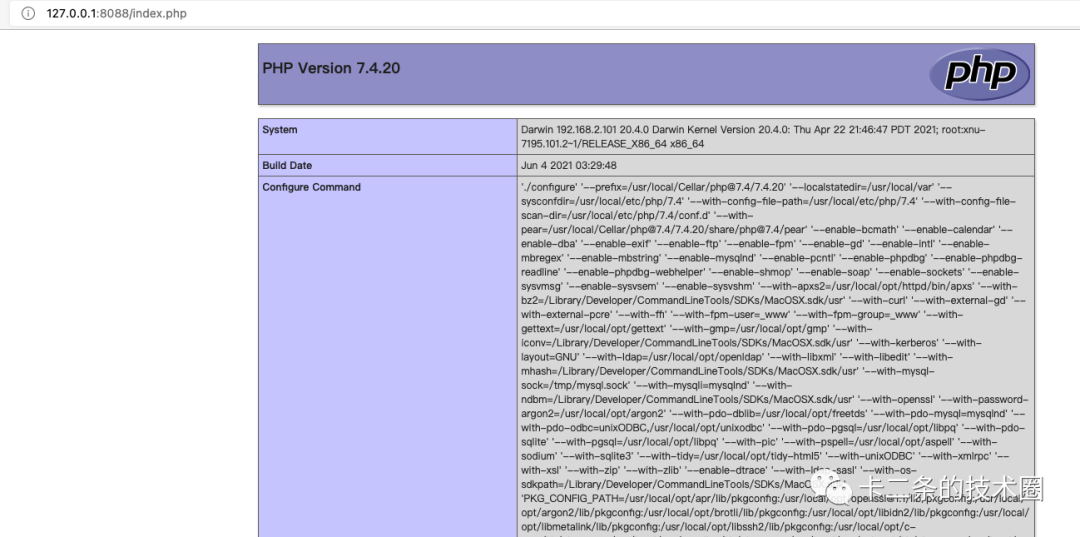
The basic configuration of Apache is completed. Next, restart the Apache service and run it in / Users/kert/code/php_dnmp/www/xdebug create an index.php file and write the following code:
<?php
    phpinfo();
# Restart Apache
brew services restart httpd
# Stop Apache
brew services stop httpd
# Start Apache
brew services start httpd
visit http://127.0.0.1:8088/index.php , the following interface appears, indicating that we have successfully installed.
xdebug installation
When using xdebug, you must pay attention to the version of PHP, otherwise you can't use it. xdebug officially provides a detection tool to help us choose the version of xdebug. We can use php -i at the terminal to fill the output content into the text box of the website. After detection, the installed version and installation process will be given automatically.


As for how to install xdebug, it is directly omitted here, which is no different from the regular PHP extension installation. After installation, you need to configure php.ini as follows:
[xdebug]
zend_extension=xdebug.so

;Enable code auto tracking
xdebug.mode = develop,debug,profile,trace
xdebug.profiler_append = 0
xdebug.profiler_output_name = cachegrind.out.%p
xdebug.start_with_request = default|yes|no|trigger
xdebug.trigger_value = StartProfileForMe

;Specify the storage directory of performance analysis files
xdebug.output_dir ="/usr/local/Cellar/php@7.4/7.4.20/log/xdebug2"
xdebug.show_local_vars=0

;Configure port and listening domain name
xdebug.client_host=9003
xdebug.clent_host="localhost"
The configuration format here may be different from what you see on the network because xdebug has made some configuration changes in the higher version and some command names have been changed. For details, please refer to the official introduction. Note the 9003 port number. You can set other ports, just keep consistent in the PHPstorm mentioned later.
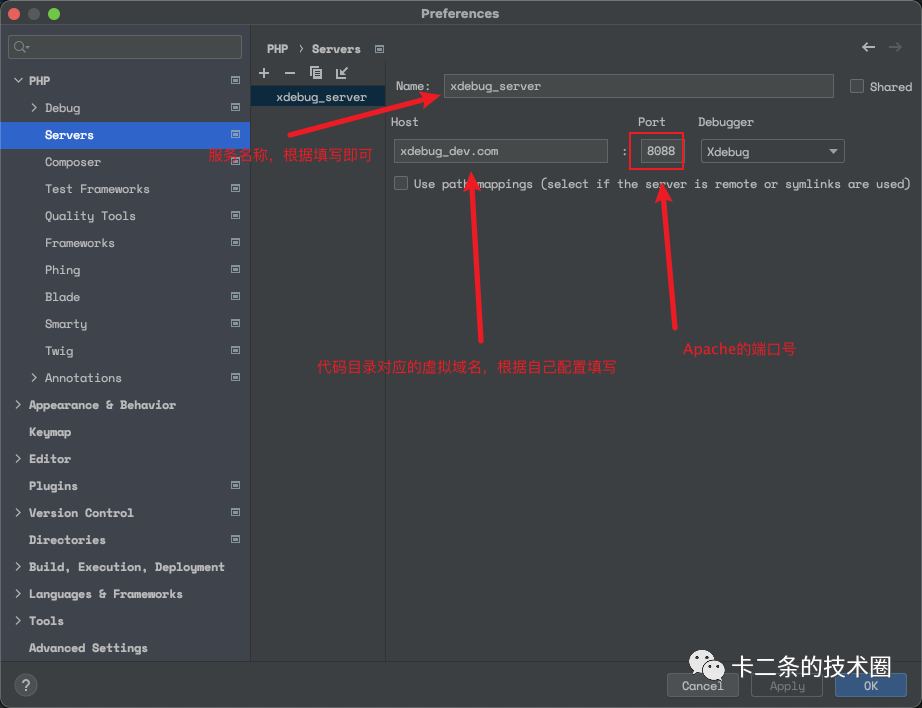
PHPstorm configuration
PHPstorm I use the 2021 version, so there may be some differences in the interface. You can find the corresponding configuration according to your own situation. The general interface is as follows: