html2.0 learning notes
I html advanced Tags
1. The HTML encoding format is &; There are three common:
1) Spaces, & nbsp;
2)<,<;
3)>,>;
2. < br > Enter (line feed)
3. < HR > horizontal line
4. Ordered list labels
Basic format:
<ol>
			<li></li>
			...
			<li></li>
</ol>
1) The attribute value of type is only 1/A/a/i/I
2) reversed attribute (in reverse order)
3) If you want to start sorting from the second, write < ol type = "1" start = "2" >
If you want to start sorting from the 117th, write < ol type = "i" start = "117" >
Favorite game
<ol type="1" reversed="reversed" start="3">
		<li>pubg</li>
		<li>Gta5</li>
</ol>
5. Unordered list labels
Basic format:
<ul >
		<li></li>
		...
		<li></li>
</ul>
1) Only the attribute type = "" can be changed. The three attribute values are disc (solid circle), square (solid square) and circle (hollow circle)
	<ul type="disc">
		<li>Tmall</li>
		<li>Poly cost-effective</li>
		<li>Tmall supermarket</li>
	</ul>
6.<img src = “sss.jpg style = “width:100px;”> Picture label
1. Online URL 2 Local absolute path 3 Local relative path
For example, html and pictures are in the same file, which is a relative relationship and relative path. Writing method: < img SRC = "123.jpg" >
D:/a/b/lesson2.html
D:/a/b/123.jpg
If html and picture are not in the same file, they are absolute paths, which can be written as follows: < img SRC = "D:/a/b/c/123.jpg" >
D:/a/b/lesson2.html
D:/a/b/c/123.jpg
2.alt picture placeholder
<img scr = "fy.jpg" style = "width:200px;" alt = "This is "master fan">
When the picture reports an error, the text information is displayed
3. Tile picture prompt
<img scr = "fy.jpg" style = "width:200px;" alt = "This is "master fan" title = "This is fy">
When the mouse is put up, this information will be displayed
7. < a > < / a > a label
<a>Function of
1) Hyperlinks
<a href="http://www.baidu.com">www.taobao.com</a>
2) Anchor point
3) Call, email
<a href="tel:17788595484">Call boss crab</a>`
4) Protocol qualifier
<a href="javascript:while(1){alert('Let your hand owe')}">You order me to try acridine!! come on!</a>
8.form label
1)form method = "get/post" these are two ways for form to send data
action = “ http://ssffg.php ”This is the location of the action to whom it is sent
The form needs to be written in conjunction with input, and the input needs type
< input type = "text" > / / this is the meaning of the input box
< input type = "password" > / / this is the meaning of the password box. The default is dark text
< input type = "submit" > / / this is the submitted component, that is, login
< input type = "submit" value = "login" > / / this changes the value of the submit box
< input type = "radio" > / / is a radio box
< input type = "checkbox" > / / Yes checkbox
The code is as follows:
<form method="get" action="">
		<p>
			usename:<input type="text" name="username" value="enter one user name">
		</p>
		<p>
			password:<input type="password" name="username" >
		</p>
		<input type="submit" value="Sign in">
	</form>
2) When sending data, we should pay attention to the subject (data name) and content (data value) of the data
This can't send data
< input type = "text" name = "1234" > here name is the data name, 1234 is the data value, 1234
You can fill in at will. It's best to fill in English words close to the meaning for easy use
Example: the code is as follows:
<form method="get" action="">
		<p>
			usename:<input type="text" name="username" >
		</p>
		<p>
			password:<input type="password" name="password" >
		</p>
		<input type="submit" >
	</form>
Show html in browser? The following values are the reflection of successful sending, as follows:

3) Use form to complete radio selection function
The code is as follows
<form method="get" action="">
		Your favorite actor
		1.Beckham<input type="radio" name="star" value="xiaobei" >
		2.Leonardo<input type="radio" name="star" value="xiaolai" >
		3.Messi<input type="radio" name="star" value="handsome">
		<input type="submit" name="">
	</form>
The effects are as follows:

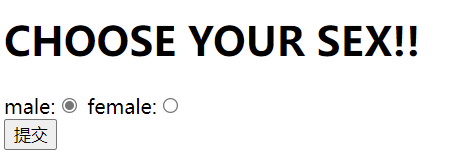
4) Set default selection in radio selection
Add checked = "checked" in < input >, which is selected by default
The code is as follows:
<form method="get" action="">
		<h1>
			CHOOSE YOUR SEX!!
		</h1>
		male:<input type="radio" name="sex" value="male" checked="checked">
		female:<input type="radio" name="sex"value="female">
		<br>
		<input type="submit" >

	</form>
The effects are as follows:
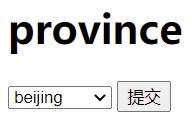
5) Drop down menu options
Use component select and option location tags.
The code is as follows:
<form method="get"action="">
		<h1>
			province
		</h1>
		<select name="province">
			<option>beijing</option>
			<option>shanghai</option>
			<option>hangzhou</option>
		</select>
		<input type="submit" >


	</form>
The effects are as follows: