In HTML, in the process of file upload, there are many cases where there is no prompt, which is very bad in the experience. Users don't know whether there is a successful upload or not, so the content introduced to you today is through HT for Web Vector to achieve HTML5 file upload progress bar, vector in< Application of embedding vector Chart into HTML5 network topology >This paper has described the application of setCompType() method. Today, we use setImage() method to make full use of the vector resources defined in the system to realize the file upload progress bar. Let's take a look at the following renderings:
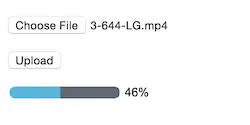
As can be seen from the rendering, an mp4 file is uploaded to the server, and the current upload progress is displayed at the bottom. Then we will discuss the following specific implementation: first, we will analyze the structure of the next progress bar: 1. We need a background, 2. We need a current progress value, 3. We need a foreground, foreground. According to the current progress value, we can draw the foreground, which is so simple as to cover the background structure. Then we will see the code:
ht.Default.setImage('progress', {
    width : 150,
    height : 12,
    comps : [
        // Drawing background
        {
            type : 'rect',
            rect : {x : 0, y : 0, width : 115, height : 12},
            background : {func : function(data) {return data.a('background');}}
        },
        // Drawing foreground
        {
            rect : {x : 0, y : 0, width : 115, height : 12},
            type : function(g, rect, comp, data, view) {
                var width = rect.width, height = rect.height, value = data.getValue(),
                    foreWidth = width / 100 * value;
                g.fillStyle = data.a('foreground');
                g.fillRect(0, 0, foreWidth, height);
            }
        }
    ]
});
We define a vector object named progress, which consists of two parts, one is background, the other is foreground.
Data binding is used to draw the background, and the background attribute of data is bound; custom type method is used to draw the foreground, which is an abbreviation of setCompType(), and the drawing width is calculated according to the value value in data.
The general design of the vector has been completed, so let's use it to see how it works.
var dataModel = new ht.DataModel(),
    node = new ht.Node();
node.setValue(0);
node.setImage('progress');
node.a('background', '#5F6870');
node.a('foreground', '#58B6DA');
node.p(85, 87);
dataModel.add(node);
var graphView = new ht.graph.GraphView(dataModel);
graphView.addToDOM();
graphView.layout({x : 0, y : 80, width : 170, height : 30});
We create a node, set the image attribute of the node to the vector we defined, and then create a graphView component to display the node in the graphView network topology.
Then let's simulate the file upload progress and let the progress bar move.
function setProgressValue(node) {
    var value = node.getValue();
    if (value !== 100) {
        node.setValue(value + 1);
        var second = Math.round(Math.random() * 500);
        setTimeout(setProgressValue, second, node);
    }
}
We use the setTimeout() method to set the value value of the node continuously. However, when the code runs, you will find that the progress bar is not moving at all and is in the initial state. When we zoom in and out of grapeview, we can see that the progress bar is changing. Why? In fact, the reason is very simple. When we modify the value value, we do not notify graphView to update, so the progress bar will not change because the value of the node changes. So how can we notify graphView to update? The method is very simple. After modifying the value value of the node, you can dispatch a propertyChange event. After creating the node code, add the following code:
node.getValue = function() {
    return this._value;
};
node.setValue = function(value) {
    var self = this,
        oV = self._value;
    self._value = value;
    self.fp('value', oV, value);
};
In the code, the fp() method is used to dispatch the propertyChange event, so that the progress bar can work normally and change with the value of the node. The effect chart is as follows:

However, there is still a shortage. Although the progress bar is running, we still don't know what the current progress value is. We can only estimate the current progress value by comparing the weight of the progress bar. Can we add a text on the progress bar to display the current progress value? The answer is yes. We just need to add the following code to the vector comps:
// Draw text
{
    rect : {x : 118, y : 0, width : 32, height : 12},
    type : 'text',
    text : {func : function(data) {return data.getValue() + '%';}},
    font : '12px arial, sans-ferif',
    color : 'black'
}
Binding is also applicable in the code. Bind the current value value of node. The specific effect is as follows:

Now the progress bar is not as good as the final effect, so how to achieve the fillet? In fact, it's not difficult. Just draw a rounded rectangle and cut off the part beyond the rounded rectangle area with the help of clip() method. For the detailed introduction of clip() method, please refer to MDN In.
1. First, we need to create a rounded rectangle:
/***
 * Draw a circular rectangle
 * @param ctx Paint brush
 * @param x Coordinate x
 * @param y Coordinate y
 * @param width width
 * @param height height
 * @param radius Fillet radius
 */
function roundRect(ctx, x, y, width, height, radius) {
    ctx.beginPath();
    ctx.moveTo(x, y + radius);
    ctx.lineTo(x, y + height - radius);
    ctx.quadraticCurveTo(x, y + height, x + radius, y + height);
    ctx.lineTo(x + width - radius, y + height);
    ctx.quadraticCurveTo(x + width, y + height, x + width, y + height - radius);
    ctx.lineTo(x + width, y + radius);
    ctx.quadraticCurveTo(x + width, y, x + width - radius, y);
    ctx.lineTo(x + radius, y);
    ctx.quadraticCurveTo(x, y, x, y + radius);
}
2. Using the method of custom type, call roundRect() method, draw a rounded rectangle area, and then call clip() method to cut off the outer part of the rounded rectangle area. It should be noted that the content intercepted by the clip () method is only valid for the content drawn after calling the method, and the content drawn before calling the method will not be intercepted. So the following code must be placed before the code that draws the background.
// Draw a rounded rectangle
{
    rect : {x : 0, y : 0, width : 115, height : 12},
    type : function(g, rect, comp, data, view) {
        var width = rect.width, height = rect.height;
        roundRect(g, 0, 0, width, height, height / 2);
        g.clip();
    }
}
See how it works

At this point, the design of progress bar is over. Next, let's see how to combine the progress bar with file upload:
1. First of all, we need a server to receive files. In addition to using a regular web server, the server can refer to: Implementation of HTML5 tree component delay loading technology for HT for Web ), also used formidable Module, the following is the code of the server:
var express = require('express'),
    app = express(),
    server = require('http').createServer(app),
    io = require('socket.io')(server),
    path = require('path'),
    root = path.join(__dirname, '../../../'),
    formidable = require('formidable');

// io listens for connection events
io.on('connection', function(socket){
    // Define socket name
    socket.join('upload');
});

// Set the working path of the server
app.use(express.static(root));

app.post('/', function(req, res){
    var form = new formidable.IncomingForm();

    form.on('end', function(){
        res.end('upload complete!');
    });
    form.on('progress', function(bytesReceived, bytesExpected){
        var percent = Math.floor(bytesReceived / bytesExpected * 100);
        // Gets the specified socket and dispatches the event
        io.sockets.in('upload').emit('progress', percent);
    });
    form.parse(req);
});

// Server listens for 4000 ports
server.listen(3000, function(){
    console.log('server is listening at port 3000');
});
2. Secondly, we need to design a file upload form:
<form method="post" action="/" enctype="multipart/form-data" name="fileForm">
    <p><input type="file" name="file"/></p>
    <p><input type="submit" value="Upload"/></p>
</form>
3. In addition, we need to upload files to the server with ajax without refresh, and monitor server events with socket technology. How to use socket in the browser can refer to: Implementation of HTML5 tree component delay loading technology for HT for Web.
var fileForm = document.forms.namedItem('fileForm');
fileForm.addEventListener('submit', function(e) {
    var httpRequest;
    if (window.XMLHttpRequest) { // Mozilla, Safari, IE7+ ...
        httpRequest = new XMLHttpRequest();
    }
    else if (window.ActiveXObject) { // IE 6 and older
        httpRequest = new ActiveXObject("Microsoft.XMLHTTP");
    }

    httpRequest.open('POST', '/', true);
    httpRequest.send(new FormData(fileForm));

    socket.on('progress', function(val) {
        progress.setValue(val);
    });
    e.preventDefault();
}, false);
In this way, the page design and code design of HTML5 file upload progress bar based on HT for Web custom class are completed.