1, Required environment
- Wiindows1up
- python3. More than 6
- httprunner3.1.6 (latest version)
- pycharm Community Edition
2, Install httprunner
1. Uninstall old version
The command to uninstall the previous version is: pip3 uninstall httprunner
2. Install new version
Default installation method:
pip3 install httprunner
In this way, the latest version is installed by default and downloaded from foreign servers, but there are occasional errors or timeouts. Therefore, the domestic image installation is generally adopted, and the domestic watercress source image installation is adopted here.
General installation commands:
pip3 install httprunner==3.1.6 -i https://pypi.douban.com/simple
This method is to specify the installation version and installation source
After the installation is completed, the following display indicates that the installation is successful
C:\Users\fsy>pip3 install httprunner==3.1.6 -i https://pypi.douban.com/simple
Looking in indexes: https://pypi.douban.com/simple
Collecting httprunner==3.1.6
  Downloading https://pypi.doubanio.com/packages/e4/2f/25011310f2f13f55de18845435f62b0ae16fbb69500885c268705ef42ee2/httprunner-3.1.6-py3-none-any.whl (60 kB)
     |████████████████████████████████| 60 kB 549 kB/s
Collecting requests<3.0.0,>=2.22.0
  Downloading https://pypi.doubanio.com/packages/2d/61/08076519c80041bc0ffa1a8af0cbd3bf3e2b62af10435d269a9d0f40564d/requests-2.27.1-py2.py3-none-any.whl (63 kB)
     |████████████████████████████████| 63 kB 584 kB/s
Collecting jmespath<0.10.0,>=0.9.5
  Downloading https://pypi.doubanio.com/packages/a3/43/1e939e1fcd87b827fe192d0c9fc25b48c5b3368902bfb913de7754b0dc03/jmespath-0.9.5-py2.py3-none-any.whl (24 kB)
Collecting pytest<6.0.0,>=5.4.2
  Downloading https://pypi.doubanio.com/packages/9f/f3/0a83558da436a081344aa6c8b85ea5b5f05071214106036ce341b7769b0b/pytest-5.4.3-py3-none-any.whl (248 kB)
     |████████████████████████████████| 248 kB 819 kB/s
Collecting sentry-sdk<0.15.0,>=0.14.4
  Downloading https://pypi.doubanio.com/packages/1b/95/9a20eebcedab2c1c63fad59fe19a0469edfc2a25b8576497e8084629c2ff/sentry_sdk-0.14.4-py2.py3-none-any.whl (104 kB)
     |████████████████████████████████| 104 kB 1.3 MB/s
Collecting black<20.0,>=19.10b0
  Downloading https://pypi.doubanio.com/packages/fd/bb/ad34bbc93d1bea3de086d7c59e528d4a503ac8fe318bd1fa48605584c3d2/black-19.10b0-py36-none-any.whl (97 kB)
     |████████████████████████████████| 97 kB 951 kB/s
Collecting pytest-html<3.0.0,>=2.1.1
  Downloading https://pypi.doubanio.com/packages/00/a7/34f195c514d39b4453619b3eb284989e5adb09a2a68ac09ce3779f9b9478/pytest_html-2.1.1-py2.py3-none-any.whl (16 kB)
Collecting pyyaml<6.0.0,>=5.1.2
  Downloading https://pypi.doubanio.com/packages/97/d3/24097209f6af04fcdbb40500480a0feaa62164e60bca4c9532f0e9354e47/PyYAML-5.4.1-cp38-cp38-win_amd64.whl (213 kB)
     |████████████████████████████████| 213 kB 3.3 MB/s
Collecting loguru<0.5.0,>=0.4.1
  Downloading https://pypi.doubanio.com/packages/b2/f4/2c8b94025c6e30bdb331c7ee628dc152771845aedff35f0365c2a4dacd42/loguru-0.4.1-py3-none-any.whl (54 kB)
     |████████████████████████████████| 54 kB 331 kB/s
Collecting jinja2<3.0.0,>=2.10.3
  Downloading https://pypi.doubanio.com/packages/7e/c2/1eece8c95ddbc9b1aeb64f5783a9e07a286de42191b7204d67b7496ddf35/Jinja2-2.11.3-py2.py3-none-any.whl (125 kB)
     |████████████████████████████████| 125 kB 819 kB/s
Collecting pydantic<2.0,>=1.4
  Downloading https://pypi.doubanio.com/packages/5f/ca/ec4b2597b7ace79a05300a2e7eff8713b55745312b2acc89f74bf73f8dfc/pydantic-1.9.0-cp38-cp38-win_amd64.whl (2.1 MB)
     |████████████████████████████████| 2.1 MB 1.3 MB/s
Collecting Brotli<2.0.0,>=1.0.9
  Downloading https://pypi.doubanio.com/packages/63/29/1b104b5915e61d9f7443889657d93937b7e0b33b331609b82693547934a0/Brotli-1.0.9-cp38-cp38-win_amd64.whl (365 kB)
     |████████████████████████████████| 365 kB 6.8 MB/s
Collecting attrs>=18.1.0
  Downloading https://pypi.doubanio.com/packages/be/be/7abce643bfdf8ca01c48afa2ddf8308c2308b0c3b239a44e57d020afa0ef/attrs-21.4.0-py2.py3-none-any.whl (60 kB)
     |████████████████████████████████| 60 kB 952 kB/s
Collecting typed-ast>=1.4.0
  Downloading https://pypi.doubanio.com/packages/93/6a/1b01a1864854fd6ed63e0e0649a9c1e4ef1425e417c43e7b09c0e4e7fdac/typed_ast-1.5.1-cp38-cp38-win_amd64.whl (164 kB)
     |████████████████████████████████| 164 kB 819 kB/s
Collecting click>=6.5
  Downloading https://pypi.doubanio.com/packages/48/58/c8aa6a8e62cc75f39fee1092c45d6b6ba684122697d7ce7d53f64f98a129/click-8.0.3-py3-none-any.whl (97 kB)
     |████████████████████████████████| 97 kB 3.2 MB/s
Collecting appdirs
  Downloading https://pypi.doubanio.com/packages/3b/00/2344469e2084fb287c2e0b57b72910309874c3245463acd6cf5e3db69324/appdirs-1.4.4-py2.py3-none-any.whl (9.6 kB)
Collecting regex
  Downloading https://pypi.doubanio.com/packages/e2/b1/b1d30513d3638e1e48cdfa5857a0e9c92ec7d19c0641836d0b49c4d00cac/regex-2021.11.10-cp38-cp38-win_amd64.whl (273 kB)
     |████████████████████████████████| 273 kB 731 kB/s
Collecting toml>=0.9.4
  Downloading https://pypi.doubanio.com/packages/44/6f/7120676b6d73228c96e17f1f794d8ab046fc910d781c8d151120c3f1569e/toml-0.10.2-py2.py3-none-any.whl (16 kB)
Collecting pathspec<1,>=0.6
  Downloading https://pypi.doubanio.com/packages/42/ba/a9d64c7bcbc7e3e8e5f93a52721b377e994c22d16196e2b0f1236774353a/pathspec-0.9.0-py2.py3-none-any.whl (31 kB)
Collecting colorama
  Downloading https://pypi.doubanio.com/packages/44/98/5b86278fbbf250d239ae0ecb724f8572af1c91f4a11edf4d36a206189440/colorama-0.4.4-py2.py3-none-any.whl (16 kB)
Collecting MarkupSafe>=0.23
  Downloading https://pypi.doubanio.com/packages/30/9e/4b7116f464a0151b86ce42b5185941eb74c207b38fe033f71f5e5d150356/MarkupSafe-2.0.1-cp38-cp38-win_amd64.whl (14 kB)
Collecting win32-setctime>=1.0.0
  Downloading https://pypi.doubanio.com/packages/37/6a/a498698d31626f32eae2c3bd1f1c303c6b3d54589b2993e9e05a4cd513dd/win32_setctime-1.0.4-py3-none-any.whl (3.5 kB)
Collecting typing-extensions>=3.7.4.3
  Downloading https://pypi.doubanio.com/packages/05/e4/baf0031e39cf545f0c9edd5b1a2ea12609b7fcba2d58e118b11753d68cf0/typing_extensions-4.0.1-py3-none-any.whl (22 kB)
Collecting wcwidth
  Downloading https://pypi.doubanio.com/packages/59/7c/e39aca596badaf1b78e8f547c807b04dae603a433d3e7a7e04d67f2ef3e5/wcwidth-0.2.5-py2.py3-none-any.whl (30 kB)
Collecting pluggy<1.0,>=0.12
  Downloading https://pypi.doubanio.com/packages/a0/28/85c7aa31b80d150b772fbe4a229487bc6644da9ccb7e427dd8cc60cb8a62/pluggy-0.13.1-py2.py3-none-any.whl (18 kB)
Collecting atomicwrites>=1.0
  Downloading https://pypi.doubanio.com/packages/2c/a0/da5f49008ec6e9a658dbf5d7310a4debd397bce0b4db03cf8a410066bb87/atomicwrites-1.4.0-py2.py3-none-any.whl (6.8 kB)
Collecting packaging
  Downloading https://pypi.doubanio.com/packages/05/8e/8de486cbd03baba4deef4142bd643a3e7bbe954a784dc1bb17142572d127/packaging-21.3-py3-none-any.whl (40 kB)
     |████████████████████████████████| 40 kB 2.7 MB/s
Collecting more-itertools>=4.0.0
  Downloading https://pypi.doubanio.com/packages/e5/c3/48e2c81038f57e8caab9a6e6fb6c2fc23536c59b092abefc447e6b5d1903/more_itertools-8.12.0-py3-none-any.whl (54 kB)
     |████████████████████████████████| 54 kB 1.9 MB/s
Collecting py>=1.5.0
  Downloading https://pypi.doubanio.com/packages/f6/f0/10642828a8dfb741e5f3fbaac830550a518a775c7fff6f04a007259b0548/py-1.11.0-py2.py3-none-any.whl (98 kB)
     |████████████████████████████████| 98 kB 2.6 MB/s
Collecting pytest-metadata
  Using cached https://pypi.doubanio.com/packages/e5/12/bfb677aad996cc994efb9c61289a4994d60079587e85155738859fd3b68e/pytest_metadata-1.11.0-py2.py3-none-any.whl (10 kB)
Collecting idna<4,>=2.5
  Downloading https://pypi.doubanio.com/packages/04/a2/d918dcd22354d8958fe113e1a3630137e0fc8b44859ade3063982eacd2a4/idna-3.3-py3-none-any.whl (61 kB)
     |████████████████████████████████| 61 kB 2.0 MB/s
Collecting urllib3<1.27,>=1.21.1
  Downloading https://pypi.doubanio.com/packages/4e/b8/f5a25b22e803f0578e668daa33ba3701bb37858ec80e08a150bd7d2cf1b1/urllib3-1.26.8-py2.py3-none-any.whl (138 kB)
     |████████████████████████████████| 138 kB 6.8 MB/s
Collecting charset-normalizer~=2.0.0
  Downloading https://pypi.doubanio.com/packages/84/3e/1037abe6498e65d645ce7a22d3402605d49a3b2c7f20c3abb027760da4f0/charset_normalizer-2.0.10-py3-none-any.whl (39 kB)
Collecting certifi>=2017.4.17
  Downloading https://pypi.doubanio.com/packages/37/45/946c02767aabb873146011e665728b680884cd8fe70dde973c640e45b775/certifi-2021.10.8-py2.py3-none-any.whl (149 kB)
     |████████████████████████████████| 149 kB 3.2 MB/s
Collecting pyparsing!=3.0.5,>=2.0.2
  Downloading https://pypi.doubanio.com/packages/a0/34/895006117f6fce0b4de045c87e154ee4a20c68ec0a4c9a36d900888fb6bc/pyparsing-3.0.6-py3-none-any.whl (97 kB)
     |████████████████████████████████| 97 kB 1.7 MB/s
Installing collected packages: pyparsing, wcwidth, py, pluggy, packaging, more-itertools, colorama, attrs, atomicwrites, pytest, win32-setctime, urllib3, typing-extensions, typed-ast, toml, regex, pytest-metadata, pathspec, MarkupSafe, idna, click, charset-normalizer, certifi, appdirs, sentry-sdk, requests, pyyaml, pytest-html, pydantic, loguru, jmespath, jinja2, Brotli, black, httprunner
Successfully installed Brotli-1.0.9 MarkupSafe-2.0.1 appdirs-1.4.4 atomicwrites-1.4.0 attrs-21.4.0 black-19.10b0 certifi-2021.10.8 charset-normalizer-2.0.10 click-8.0.3 colorama-0.4.4 httprunner-3.1.6 idna-3.3 jinja2-2.11.3 jmespath-0.9.5 loguru-0.4.1 more-itertools-8.12.0 packaging-21.3 pathspec-0.9.0 pluggy-0.13.1 py-1.11.0 pydantic-1.9.0 pyparsing-3.0.6 pytest-5.4.3 pytest-html-2.1.1 pytest-metadata-1.11.0 pyyaml-5.4.1 regex-2021.11.10 requests-2.27.1 sentry-sdk-0.14.4 toml-0.10.2 typed-ast-1.5.1 typing-extensions-4.0.1 urllib3-1.26.8 wcwidth-0.2.5 win32-setctime-1.0.4
3. View version number
Use the hrun command to view the installed version number of httprunner, or use the command httprunner. The effect is the same
C:\Users\fsy>hrun -V
3.1.6
C:\Users\fsy>httprunner -V
3.1.6
So far, httprunner has been successfully installed. After successful installation, httprunner will automatically generate several important commands. View the commands through - h
C:\Users\fsy>httprunner -h
usage: httprunner [-h] [-V] {run,startproject,har2case,make} ...

One-stop solution for HTTP(S) testing.

positional arguments:
  {run,startproject,har2case,make}
                        sub-command help
    run                 Make HttpRunner testcases and run with pytest.
    startproject        Create a new project with template structure.
    har2case            Convert HAR(HTTP Archive) to YAML/JSON testcases for HttpRunner.
    make                Convert YAML/JSON testcases to pytest cases.

optional arguments:
  -h, --help            show this help message and exit
  -V, --version         show version
You can see that four commands are generated:
- Run: command to run the test case
- startproject: command to create a test template project
- har2case: command to convert files exported by fiddler or charles into py files
- make: convert the test cases of yaml file or json file into pytest test test cases
3, Create project
1. Create a template project with the command startproject, enter the corresponding directory, and execute the command
D:\httprunnerStudy>httprunner startproject httprunner_demo
2022-01-09 13:25:30.189 | INFO     | httprunner.scaffold:create_scaffold:43 - Create new project: httprunner_demo
Project Root Dir: D:\httprunnerStudy\httprunner_demo

created folder: httprunner_demo
created folder: httprunner_demo\har
created folder: httprunner_demo\testcases
created folder: httprunner_demo\reports
created file: httprunner_demo\testcases\demo_testcase_request.yml
created file: httprunner_demo\testcases\demo_testcase_ref.yml
created file: httprunner_demo\debugtalk.py
created file: httprunner_demo\.env
created file: httprunner_demo\.gitignore

$ tree httprunner_demo -a
2022-01-09 13:25:30.205 | WARNING  | httprunner.scaffold:show_tree:29 - tree command not exists, ignore.
Sentry is attempting to send 0 pending error messages
Waiting up to 2 seconds
Press Ctrl-Break to quit
From the log information, you can see that a project has been successfully created. Open the created project through pycahrm and see the project structure as follows

It contains two yml files. These two yml files are official examples. They can be deleted in actual use and one of the yml test cases can be executed
 D:\httprunnerStudy> hrun D:\httprunnerStudy\httprunner_demo\testcases\demo_testcase_ref.yml
2022-01-09 13:31:48.546 | INFO     | httprunner.make:__make:512 - make path: D:\httprunnerStudy\httprunner_demo\testcases\demo_testcase_ref.yml
2022-01-09 13:31:48.556 | INFO     | httprunner.compat:ensure_testcase_v3:219 - ensure compatibility with testcase format v2
2022-01-09 13:31:48.561 | INFO     | httprunner.loader:load_dot_env_file:127 - Loading environment variables from D:\httprunnerStudy\httprunner_demo\.env
2022-01-09 13:31:48.566 | DEBUG    | httprunner.utils:set_os_environ:33 - Set OS environment variable: USERNAME
2022-01-09 13:31:48.566 | DEBUG    | httprunner.utils:set_os_environ:33 - Set OS environment variable: PASSWORD
2022-01-09 13:31:48.566 | INFO     | httprunner.make:make_testcase:349 - start to make testcase: D:\httprunnerStudy\httprunner_demo\testcases\demo_testcase_ref.yml
2022-01-09 13:31:48.586 | INFO     | httprunner.compat:ensure_testcase_v3:219 - ensure compatibility with testcase format v2
2022-01-09 13:31:48.586 | INFO     | httprunner.make:make_testcase:349 - start to make testcase: D:\httprunnerStudy\httprunner_demo\testcases\demo_testcase_request.yml
2022-01-09 13:31:48.586 | INFO     | httprunner.make:make_testcase:442 - generated testcase: D:\httprunnerStudy\httprunner_demo\testcases\demo_testcase_request_test.py
2022-01-09 13:31:48.596 | INFO     | httprunner.make:make_testcase:442 - generated testcase: D:\httprunnerStudy\httprunner_demo\testcases\demo_testcas2022-01-09 13:31:48.596 | INFO     | httprunner.make:format_pytest_with_black:170 - format pytest cases with black ...
reformatted D:\httprunnerStudy\httprunner_demo\testcases\demo_testcase_ref_test.py
reformatted D:\httprunnerStudy\httprunner_demo\testcases\demo_testcase_request_test.py
All done! ✨ 🍰 ✨
2 files reformatted.
2022-01-09 13:31:50.116 | INFO     | httprunner.cli:main_run:56 - start to run tests with pytest. HttpRunner version: 3.1.6
================================================================ test session starts ================================================================
platform win32 -- Python 3.8.10, pytest-5.4.3, py-1.11.0, pluggy-0.13.1
rootdir: D:\httprunnerStudy
plugins: html-2.1.1, metadata-1.11.0
collected 1 item

httprunner_demo\testcases\demo_testcase_ref_test.py .                                                                                          [100%]

================================================================= 1 passed in 2.46s =================================================================
From the log, you can see that the use case is successfully executed. If you want to execute two use cases together, execute the command hrun run testcases. You can see that the execution has been successful as follows
D:\httprunnerStudy\httprunner_demo> httprunner run testcases
2022-01-09 13:36:28.756 | INFO     | httprunner.make:__make:512 - make path: D:\httprunnerStudy\httprunner_demo\testcases
2022-01-09 13:36:28.772 | INFO     | httprunner.compat:ensure_testcase_v3:219 - ensure compatibility with testcase format v2
2022-01-09 13:36:28.772 | INFO     | httprunner.loader:load_dot_env_file:127 - Loading environment variables from D:\httprunnerStudy\httprunner_demo\.env
2022-01-09 13:36:28.772 | DEBUG    | httprunner.utils:set_os_environ:33 - Set OS environment variable: USERNAME
2022-01-09 13:36:28.772 | DEBUG    | httprunner.utils:set_os_environ:33 - Set OS environment variable: PASSWORD
2022-01-09 13:36:28.772 | INFO     | httprunner.make:make_testcase:349 - start to make testcase: D:\httprunnerStudy\httprunner_demo\testcases\demo_testcase_ref.yml
2022-01-09 13:36:28.788 | INFO     | httprunner.compat:ensure_testcase_v3:219 - ensure compatibility with testcase format v2
2022-01-09 13:36:28.788 | INFO     | httprunner.make:make_testcase:349 - start to make testcase: D:\httprunnerStudy\httprunner_demo\testcases\demo_testcase_request.yml
2022-01-09 13:36:28.788 | INFO     | httprunner.make:make_testcase:442 - generated testcase: D:\httprunnerStudy\httprunner_demo\testcases\demo_testcase_request_test.py
2022-01-09 13:36:28.803 | INFO     | httprunner.make:make_testcase:442 - generated testcase: D:\httprunnerStudy\httprunner_demo\testcases\demo_testcase_ref_test.py
2022-01-09 13:36:28.803 | INFO     | httprunner.compat:ensure_testcase_v3:219 - ensure compatibility with testcase format v2
2022-01-09 13:36:28.803 | INFO     | httprunner.make:make_testcase:349 - start to make testcase: D:\httprunnerStudy\httprunner_demo\testcases\demo_testcase_request.yml
2022-01-09 13:36:28.819 | INFO     | httprunner.make:format_pytest_with_black:170 - format pytest cases with black ...
reformatted D:\httprunnerStudy\httprunner_demo\testcases\demo_testcase_ref_test.py
reformatted D:\httprunnerStudy\httprunner_demo\testcases\demo_testcase_request_test.py
All done! ✨ 🍰 ✨
2 files reformatted.
2022-01-09 13:36:30.000 | INFO     | httprunner.cli:main_run:56 - start to run tests with pytest. HttpRunner version: 3.1.6
================================================================ test session starts ================================================================
platform win32 -- Python 3.8.10, pytest-5.4.3, py-1.11.0, pluggy-0.13.1
rootdir: D:\httprunnerStudy\httprunner_demo
plugins: html-2.1.1, metadata-1.11.0
collected 2 items

testcases\demo_testcase_request_test.py .                                                                                                      [ 50%]
testcases\demo_testcase_ref_test.py .                                                                                                          [100%]

================================================================= 2 passed in 4.00s =================================================================
The project root directory here is different from the above. If the directory is the same as the above, you need to add httprunnerStudy in front of the testcases directory, otherwise the test cases cannot be found during execution
4, Test case
In the httprunner project structure, test cases are written directly under the testcases package. Whether a single request or multiple dependent requests are written in the yml file under the package. A yml file represents a test case
1. Properties of test cases
In the yml file, that is, our test case, there must be two class attributes, namely config and teststeps. Config contains the following attributes
| Attribute name | Required | effect |
|---|---|---|
| name | Required | Specify the test case name, which will be displayed in the execution log and test report |
| base_url | Optional filling | If base_ If the url is specified, the url in teststep can be set as a relative path |
| verify | Optional filling | Whether to verify the certificate when https requests. The default value is true. If it is set to False, it means that the certificate is ignored |
| variables | Optional filling | Specify the public variable of the test case, which can be referenced by each test step |
| export | Optional filling | The exported test case session variables expose the variables and set them as global variables |
teststeps contains the following properties
| Attribute name | Required | effect |
|---|---|---|
| name | Required | Specifies the name of the test step |
| request | Required | Send the requested parameter, which refers to the variable "$variable name" |
| variables | Optional filling | Specify the test step variable, and the parameter refers to the variable "$variable name" |
| extract | Optional filling | Extract returned results |
| export | Optional filling | Export test case variables and set them as global variables |
| validate | Optional filling | Verification return result |
2. Practical application
Take the login interface as an example: login address: http://49.235.92.12:8201/api/v1/login , user name: test, password: 123456
- Create a new login under the testcases package YML file
- Fill in the following information in the yml file
config:
  name: Login use case
teststeps:
  - name: Sign in
    request:
      url: http://49.235.92.12:8201/api/v1/login
      method: POST  # POST must be capitalized, which is the Convention
      json:
        username: test
        password: "123456"  # 123456 if you don't use quotation marks, it means int type, but what you actually need is str type
    validate:
      - eq: [status_code,200]
      - eq: [body.msg,login success!]
- Execute the command in pycharm's terminal console: Hrun testcases / login YML, see the console information:
 D:\httprunnerStudy\httprunner_demo> hrun testcases/login.yml
2022-01-09 16:16:58.932 | INFO     | httprunner.make:__make:512 - make path: D:\httprunnerStudy\httprunner_demo\testcases\login.yml
2022-01-09 16:16:58.937 | INFO     | httprunner.compat:ensure_testcase_v3:219 - ensure compatibility with testcase format v2
2022-01-09 16:16:58.939 | INFO     | httprunner.loader:load_dot_env_file:127 - Loading environment variables from D:\httprunnerStudy\httprunner_demo\.env
2022-01-09 16:16:58.941 | DEBUG    | httprunner.utils:set_os_environ:33 - Set OS environment variable: USERNAME
2022-01-09 16:16:58.942 | DEBUG    | httprunner.utils:set_os_environ:33 - Set OS environment variable: PASSWORD
2022-01-09 16:16:58.945 | INFO     | httprunner.make:make_testcase:349 - start to make testcase: D:\httprunnerStudy\httprunner_demo\testcases\login.yml
2022-01-09 16:16:58.948 | INFO     | httprunner.make:make_testcase:442 - generated testcase: D:\httprunnerStudy\httprunner_demo\testcases\login_test.p
================================================================= 1 passed in 0.52s =================================================================
The above log indicates that the interface was executed successfully
3. Request request
The most commonly used methods of request in python are post and get. In the post request, if the request header is in the format of content type: application / json, the post request parameters are transferred to json. If the request header is application / x-www-from-urlencoded, the post request parameters are transferred to data. For details, please refer to the request request library
4,base_url
- Why is there a base_uel? Because in our test, there will be multiple sets of test environments. In each set of environment, except for the address of the server, everything else is the same. The address of the server is our base_url, so you need to extract the server address and manage it separately. In this way, when the test environment is switched, you only need to modify the base_ The value of the URL. The interface refers to the base_ All the places in the URL have been changed
- base_ Where is the URL written in the yml file? In fact, in the yml file, base_ The URL should be written under the config attribute and belong to the same level as the name, for example:
config:
  name: Get goods
  base_url: http://49.235.92.12:8201
teststeps:
  - name: goods
    request:
      url: /api/v1/goods
      method: GET
      params:
        page: 1
        size: 2
    validate:
      - eq: [status_code,200]
      - eq: [body.code,0]
- Base is written in config_ After the url, the url in teststeps only needs to write the path address of the interface, and httprunner will write the base_url and url are spliced together and sent as a complete address
- If in base_ After the url is configured, does the absolute path of the url writing interface in the test step report an error? The answer is no, because when requesting, HTTP runner will follow the proximity principle to get the url address. If the address in the test step is the correct address, HTTP runner will directly request
5. Declaration and application of variables
There are variables in the two attributes in the yml file. The variables in config are valid for the whole yml file, while the variables in teststeps are only valid for the current step. It can be understood that one is a global variable and the other is a local variable. The priority is that the local variable is greater than the global variable
6. validate verification
In httprunner's validate, three parameters can be passed inside the list. The first parameter is jmespath expression, that is, the actual result, the second parameter is the expected result, and the third parameter is message, indicating the cause of the assertion error. The first parameter and the second parameter are required, and the third parameter can not be passed

After httprunner sends a request, it will return four objects, namely:
- status_code: status code
- headers: header information
- cookies: cookie information
- Body: returned body content
If you want to verify the returned header information, you can use headers XXX, etc. if you want to verify the content of the returned response body, use body XXX, such as body msg
7. Parameter association
What is parameter association? The parameters returned from the previous interface need to be used in the next interface, which is parameter association, and the parameters change dynamically. Parameter association involves two points. One is to extract variables and use extract, but to reference variables. The reference variables are the same as other reference methods, and the $variable name.
Click to view the codeconfig:
name: Login use case
base_url: http://49.235.92.12:8201
variables:
user: test
teststeps:
- name: Sign in
request:
url: /api/v1/login
method: POST # POST must be capitalized
json:
username: $user
password: "123456" # 123456 if you don't use quotation marks, it means int type, but what you actually need is str type
extract:
token: body.token
validate:
- eq: [status_code,200]
- eq: [body.msg,login success!]
- name: Get user information
request:
url: /api/v1/userinfo
method: POST
headers:
Authorization: Token $token
json:
name: $user
sex: M
age: 18
mail: 592485@qq.com
validate:
- eq: [status_code,200]
- eq: [body.code,0]
The above code association is in a yml file, and a yml file corresponds to a use case. How to deal with the association in different yml files? Just export the associated values, add export under the config attribute, and set the exported variables

Specific measures: there are two yml files, one is login yml, the other is userinfo yml, it is obvious that a file needs to rely on the token returned by login, which needs to be in login The above information is written in the config of the yml file in userinfo There are two test steps in teststeps in the yml file. The first test step is login, and login is in another file, so you need to refer to login in the first step yml, one yml file references another yml file, uses the keyword testcase, and then the second step is userinfo
login.yml Code:
config:
  name: Login use case
  base_url: http://49.235.92.12:8201
  variables:
    user: test
  export:
    - token
teststeps:
  - name: Sign in
    request:
      url: /api/v1/login
      method: POST  # POST must be capitalized
      json:
        username: $user
        password: "123456"  # 123456 if you don't use quotation marks, it means int type, but what you actually need is str type
    extract:
      token: body.token
    validate:
      - eq: [status_code,200]
      - eq: [body.msg,login success!]
config:
  name: Get goods
  base_url: http://49.235.92.12:8201
teststeps:
  - name: Step 1: Login
    testcase: testcases/login.yml
  - name: Get user information
    request:
      url: /api/v1/userinfo
      method: POST
      headers:
        Authorization: Token $token
      json:
        name: test
        sex: M
        age: 18
        mail: 592485@qq.com
    validate:
    - eq: [status_code,200]
    - eq: [body.code,0]
8. Environmental variables
In the root directory of the project, there is a env file, which is the environment variable for storing the project. In this file, the storage form of variables is k=v, generally the account number, password, environment address, etc
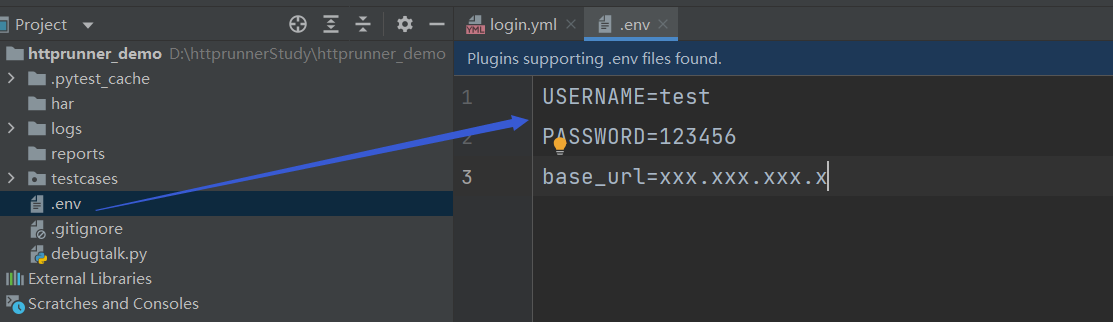
So how to change environment variables? Just reference the environment variable ${env (variable name)} in the yml file
9. Parameterization
In the httprunner3 version, parameterization is implemented in config. There are three ways to implement parameterization
Method 1: (applicable to the case of relatively small amount of data)
Add the keyword parameters under the config attribute to realize parameterization, and then specify the user variable. The specific variable is written in []
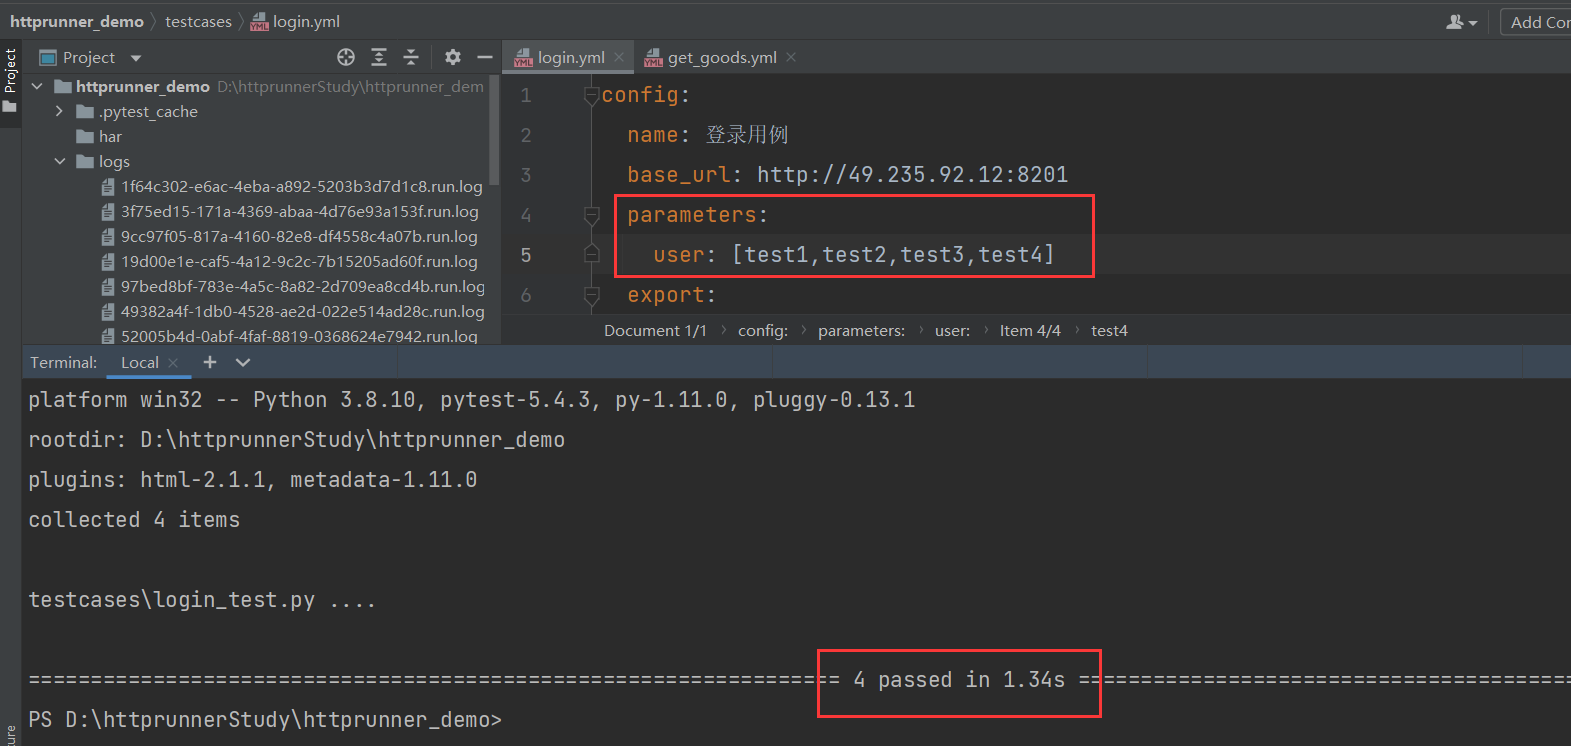
This is a single variable parameterization. If multiple parameters are parameterized, such as account and password, what should be done? In fact, multiple parameterizations also use the parameters keyword. Variable names are linked by - and all combinations of parameters can be displayed in the list. One line represents one situation
parameters:
  user-password:
    - [test1,"123456"]
    - [test2,"123456"]
    - [test3,"123456"]
    - [test4,"123456"]
It can also be expressed in the following form, Cartesian product form
parameters:
  user: [test1,test2,test3,test4]
  password: ["13578","246810","123456","456789"]
Mode 2: (applicable to the case of large amount of data)
Reference the CSV file for parameterization. Create a new directory data under the project root directory and a CSV file under the data directory. Store the required parameterized data in the CSV file. The parameterized data of the CSV file is separated by commas, and the parameter name is written in the first line of CSV
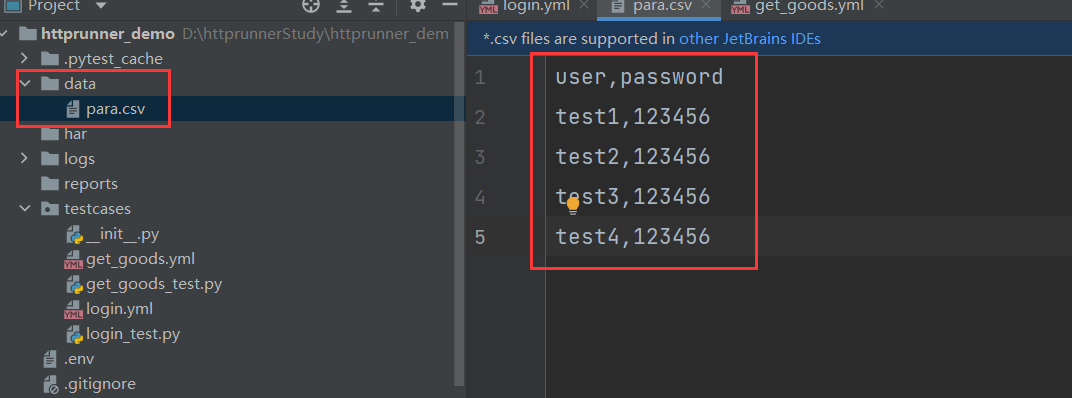
How to reference the csv file? Just write the path of the csv file with the P function under the paramaters keyword. The path must be found from the root directory of the project
parameters:
  user-password:${P(data/para.csv)}
Mode 3: (applicable to more flexible parameters)
This method is debugtalk. In the root directory of the project The python function is written in the python file. The implementation of a single parameter:
def get_user():
    return ["test1", "test2", "test3", "test4"]
How to quote? Just write ${get_user()} after user under the parameters keyword
In the case of multiple parameters, the python script is:
def get_user_pwd(m):
    account = []
    for i in range(1, m):
        account.append({"user": "test%s" % i, "pwd": 123456})
    return account
The reference form is:
parameters:
  user-password:${get_user_pwd(9)}
In debugtalk When there are more than two parameterizations in py, the return value needs to be in the form of a dictionary, with the variable name as the key and the variable value as the value
10. hook mechanism
hook mechanism is to execute the pre and post steps of use cases. In pytest, it is generally represented by setup and teardown. In httprunner, the pre and post functions need to be written in debugtalk Py, and then use the keyword setup in the test step teststeps_ Hooks and teardown_hooks to reference

11. File upload
File upload is implemented by using the keyword upload in httprunner. There are several parameters under upload, which are processed according to the actual situation. There are only two here. The code is as follows:
config:
  name: File upload
  base_url: http://49.235.92.12:8201
teststeps:
  - name: Upload file
    request:
      url: /api/v1/upfile/
      method: POST
      upload:
        file: data/QQ20220109214618.png
        title: faith
But I reported an error when running

Execute the command as prompted: PIP3 install requests_ Toolkit filetype, and then run the use case again. The execution is successful
5, Database link
1. Database link
The driver is required to link the database. First, install the driver and execute the command on the cmd command line: pip3 install PyMySQL. The latest version is installed by default
C:\Users\fsy>pip3 install PyMySQL
Collecting PyMySQL
  Downloading PyMySQL-1.0.2-py3-none-any.whl (43 kB)
     |████████████████████████████████| 43 kB 28 kB/s
Installing collected packages: PyMySQL
Successfully installed PyMySQL-1.0.2
After successful installation, create a new directory utils under the root directory of the project and a new python file to link the database
import pymysql

class MysqlHelper:
    # Initialize database information
    def __init__(self, host, username, password, db, charset='utf8', port=3306):
        self.host = host
        self.username = username
        self.password = password
        self.db = db
        self.charset = charset
        self.port = port

    # Database connection
    def connect(self):
        self.conn = pymysql.connect(host=self.host, port=self.port, user=self.username, password=self.password,
                                    db=self.db, charset=self.charset, cursorclass=pymysql.cursors.DictCursor)
        self.cursor = self.conn.cursor()

    # Query a single piece of data
    def get_one(self, sql, params=()):
        result = None
        try:
            self.connect()
            self.cursor.execute(sql, params)
            result = self.cursor.fetchone()
            self.close()
        except Exception as e:
            print(e)
        return result

    # Query multiple data
    def get_all(self, sql, params=()):
        list_data = ()
        try:
            self.connect()
            self.cursor.execute(sql, params)
            list_data = self.cursor.fetchall()
            self.close()
        except Exception as e:
            print(e)
        return list_data

    def execute(self, sql, params=()):
        # SQL delete, submit and modify statements
        try:
            self.cursor.execute(sql, params)  # Execute SQL statement
            self.db.commit()  # Submit modification
        except Exception as e:
            # Rollback on error
            print(e)
            self.db.rollback()

    # Close connection
    def close(self):
        self.cursor.close()
        self.conn.close()
2. Database verification results
In debugtalk Py file, call the database to query. After the data is queried, take out the field to be verified, and then return it. Finally, refer to the modified function to judge when verifying the field
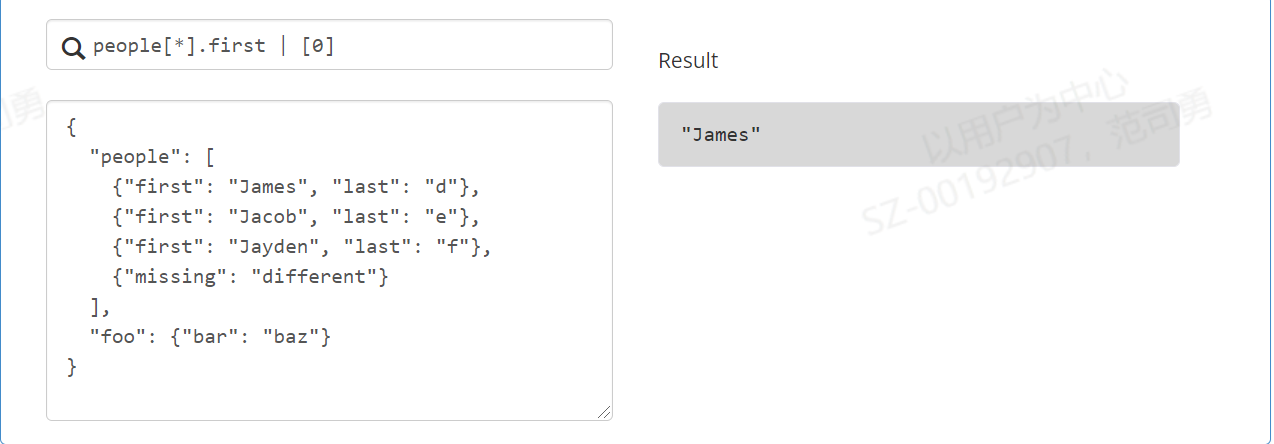
6, jmespath
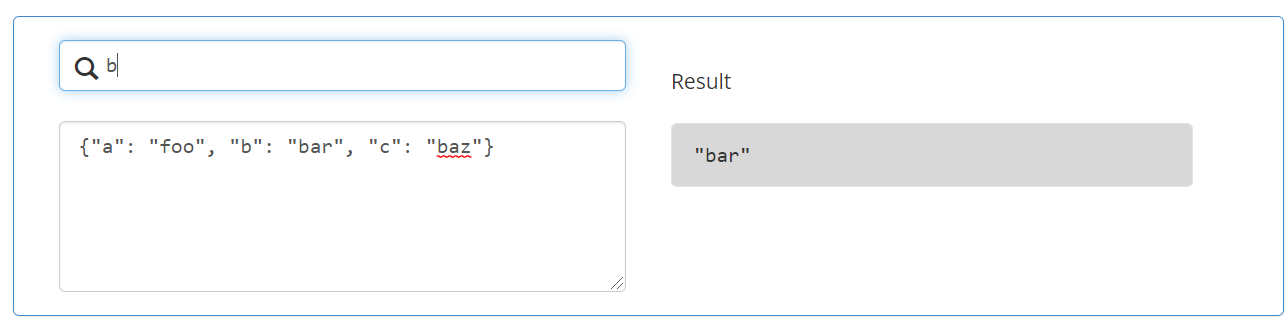
jmespath is used to extract the value of json expression. Official website address: https://jmespath.org/tutorial.html
It can be divided into the following situations:
-
The simplest json format, such as ` {"a": "foo", "b": "bar", "c": "baz"}, can be obtained by directly entering the key value
-
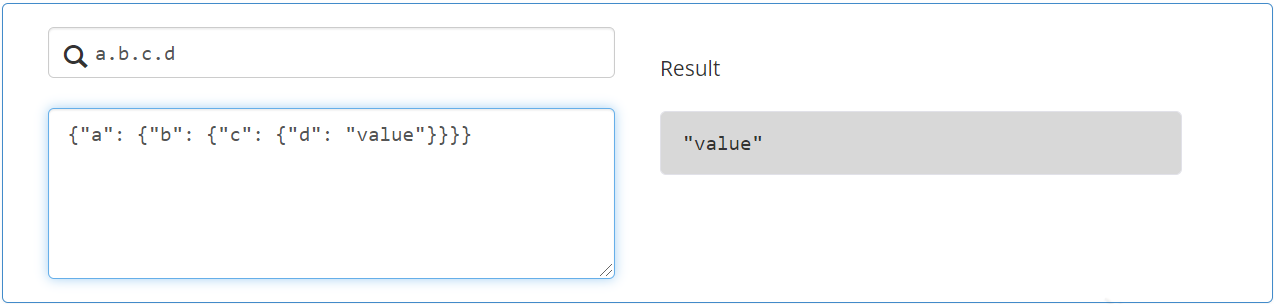
json nested values, such as {"a": {"b": {"c": {"d": "value"}}, can be obtained according to the python dictionary
-
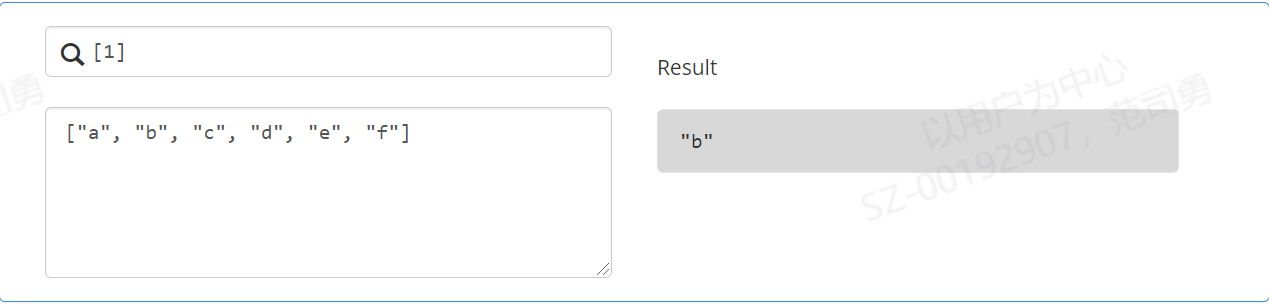
List values, such as ["a", "b", "c", "d", "e", "f"], can be obtained according to the python list
-
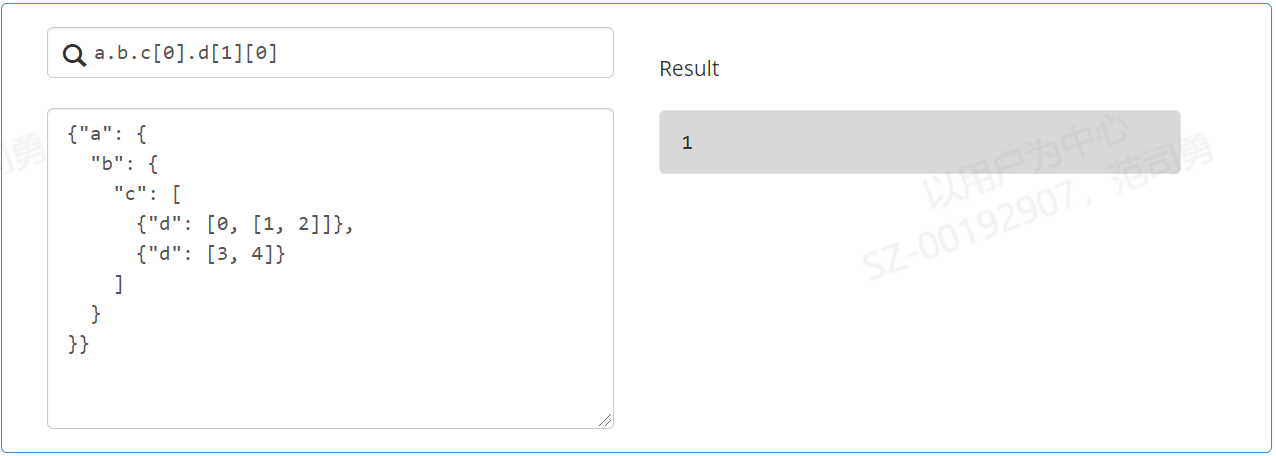
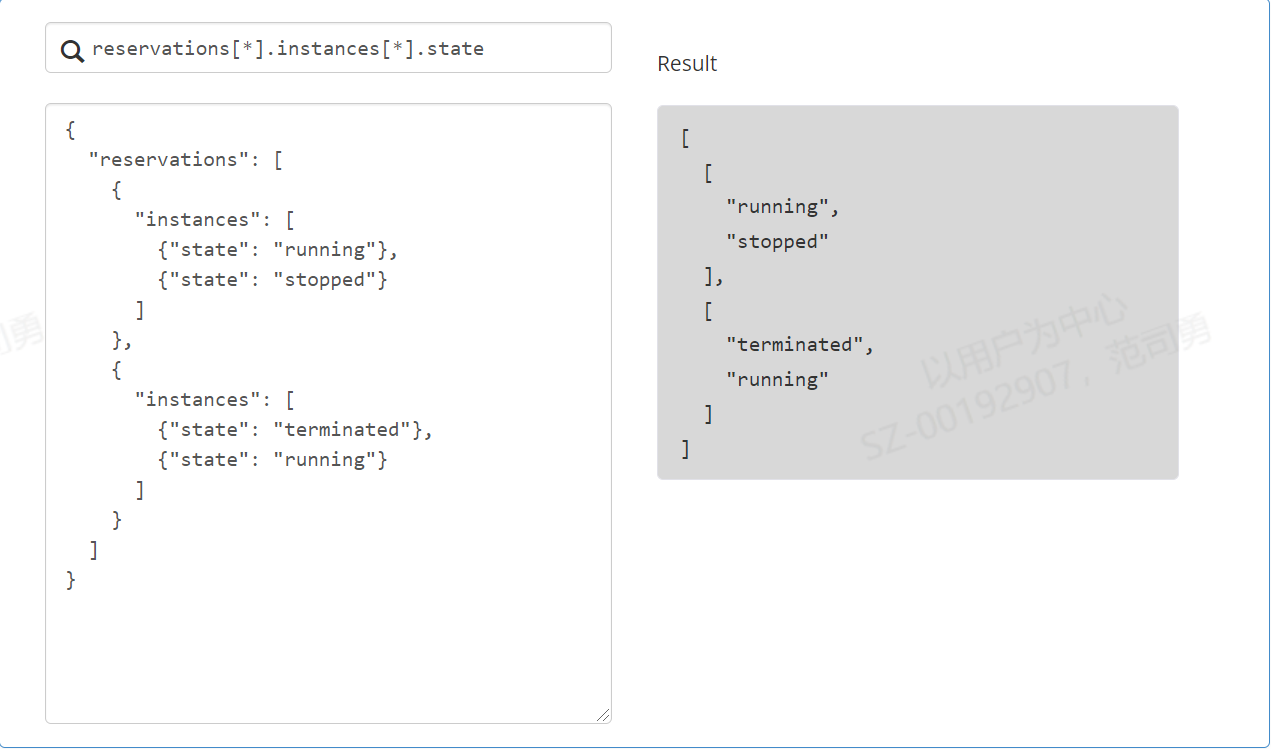
When dictionary and list are nested, dictionary and list values are combined
-
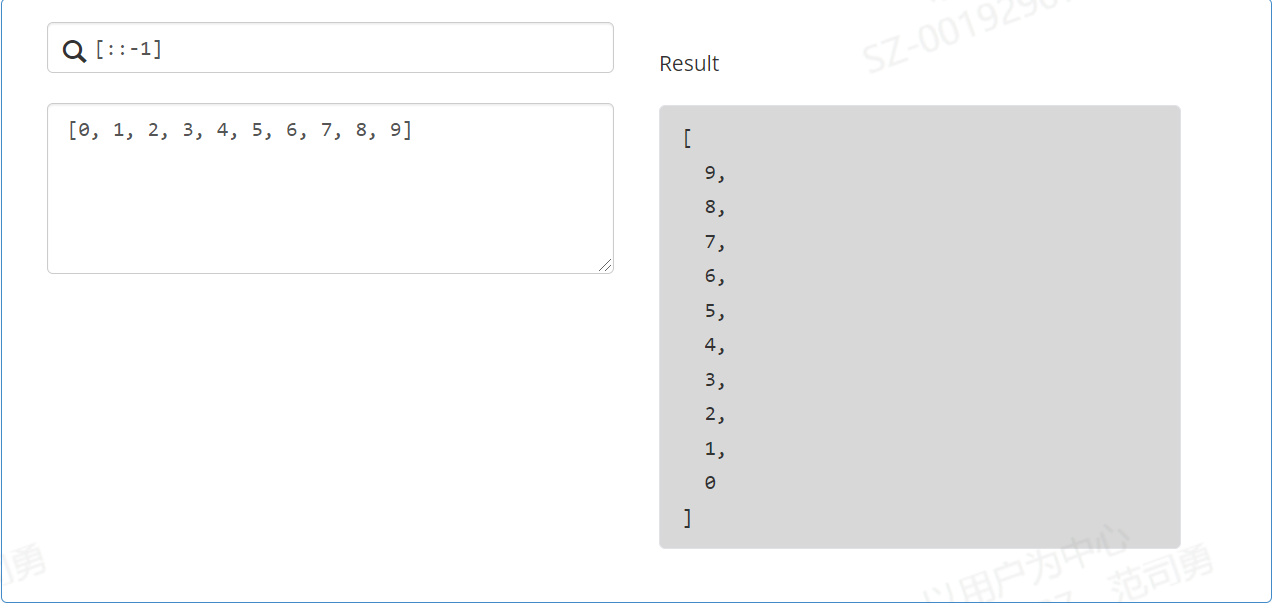
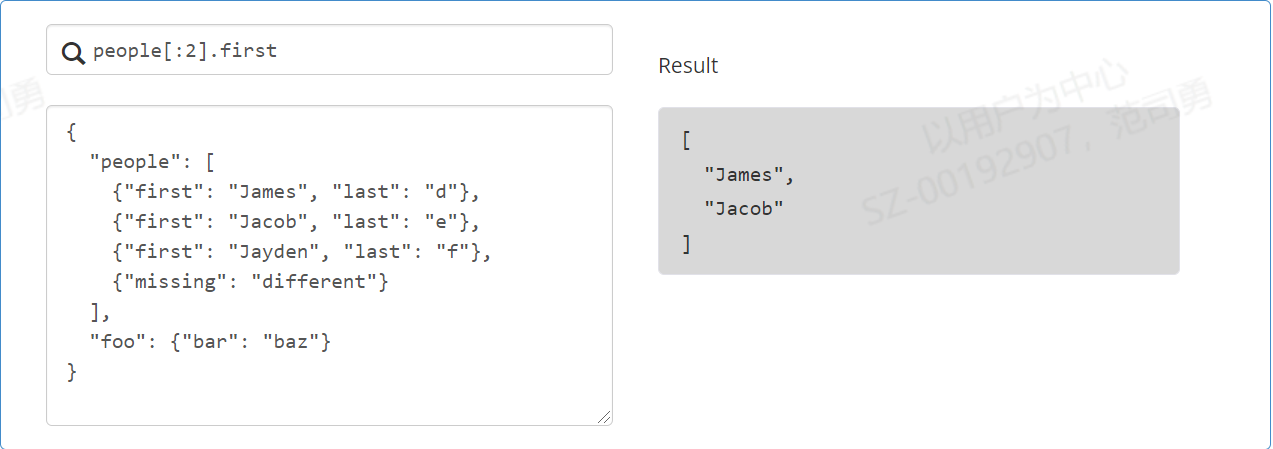
The slice value is the same as that in python
-
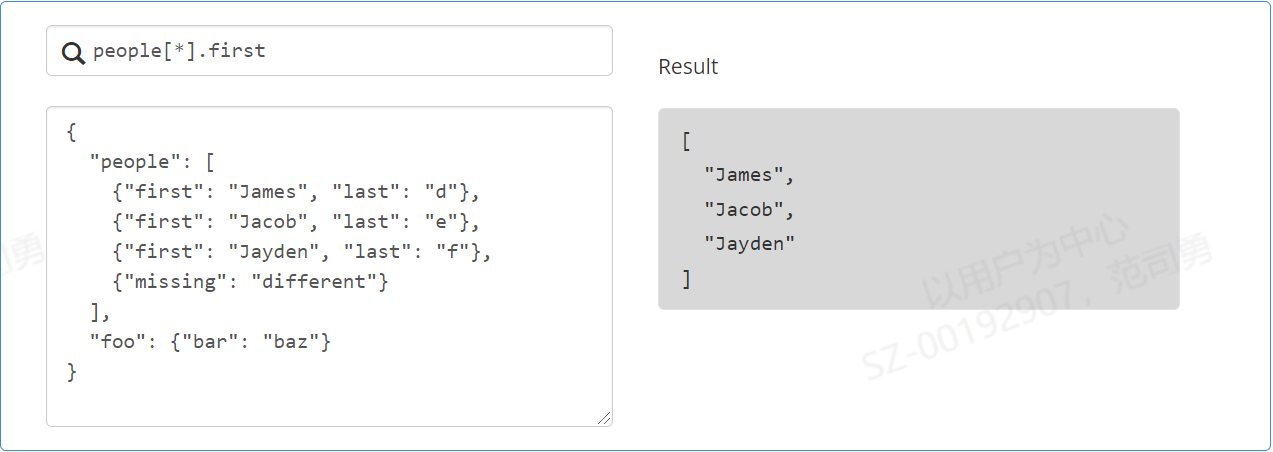
Value with *
-
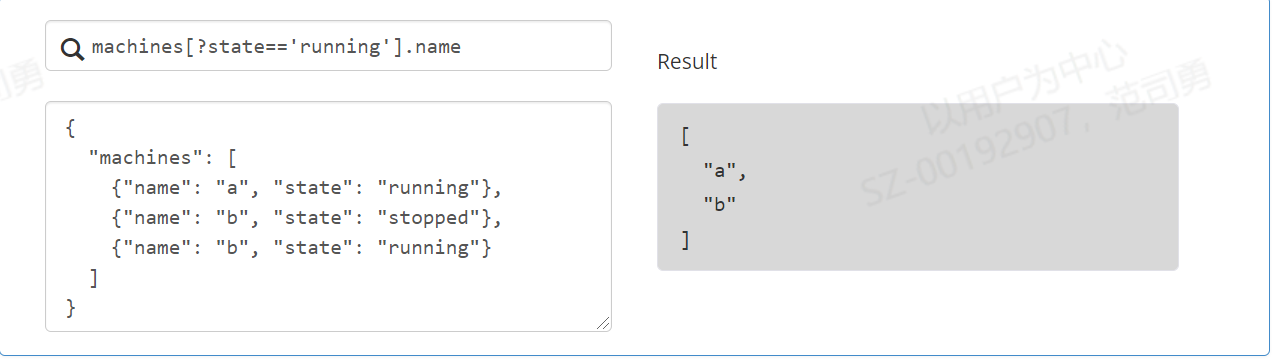
Value by condition
-
|Pipe character filter value
7, Write pytest case
1. Why write pytest cases
Because pytest is used at the bottom of httprunner, httprunner supports use cases written by pytest. The following conditions must be met for writing pytest use cases:
- The file name must begin with test_ Py file or_ test.py file
- The test case function must start with test_ start
- Class starts with Test and cannot have__ init__ method
- All packages must have__ init__.py file
2. Properties of pytest case
A pytest use case is a python class. There are two attributes in this class, namely config and teststeps. It just converts the use cases in the yml file into a python language, mainly some methods in teststeps
RunRequest test steps: RunRequest is generally used when sending a request. It contains function information, request method, request header, request data, assertion information, etc., as follows
| Attribute name | Required | effect |
|---|---|---|
| name | Required | Specifies the name of the test step |
| method(url) | Required | If base is set in config_ URL. Only relative paths can be set in the method |
| with_params | Optional filling | The corresponding params parameter is generally used when using the get method |
| with_headers | Optional filling | Corresponding headers parameter |
| with_cookies | Optional filling | Cookie parameters |
| with_data | Optional filling | Corresponding to data parameter |
| with_json | Optional filling | Corresponding json parameters |
| with_variables | Optional filling | The variables in the test steps are independent. The variable reference form is: $variable name. If it is a function reference, it is ${function name ()} |
| with_jmespath | Optional filling | Extract the variable value, save it and use it for the next interface. Use it in combination with extract, first extract, then with_jmespath |
| validate | Optional filling | The verification result is used in combination with the assert function, first with validate and then with the assert function |
RunTestCase: RunTestCase is generally used as a test case. When it needs to rely on another case, RunTestCase has the following parameters
| parameter | effect |
|---|---|
| name | Specify the test step name, which will be displayed in the execution log and test report |
| with_variables | Define variables |
| call | The referenced test case class needs to be imported in advance |
| export | The name of the session variable exported from the referenced test case. The exported variable is convenient for reference in subsequent test steps |
8, Test report
1. pytest comes with its own test report
Because the bottom layer of httprunner uses the pytest test test framework, and the pytest test framework comes with test reports, httprunner can also execute the test reports of pytest and execute the command: pytest testcases -- HTML =/ reports/result. html --self-contained-html
2. allure plug-in installation
The allure test report is a plug-in developed in java. It requires a java environment. First, follow the allure pytest plug-in
Click to view the codeC:\Users\siyong.fan>pip install allure-pytest -i https://pypi.douban.com/simple Looking in indexes: https://pypi.douban.com/simple Requirement already satisfied: allure-pytest in c:\users\siyong.fan\appdata\local\programs\python\python38\lib\site-packages (2.9.43) Requirement already satisfied: six>=1.9.0 in c:\users\siyong.fan\appdata\local\programs\python\python38\lib\site-packages (from allure-pytest) (1.16.0) Requirement already satisfied: allure-python-commons==2.9.43 in c:\users\siyong.fan\appdata\local\programs\python\python38\lib\site-packages (from allure-pytest) (2.9.43) Requirement already satisfied: pytest>=4.5.0 in c:\users\siyong.fan\appdata\local\programs\python\python38\lib\site-packages (from allure-pytest) (5.4.3) Requirement already satisfied: pluggy>=0.4.0 in c:\users\siyong.fan\appdata\local\programs\python\python38\lib\site-packages (from allure-python-commons==2.9.43->allure-pytest) (0.13.1) Requirement already satisfied: attrs>=16.0.0 in c:\users\siyong.fan\appdata\local\programs\python\python38\lib\site-packages (from allure-python-commons==2.9.43->allure-pytest) (21.2.0) Requirement already satisfied: colorama in c:\users\siyong.fan\appdata\local\programs\python\python38\lib\site-packages (from pytest>=4.5.0->allure-pytest) (0.4.4) Requirement already satisfied: py>=1.5.0 in c:\users\siyong.fan\appdata\local\programs\python\python38\lib\site-packages (from pytest>=4.5.0->allure-pytest) (1.10.0) Requirement already satisfied: more-itertools>=4.0.0 in c:\users\siyong.fan\appdata\local\programs\python\python38\lib\site-packages (from pytest>=4.5.0->allure-pytest) (8.12.0) Requirement already satisfied: packaging in c:\users\siyong.fan\appdata\local\programs\python\python38\lib\site-packages (from pytest>=4.5.0->allure-pytest) (21.0) Requirement already satisfied: atomicwrites>=1.0 in c:\users\siyong.fan\appdata\local\programs\python\python38\lib\site-packages (from pytest>=4.5.0->allure-pytest) (1.4.0) Requirement already satisfied: wcwidth in c:\users\siyong.fan\appdata\local\programs\python\python38\lib\site-packages (from pytest>=4.5.0->allure-pytest) (0.2.5) Requirement already satisfied: pyparsing>=2.0.2 in c:\users\siyong.fan\appdata\local\programs\python\python38\lib\site-packages (from packaging->pytest>=4.5.0->allure-pytest) (2.4.7)
It has been successfully installed here
When running the use case, if an error is reported because pytest allure adapter and allure pytest cannot coexist, download it: PIP uninstall pytest allure adapter, and then install the allure command-line tool:
-
Download the allure commandline installation package, github official website: https://github.com/allure-framework/allure2/releases/tag/2.17.2
-
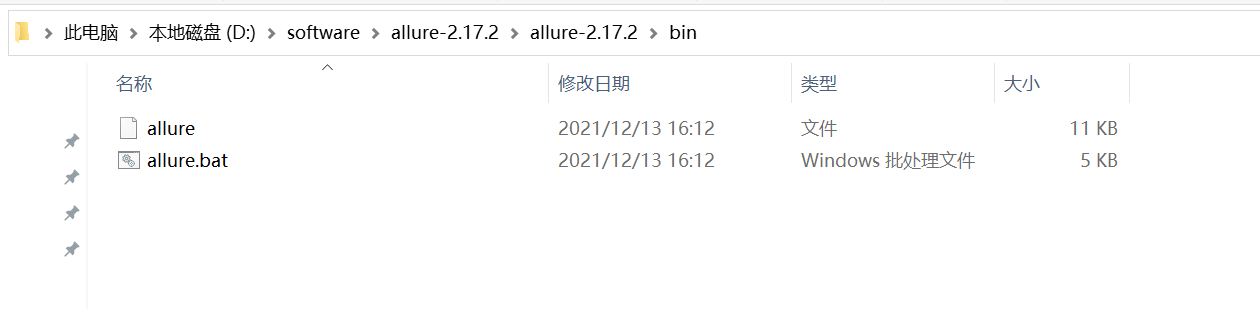
Unzip the downloaded files and enter the bin directory. One is the linux startup file and the other is the windows startup file
-
Add the bin directory where allure is located to the environment variable. Note that you only need to go to the bin directory. After adding, enter allure --version in the newly opened cmd. You can see that the displayed version indicates that allure has been successfully installed
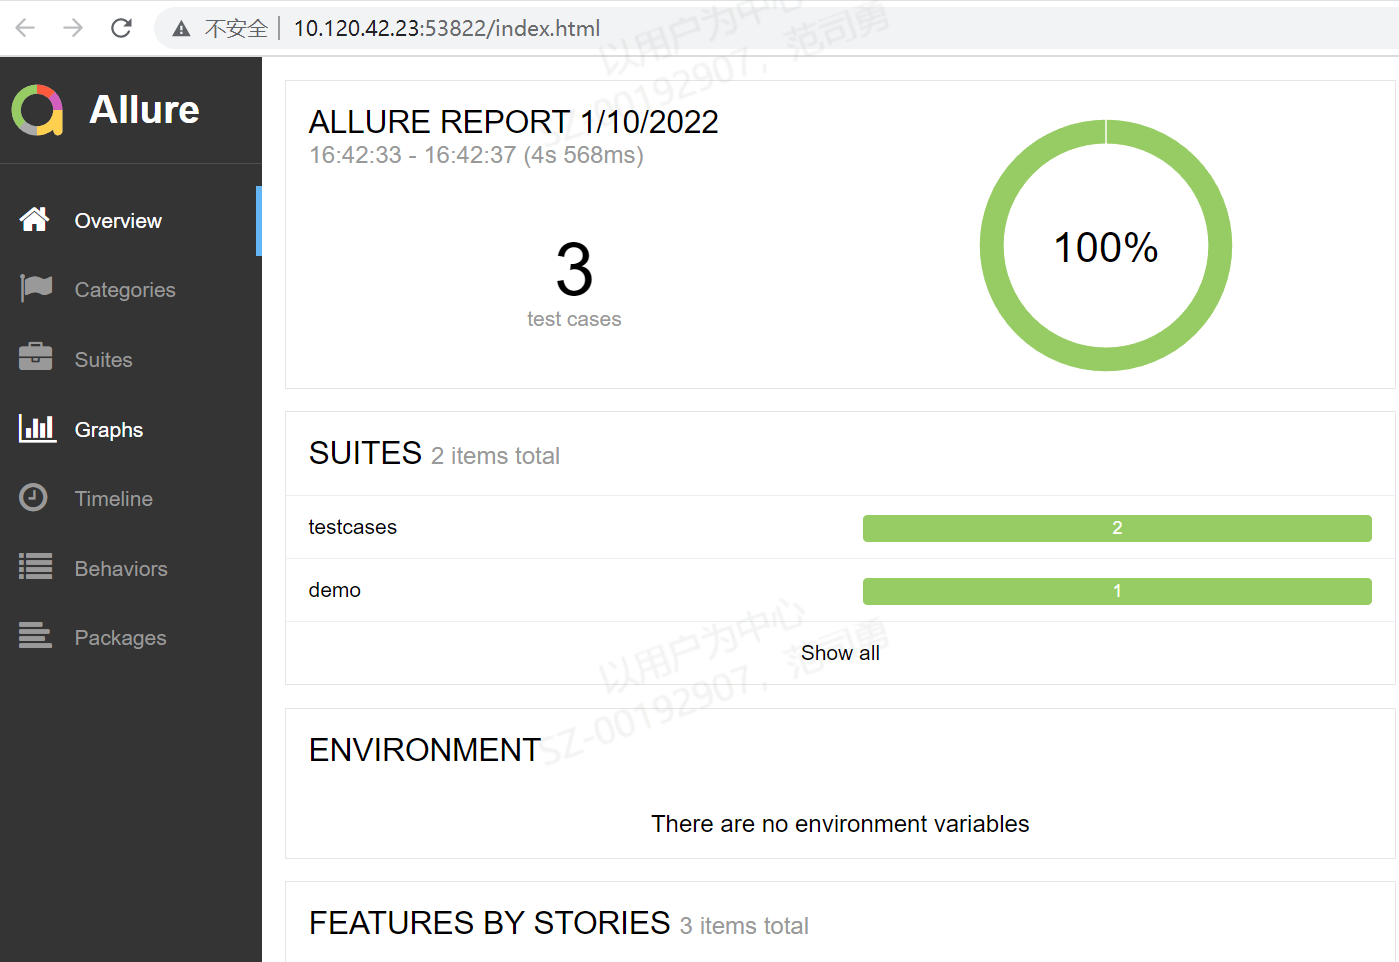
3. Generate allure test report
- allure generates test reports in two steps: running use cases and generating reports. There are two ways to run use cases
- hrun testcases --alluredir ./allure_report
- Pytest test case file -- allouredir/ reports/allure_report, the test case file can be written to a specific file or not. If it is not written, allure will automatically find the use case that conforms to the pytest use case style in the current directory, and execute the command in allure_ A json file is generated in the report directory. The json file is the result of report execution
- Convert json files into html reports
Execute: allure serve on the command line/ reports/allure_ Report generates an html report
8, Continuous integration
1. Installing Python 3.0 on a linux server Version 9, install related dependencies first
yum -y install zlib-devel bzip2-devel openssl-devel ncurses-devel sqlite-devel readline-devel tk-devel gdbm-devel db4-devel libpcap-devel xz-devel mysql-devel
2. Download the python package required for linux at: https://www.python.org/ftp/python/3.9.0/Python-3.9.0.tgz
3. Create a new directory in linux to store the downloaded Python installation package. Use the command: mkdir python39, enter the python39 directory, and use the wget command to download the 3.9.0 Python package
Click to view the code[edenapp@eden-dev-test ~]$ cd python39/ [edenapp@eden-dev-test python39]$ wget https://www.python.org/ftp/python/3.9.0/Python-3.9.0.tgz --2022-01-10 17:03:28-- https://www.python.org/ftp/python/3.9.0/Python-3.9.0.tgz Resolving www.python.org (www.python.org)... 151.101.72.223, 2a04:4e42:11::223 Connecting to www.python.org (www.python.org)|151.101.72.223|:443... connected. HTTP request sent, awaiting response... 200 OK Length: 26724009 (25M) [application/octet-stream] Saving to: 'Python-3.9.0.tgz' 100%[=========================================================================================================================================================================>] 26,724,009 13.2MB/s in 1.9s 2022-01-10 17:03:31 (13.2 MB/s) - 'Python-3.9.0.tgz' saved [26724009/26724009]
4. Unzip the downloaded python package
Decompression command: tar -xvf python-3.9.0 tgz
5. Specify installation directory
Execute command:/ configure --prefix=/usr/local/python39. If an error is reported when executing the command: configure: error: no acceptable C compiler found in $PATH, execute sudo yum install gcc-c + + first, and then execute the previous command to install successfully
6. Compile
Enter sudo make in the current directory, and then execute sudo make install
7. Add a soft connection and check the installed version. The directory of the soft connection must be the directory specified before
[edenapp@eden-dev-test bin]$ sudo ln -s  /usr/local/python39/bin/python3.9 /usr/bin/python3
 [edenapp@eden-dev-test bin]$ python3
Python 3.9.0 (default, Jan 10 2022, 17:26:42)
[GCC 4.8.5 20150623 (Red Hat 4.8.5-44)] on linux
Type "help", "copyright", "credits" or "license" for more information.
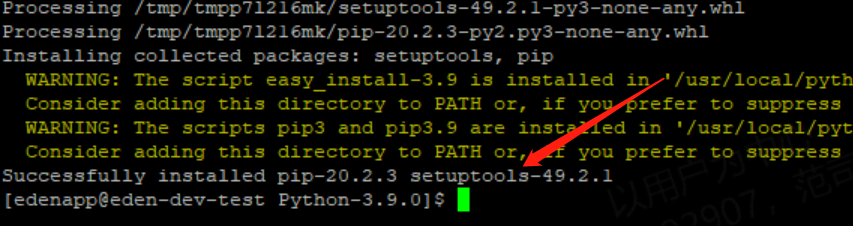
8. Add a soft connection to pip to check whether it is successful
[edenapp@eden-dev-test bin]$ sudo ln -s  /usr/local/python39/bin/pip3 /usr/bin/pip3
 [edenapp@eden-dev-test bin]$ pip3 -V
 pip 20.2.3 from /usr/local/python39/lib/python3.9/site-packages/pip (python 3.9)
9. Install httprunner
Use the command pip3 install httprunner to install. After the installation is completed, use httprunner -V to view the installed version, but the following information will appear because the command does not add environment variables or soft connections
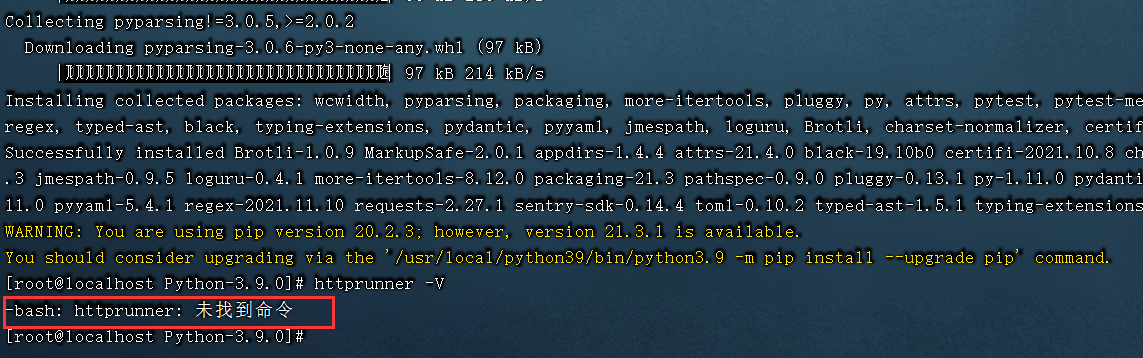
To solve the problem, add a soft connection here. First find the httprunner command and find the command find / -name httprunner
[root@localhost Python-3.9.0]# find / -name httprunner
/usr/local/python39/bin/httprunner
/usr/local/python39/lib/python3.9/site-packages/httprunner
[root@localhost Python-3.9.0]#
Find the httprunner under the bin directory and add a soft connection to it
[root@localhost Python-3.9.0]# ln -s /usr/local/python39/bin/httprunner /usr/bin/httprunner
[root@localhost Python-3.9.0]# httprunner -V
3.1.6
[root@localhost Python-3.9.0]#
You can see that the addition is successful and can be used correctly. Use the same method to add a soft connection to pytest
10. Execute test cases
Package the test code written in windows, and then upload it to the specified directory of the linux server through the rz command. After decompression, enter the root directory of the project to view the dependency libraries to be installed, install all the required dependency libraries, and then enter the pytest execution case in the root directory
11. Integrated into jenkins
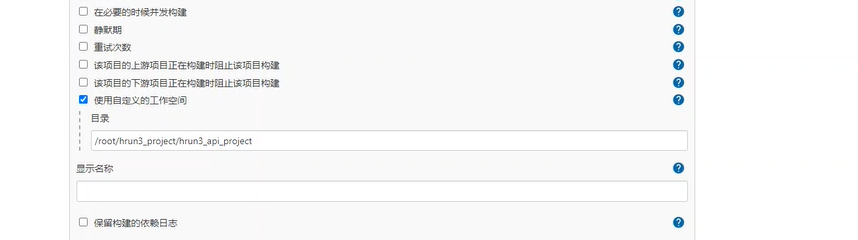
jenkins is installed directly using docker, which is convenient and fast. After installation, create a free style project and specify the root directory of the project
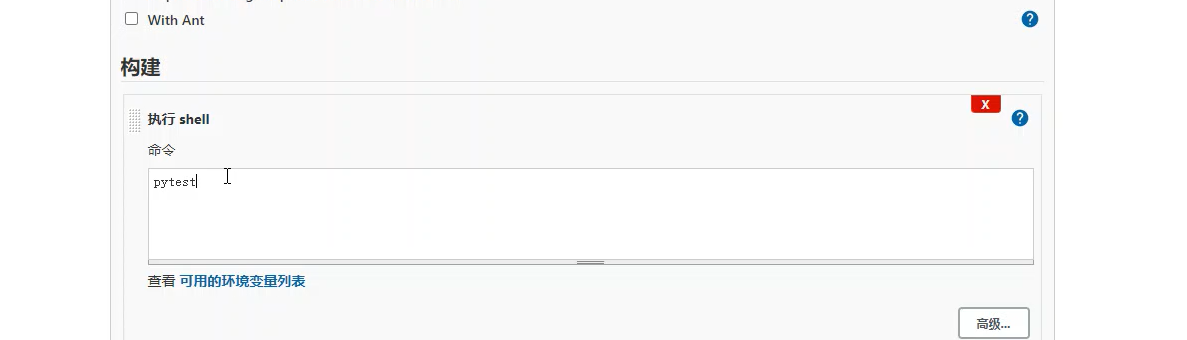
Enter the shell command pytest
The last step is that jenkins generates the allure test report, and opens jenkins home page - system management - management plug-ins - optional plug-ins
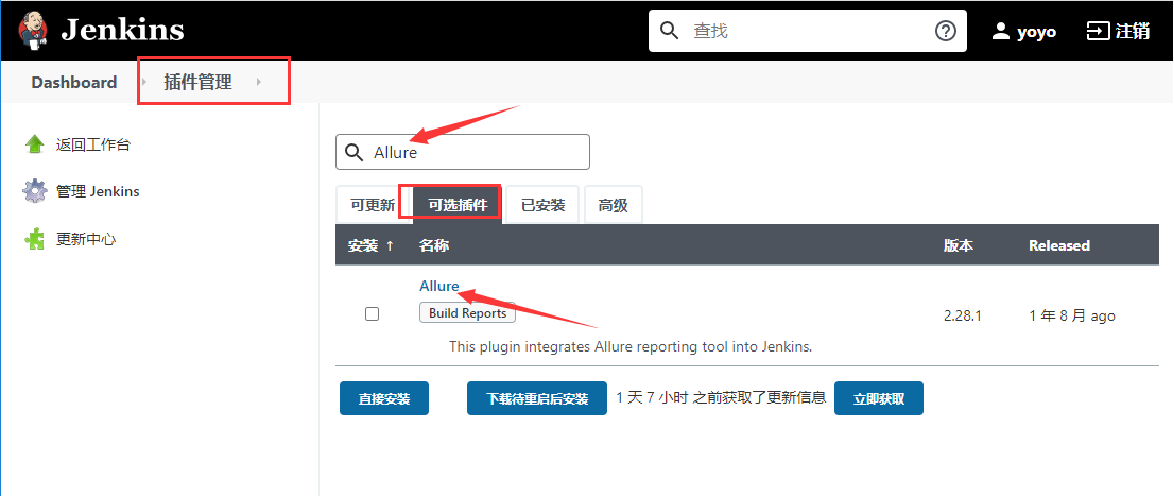
After the plug-in installation is completed, find the plug-in of allure in the configuration

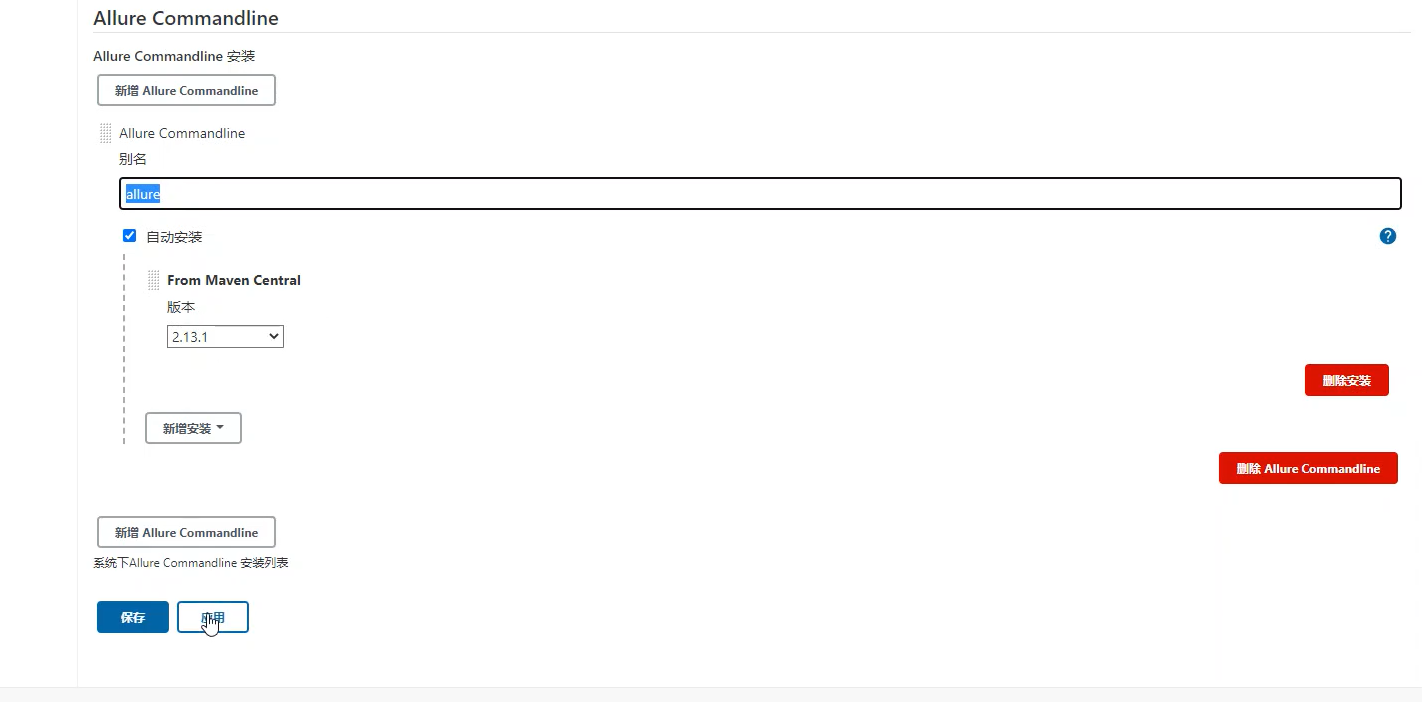
Go back to the global tool configuration page and find the Allure Commandline installation
Finally, enter the following information on the build page

12. Send mail
You need a plug-in to send mail. Please refer to the blog: https://www.cnblogs.com/yoyoketang/p/12174056.html