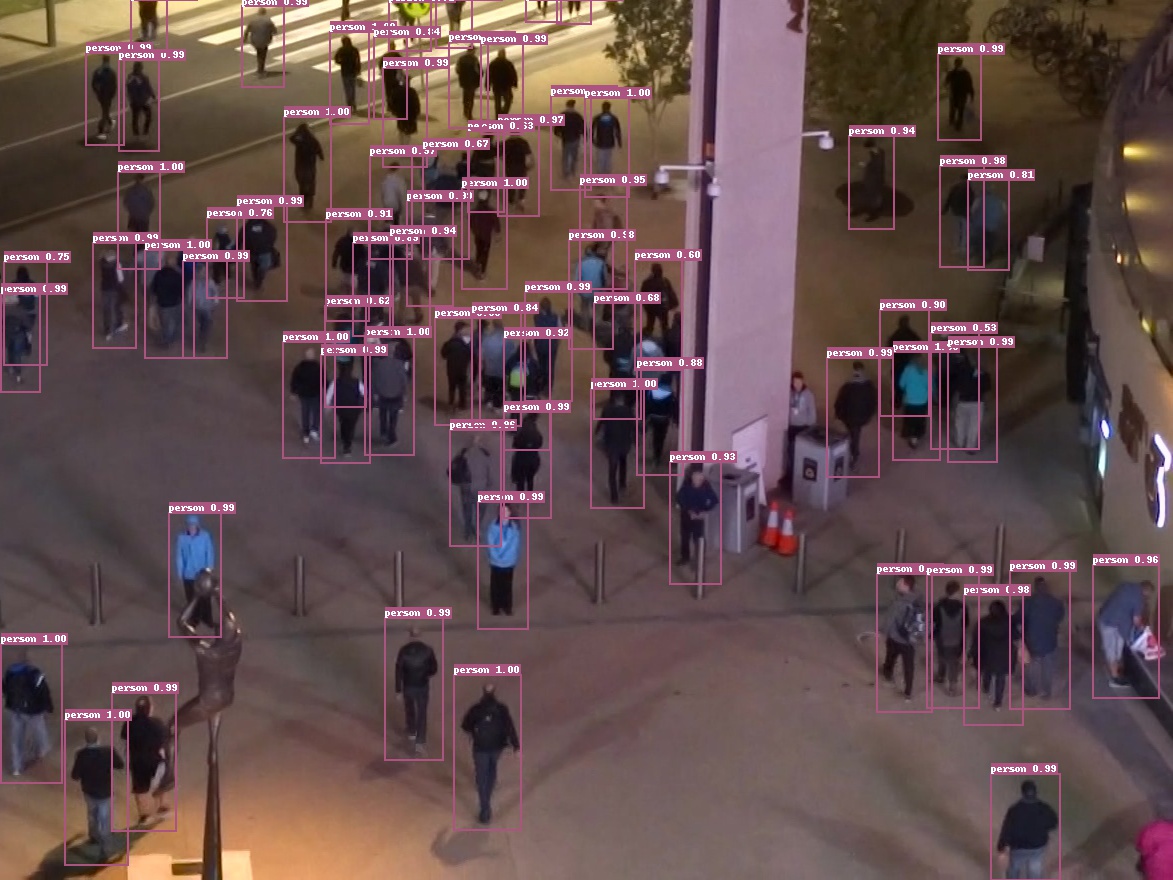
China software Cup - Pedestrian Detection and tracking (GitHub address: https://github.com/dddlli/Swin-Transformer-Object-Detection-PaddlePaddle)
1, Algorithm design
(1) Pedestrian detection part
1. As the backbone of Faster-RCNN and YOLOV3 and the backbone network of feature extraction, swing transformer replaces the traditional convolutional neural networks Resnet and DarkNet to a certain extent.
Since Transformer[1] made a breakthrough in NLP task, the industry has been trying to use Transformer in CV field. Several previous attempts, such as iGPT[2] and ViT[3], have used Transformer in the field of image classification. At present, these methods have two very serious problems
- Limited by the matrix nature of the image, a picture that can express information often needs at least hundreds of pixels, and modeling this hundreds of long sequence data is the natural defect of Transformer;
- At present, the framework based on Transformer is mostly used for image classification. Theoretically, it should be easier to solve the detection problem, but Transformer is not good at solving the dense prediction scene of instance segmentation.
The Swin Transformer [4] proposed in this paper solves these two problems, and has achieved SOTA results in classification, detection and segmentation tasks. The biggest contribution of swing Transformer is to propose a backbone that can be widely used in all computer vision fields, and most of the common super parameters in CNN network can also be manually adjusted in swing Transformer, such as the number of network blocks that can be adjusted, the number of layers of each block, the size of input image, etc. The design of the network architecture is very ingenious. It is a very wonderful structure to apply Transformer to the image field, which is worth learning by everyone in the AI field.
ViT and iGPT before Swin Transformer used small-size images as input. This direct resize strategy will undoubtedly lose a lot of information. Unlike them, the input of swing transformer is the original size of the image, such as 224 * 224 of ImageNet. In addition, swing transformer uses the most commonly used hierarchical network structure in CNN. A particularly important point in CNN is that with the deepening of the network hierarchy, the receptive field of nodes is also expanding. This feature is also satisfied in swing transformer. The hierarchical structure of swing transformer also gives it the ability to implement tasks that can be segmented or detected in structures such as FPN[6] and U-Net[7]. The comparison between swing transformer and ViT is shown in Figure 1.
[external chain picture transfer... (img-ok6vty7D-1626145809577)] Figure 1: comparison between swing transformer and ViT
This paper will combine its pytorch source code The algorithm details and code implementation of this paper are introduced in detail, and the vague explanations in the paper are analyzed in detail. After reading this article, you will fully understand the structural details and design motivation of swing transfomer. Now let's start.
1. Algorithm details
1.1 network framework
Swin Transformer proposes four network frameworks, which are Swin-T, Swin-S, Swin-B and Swin-L from small to large. In order to make the drawing simple, this paper takes the simplest Swin-T as an example to explain. The structure of Swin-T is shown in Figure 2. The core part of the swing transformer is the swing transformer block in the four stages, as shown in Figure 3.
class SwinTransformer(nn.Module):
    def __init__(self, *, hidden_dim, layers, heads, channels=3, num_classes=1000, head_dim=32, window_size=7, downscaling_factors=(4, 2, 2, 2), relative_pos_embedding=True):
        super().__init__()

        self.stage1 = StageModule(in_channels=channels, hidden_dimension=hidden_dim, layers=layers[0], downscaling_factor=downscaling_factors[0], num_heads=heads[0], head_dim=head_dim, window_size=window_size, relative_pos_embedding=relative_pos_embedding)
        self.stage2 = StageModule(in_channels=hidden_dim, hidden_dimension=hidden_dim * 2, layers=layers[1], downscaling_factor=downscaling_factors[1], num_heads=heads[1], head_dim=head_dim, window_size=window_size, relative_pos_embedding=relative_pos_embedding)
        self.stage3 = StageModule(in_channels=hidden_dim * 2, hidden_dimension=hidden_dim * 4, layers=layers[2], downscaling_factor=downscaling_factors[2], num_heads=heads[2], head_dim=head_dim, window_size=window_size, relative_pos_embedding=relative_pos_embedding)
        self.stage4 = StageModule(in_channels=hidden_dim * 4, hidden_dimension=hidden_dim * 8, layers=layers[3], downscaling_factor=downscaling_factors[3], num_heads=heads[3], head_dim=head_dim, window_size=window_size, relative_pos_embedding=relative_pos_embedding)

        self.mlp_head = nn.Sequential(
            nn.LayerNorm(hidden_dim * 8),
            nn.Linear(hidden_dim * 8, num_classes)
        )

    def forward(self, img):
        x = self.stage1(img)
        x = self.stage2(x)
        x = self.stage3(x)
        x = self.stage4(x) # (1, 768, 7, 7)
        x = x.mean(dim=[2, 3]) # (1,768)
        return self.mlp_head(x)
From the source code, we can see that the network structure of swing transformer is very simple. It is composed of four stages and one output header, which is very easy to expand. The network framework of the four stages of swing transformer is the same. Each stage has only a few basic hyperparameters to adjust, including the number of hidden layer nodes, the number of network layers, the number of multi head self attention headers, the downsampling scale, etc. the specific values of these hyperparameters in the source code are as follows. This paper will also explain the network structure in detail with these parameters.
net = SwinTransformer(
    hidden_dim=96,
    layers=(2, 2, 6, 2),
    heads=(3, 6, 12, 24),
    channels=3,
    num_classes=3,
    head_dim=32,
    window_size=7,
    downscaling_factors=(4, 2, 2, 2),
    relative_pos_embedding=True
)
[external chain picture transfer... (img-YVqW2Gme-1626145809579)] Figure 2: Swin-T network structure
1.2 Patch Partition/Patch Merging
In Figure 2, the input image is followed by a Patch Partition, followed by a Linear Embedding layer. These two together are actually a Patch Merging layer (at least in the above source code). The source code of this part is as follows:
class PatchMerging(nn.Module):
    def __init__(self, in_channels, out_channels, downscaling_factor):
        super().__init__()
        self.downscaling_factor = downscaling_factor
        self.patch_merge = nn.Unfold(kernel_size=downscaling_factor, stride=downscaling_factor, padding=0)
        self.linear = nn.Linear(in_channels * downscaling_factor ** 2, out_channels)

    def forward(self, x):
        b, c, h, w = x.shape
        new_h, new_w = h // self.downscaling_factor, w // self.downscaling_factor
        x = self.patch_merge(x) # (1, 48, 3136)
        x = x.view(b, -1, new_h, new_w).permute(0, 2, 3, 1) # (1, 56, 56, 48)
        x = self.linear(x) # (1, 56, 56, 96)
        return x
Patch Merging is used to downsample images, similar to the Pooling layer in CNN. Patch Merging is mainly through NN Unfold function realizes downsampling, NN The function of unfold is to slide the window on the image, which is equivalent to the first step of convolution operation. Therefore, its parameters include the size of the window and the step size of the sliding window. According to the super parameters given in the source code, we know that the proportion of downsampling in this step is [external chain picture transfer... (img-eVBJ900t-1626145809582)], so it passes NN After unfold, you will get [img-8tfcgz36-1626145809584] feature vectors with a length of [img-0lqpzrk9-1626145809585], where [img-nfdmeal5-1626145809586] is the number of channels input to the Feature Map of this stage. The input of the first stage is RGB image, so the number of channels is 3, Expressed as equation (1).
[external chain picture transferring... (IMG phutmtby-1626145809587)]
Next, the view and permute restore the obtained vector sequence to the two-dimensional matrix of [external chain picture transfer... (img-RTT8zwJQ-1626145809589)], and the linear map the feature vector with length of [external chain picture transfer... (img-qk9hSXmq-1626145809590)] to out_ The length of channels. Therefore, the output vector dimension of Patch Merging of stage-1 is [in external chain picture transfer... (img-snMOQK4t-1626145809591)]. Compared with the notes of the source code, the dimension of the first batch is [in external chain picture transfer... (img-E8xlMt6O-1626145809592)] is omitted here.
It can be seen that Patch Partition/Patch Merging plays a role, such as reducing the resolution through a sliding window with step size in CNN, and then adjusting the number of channels through [external chain picture transfer... (img-sA1mgq1l-1626145809594)] convolution. The difference is that the maximum pooling or average pooling of downsampling most commonly used in CNN often discards some information. For example, the maximum pooling discards the ground response value in a window, while the Patch Merging strategy does not discard other responses, but its disadvantage is that it increases the amount of computation. In some scenarios where the model capacity needs to be increased, we can actually consider using Patch Merging to replace pooling in CNN.
1.3 Stage of swing transformer
As we analyzed above, the Patch Partition+Linaer Embedding in Figure 2 is a patch margin, so a stage of the swing transformer can be regarded as composed of Patch Merging and the swing transformer block. The source code is as follows.
class StageModule(nn.Module):
    def __init__(self, in_channels, hidden_dimension, layers, downscaling_factor, num_heads, head_dim, window_size,
                 relative_pos_embedding):
        super().__init__()
        assert layers % 2 == 0, 'Stage layers need to be divisible by 2 for regular and shifted block.'

        self.patch_partition = PatchMerging(in_channels=in_channels, out_channels=hidden_dimension,
                                            downscaling_factor=downscaling_factor)

        self.layers = nn.ModuleList([])
        for _ in range(layers // 2):
            self.layers.append(nn.ModuleList([
                SwinBlock(dim=hidden_dimension, heads=num_heads, head_dim=head_dim, mlp_dim=hidden_dimension * 4,
                          shifted=False, window_size=window_size, relative_pos_embedding=relative_pos_embedding),
                SwinBlock(dim=hidden_dimension, heads=num_heads, head_dim=head_dim, mlp_dim=hidden_dimension * 4,
                          shifted=True, window_size=window_size, relative_pos_embedding=relative_pos_embedding),
            ]))

    def forward(self, x):
        x = self.patch_partition(x)
        for regular_block, shifted_block in self.layers:
            x = regular_block(x)
            x = shifted_block(x)
        return x.permute(0, 3, 1, 2)
1.4 Swin Transformer Block
The swing transformer block is the core of the algorithm. It is composed of window multi head self attention (W-MSA) and shifted window multi head self attention (SW-MSA), as shown in Figure 3. For this reason, the number of layers of swing transformer should be an integer multiple of 2. One layer is provided to W-MSA and the other layer is provided to SW-MSA.
[external chain picture transfer... (img-2ucOIhsq-1626145809595)] Figure 3: network structure of swing transformer block
From Figure 3, we can see that the feature [external chain picture transfer... (img-Y2iT3WCQ-1626145809596)] input to the stage is normalized by LN, then the feature is learned by W-MSA, and then a residual operation is performed to obtain [external chain picture transfer... (img-4LkE2pSh-1626145809597)]. Then there is an LN, an MLP and a residual to obtain the output characteristics of this layer [in the external chain picture transfer... (img-1r2oGIAA-1626145809598)]. The structure of SW-MSA layer is similar to that of W-MSA layer. The difference is that SW-MSA and W-MSA are used in the calculation feature part respectively. It can be seen from the above source code that their values are completely consistent except for the bool value of shifted. This part can be expressed as equation (2).
[external chain picture transferring... (img-YtxqWoyJ-1626145809599)]
The source code of a Swin Block is as follows. Different from the figure in the paper, the LN layer (PerNorm function) is moved from before self attention to after self attention.
class Residual(nn.Module):
    def __init__(self, fn):
        super().__init__()
        self.fn = fn

    def forward(self, x, **kwargs):
        return self.fn(x, **kwargs) + x

class PreNorm(nn.Module):
    def __init__(self, dim, fn):
        super().__init__()
        self.norm = nn.LayerNorm(dim)
        self.fn = fn

    def forward(self, x, **kwargs):
        return self.fn(self.norm(x), **kwargs)

class SwinBlock(nn.Module):
    def __init__(self, dim, heads, head_dim, mlp_dim, shifted, window_size, relative_pos_embedding):
        super().__init__()
        self.attention_block = Residual(PreNorm(dim, WindowAttention(dim=dim, heads=heads, head_dim=head_dim, shifted=shifted, window_size=window_size, relative_pos_embedding=relative_pos_embedding)))
        self.mlp_block = Residual(PreNorm(dim, FeedForward(dim=dim, hidden_dim=mlp_dim)))

    def forward(self, x):
        x = self.attention_block(x)
        x = self.mlp_block(x)
        return x
1.5 W-MSA
Window multi head self attention (W-MSA), as its name implies, is a self attention calculation on the size of the window. Unlike SW-MSA, it does not shift the window. Their source code is as follows. Let's ignore the case where shifted is True. This part will be described in section 1.6.
class WindowAttention(nn.Module):
    def __init__(self, dim, heads, head_dim, shifted, window_size, relative_pos_embedding):
        super().__init__()
        inner_dim = head_dim * heads
        self.heads = heads
        self.scale = head_dim ** -0.5
        self.window_size = window_size
        self.relative_pos_embedding = relative_pos_embedding # (13, 13)
        self.shifted = shifted

        if self.shifted:
            displacement = window_size // 2
            self.cyclic_shift = CyclicShift(-displacement)
            self.cyclic_back_shift = CyclicShift(displacement)
            self.upper_lower_mask = nn.Parameter(create_mask(window_size=window_size, displacement=displacement, upper_lower=True, left_right=False), requires_grad=False) # (49, 49)
            self.left_right_mask = nn.Parameter(create_mask(window_size=window_size, displacement=displacement,pper_lower=False, left_right=True), requires_grad=False) # (49, 49)

        self.to_qkv = nn.Linear(dim, inner_dim * 3, bias=False)
        if self.relative_pos_embedding:
            self.relative_indices = get_relative_distances(window_size) + window_size - 1
            self.pos_embedding = nn.Parameter(torch.randn(2 * window_size - 1, 2 * window_size - 1))
        else:
            self.pos_embedding = nn.Parameter(torch.randn(window_size ** 2, window_size ** 2))

        self.to_out = nn.Linear(inner_dim, dim)

    def forward(self, x):
        if self.shifted:
            x = self.cyclic_shift(x)

        b, n_h, n_w, _, h = *x.shape, self.heads # [1, 56, 56, _, 3]
        qkv = self.to_qkv(x).chunk(3, dim=-1) # [(1,56,56,96), (1,56,56,96), (1,56,56,96)]
        nw_h = n_h // self.window_size # 8
        nw_w = n_w // self.window_size # 8
        # Divided into h/M * w/M windows
        q, k, v = map( lambda t: rearrange(t, 'b (nw_h w_h) (nw_w w_w) (h d) -> b h (nw_h nw_w) (w_h w_w) d', h=h, w_h=self.window_size, w_w=self.window_size), qkv)
        # q, k, v : (1, 3, 64, 49, 32)
        # Self attention by number of windows
        dots = einsum('b h w i d, b h w j d -> b h w i j', q, k) * self.scale # (1,3,64,49,49)

        if self.relative_pos_embedding:
            dots += self.pos_embedding[self.relative_indices[:, :, 0], self.relative_indices[:, :, 1]]
        else:
            dots += self.pos_embedding

        if self.shifted:
            dots[:, :, -nw_w:] += self.upper_lower_mask
            dots[:, :, nw_w - 1::nw_w] += self.left_right_mask

        attn = dots.softmax(dim=-1) # (1,3,64,49,49)
        out = einsum('b h w i j, b h w j d -> b h w i d', attn, v)
        out = rearrange(out, 'b h (nw_h nw_w) (w_h w_w) d -> b (nw_h w_h) (nw_w w_w) (h d)', h=h, w_h=self.window_size, w_w=self.window_size, nw_h=nw_h, nw_w=nw_w) # (1, 56, 56, 96) # Window merge
        out = self.to_out(out)
        if self.shifted:
            out = self.cyclic_back_shift(out)
        return out
In the forward function, the three features of [external chain picture transfer... (img-DLAt8c1G-1626145809600)], [external chain picture transfer... (img-g7MvcEW7-1626145809601)], and [external chain picture transfer... (img-tuwpb4c7-1626145809602)] introduced in Transformer are calculated first. So to_qkv() function is a linear transformation. Here we use an implementation trick, that is, only one hidden layer is used, and the number of nodes is inner_ The linear transformation of dim * 3, and then cut them using the chunk(3) operation. Therefore, qkv is a Tensor with a length of 3, and the dimension of each Tensor is [external chain picture transfer... (img-84N4T6Bl-1626145809603)].
The subsequent map function is the core code to implement W in W-MSA, which is implemented through the realrange of einops. Einops is a very readable python package for common matrix operations, such as matrix transpose, matrix copy, matrix reshape and so on. Finally, through this operation, the weight matrices of three independent windows are obtained. Their dimensions are [external chain picture transfer... (img-ZGWPQyUy-1626145809604)]. The four values mean:
- [external chain picture transfer... (img-w1AWnVmU-1626145809605)]: the number of heads with multiple self attention;
- [img-RwMprNLA-1626145809605)]: the number of windows. First, reduce the size of the image to [img-yihfuz75-1626145809606] through Patch Merging, because the size of the window is [img-c9wtsog-1626145809606], Therefore, a total of [img-befmcr2k-1626145809607] windows are left;
- [external chain picture transfer... (img-qOLnDbpe-1626145809608)]: the number of pixels in the window;
- [external chain picture transferring... (img-ZVz8GWzr-1626145809608)]: the number of hidden layer nodes.
The swing transformer controls the computing area in the window unit strategy, which greatly reduces the amount of network computing and reduces the complexity to the linear proportion of image size. The complexity of traditional MSA and W-MSA are:
[external chain picture transferring... (img-c7saTVn5-1626145809609)]
(3) The calculation of formula ignores the calculation amount occupied by softmax. Here, take [external chain picture transfer... (img-y0PMD7Ks-1626145809609)] as an example, and its specific composition is as follows:
- To in code_ Qkv () function is used to generate three feature vectors of [external chain picture transfer... (img-O0u5cVzg-1626145809610)]: where [external chain picture transfer... (img-B5dJmsP3-1626145809610)]. The dimension of [external chain picture transfer... (img-Kj0zeLSh-1626145809611)] is [external chain picture transfer... (img-bKl1qx5D-1626145809612)], and the dimension of [external chain picture transfer... (img-wbZVi3zz-1626145809613)] is [external chain picture transfer... (img-pwPqYYVC-1626145809614)], then the complexity of these three items is [external chain picture transfer... (img-7SlSctiy-1626145809616)];
- Calculate that the dimensions of [external chain picture transfer... (img-0hbh8L1Q-1626145809616)]: [external chain picture transfer... (img-EihJ6G3o-1626145809617)] are [external chain picture transfer... (img-RDsjEt53-1626145809618)], so its complexity is [external chain picture transfer... (img-RiUjdhp7-1626145809618)];
- After softmax, multiply [external chain picture transferring... (img-3KHAWMQs-1626145809619)] to get [external chain picture transferring... (img-3RqfvsLG-1626145809620)]: because the dimension of [external chain picture transferring... (img-MLdL7vyw-1626145809621)] is [external chain picture transferring... (img-hLixEgKT-1626145809622)], Therefore, its complexity is [external chain picture transfer... (img-ZINHiK3r-1626145809622)];
- The final output is obtained by multiplying the [external link picture transfer... (img-m9Z7kyKx-1626145809623)] by the [external link picture transfer... (img-50kjDAH3-1626145809624)] matrix, corresponding to the to in the code_ Out() function: its complexity is [external chain picture transfer... (img-PZPefzWb-1626145809625)].
We can have a more intuitive understanding through Transformer's calculation formula (4). In Transformer, we introduced that self attention obtains the similarity between Query matrix and Key matrix by point multiplication, that is, [external chain picture transfer... (img-7EDFuyL8-1626145809626)] in formula (4). Then match the Value through this similarity. Therefore, the similarity is calculated by point multiplication one element by one. If the comparison range is an image, the bottleneck of the calculation is the pixel by pixel comparison of the whole image, so the complexity is [external chain picture transfer... (img-TgiKKIZV-1626145809627)]. The W-MSA is a pixel by pixel comparison in the window, so the complexity is [in the external chain picture transfer... (IMG uegycmph-1626145809628)], where [in the external chain picture transfer... (img-8f345D3t-1626145809628)] is the size of the W-MSA window.
[external chain picture transferring... (img-Zfc4R6ZO-1626145809629)]
Back to the code, the next dots variable is the [external chain picture transfer... (img-zRkSeNPb-1626145809630)] operation we just introduced. Then we add relative position coding, which we will introduce at the end. Then attn and einsum complete the whole process of equation (4). Then use realrange again to adjust the dimension back to [external chain picture transfer... (img-BuZZN2Rt-1626145809631)]. Finally pass to_out adjusts the dimension to the value of the output dimension set by the super parameter.
Here we introduce the relative position code of W-MSA. Firstly, this position code is added to the dots variable multiplied by the normalized scale. Therefore, the calculation method of [in external chain picture transfer... (img-qVrFxBsl-1626145809631)] becomes equation (5). Because W-MSA performs feature matching in the unit of window, the range of relative position coding should also be in the unit of window. See the following code for its specific implementation. For the specific idea of relative position coding, refer to UniLMv2[8].
[external chain picture transferring... (img-Ifagu1XE-1626145809632)]
def get_relative_distances(window_size):
    indices = torch.tensor(np.array([[x, y] for x in range(window_size) for y in range(window_size)]))
    distances = indices[None, :, :] - indices[:, None, :]
    return distances
The modeling ability of the network obtained by using W-MSA alone is very poor, because it calculates each window as an independent area and ignores the necessity of interaction between windows. Based on this motivation, swing transformer proposed SW-MSA.
1.6 SW-MSA
The position of SW-MSA is connected behind the W-MSA layer. Therefore, cross window communication can be realized as long as we provide a window segmentation method different from W-MSA. The implementation of SW-MSA is shown in Figure 4. As mentioned above, the image size input to Stage-1 is [img-1nmxjosb-1626145809633] (Fig. 4.(a)), then the window segmentation result of W-MSA is shown in Fig. 4 (b) As shown in. So how do we get different segmentation methods from W-MSA? The idea of SW-MSA is very simple. Move each cycle of the image up and left by half the size of the window, as shown in Figure 4 © The blue and red areas will be moved to the lower and right sides of the image, respectively, as shown in Figure 4 (d). Then, on the basis of shift, divide the window according to W-MSA, and a window segmentation method different from W-MSA will be obtained, as shown in Figure 4 (d) Medium red and blue are the results of the segmentation windows of W-MSA and SW-MSA, respectively. This part can be realized by pytorch's roll function. The CyclicShift function is in the source code.
class CyclicShift(nn.Module):
    def __init__(self, displacement):
        super().__init__()
        self.displacement = displacement

    def forward(self, x):
        return torch.roll(x, shifts=(self.displacement, self.displacement), dims=(1, 2))
Where the value of display is the window value divided by 2.
[external chain picture transferring... (img-gwrpHAja-1626145809633)]
This window segmentation method introduces a new problem, that is, a shifted area is introduced in the last row and the last column of the shifted image, as shown in Fig. 4 (d). According to the self attention mechanism used to calculate the similarity pixel by pixel in [external chain picture transfer... (IMG ygmghhmp-1626145809634)] we introduced above, the pixels on both sides of the image have no effect on calculating the similarity with each other, that is, we only need to compare Fig. 4 (d) In a window with the same color, we take Figure 4 (d) Take the area (1) in the lower left corner as an example to illustrate how SW-MSA realizes this function.
The calculation of area (1) is shown in Figure 5. First, a window with the size of [external chain picture transferring... (img-QW87r3KQ-1626145809635)] obtains three weights through linear budget, such as [external chain picture transferring... (img-sleCpQvB-1626145809636)], [external chain picture transferring... (img-KkmJq1Xm-1626145809636)], and [external chain picture transferring... (img-m77dLZSv-1626145809637)], Its dimension is [external chain picture transfer... (img-S5G893DH-1626145809638)]. In this 49, the first 28 pixels are obtained by traversing the first 48 pixels in the region (1) in a sliding window manner, and the last 21 pixels are obtained by traversing the lower half of the region (1). At this time, their corresponding position relationship still maintains the nature of upper yellow and lower blue.
Next is the calculation [img-3knumldn-1626145809639] in the transfer of external chain pictures. After the mutual calculation of the same color areas in the figure, the color will still remain, while the yellow and blue areas will turn green after calculation, and the green part is meaningless similarity. Upper is used in the paper_ lower_ Mask it off, upper_lower_mask is a binary matrix composed of [external chain picture transfer... (img-GoLd7V0R-1626145809640)] and infinity. Finally, the final dots variable is obtained by unit addition.
[external chain picture transfer... (img-o0g3P5yX-1626145809641)] Figure 5: calculation method of area (1) shift line of SW-MSA
upper_ lower_ The mask is calculated as follows.
mask = torch.zeros(window_size ** 2, window_size ** 2)
mask[-displacement * window_size:, :-displacement * window_size] = float('-inf')
mask[:-displacement * window_size, -displacement * window_size:] = float('-inf')
The calculation method of region (2) is similar to that of region (1), except that region (2) is the result of cyclic left shift, as shown in Fig. 6. Because (2) is arranged left and right, the [external chain picture transfer... (img-bWzN1M1s-1626145809641)], [external chain picture transfer... (img-AZjmlS0P-1626145809642)], [external chain picture transfer... (img-n0YHwWX3-1626145809643)] obtained by (2) is striped, that is, it will traverse line by line. In these seven lines, it will traverse four yellow ones first, and then three red ones. After multiplying the two striped matrices, the obtained similarity matrix is network like, in which orange represents the invalid area, so a grid like mask left is required_ right_ Mask to overwrite.
[external chain picture transfer... (img-7MtG7HbR-1626145809644)] Figure 6: calculation method of area (2) shift line of SW-MSA
left_ right_ The generation method of mask is shown in the following code. For the values of these two masks, you can substitute some values to verify. You can set the window_size, and then set the value of display to window_ Half the size.
In this part of operation, the calculation of window shift and mask is implemented in the first if shifted = True in WindowAttention class. The addition of masks is implemented in the second if, and the last if restores the image back to its original position.
mask = torch.zeros(window_size ** 2, window_size ** 2)
mask = rearrange(mask, '(h1 w1) (h2 w2) -> h1 w1 h2 w2', h1=window_size, h2=window_size)
mask[:, -displacement:, :, :-displacement] = float('-inf')
mask[:, :-displacement, :, -displacement:] = float('-inf')
mask = rearrange(mask, 'h1 w1 h2 w2 -> (h1 w1) (h2 w2)')
So far, we have combed the stage-1 of swing-t from beginning to end. Except for several super parameters and the size of the image is different from that of stage-1, the other structures of the latter three stages remain the same, which will not be repeated here.
1.7 output layer
Finally, let's introduce the output layer of swing transformer. After stage-4 completes the calculation, the feature dimension is [img-yavojtay-1626145809645]. The swing transformer first obtains the feature vector with the length of 768 through a global average pool, and then obtains the final prediction result through an LN and a full connection, as shown in equation (6).
[external chain picture transferring... (img-VygxeHYY-1626145809645)]
2. Swin Transformer family
Swin Transformer proposes four models of different sizes. Their differences lie in the length of hidden layer nodes, the number of layers of each stage and the number of heads of multi head self attention mechanism. See the following code for specific values.
def swin_t(hidden_dim=96, layers=(2, 2, 6, 2), heads=(3, 6, 12, 24), **kwargs):
    return SwinTransformer(hidden_dim=hidden_dim, layers=layers, heads=heads, **kwargs)

def swin_s(hidden_dim=96, layers=(2, 2, 18, 2), heads=(3, 6, 12, 24), **kwargs):
    return SwinTransformer(hidden_dim=hidden_dim, layers=layers, heads=heads, **kwargs)

def swin_b(hidden_dim=128, layers=(2, 2, 18, 2), heads=(4, 8, 16, 32), **kwargs):
    return SwinTransformer(hidden_dim=hidden_dim, layers=layers, heads=heads, **kwargs)

def swin_l(hidden_dim=192, layers=(2, 2, 18, 2), heads=(6, 12, 24, 48), **kwargs):
    return SwinTransformer(hidden_dim=hidden_dim, layers=layers, heads=heads, **kwargs)
Because swing transformer is a multi-stage network framework, and the output of each stage is also a set of feature maps, it can be easily migrated to almost all CV tasks. The author's experimental results also show that swing transformer has reached the level of state of the art in the field of detection and segmentation.
3. Summary
Swing transformer is one of the few exciting algorithms in recent years. It has three exciting points:
- It solves the problem of slow application of Transformer to CV field, which has plagued the industry for a long time;
- The design of swing transformer is very ingenious. It is innovative and closely adheres to the advantages of CNN. It fully considers the characteristics of CNN, such as displacement invariance, size invariance, the relationship between receptive field and hierarchy, reducing the resolution in stages and increasing the number of channels. Without these characteristics, swing transformer does not have the courage to call itself a backbone;
- Its STOA performance in many CV fields.
Of course, we should evaluate the swing transformer from an objective perspective. Although the paper says that the swing transformer is a backbone, it is still too early to evaluate it because
- The swing transformer does not provide an up sampling algorithm like deconvolution. Therefore, the backbone swing transformer for such requirements cannot be directly replaced. Maybe it can be realized by bilinear difference, but the effect needs to be evaluated.
- From the W-MSA section, we can see that each window has a set of independent [external chain picture transfer... (img-czdeviads-1626145809646)], [external chain picture transfer... (img-xIC5oQin-1626145809647)], [external chain picture transfer... (img-3XxBXaUA-1626145809648)]. Therefore, swing transformer does not have a particularly important feature of CNN: weight sharing. This has also resulted in a big gap between Swin Transformer and CNN of the same level in speed. So at present, CNN still has an unshakable position on the embedded platform.
- Swin Transformer has not been fully verified in many areas where CNN has achieved very good results. If there is only a wind of irrigation in CV field using Swin Transformer or its derivative algorithms, we can say that the era of Swin Transformer has come.
2.DogeNet serves as the backbone of fast-RCNN and yoov3 and as the backbone network for feature extraction.
To some extent, it replaces the traditional convolutional neural networks RESNET and DarkNet as the feature extraction network. DogeNet is also a feature extraction network based on Transformer+CNN. It has good results in image classification and as the backbone of target detection. DogeNet is a self-developed network developed by the team, which originates from RESNET (traditional residual convolution neural network) and BotNet (Transformer+CNN), and has made great improvements in parameter quantity and robustness. The experimental results show that the feature extraction ability of the network is greatly improved compared with RESNET and BotNet.
| model | Accuracy | R30 | R45 | R60 | R75 | R90 | Channel List | Parameter | FLOPS |
|---|---|---|---|---|---|---|---|---|---|
| res_net26(2x2x2x2) | 95 | 84.4 | 78 | 69.8 | 68.6 | 74 | 64x64x128x256x512 | 14.0M | 2377M |
| res_net50(3x4x6x3) | 95 | 81.8 | 74.4 | 66.4 | 71.6 | 72.4 | 64x64x128x256x512 | 23.5M | 4143M |
| bot_net50_l1(3x4x6x3) | 75.6 | 70.2 | 62.2 | 71.4 | 54.4 | 51.8 | 64x64x128x256x512 | 18.8M | 4094M |
| bot_net50_l2(3x4x6x3) | 75 | N | N | N | N | 52.4 | 64x64x128x256x512 | 14.3M | 3849M |
| doge_net26(2x3x1x2) | 94.2 | 83.2 | 76.2 | 69.2 | 74.6 | 85.4 | 64x32x 48x 96 x128 | 0.9M | 685M |
| doge_net26(2x1x3x2) | 91.4 | 82.4 | 77.6 | 72.8 | 76.2 | 79 | 64x32x 48x 96 x128 | 0.9M | 685M |
| doge_net50(6x6x2x2) | 90.4 | 80.6 | 72.2 | 70.2 | 71 | 77.4 | 64x32x 48x 96 x128 | 1.2M | 1043M |
| dogex26(2x3x1x2) | 88.8 | 77.4 | 72 | 68.6 | 73.4 | 76.2 | 64x32x 48x 96 x128 | 0.83M | 659M |
| dogex50(6x6x2x2) | - | - | - | - | - | - | 64x32x 48x 96 x128 | 1.13M | 1014M |
| shibax26(2x3x1x2)-DSA*2 | 95.8 | 80.8 | 75.8 | 70.2 | 71.2 | 80.4 | 64x32x 48x 96 x128 | 0.82M | 452M |
| shibax50(6x6x2x2)-DSA*2 | 93.8 | 81.8 | 76 | 71.6 | 71.4 | 80.4 | 64x32x 48x 96 x128 | 1.11M | 796M |
| Efficient-net-B0(Origin) | 95.6 | 81.4 | 74.4 | 70.2 | 68.2 | 76.2 | N | 5.3M | 422M |
| Efficient-net-B0(pretrain) | 99.4 | 98.8 | 97.8 | 95 | 92.6 | 94.2 | N | 5.3M | 422M |
| Shiba26(2x3x1x2)-DSA*3 | 93.8 | 81.4 | 77 | 70.8 | 70 | 79.4 | 64x32x 48x 96 x128 | 0.746M | 380M |
| Shiba50(6x6x2x2)-DSA*3 | 92.6 | 81.8 | 74.8 | 68 | 69.2 | 74.6 | 64x32x 48x 96 x128 | 0.938M | 582M |
(2) Pedestrian tracking part
1.ResNet_ReID
#Defined deep_ Original of sort feature extractor_ model,dogenet50

import paddle
import paddle.nn as nn
import paddle.nn.functional as F

class BasicBlock(nn.Layer):
    def __init__(self, c_in, c_out,is_downsample=False):
        super(BasicBlock,self).__init__()
        self.is_downsample = is_downsample
        if is_downsample:
            self.conv1 = nn.Conv2D(c_in, c_out, 3, stride=2, padding=1, bias_attr=False)
        else:
            self.conv1 = nn.Conv2D(c_in, c_out, 3, stride=1, padding=1, bias_attr=False)
        self.bn1 = nn.BatchNorm2D(c_out)
        self.relu = nn.ReLU()
        self.conv2 = nn.Conv2D(c_out,c_out,3,stride=1,padding=1, bias_attr=False)
        self.bn2 = nn.BatchNorm2D(c_out)
        if is_downsample:
            self.downsample = nn.Sequential(
                nn.Conv2D(c_in, c_out, 1, stride=2, bias_attr=False),
                nn.BatchNorm2D(c_out)
            )
        elif c_in != c_out:
            self.downsample = nn.Sequential(
                nn.Conv2D(c_in, c_out, 1, stride=1, bias_attr=False),
                nn.BatchNorm2D(c_out)
            )
            self.is_downsample = True

    def forward(self,x):
        y = self.conv1(x)
        y = self.bn1(y)
        y = self.relu(y)
        y = self.conv2(y)
        y = self.bn2(y)
        if self.is_downsample:
            x = self.downsample(x)
        return F.relu(x.add(y))

def make_layers(c_in,c_out,repeat_times, is_downsample=False):
    blocks = []
    for i in range(repeat_times):
        if i ==0:
            blocks += [BasicBlock(c_in,c_out, is_downsample=is_downsample),]
        else:
            blocks += [BasicBlock(c_out,c_out),]
    return nn.Sequential(*blocks)

class Net(nn.Layer):
    def __init__(self, num_classes=625 ,reid=False):
        super(Net,self).__init__()
        # 3 128 64
        self.conv = nn.Sequential(
            nn.Conv2D(3,32,3,stride=1,padding=1),
            nn.BatchNorm2D(32),
            nn.ELU(),
            nn.Conv2D(32,32,3,stride=1,padding=1),
            nn.BatchNorm2D(32),
            nn.ELU(),
            nn.MaxPool2D(3,2,padding=1),
        )
        # 32 64 32
        self.layer1 = make_layers(32,32,2,False)
        # 32 64 32
        self.layer2 = make_layers(32,64,2,True)
        # 64 32 16
        self.layer3 = make_layers(64,128,2,True)
        # 128 16 8
        self.dense = nn.Sequential(
            nn.Dropout(p=0.6),
            nn.Linear(128*16*8, 128),
            nn.BatchNorm1D(128),
            nn.ELU()
        )
        # 256 1 1
        self.reid = reid
        self.batch_norm = nn.BatchNorm1D(128)
        self.classifier = nn.Sequential(
            nn.Linear(128, num_classes),
        )

    def forward(self, x):
        x = self.conv(x)
        x = self.layer1(x)
        x = self.layer2(x)
        x = self.layer3(x)

        x = paddle.reshape(x, [x.shape[0],-1])
        if self.reid:
            x = self.dense[0](x)
            x = self.dense[1](x)
            x = paddle.divide(x, paddle.norm(x, p=2, axis=1,keepdim=True))
            return x
        x = self.dense(x)
        # B x 128
        # classifier
        x = self.classifier(x)
        return x
2.DogeNet_ReID
import efficientnet_pypaddle
import paddle
import paddle.nn as nn
import paddle.nn.functional as F
from paddle.nn.transformer import models

__all__ = ["get_n_params", "efficient_b0", "res_net50", "bot_net50_l1", "bot_net50_l2", "doge_net26",
           "doge_net50", "doge_net_2x1x3x2", "res_net26", "doge_net50_no_embed", "doge_net_2x1x3x2_no_embed",
           "doge_net26_no_embed"]


def get_n_params(model):
    pp = 0
    for p in list(model.parameters()):
        nn = 1
        for s in list(p.size()):
            nn = nn * s
        pp += nn
    return pp


class SE(nn.Module):
    """Squeeze-and-Excitation block."""

    def __init__(self, in_planes, se_planes):
        super(SE, self).__init__()
        self.se1 = nn.Conv2D(in_planes, se_planes, kernel_size=1, bias=True)
        self.se2 = nn.Conv2D(se_planes, in_planes, kernel_size=1, bias=True)

    def forward(self, x):
        out = F.adaptive_avg_pool2D(x, (1, 1))
        out = F.relu(self.se1(out))
        out = self.se2(out).sigmoid()
        out = x * out
        return out


class MHSA(nn.Module):
    def __init__(self, n_dims, width=14, height=14, heads=4, position_embedding=True):
        super(MHSA, self).__init__()
        self.heads = heads
        self.position_embedding = position_embedding
        self.query = nn.Conv2D(n_dims, n_dims, kernel_size=1)
        self.key = nn.Conv2D(n_dims, n_dims, kernel_size=1)
        self.value = nn.Conv2D(n_dims, n_dims, kernel_size=1)
        if position_embedding:
            self.rel_h = nn.Parameter(paddle.randn([1, heads, n_dims // heads, 1, height]), requires_grad=True)
            self.rel_w = nn.Parameter(paddle.randn([1, heads, n_dims // heads, width, 1]), requires_grad=True)

        self.softmax = nn.Softmax(dim=-1)

    def forward(self, x):
        n_batch, C, width, height = x.size()
        q = self.query(x).view(n_batch, self.heads, C // self.heads, -1)
        k = self.key(x).view(n_batch, self.heads, C // self.heads, -1)
        v = self.value(x).view(n_batch, self.heads, C // self.heads, -1)

        content_content = paddle.matmul(q.permute(0, 1, 3, 2), k)

        if self.position_embedding:
            content_position = (self.rel_h + self.rel_w).view(1, self.heads, C // self.heads, -1).permute(0, 1, 3, 2)
            content_position = paddle.matmul(content_position, q)
            energy = content_content + content_position
        else:
            energy = content_content

        attention = self.softmax(energy)

        out = paddle.matmul(v, attention.permute(0, 1, 3, 2))
        out = out.view(n_batch, C, width, height)

        return out


class BottleNeck(nn.Module):
    expansion = 4

    def __init__(self, in_planes, planes, stride=1, heads=4, mhsa=False, resolution=None):
        super(BottleNeck, self).__init__()

        self.conv1 = nn.Conv2D(in_planes, planes, kernel_size=1, bias=False)
        self.bn1 = nn.BatchNorm2D(planes)
        if not mhsa:
            self.conv2 = nn.Conv2D(planes, planes, kernel_size=3, padding=1, stride=stride, bias=False)
        else:
            self.conv2 = nn.ModuleList()
            self.conv2.append(MHSA(planes, width=int(resolution[0]), height=int(resolution[1]), heads=heads))
            if stride == 2:
                self.conv2.append(nn.AvgPool2D(2, 2))
            self.conv2 = nn.Sequential(*self.conv2)
        self.bn2 = nn.BatchNorm2D(planes)
        self.conv3 = nn.Conv2D(planes, self.expansion * planes, kernel_size=1, bias=False)
        self.bn3 = nn.BatchNorm2D(self.expansion * planes)

        self.shortcut = nn.Sequential()
        if stride != 1 or in_planes != self.expansion * planes:
            self.shortcut = nn.Sequential(
                nn.Conv2D(in_planes, self.expansion * planes, kernel_size=1, stride=stride),
                nn.BatchNorm2D(self.expansion * planes)
            )

    def forward(self, x):
        out = F.relu(self.bn1(self.conv1(x)))
        out = F.relu(self.bn2(self.conv2(out)))
        out = self.bn3(self.conv3(out))
        out += self.shortcut(x)
        out = F.relu(out)
        return out


class DogeNeck(nn.Module):
    expansion = 4

    def __init__(self, in_planes, planes, stride=1, heads=4, mhsa=False, resolution=None, position_embedding=True):
        super(DogeNeck, self).__init__()

        self.conv1 = nn.Conv2D(in_planes, planes, kernel_size=1, bias=False)
        self.bn1 = nn.BatchNorm2D(planes)
        if not mhsa:
            self.conv2 = nn.ModuleList()
            self.conv2.append(nn.Conv2D(planes, planes, kernel_size=3, padding=1, stride=stride, bias=False))
            self.conv2.append(SE(planes, planes // 2))
            self.conv2 = nn.Sequential(*self.conv2)
        else:
            self.conv2 = nn.ModuleList()
            self.conv2.append(MHSA(
                planes, width=int(resolution[0]), height=int(resolution[1]),
                heads=heads, position_embedding=position_embedding
            ))
            if stride == 2:
                self.conv2.append(nn.AvgPool2D(2, 2))
            self.conv2 = nn.Sequential(*self.conv2)
        self.bn2 = nn.BatchNorm2D(planes)
        self.conv3 = nn.Conv2D(planes, self.expansion * planes, kernel_size=1, bias=False)
        self.bn3 = nn.BatchNorm2D(self.expansion * planes)

        self.shortcut = nn.Sequential()
        if stride != 1 or in_planes != self.expansion * planes:
            self.shortcut = nn.Sequential(
                nn.Conv2D(in_planes, self.expansion * planes, kernel_size=1, stride=stride),
                nn.BatchNorm2D(self.expansion * planes)
            )

    def forward(self, x):
        out = F.relu(self.bn1(self.conv1(x)))
        out = F.relu(self.bn2(self.conv2(out)))
        out = self.bn3(self.conv3(out))
        out += self.shortcut(x)
        out = F.relu(out)
        return out


# reference
# https://github.com/kuangliu/pypaddle-cifar/blob/master/models/resnet.py
class BotNet(nn.Module):
    def __init__(self, block, num_blocks, num_classes=15, resolution=(224, 224), heads=4,
                 layer3: str = "CNN", in_channel=3):
        super(BotNet, self).__init__()
        self.in_planes = 64
        self.resolution = list(resolution)

        self.conv1 = nn.Conv2D(in_channel, 64, kernel_size=7, stride=2, padding=3, bias=False)
        if self.conv1.stride[0] == 2:
            self.resolution[0] /= 2
        if self.conv1.stride[1] == 2:
            self.resolution[1] /= 2
        self.bn1 = nn.BatchNorm2D(64)
        self.relu = nn.ReLU(inplace=True)
        self.maxpool = nn.MaxPool2D(kernel_size=3, stride=2, padding=1)  # for ImageNet
        if self.maxpool.stride == 2:
            self.resolution[0] /= 2
            self.resolution[1] /= 2

        self.layer1 = self._make_layer(block, 64, num_blocks[0], stride=1)
        self.layer2 = self._make_layer(block, 128, num_blocks[1], stride=2)

        if layer3 == "CNN":
            self.layer3 = self._make_layer(block, 256, num_blocks[2], stride=2)
        elif layer3 == "Transformer":
            self.layer3 = self._make_layer(block, 256, num_blocks[3], stride=2, heads=heads, mhsa=True)
        else:
            raise NotImplementedError

        self.layer4 = self._make_layer(block, 512, num_blocks[3], stride=2, heads=heads, mhsa=True)

        self.avgpool = nn.AdaptiveAvgPool2D((1, 1))
        self.fc = nn.Sequential(
            nn.Dropout(0.3),  # All architecture deeper than ResNet-200 dropout_rate: 0.2
            nn.Linear(512 * block.expansion, num_classes),
        )

    def _make_layer(self, block, planes, num_blocks, stride=1, heads=4, mhsa=False):
        strides = [stride] + [1] * (num_blocks - 1)
        layers = []
        for idx, stride in enumerate(strides):
            layers.append(block(self.in_planes, planes, stride, heads, mhsa, self.resolution))
            if stride == 2:
                self.resolution[0] /= 2
                self.resolution[1] /= 2
            self.in_planes = planes * block.expansion
        return nn.Sequential(*layers)

    def forward(self, x):
        out = self.relu(self.bn1(self.conv1(x)))
        out = self.maxpool(out)  # for ImageNet

        out = self.layer1(out)
        out = self.layer2(out)
        out = self.layer3(out)
        out = self.layer4(out)

        out = self.avgpool(out)
        out = paddle.flatten(out, 1)
        out = self.fc(out)
        return out


class DogeNet(nn.Module):
    def __init__(self, block, num_blocks, num_classes=15, resolution=(224, 224), heads=4, in_channel=3,
                 position_embedding=True):
        super(DogeNet, self).__init__()
        self.in_planes = 64
        self.resolution = list(resolution)
        self.position_embedding = position_embedding

        self.conv1 = nn.Conv2D(in_channel, 64, kernel_size=3, stride=2, padding=1, bias=False)
        if self.conv1.stride[0] == 2:
            self.resolution[0] /= 2
        if self.conv1.stride[1] == 2:
            self.resolution[1] /= 2
        self.bn1 = nn.BatchNorm2D(64)
        self.relu = nn.ReLU(inplace=True)
        if self.conv1.stride == 2:
            self.resolution[0] /= 2
            self.resolution[1] /= 2

        self.layer1 = self._make_layer(block, 32, num_blocks[0], stride=2)
        self.layer2 = self._make_layer(block, 48, num_blocks[1], stride=2)
        self.layer3 = self._make_layer(block, 96, num_blocks[2], stride=2, heads=heads, mhsa=True)
        self.layer4 = self._make_layer(block, 128, num_blocks[3], stride=1, heads=heads, mhsa=True)
        self.avgpool = nn.AdaptiveAvgPool2D((1, 1))
        self.fc = nn.Sequential(
            nn.Dropout(0.3),
            nn.Linear(128 * block.expansion, num_classes),
        )

    def _make_layer(self, block, planes, num_blocks, stride=1, heads=4, mhsa=False):
        strides = [stride] + [1] * (num_blocks - 1)
        layers = []
        for idx, stride in enumerate(strides):
            layers.append(block(self.in_planes, planes, stride, heads, mhsa, self.resolution, self.position_embedding))
            if stride == 2:
                self.resolution[0] /= 2
                self.resolution[1] /= 2
            self.in_planes = planes * block.expansion
        return nn.Sequential(*layers)

    def forward(self, x):
        out = self.relu(self.bn1(self.conv1(x)))

        out = self.layer1(out)
        out = self.layer2(out)
        out = self.layer3(out)
        out = self.layer4(out)

        out = self.avgpool(out)
        out = paddle.flatten(out, 1)
        out = self.fc(out)
        return out


def efficient_b0(num_classes=10, **kwargs):
    return efficientnet_pypaddle.EfficientNet.from_name("efficientnet-b0", num_classes=num_classes)


def res_net50(num_classes=10, **kwargs):
    return models.ResNet(models.resnet.Bottleneck, [3, 4, 6, 3], num_classes=num_classes)


def res_net26(num_classes=10, **kwargs):
    return models.ResNet(models.resnet.Bottleneck, [2, 2, 2, 2], num_classes=num_classes)


def bot_net50_l1(num_classes=10, args=None, heads=4, **kwargs):
    in_shape = args.in_shape
    return BotNet(BottleNeck, [3, 4, 6, 3], num_classes=num_classes,  # resnet50 adds a layer of transformer
                  resolution=in_shape[1:], heads=heads, layer3="CNN", in_channel=in_shape[0])


def bot_net50_l2(num_classes=10, args=None, heads=4, **kwargs):
    in_shape = args.in_shape
    return BotNet(BottleNeck, [3, 4, 6, 3], num_classes=num_classes,  # resnet50 adds two layers of transformer
                  resolution=in_shape[1:], heads=heads, layer3="Transformer", in_channel=in_shape[0])


def doge_net26(num_classes=10, args=None, heads=4, **kwargs):
    in_shape = args.in_shape
    return DogeNet(DogeNeck, [2, 3, 1, 2], num_classes=num_classes,
                   resolution=in_shape[1:], heads=heads, in_channel=in_shape[0])


def doge_net50(num_classes=4, args=None, heads=4, **kwargs):
    in_shape = (3, 224, 224)
    return DogeNet(DogeNeck, [6, 6, 2, 2], num_classes=num_classes,
                   resolution=in_shape[1:], heads=heads, in_channel=in_shape[0])


def doge_net_2x1x3x2(num_classes=10, args=None, heads=4, **kwargs):
    in_shape = args.in_shape
    return DogeNet(DogeNeck, [2, 3, 1, 2], num_classes=num_classes,
                   resolution=in_shape[1:], heads=heads, in_channel=in_shape[0])


def doge_net26_no_embed(num_classes=10, args=None, heads=4, **kwargs):
    in_shape = args.in_shape
    return DogeNet(DogeNeck, [2, 3, 1, 2], num_classes=num_classes,
                   resolution=in_shape[1:], heads=heads, in_channel=in_shape[0], position_embedding=False)


def doge_net50_no_embed(num_classes=10, args=None, heads=4, **kwargs):
    in_shape = args.in_shape
    return DogeNet(DogeNeck, [6, 6, 2, 2], num_classes=num_classes,
                   resolution=in_shape[1:], heads=heads, in_channel=in_shape[0], position_embedding=False)


def doge_net_2x1x3x2_no_embed(num_classes=10, args=None, heads=4, **kwargs):
    in_shape = args.in_shape
    return DogeNet(DogeNeck, [2, 3, 1, 2], num_classes=num_classes,
                   resolution=in_shape[1:], heads=heads, in_channel=in_shape[0], position_embedding=False)


if __name__ == '__main__':
    from paddlesummary import summary
    from core.utils.argparse import arg_parse

    args = arg_parse().parse_args()
    args.in_shape = (3, 224, 224)
    x = paddle.randn([1, 3, 224, 224])
    model = doge_net26(args=args, heads=4)  # 904994
    # model = doge_net50_64x64(resolution=tuple(x.shape[2:]), heads=8)  # 4178255
    # model = efficient_b0()
    # model = efficientnet_pypaddle.EfficientNet.from_name("efficientnet-b0")

    print(model(x).size())
    print(get_n_params(model))

    # Print network structure
    summary(model, input_size=[(3, 224, 224)], batch_size=1, device="cpu")
Reference
[1] Vaswani, Ashish, et al. "Attention is all you need." arXiv preprint arXiv:1706.03762 (2017).
[2] Dosovitskiy, Alexey, et al. "An image is worth 16x16 words: Transformers for image recognition at scale." arXiv preprint arXiv:2010.11929 (2020).
[3] Chen, Mark, et al. "Generative pretraining from pixels." International Conference on Machine Learning. PMLR, 2020.
[4] Liu, Ze, et al. "Swin Transformer: Hierarchical Vision Transformer using Shifted Windows." arXiv preprint arXiv:2103.14030 (2021).
[5] Ba J L, Kiros J R, Hinton G E. Layer normalization[J]. arXiv preprint arXiv:1607.06450, 2016.
[6] T.-Y. Lin, P. Dollar, R. Girshick, K. He, B. Hariharan, and ´ S. Belongie. Feature pyramid networks for object detection. In CVPR, 2017. 2, 4, 5, 7
[7] Ronneberger O, Fischer P, Brox T. U-net: Convolutional networks for biomedical image segmentation[C]//International Conference on Medical image computing and computer-assisted intervention. Springer, Cham, 2015: 234-241.
image is worth 16x16 words: Transformers for image recognition at scale." arXiv preprint arXiv:2010.11929 (2020).
[3] Chen, Mark, et al. "Generative pretraining from pixels." International Conference on Machine Learning. PMLR, 2020.
[4] Liu, Ze, et al. "Swin Transformer: Hierarchical Vision Transformer using Shifted Windows." arXiv preprint arXiv:2103.14030 (2021).
[5] Ba J L, Kiros J R, Hinton G E. Layer normalization[J]. arXiv preprint arXiv:1607.06450, 2016.
[6] T.-Y. Lin, P. Dollar, R. Girshick, K. He, B. Hariharan, and ´ S. Belongie. Feature pyramid networks for object detection. In CVPR, 2017. 2, 4, 5, 7
[7] Ronneberger O, Fischer P, Brox T. U-net: Convolutional networks for biomedical image segmentation[C]//International Conference on Medical image computing and computer-assisted intervention. Springer, Cham, 2015: 234-241.
[8] Bao, Hangbo, et al. "Unilmv2: Pseudo-masked language models for unified language model pre-training." International Conference on Machine Learning. PMLR, 2020.