1, Deploy PPTP VPN server
1. Check whether the server system environment supports the installation of pptp
1,Check whether the system kernel supports MPPE patch
[root@PPTP ~]# modprobe ppp-compress-18 && echo success
		display success Description system support MPPE If the patch is not supported, you need to install it first kernel-devel
[root@PPTP ~]# yum -y install kernel-devel
2,Check whether the system is on TUN/TAP support
[root@PPTP ~]# cat /dev/net/tun
		If this command displays the following text, it indicates that it is passed:
		cat: /dev/net/tun: File descriptor in bad state
3,Check whether the system is on ppp support
[root@PPTP ~]# cat /dev/ppp
		If this command displays the following text, it indicates that it is passed:
		cat: /dev/ppp: No such device or address
The above three items must be met at the same time, otherwise pptp cannot be installed
2. Install xl2tpd package
[root@PPTP ~]# yum clean all 	#Empty local yum source
[root@PPTP ~]# yum repolist 	#Reload local yum source
[root@PPTP ~]# yum -y install xl2tpd  libreswan iptables
	#I use the iptables firewall function here. Huawei cloud does not need to be installed. In the later stage, I can directly change the security group
[root@PPTP ~]#  bash
	#After executing this statement, you can complete the command with the tab key
3. Modify profile
3.1. Create IPSec encryption configuration file etc / IPSec d/myipsec. conf
[root@PPTP ~]# vim /etc/ipsec.d/myipsec.conf
	conn IDC-PSK-NAT
    rightsubnet=vhost:%priv		#Allowed VPN virtual networks
    also=IDC-PSK-noNAT

conn IDC-PSK-noNAT
    authby=secret
        ike=3des-sha1;modp1024
        phase2alg=aes256-sha1;modp2048
    pfs=no
    auto=add
    keyingtries=3
    rekey=no
    ikelifetime=8h
    keylife=3h
    type=transport
    left=192.168.3.100			#Server extranet IP address
    leftprotoport=17/1701		#Server port number
    right=%any					#Allow any client connections
    rightprotoport=17/%any

:wq #vim save exit
3.2. Modify IPSec predefined shared secret key
[root@PPTP ~]# vim /etc/ipsec.secrets
	#Server extranet ip address% any: PSK "password"
	119.3.50.156  %any: PSK "123456"

	:wq #vim save exit
[root@PPTP ~]# cat /etc/resolv.conf #View dns of this machine
	#nameserver dns address
	nameserver 8.8.8.8
3.3. Modify xl2tp the configuration file
Modify / etc / xl2tpd / xl2tpd conf
[root@PPTP ~]# vim /etc/xl2tpd/xl2tpd.conf
	[lns default]
	ip range = 172.16.0.100-172.16.0.150 #ip address pool assigned to clients
	local ip = 192.168.3.100			 #External IP address of the server
	require chap = yes
	refuse pap = yes
	require authentication = yes
	name = xl2tp
	ppp debug = yes
	pppoptfile = /etc/ppp/options.xl2tpd
	length bit = yes
Modify / etc / xl2tpd / xl2tpd conf
/etc/xl2tpd/xl2tpd.conf
	ms-dns 8.8.8.8		#dns address
	require-mschap-v2 	#The row's#Symbol deletion
	#crtscts			#Comment or delete the line
	#loock				#Comment or delete the line
require-mschap-v2: you need to enter the user name and password when connecting the windows client
3.4. Modify / etc / PPP / chap secrets and add user and password
[root@PPTP ~]# vim /etc/ppp/chap-secrets
	User name connection name password ip address
	zhangsan * 123 *
	lisi * 123 *
	#One line for one user, * indicates any. If you need to display the connection name and ip, you can customize it
Note: the connection name and IP address can be customized, which means that the client is automatically assigned an IP address
3.5. Enable routing forwarding function
Temporary opening:
[root@PPTP ~]# echo "1" > /proc/sys/net/ipv4/ip_forward
[root@PPTP ~]# cat/proc/sys/net/ipv4/ip_forward
	#Just display 1
Note: this value cannot be modified with vim, but can only be modified with echo redirection. It is a temporary modification. Restore the initial value after restart
Permanently open
[root@PPTP ~]# vim /etc/sysctl.conf
	Add a row
		net.ipv4.ip_forward = 1
	:wq Save exit
[root@PPTP ~]# /sbin/sysctl -p  ##Effective immediately
3.6. CentOS7 firewall settings (either can be configured, both can be configured, or neither can be configured)
firewall settings
[root@PPTP ~]# firewall-cmd --permanent --add-service=ipsec
[root@PPTP ~]# firewall-cmd --permanent --add-port=1701/udp
[root@PPTP ~]# firewall-cmd --permanent --add-port=4500/udp
[root@PPTP ~]# firewall-cmd --permanent --add-port=500/udp
[root@PPTP ~]# firewall-cmd --permanent --add-masquerade
[root@PPTP ~]# firewall-cmd --reload
I use the security group on the server instead of the system firewall. In order to pass the test, I stop the firewall
[root@PPTP ~]# systemctl stop firewalld
iptables settings
Add rule
[root@PPTP ~]# iptables -t nat -A POSTROUTING -s 172.16.0.0/255.255.255.0 -j SNAT --to-source 192.168.3.100
[root@PPTP ~]# iptables -A FORWARD -p tcp --syn -s 172.16.0.0/255.255.255.0 -j TCPMSS --set-mss 1356
[root@PPTP ~]# /etc/init.d/iptables save #Save rule
Open pptp service port tcp 1723 and set * * * dial in client ip address pool 172.16.1.0 / 255.255.255.0 to pass through the firewall
[root@PPTP ~]# vim /etc/sysconfig/iptables
	#Edit and add the following code
		-A RH-Firewall-1-INPUT -p tcp -m state --state NEW -m tcp --dport 1701 -j ACCEPT
		-A RH-Firewall-1-INPUT -p tcp -m state --state NEW -m tcp --dport 500 -j ACCEPT
		-A RH-Firewall-1-INPUT -p tcp -m state --state NEW -m tcp --dport 4500 -j ACCEPT
		-A RH-Firewall-1-INPUT -s 172.16.0.0/255.255.0.0 -j ACCEPT
	:wq!  #Save, exit
[root@PPTP ~]# systemctl restart iptables #Restart iptables
[root@PPTP ~]# systemctl enable iptables #Startup and self start
[root@PPTP ~]# cat /etc/sysconfig/iptables #View firewall profile
I use the security group on the server instead of the system firewall. In order to pass the test, I stop the firewall
[root@PPTP ~]# systemctl stop iptables
4. Start service
[root@PPTP ~]# systemctl restart ipsec
[root@PPTP ~]# ss -ntlup | grep 500 ##Check the ipsec service port number. The default is two 5004500 ports
[root@PPTP ~]# systemctl restart xl2tpd
[root@PPTP ~]# systemctl enable xl2tpd
[root@PPTP ~]# ss -ntlup | grep xl2tpd	##View the service port number. The default is 1701
Note: after executing systemctl stop iptables and systemctl stop firewalld, the security group of the server needs to add its own rules. Adding rules requires a port number, so please remember the port number
5. Huawei cloud security group configuration
1) Console - find EIP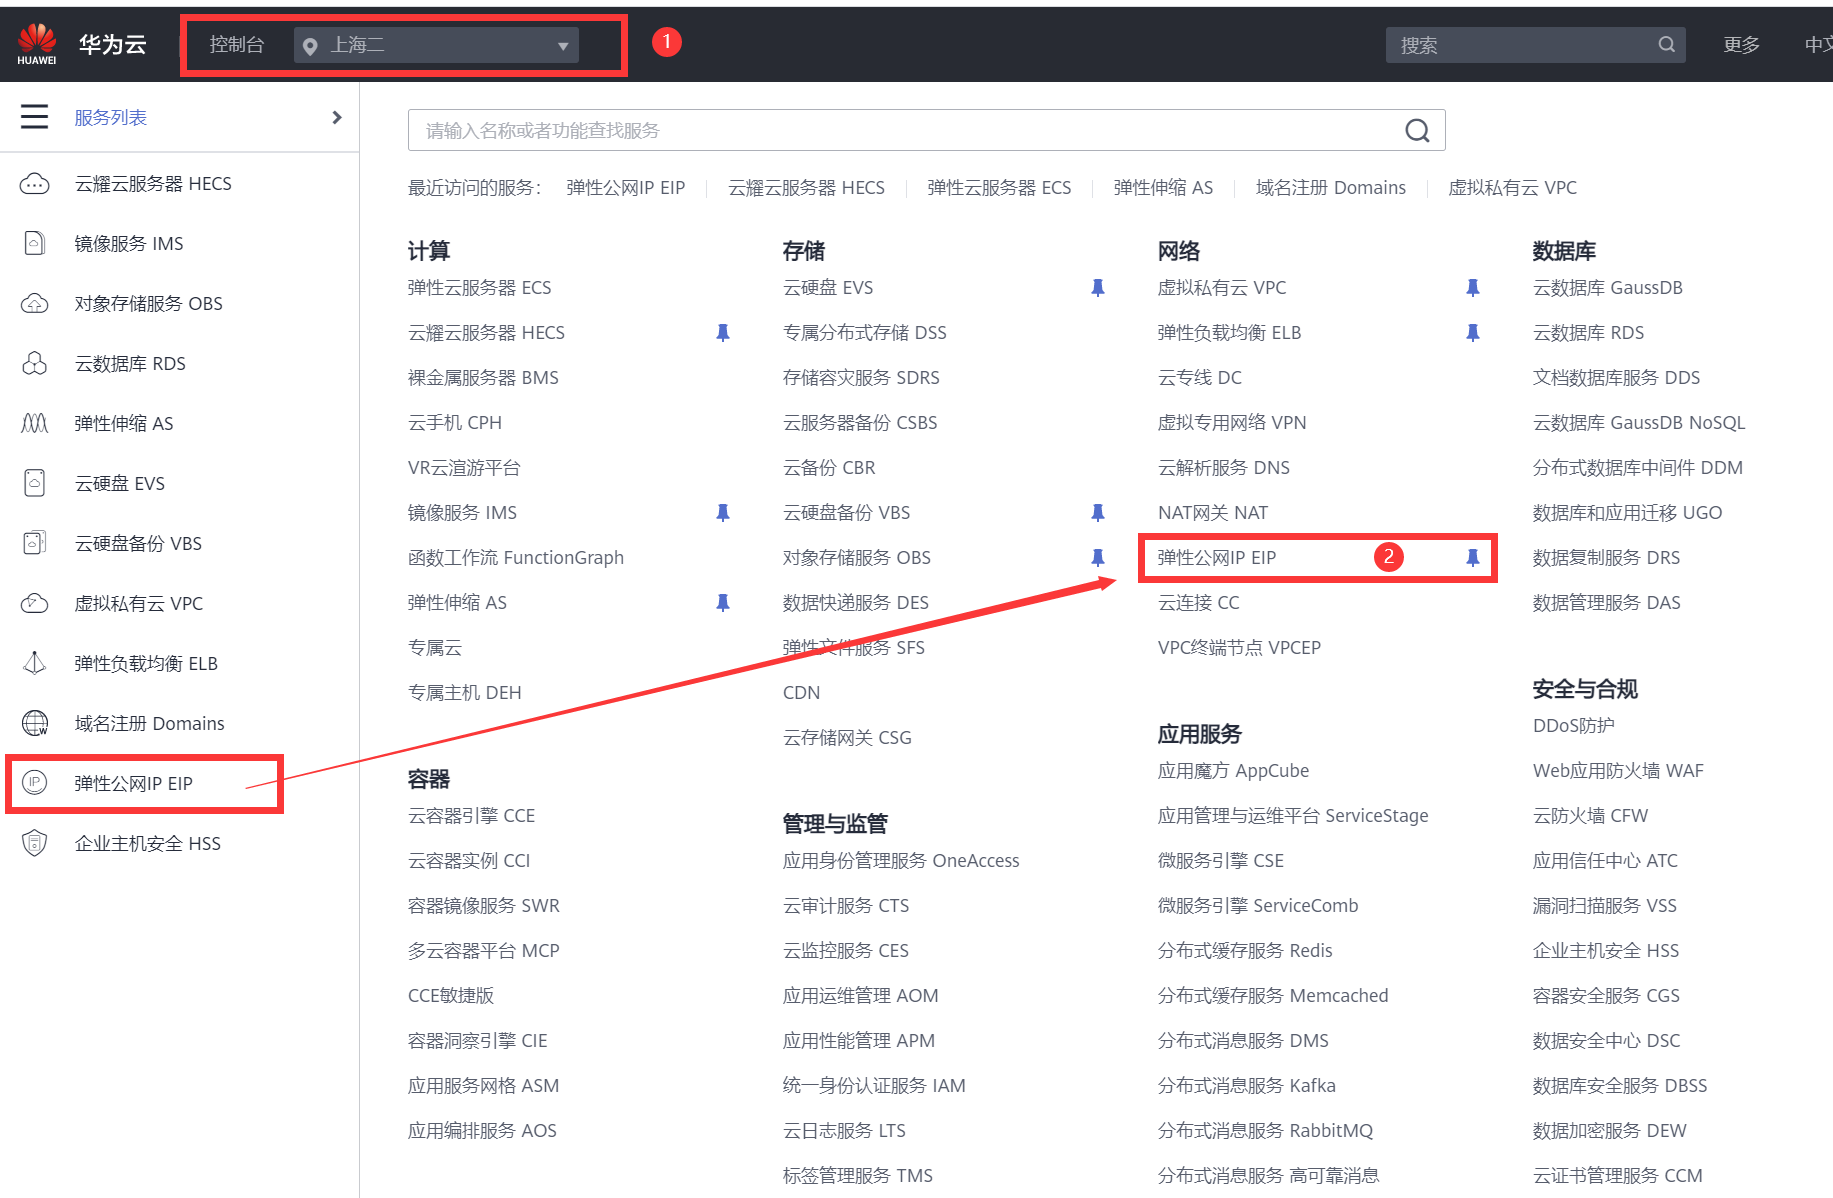
2) Find access control - Security Group - find instance of server binding - configure rule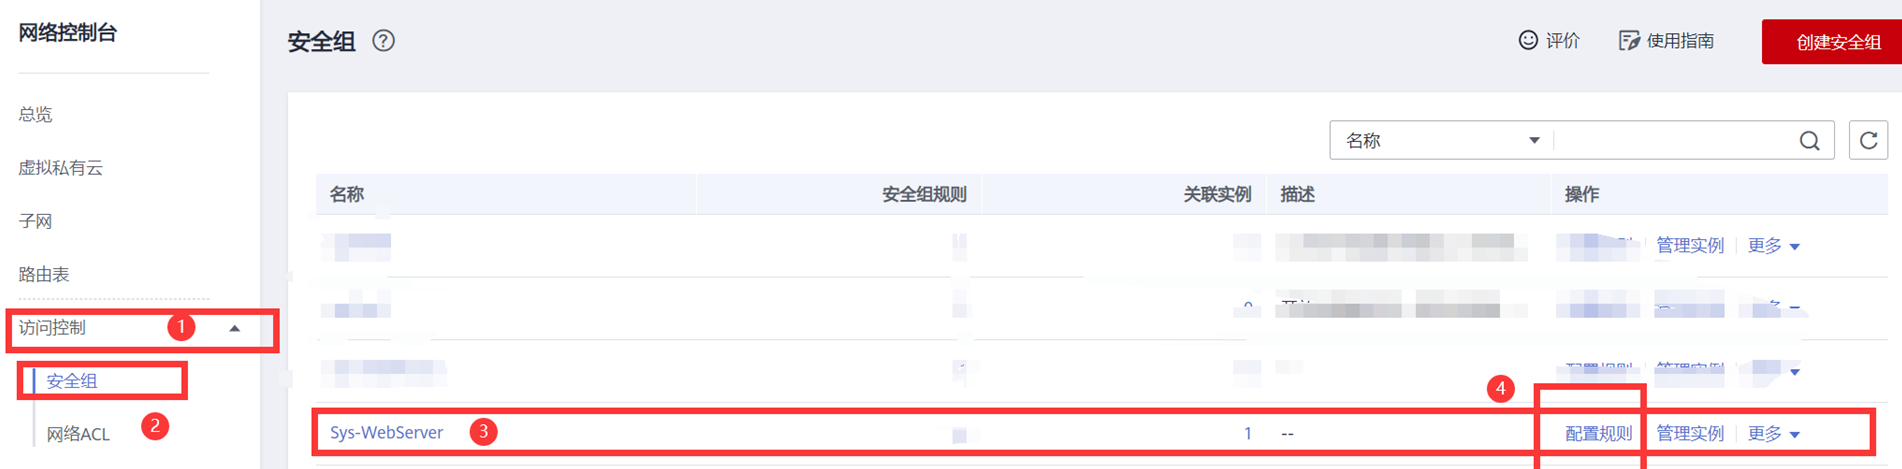
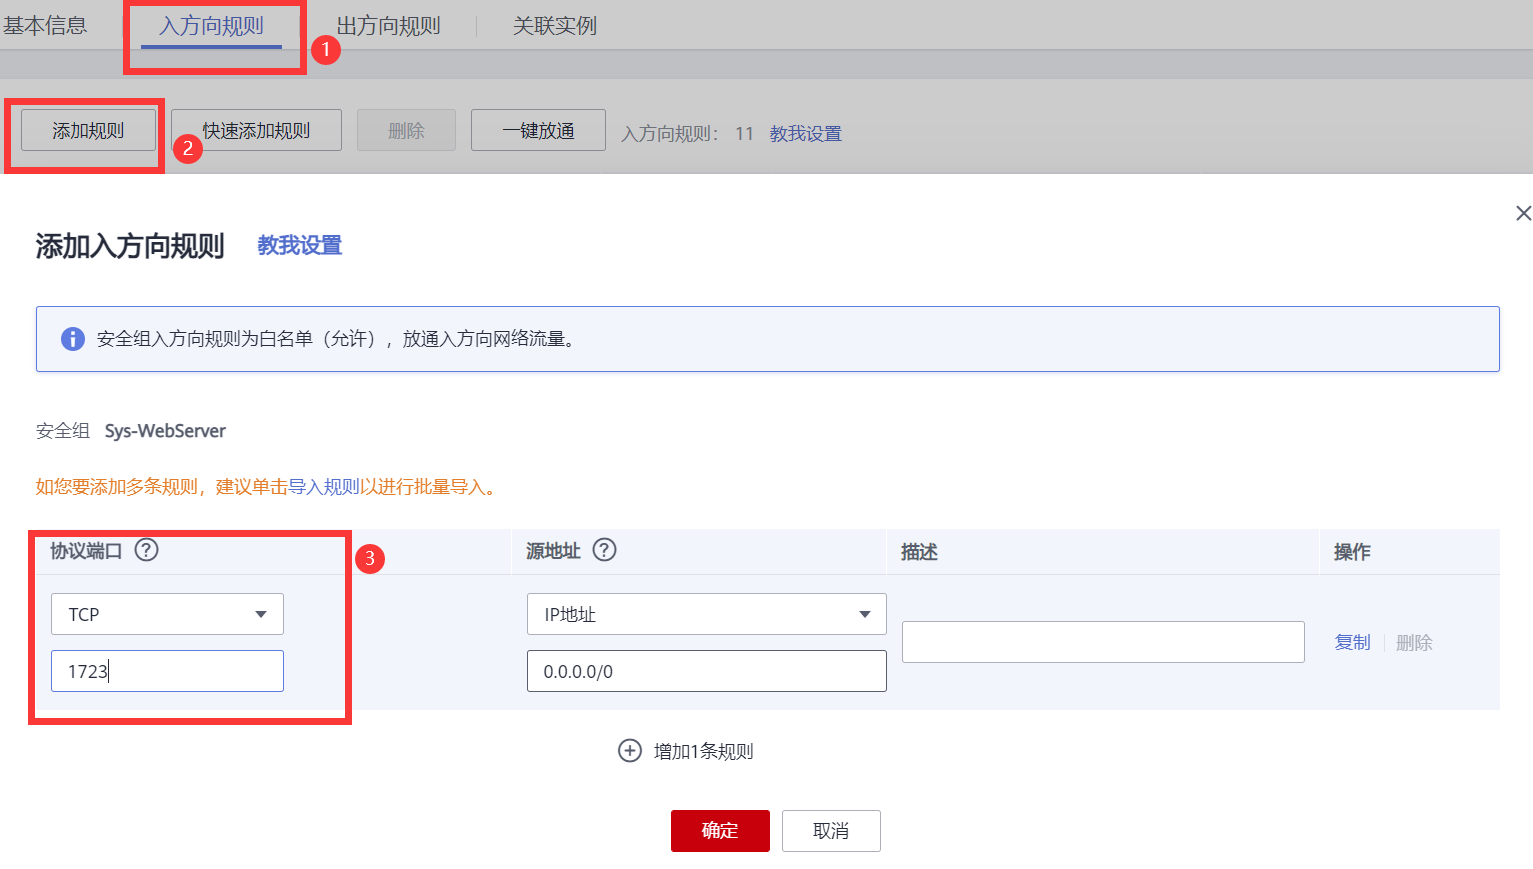
3) Incoming direction rule - add rule - select UTP protocol - enter xl2tpd the service port 1701 - OK
4) After configuration, just see the rules
! [insert picture description here]( https://img-blog.csdnimg.cn/20210711115144439.png?x-oss-process=image/watermark,type_ZmFuZ3poZW5naGVpdGk,shadow_10,text_aHR0cHM6Ly9ibG9nLmNzZG4ubmV0L0FpbWVyRGFuaWVs,size_16,color_FFFFFF,t_70,center
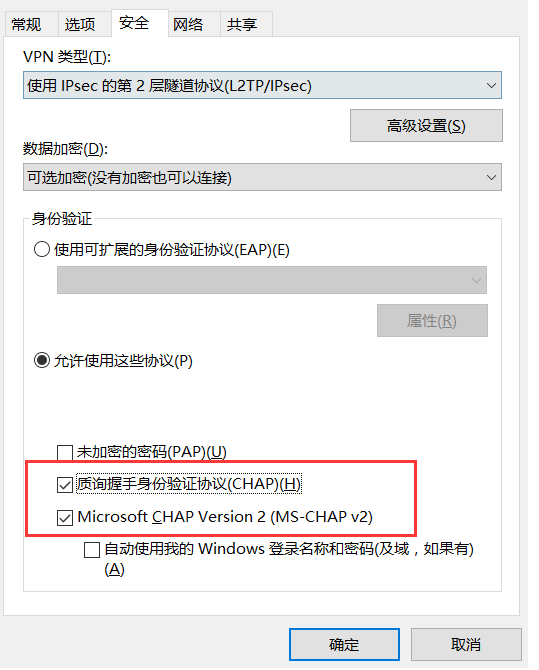
2, Windows client connection and mac connection are directly added in the network preference settings.
Here we mainly introduce window connection
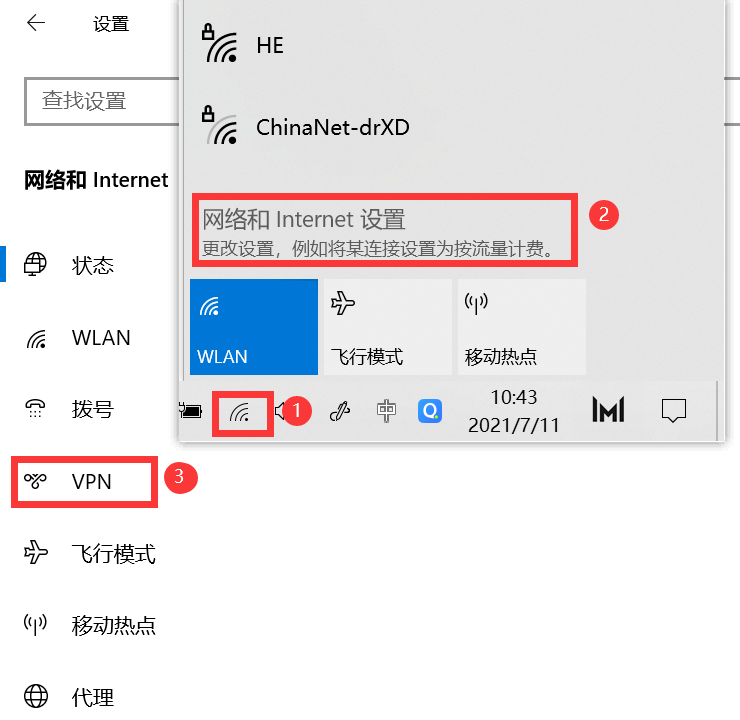
1) Lower right corner of desktop - Network symbol (wifi or small computer icon) - network and Inter settings - VPN
2) VPN - add VPN connection - windows (built-in) - hhh (custom connection name) - 192.168.3.100 (external ip address of the server) - pre shared secret key - 123456 - zhangsan (configured user name) - 123 (configured password) - save
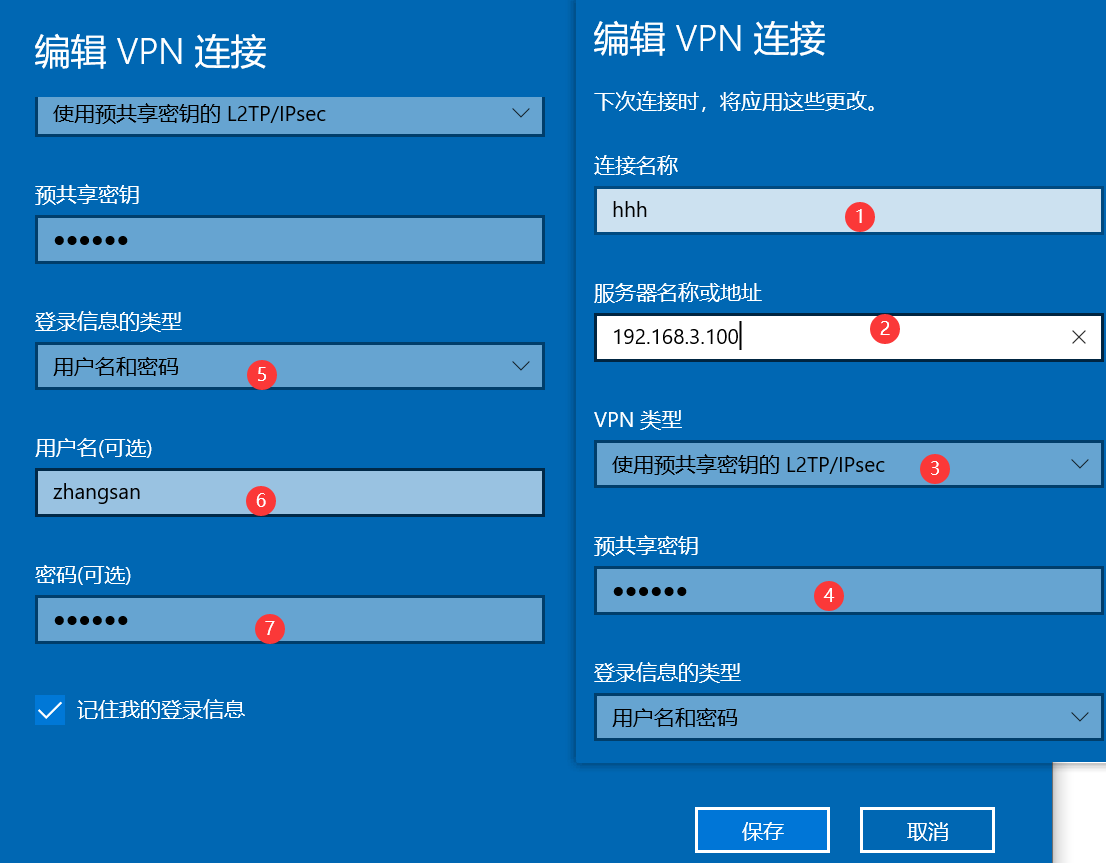
3) hhh - connected - connected will be displayed after successful connection

3, Detailed explanation of configuring firewall rules
[root@PPTP ~]# yum -y install iptables-service #Installation services
[root@PPTP ~]# systemctl stop firewalld.service  #Out of Service
	#Firewalld calls iptables, so firewalld configuration is not required
[root@PPTP ~]# systemctl disable firewalld.service  #Delete boot auto start
[root@PPTP ~]# vim /etc/sysctl.conf ##Configure to permanently turn on the routing forwarding function
	#Add at the end of the last line
	net.ipv4.ip_forward = 1
[root@PPTP ~]# sysctl -p #Reload inner box parameter configuration
[root@PPTP ~]# iptables -I INPUT -p tcp --dport 1723 -j ACCEPT #Allow pptp service port
[root@PPTP ~]# iptables -I INPUT -p gre -j ACCEPT
[root@PPTP ~]# iptables -t nat -I POSTROUTING -s 172.16.0.0/24 -o eth0 -j SNAT --to-source 192.168.0.205 #Routing address translation, 172.16.0.0: address pool address, 192.168.0.205: server local address
[root@PPTP ~]# iptables -t nat -I POSTROUTING -s 172.16.0.0/24 -o eth0 -j SNAT --to-source 119.3.50.156	#Routing address translation, 172.16.0.0: address pool address, 119.3.50.156: server local address

[root@PPTP ~]# iptables -I FORWARD -i eth0 -o ppp+ -j ACCEPT
[root@PPTP ~]# iptables -I FORWARD -i ppp+ -o eth0 -j ACCEPT
[root@PPTP ~]# iptables -I FORWARD -p tcp --syn -i ppp+ -j TCPMSS --set-mss 1356
[root@PPTP ~]#  iptables -I INPUT -p udp --dport 1701 -j ACCEPT #Service port of xl2tpd
[root@PPTP ~]# 	iptables -I INPUT -p udp --dport 500 -j ACCEPT #ipsec service port
[root@PPTP ~]#  iptables -I INPUT -p udp --dport 4500 -j ACCEPT #ipsec service port
[root@PPTP ~]# iptables -nL #View rules
[root@PPTP ~]# service iptables save #Save rule
[root@PPTP ~]# systemctl start iptables #Restart iptables service
4, There is a bug in window. Sometimes it can't be connected. You need to add the registry manually
1. Check whether the service is enabled
Run windows+r and enter services MSc, find ipsec policy agent
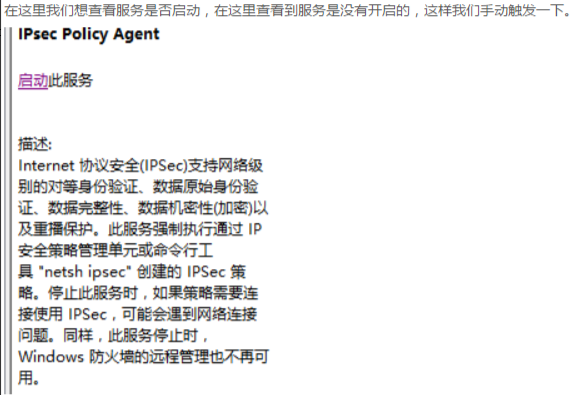
2. Enter the connection service and check the service
3. Add the registry and restart the computer
1) Run windows+r, type regedit, and then click OK
2) In the registry editor, locate and click the following registry subkey:
HKEY_LOCAL_MACHINE\System\CurrentControlSet\Services\Rasman\Parameters
3) On the edit menu, point to new, and then click DWORD value.
4) Type ProhibitIpSec and press enter.
5) On the edit menu, click Modify.
6) In the numeric data box, type 1, and then click OK.
7) Restart the computer