catalogue
1.2. Download and compile hudi
4. Run hudi program in spark shell
It mainly introduces the integrated use of Apache native Hudi, HDFS, Spark, etc
0. Links to related articles
Summary of articles on basic knowledge points of big data
1. Compile Hudi source code
Although the download and compilation of Hudi is introduced in another blog post of the blogger, this is a systematic introduction to the experience and use of Hudi, so I'm introducing it again.
1.1. Maven installation
You can decompress the configuration variables of the main os maven server and upload them to another blog server: Download, installation and use of Maven_ yang_shibiao blog - CSDN blog
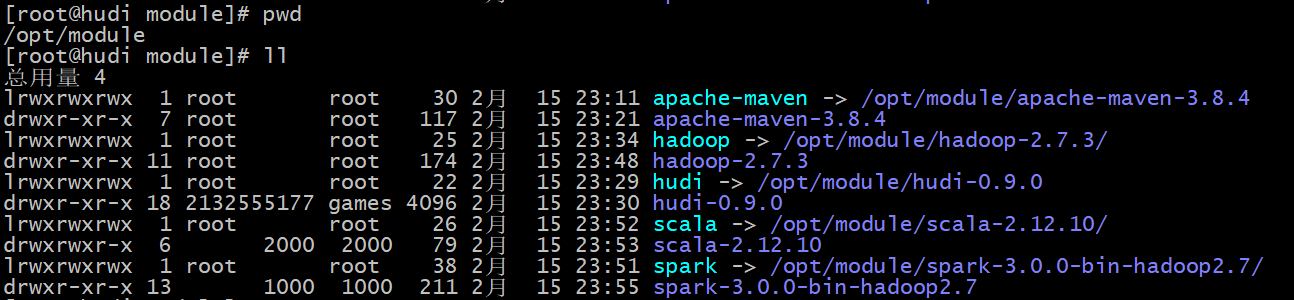
After configuring the soft connection, it is shown in the figure below:
Modify the local warehouse and image in maven as follows:
<localRepository>/opt/module/apache-maven/repository</localRepository>


  <mirrors>
    <!-- mirror
     | Specifies a repository mirror site to use instead of a given repository. The repository that
     | this mirror serves has an ID that matches the mirrorOf element of this mirror. IDs are used
     | for inheritance and direct lookup purposes, and must be unique across the set of mirrors.
     |
    <mirror>
      <id>mirrorId</id>
      <mirrorOf>repositoryId</mirrorOf>
      <name>Human Readable Name for this Mirror.</name>
      <url>http://my.repository.com/repo/path</url>
    </mirror>
     -->
    <mirror>
      <id>aliyunCentralMaven</id>
      <name>aliyun central maven</name>
      <url>https://maven.aliyun.com/repository/central/</url>
      <mirrorOf>central</mirrorOf>
    </mirror>
    <mirror>
      <id>centralMaven</id>
      <name>central maven</name>
      <url>http://mvnrepository.com/</url>
      <mirrorOf>central</mirrorOf>
    </mirror>
  </mirrors>
Modify environment variables:
export MAVEN_HOME=/opt/module/apache-maven
export PATH=$MAVEN_HOME/bin:$PATH
source environment variable, and then check the maven version, as shown below:

1.2. Download and compile hudi
- Download Hudi 0.8 source package from Apache Software Archive Directory: http://archive.apache.org/dist/hudi/0.9.0/
- Steps for compiling Hudi source code
- Upload the source package to the / opt/module directory, and decompress and configure the soft connection:
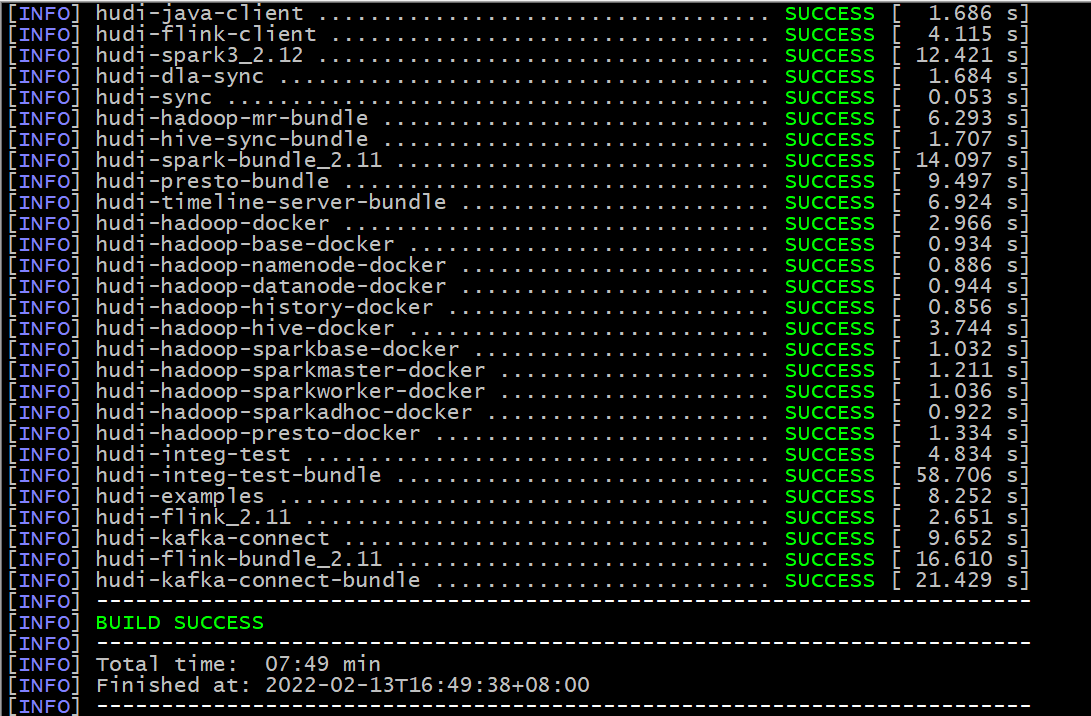
- Execute mvn clean install -DskipTests -Dscala-2.12 -Dspark3 command to compile. After success, it is shown in the following figure:
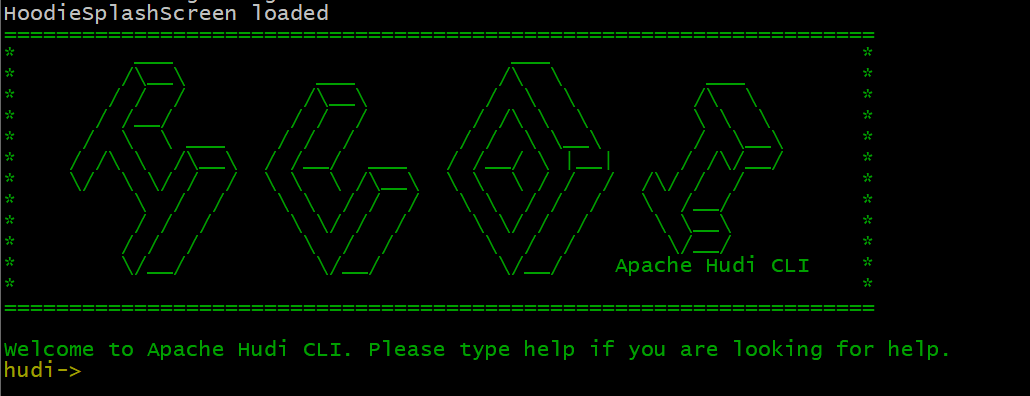
- After compiling, enter $Hudi_ Run the Hudi cli script in the home / Hudi cli directory. If it can be run, it indicates that the compilation is successful, as shown in the following figure:
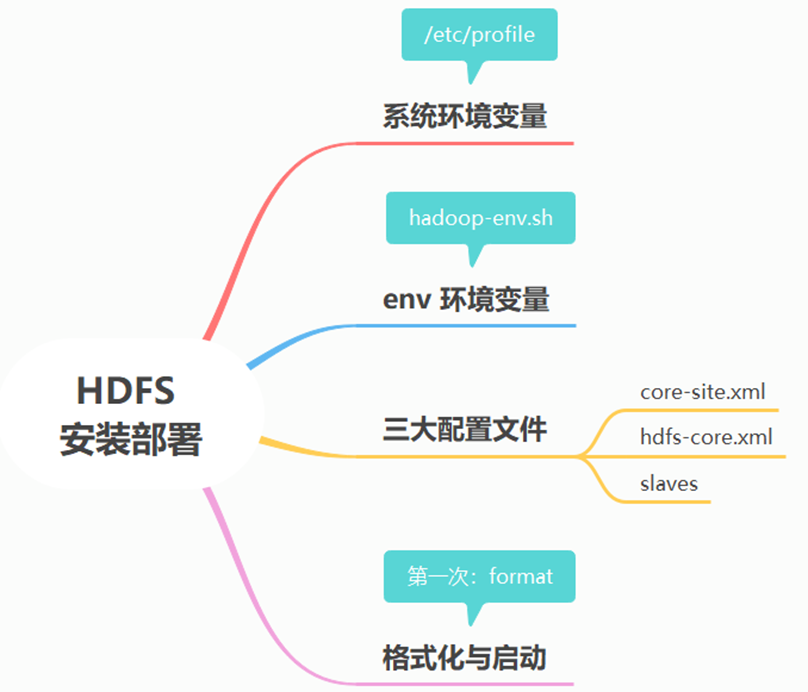
2. Install HDFS
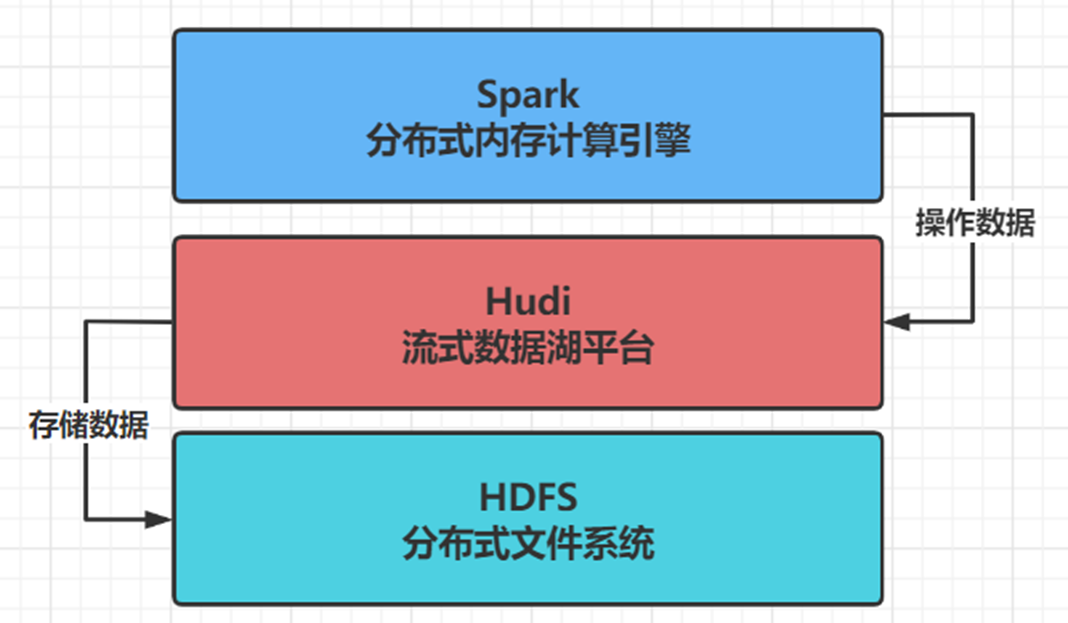
- step1: Hudi streaming data Lake platform helps manage data, stores data with the help of HDFS file system and operates data with Spark
- Step 2: download the hadoop-2.7.3 installation package, upload it to the server, unzip it, and configure the soft connection, as shown in the following figure:
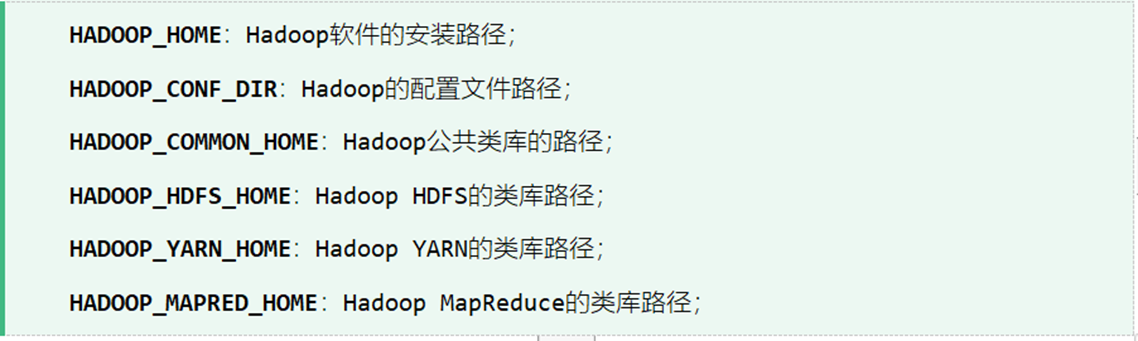
- step3: configure environment variables (in HADOOP, many configuration items of scripts in bin and sbin directories and configuration files in etc/hadoop will use HADOOP_ * these environment variables. If only HADOOP_HOME is configured, these scripts will determine the class library paths of COMMON, HDFS and yen by appending the corresponding directory structure from HADOOP_HOME.)
# Add the following configuration under / etc/profile file
export HADOOP_HOME=/opt/module/hadoop
export HADOOP_CONF_DIR=$HADOOP_HOME/etc/hadoop
export HADOOP_COMMON_HOME=$HADOOP_HOME
export HADOOP_HDFS_HOME=$HADOOP_HOME
export HADOOP_YARN_HOME=$HADOOP_HOME
export HADOOP_MAPRED_HOME=$HADOOP_HOME
export PATH=$PATH:$HADOOP_HOME/bin:$HADOOP_HOME/sbin
- step4: configure Hadoop env sh
# In this Hadoop_ HOME/etc/hadoop/hadoop-evn. Modify and add the following configuration under SH
export JAVA_HOME=/usr/java/jdk1.8.0_181
export HADOOP_HOME=/opt/module/hadoop
- Step 5: configure core site XML, configure the public attributes of Hadoop Common module, and modify Hadoop_ HOME/etc/hadoop/core-site. The XML file is as follows, and create the corresponding temporary data directory according to the configuration. Create the command: mkdir -p / opt / module / Hadoop / data / tmp
<?xml version="1.0" encoding="UTF-8"?>
<?xml-stylesheet type="text/xsl" href="configuration.xsl"?>
<!--
  Licensed under the Apache License, Version 2.0 (the "License");
  you may not use this file except in compliance with the License.
  You may obtain a copy of the License at

    http://www.apache.org/licenses/LICENSE-2.0

  Unless required by applicable law or agreed to in writing, software
  distributed under the License is distributed on an "AS IS" BASIS,
  WITHOUT WARRANTIES OR CONDITIONS OF ANY KIND, either express or implied.
  See the License for the specific language governing permissions and
  limitations under the License. See accompanying LICENSE file.
-->

<!-- Put site-specific property overrides in this file. -->

<configuration>
    <property>
        <name>fs.defaultFS</name>
        <value>hdfs://hudi:8020</value>
    </property>
    <property>
        <name>hadoop.tmp.dir</name>
        <value>/opt/module/hadoop/datas/tmp</value>
    </property>
    <property>
        <name>hadoop.http.staticuser.user</name>
        <value>root</value>
    </property>
</configuration>
- step6: configure HADOOP_HOME/etc/hadoop/hdfs-site.xml file, configure the relevant attributes of HDFS distributed file system, and create the corresponding data directory. The commands are mkdir -p / opt / module / Hadoop / data / DFs / NN, mkdir -p / opt / module / Hadoop / data / DFs / DN
<?xml version="1.0" encoding="UTF-8"?>
<?xml-stylesheet type="text/xsl" href="configuration.xsl"?>
<!--
  Licensed under the Apache License, Version 2.0 (the "License");
  you may not use this file except in compliance with the License.
  You may obtain a copy of the License at

    http://www.apache.org/licenses/LICENSE-2.0

  Unless required by applicable law or agreed to in writing, software
  distributed under the License is distributed on an "AS IS" BASIS,
  WITHOUT WARRANTIES OR CONDITIONS OF ANY KIND, either express or implied.
  See the License for the specific language governing permissions and
  limitations under the License. See accompanying LICENSE file.
-->

<!-- Put site-specific property overrides in this file. -->

<configuration>
    <property>
        <name>dfs.namenode.name.dir</name>
        <value>/opt/module/hadoop/datas/dfs/nn</value>
    </property>
    <property>
        <name>dfs.datanode.data.dir</name>
        <value>/opt/module/hadoop/datas/dfs/dn</value>
    </property>
    <property>
        <name>dfs.replication</name>
        <value>1</value>
    </property>
    <property>
        <name>dfs.permissions.enabled</name>
        <value>false</value>
    </property>
    <property>
        <name>dfs.datanode.data.dir.perm</name>
        <value>750</value>
    </property>
</configuration>
- step7: configure HADOOP_HOME/etc/hadoop/slaves. Add the configured domain name to this configuration
hudi
- step8: format HDFS. Before starting HDFS for the first time, format the HDFS file system and execute the following command
hdfs namenode -format
- step9: configure the start stop script to start or stop the HDFS cluster
vim hdfs-start.sh

hadoop-daemon.sh start namenode
hadoop-daemon.sh start datanode

================================================

hdfs-stop.sh

hadoop-daemon.sh stop datanode
hadoop-daemon.sh stop namenode
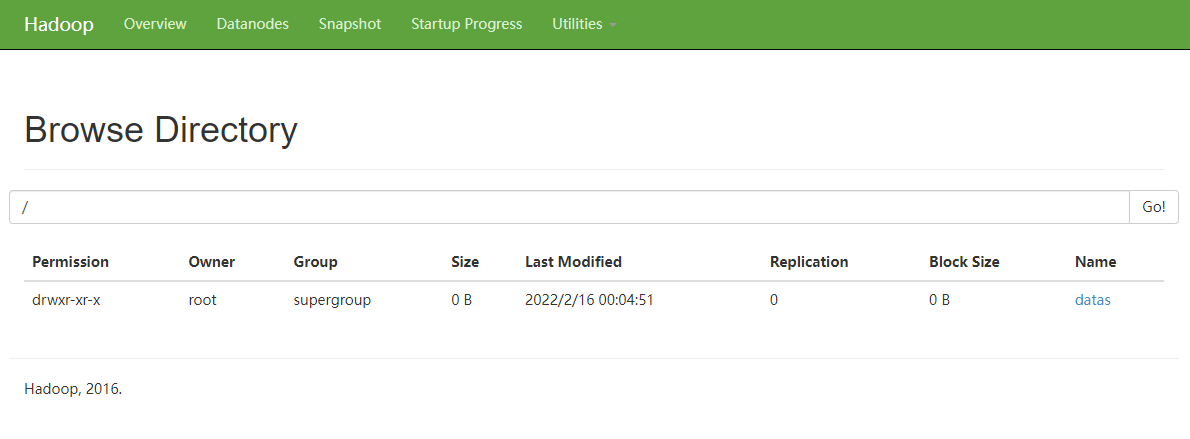
- Step 10: view the web ui of HDFS( http://hudi:50070/explorer.html# ), as shown in the figure below:
- step11: HDFS distributed file system installation and data storage
3. Install Spark
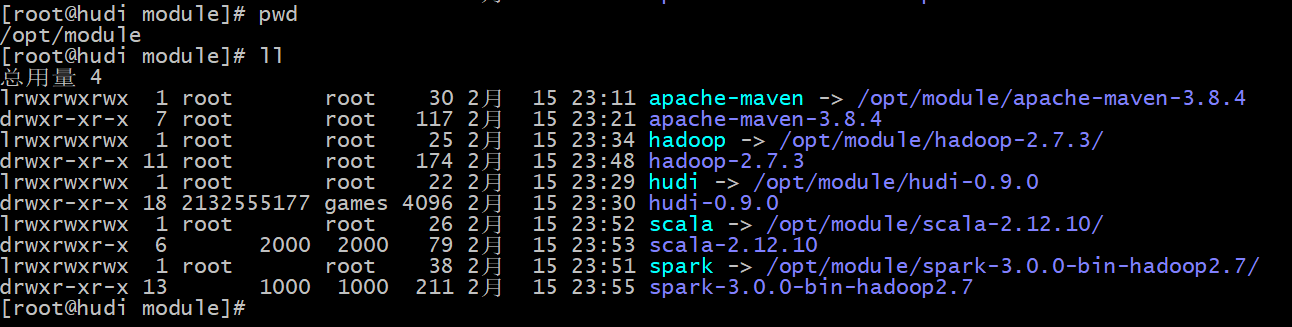
- step1: download the installation package and upload and unzip it, as shown in the figure below:
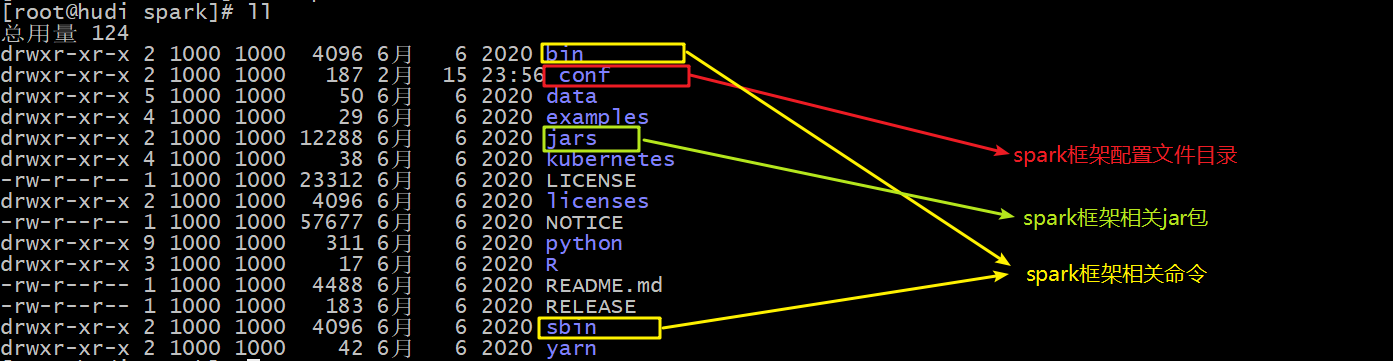
- Step 2: meaning of each directory:
- step3: install Scala, download, upload and unzip the scala package, as shown in the first step, and configure the environment variables of scala. The verification is shown in the following figure:
export SCALA_HOME=/opt/module/scala
export PATH=$PATH:$SCALA_HOME/bin

- step4: modify the configuration file, $SPARK_HOME/conf/spark-env.sh, amend and add the following:
JAVA_HOME=/usr/java/jdk1.8.0_181
SCALA_HOME=/opt/module/scala

HADOOP_CONF_DIR=/opt/module/hadoop/etc/hadoop
- step5: start spark shell and start the command (spark shell -- Master local [4]), as shown in the following figure:
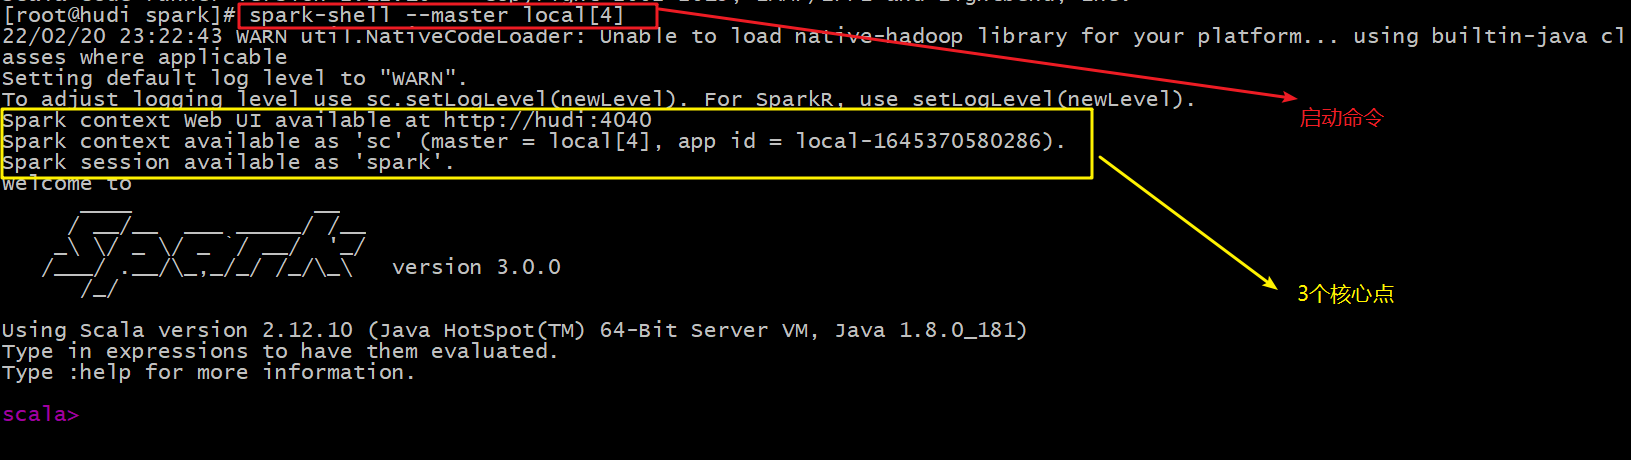
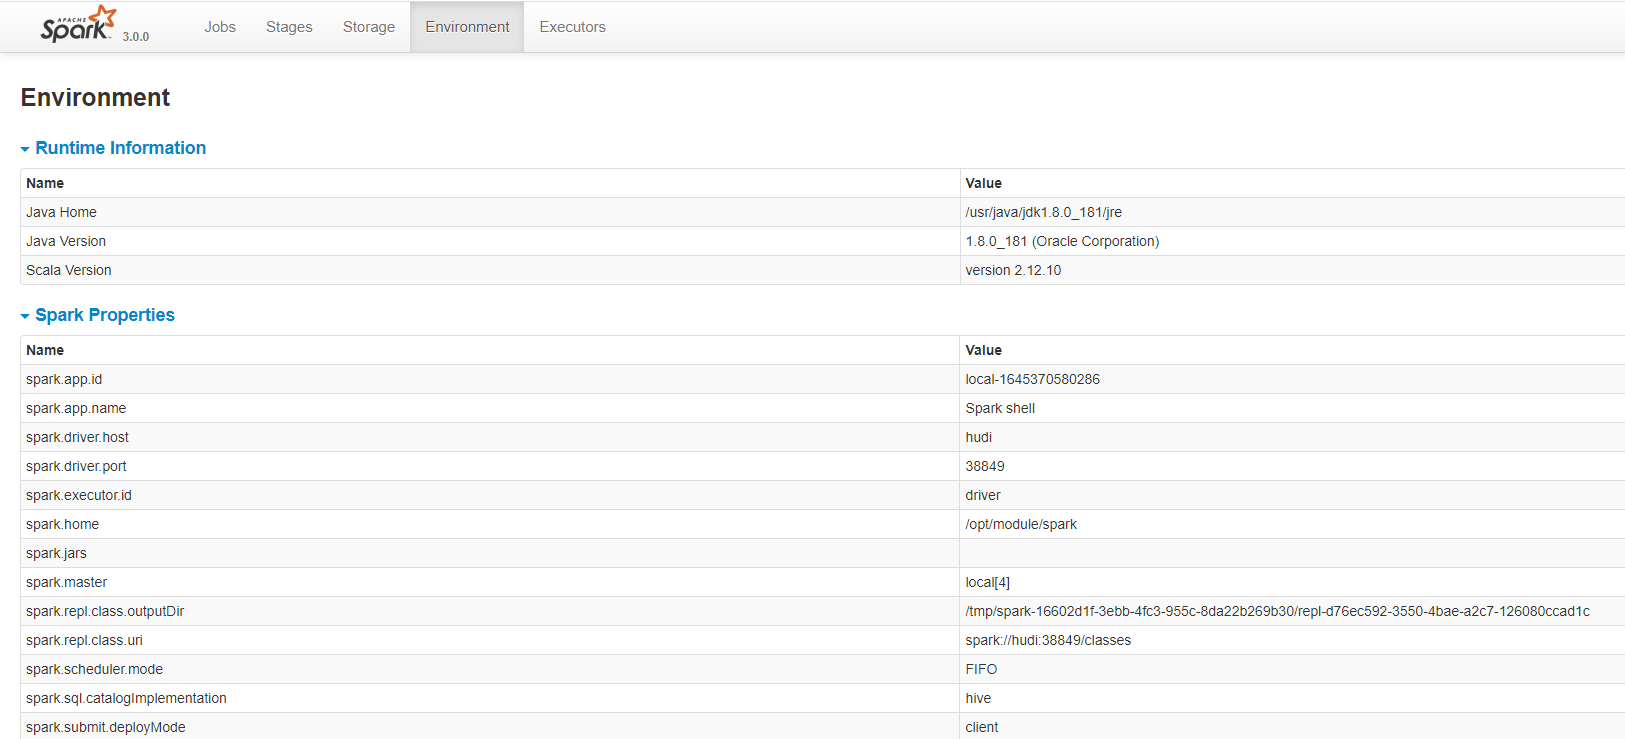
- Step 6: on a web page( http://hudi:4040/environment/ )View spark:
- step7: execute spark operator in spark shell to verify whether it can run successfully:
# Upload files to HDFS cluster
hdfs dfs -mkdir -p /datas/
hdfs dfs -put /opt/module/spark/README.md /datas

# Reading files in spark shell
val datasRDD = sc.textFile("/datas/README.md")
# View the number of entries in the file
datasRDD.count
# Get the first data
datasRDD.first
4. Run hudi program in spark shell
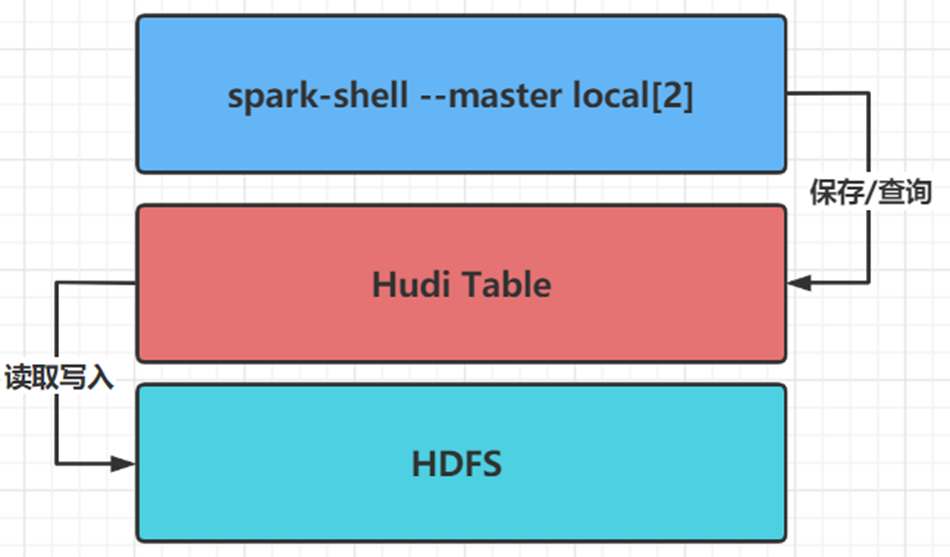
Firstly, use the spark shell command line to run in local mode (LocalMode: -- master local[2]) to simulate the generation of Trip ride transaction data, save it to the Hudi table, and load the data query and analysis from the Hudi table. The Hudi table data is finally stored on the HDFS distributed file system.
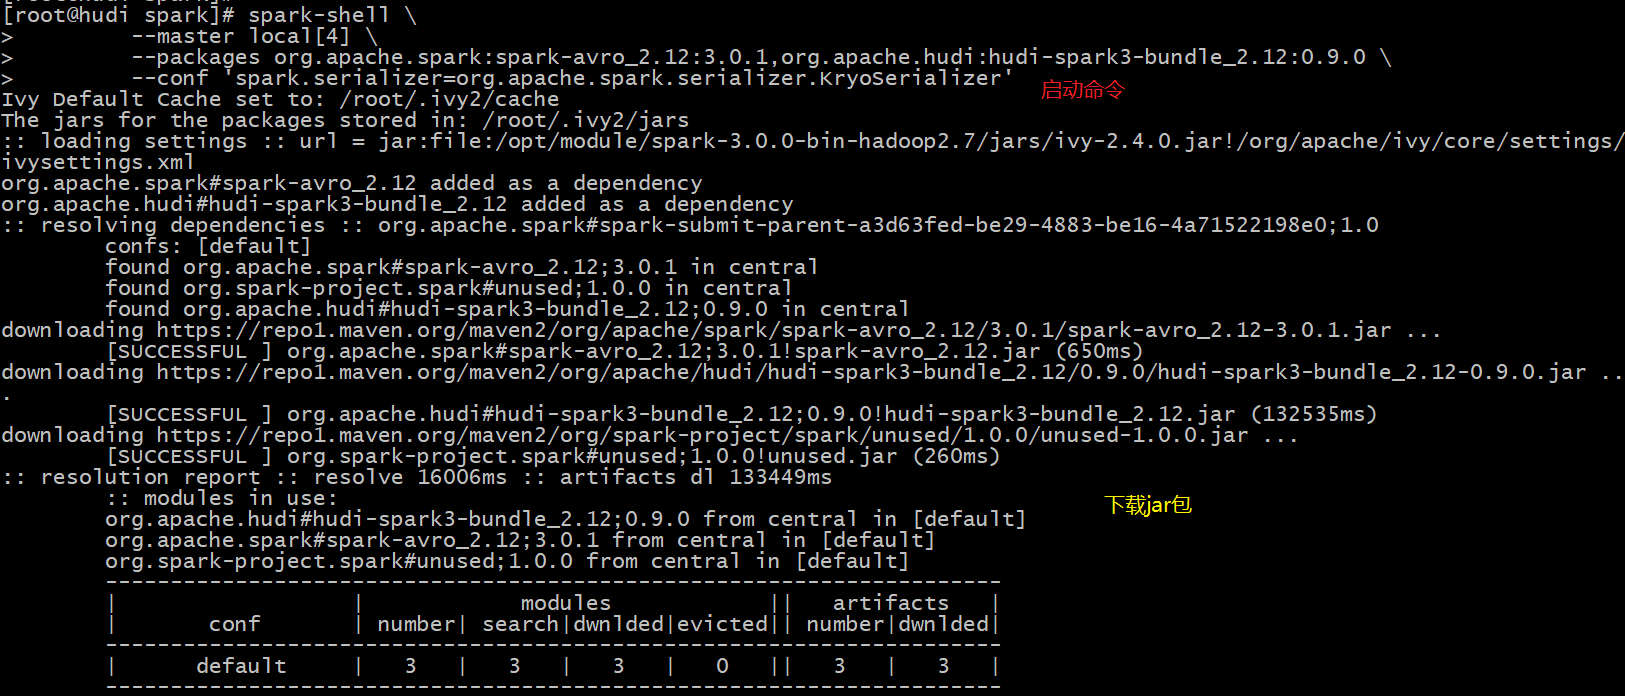
Execute the following spark shell command in the server to import the hudi package when starting the spark program. Please note that networking is required to download the corresponding jar package from the remote warehouse when executing this command:
spark-shell \
        --master local[4] \
        --packages org.apache.spark:spark-avro_2.12:3.0.1,org.apache.hudi:hudi-spark3-bundle_2.12:0.9.0 \
        --conf 'spark.serializer=org.apache.spark.serializer.KryoSerializer'
After startup, it is as follows:
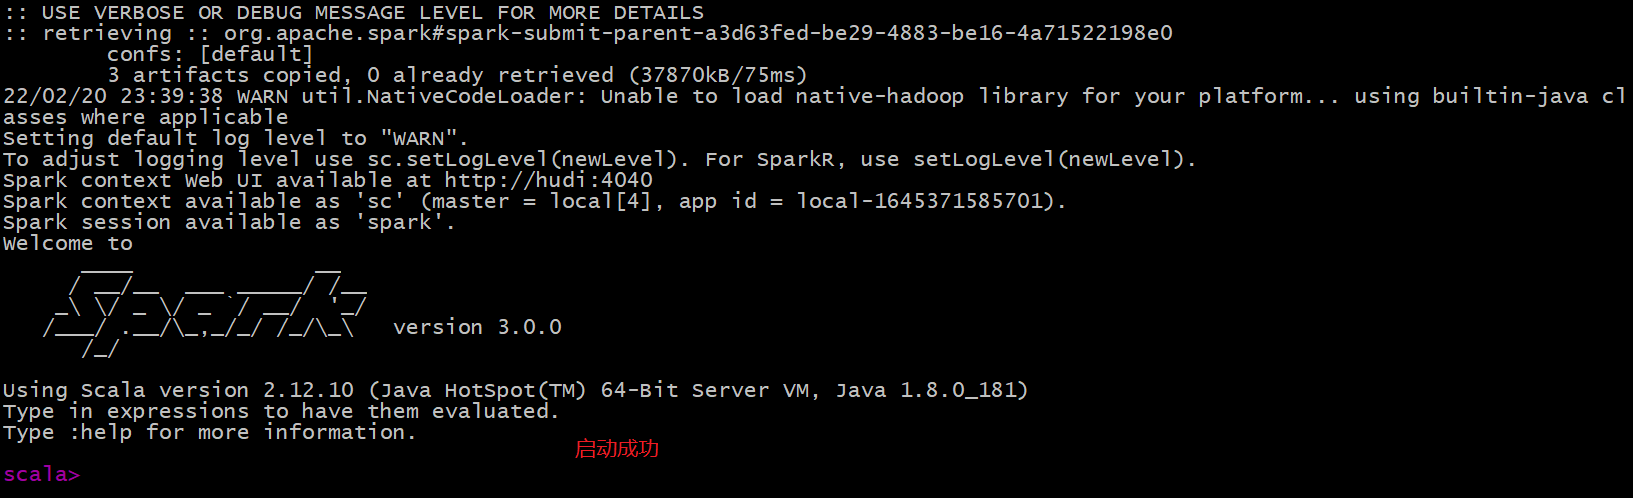
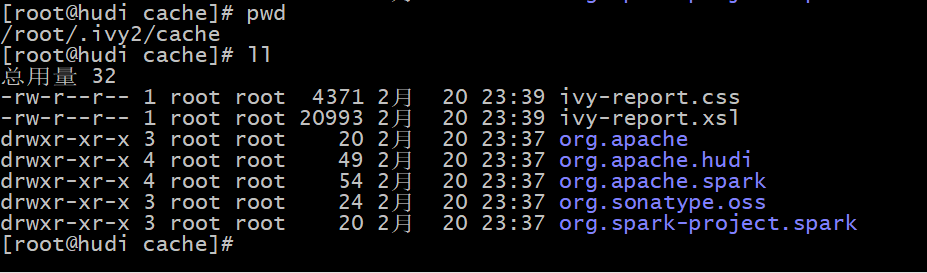
The jar package will be downloaded to the root command, as shown in the following figure:
If the server cannot be networked, you can first upload the jar package to the server, and then specify the jar package through the -- jars command when starting through the spark shell, as shown below:
spark-shell \
        --master local[4] \
        --jars /opt/module/Hudi/packaging/hudi-spark-bundle/target/hudi-spark3-bundle_2.12-0.8.0.jar \
        --packages org.apache.spark:spark-avro_2.12:3.0.1,org.apache.hudi:hudi-spark3-bundle_2.12:0.9.0 \
        --conf 'spark.serializer=org.apache.spark.serializer.KryoSerializer'
Import the related packages and definition variables of Hudi from the spark command line (table name and data storage path):
import org.apache.hudi.QuickstartUtils._
import scala.collection.JavaConversions._
import org.apache.spark.sql.SaveMode._
import org.apache.hudi.DataSourceReadOptions._
import org.apache.hudi.DataSourceWriteOptions._
import org.apache.hudi.config.HoodieWriteConfig._


val tableName = "hudi_trips_cow"
val basePath = "hdfs://hudi:8020/datas/hudi-warehouse/hudi_trips_cow"
val dataGen = new DataGenerator
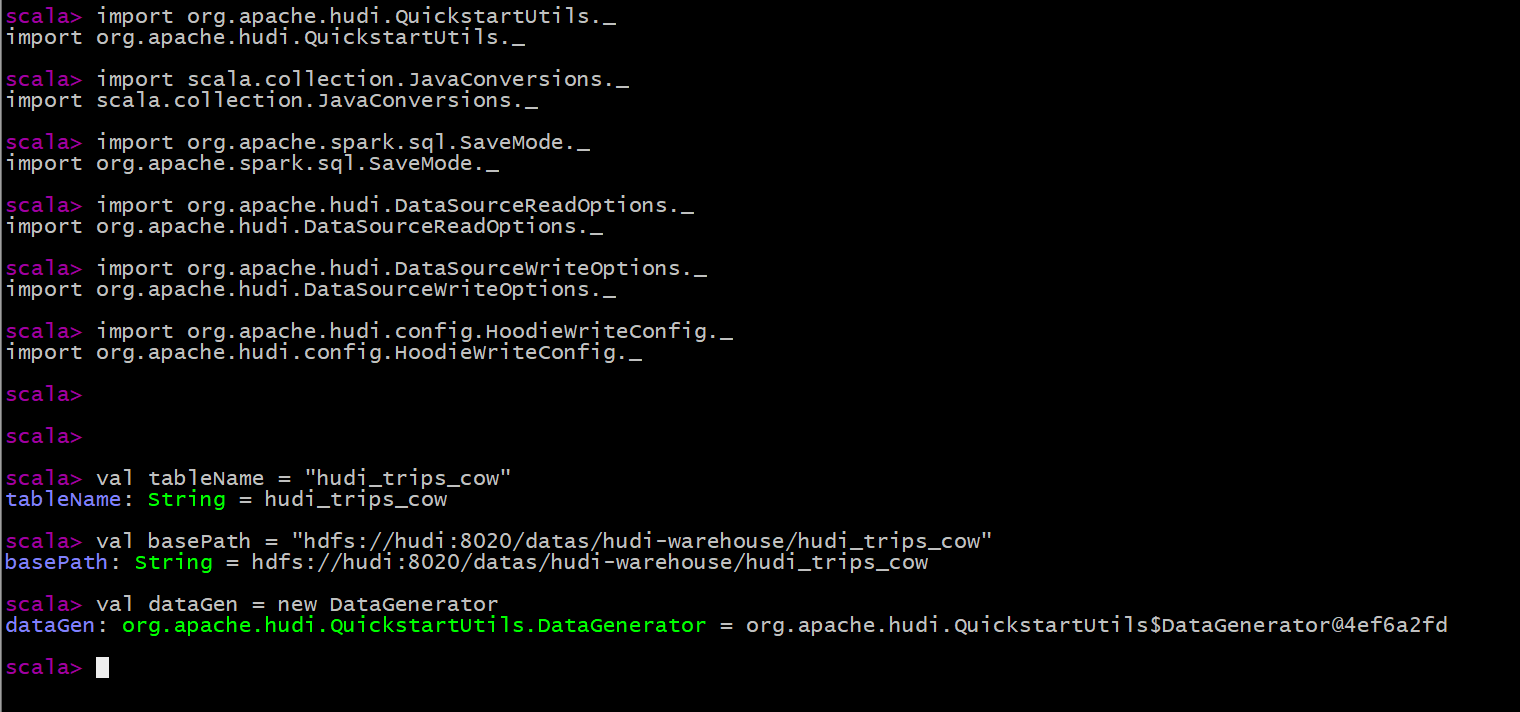
Build a DataGenerator object to simulate the generation of Trip ride data (10 json data):
val inserts = convertToStringList(dataGen.generateInserts(10))


Convert analog data List to DataFrame dataset:
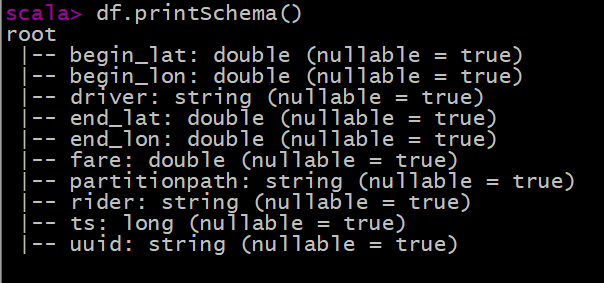
val df = spark.read.json(spark.sparkContext.parallelize(inserts, 2))

To view the Schema information of the converted DataFrame dataset:
Select relevant fields to view simulation sample data:
df.select("rider", "begin_lat", "begin_lon", "driver", "fare", "uuid", "ts").show(10, truncate=false)
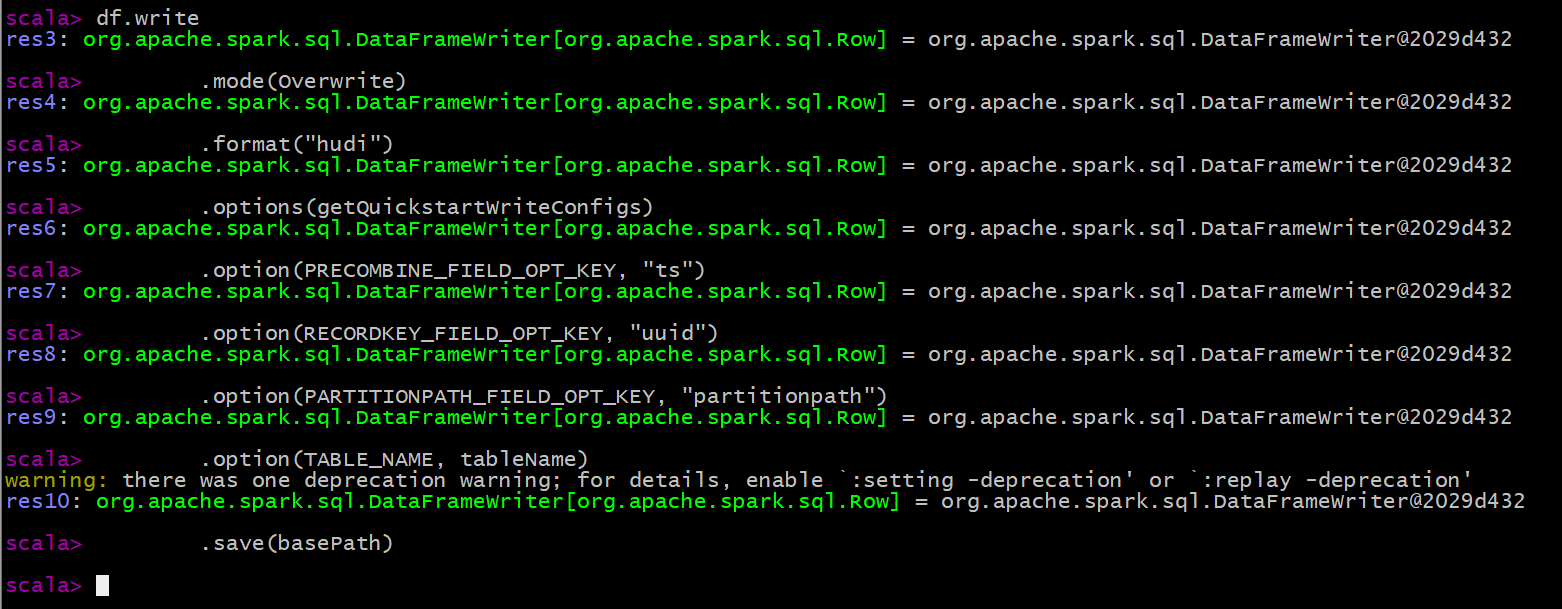
Save the Trip data generated by simulation to Hudi table. Since Hudi was born based on Spark framework, SparkSQL supports Hudi data Source. Directly specify the data Source through format, set relevant attributes and save the data.
df.write
        .mode(Overwrite)
        .format("hudi")
        .options(getQuickstartWriteConfigs)
        .option(PRECOMBINE_FIELD_OPT_KEY, "ts")
        .option(RECORDKEY_FIELD_OPT_KEY, "uuid")
        .option(PARTITIONPATH_FIELD_OPT_KEY, "partitionpath")
        .option(TABLE_NAME, tableName)
        .save(basePath)
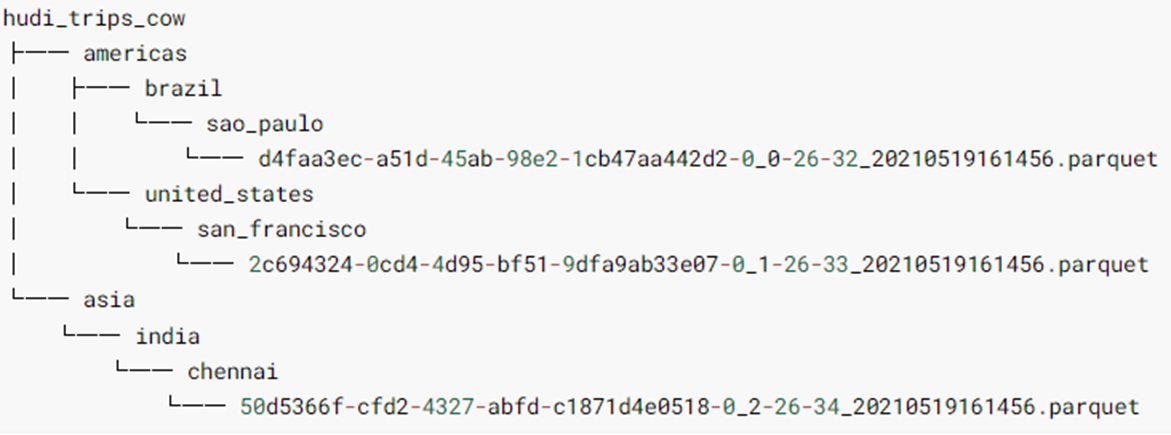
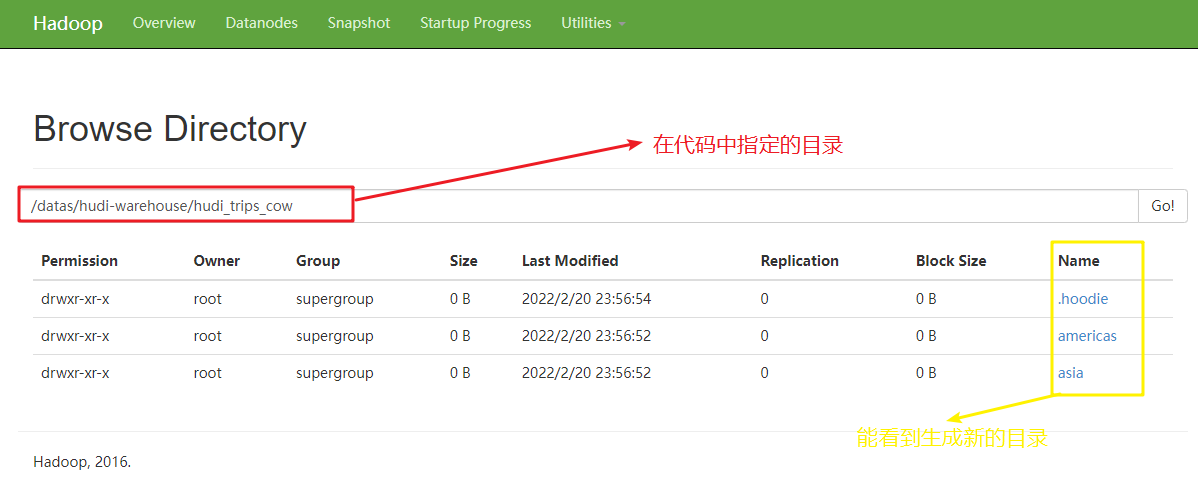
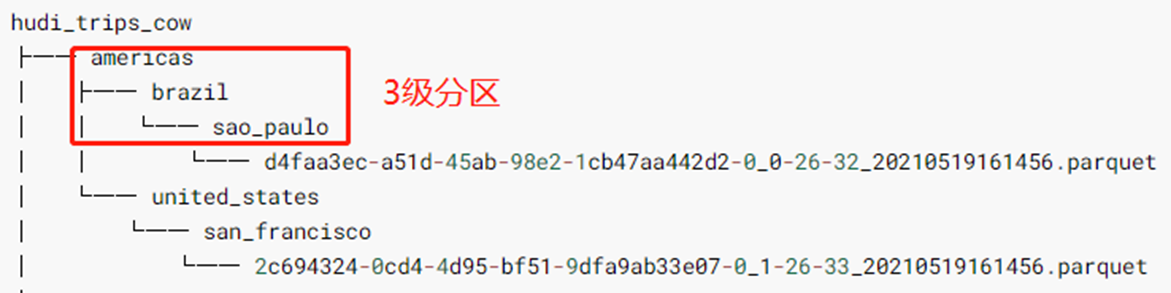
After the data is saved successfully, check the HDFS file system directory: / data / Hudi warehouse / Hudi_ trips_ Cow, the structure is as follows, and it can be found that Hudi table data is stored on HDFS in the form of PARQUET column:
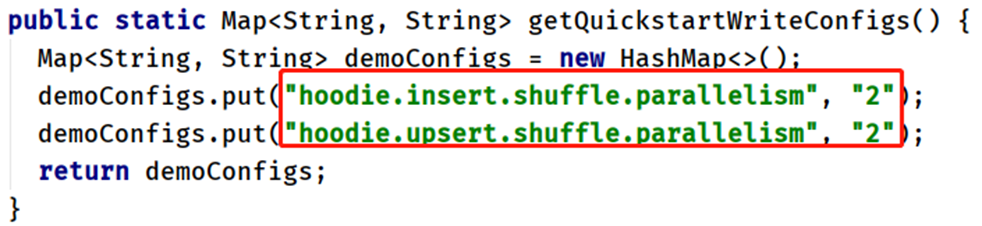
Parameter: getQuickstartWriteConfigs, set the number of partitions in Shuffle when writing / updating data to Hudi:
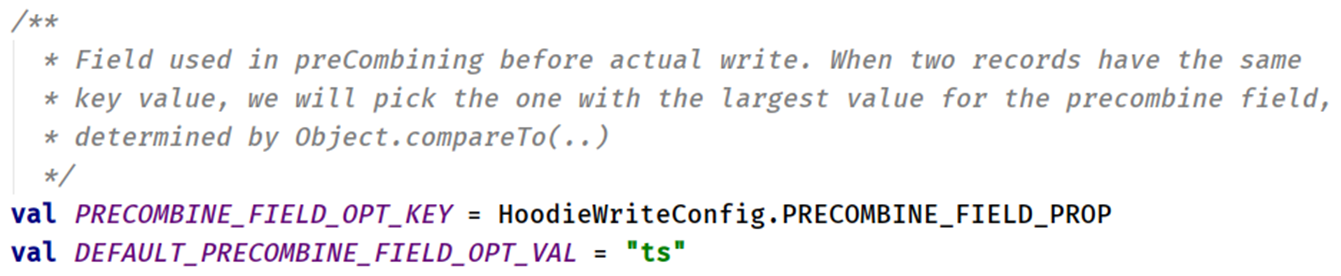
Parameter: PRECOMBINE_FIELD_OPT_KEY, based on the primary key field during data consolidation
Parameter: RECORDKEY_FIELD_OPT_KEY, the unique id of each record, supports multiple fields

Parameter: PARTITIONPATH_FIELD_OPT_KEY, a partition field used to store data

To read data from Hudi table, also use the data loading method of SparkSQL external data source, and specify the format data source and related parameter options:
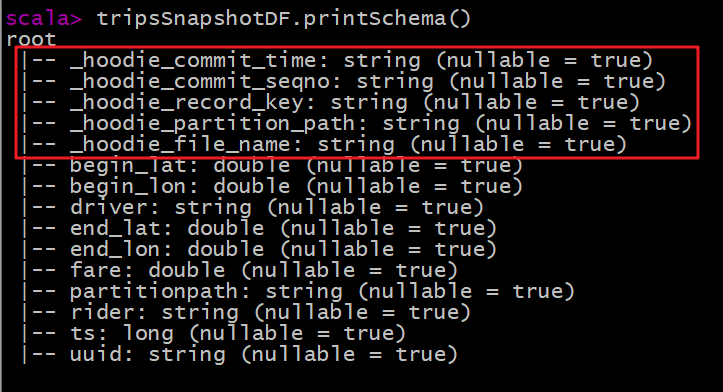
val tripsSnapshotDF = spark.read.format("hudi").load(basePath + "/*/*/*/*")
The data storage path of Hudi table can be specified. The regular Regex matching method is adopted. Since the saved Hudi table belongs to the partition table and is a three-level partition (equivalent to specifying three partition fields for the table in Hive), use the expression: / * / * / * / * to load all data:
Print the Schema information of Hudi table data (5 more fields are found than the data originally saved in Hudi table, which belong to the relevant fields used by Hudi when managing data):
Register the obtained Hudi table data DataFrame as a temporary view, and analyze the data according to business query in SQL:
tripsSnapshotDF.createOrReplaceTempView("hudi_trips_snapshot")Query service 1: information data with fare greater than 20
spark.sql("select fare, begin_lon, begin_lat, ts from hudi_trips_snapshot where fare > 20.0").show()
Query business 2: select fields to query data
spark.sql("select _hoodie_commit_time, _hoodie_record_key, _hoodie_partition_path, rider, driver, fare from hudi_trips_snapshot").show()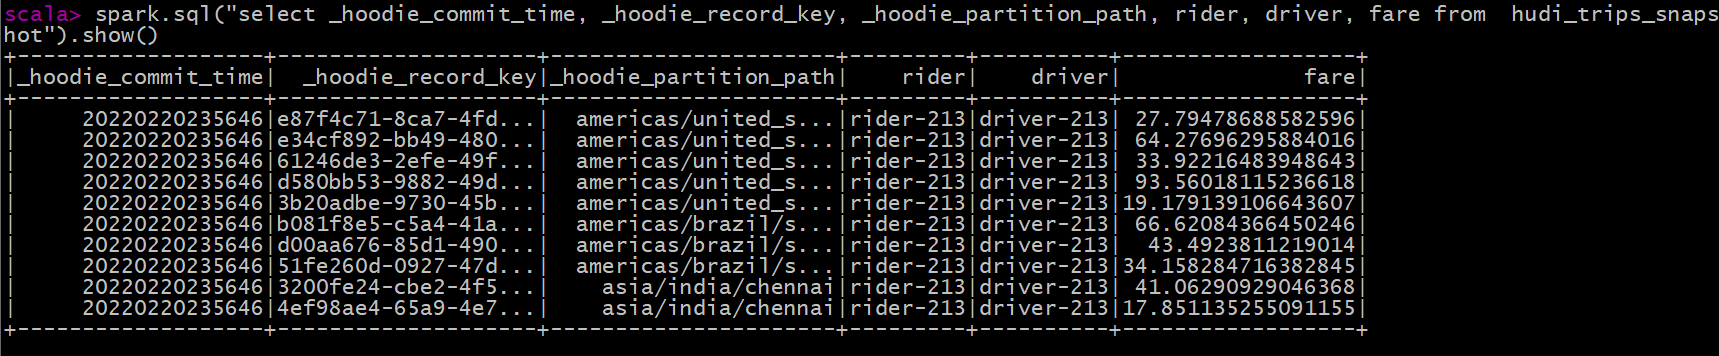
Note: Hudi series of blog posts are written through the learning records of Hudi's official website, in which personal understanding is added. If there are deficiencies, please understand ☺☺☺
Note: other related articles are linked here (all big data related blogs including Hudi) - > Summary of articles on basic knowledge points of big data