Copyright Statement: This is an original article by HaiyuKing. Please indicate where it came from!
Preface
This Demo only records the integration of Huawei Push and cannot run.
In addition, because storage permissions may be used, you need to match the Runtime Permission Request function.
Use steps
I. Project Organization Chart
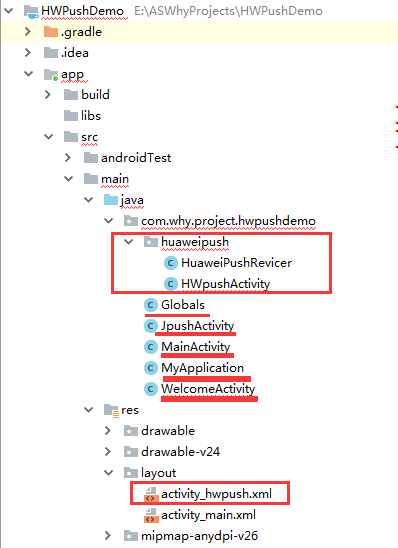
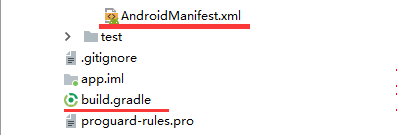
Matters needing attention:
1. Changee package name and re-import R file path are required after class file import
2. Files in the Values directory (strings.xml, dimens.xml, colors.xml, etc.) If they exist in the project, copy the contents instead of overwriting them entirely
II. Import Steps
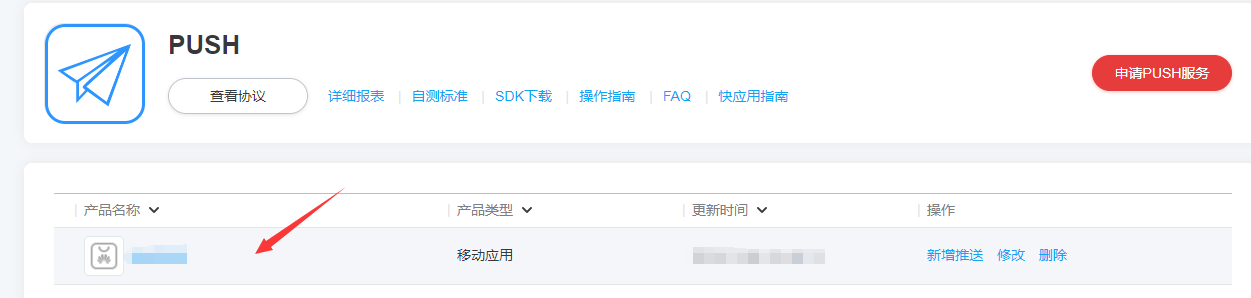
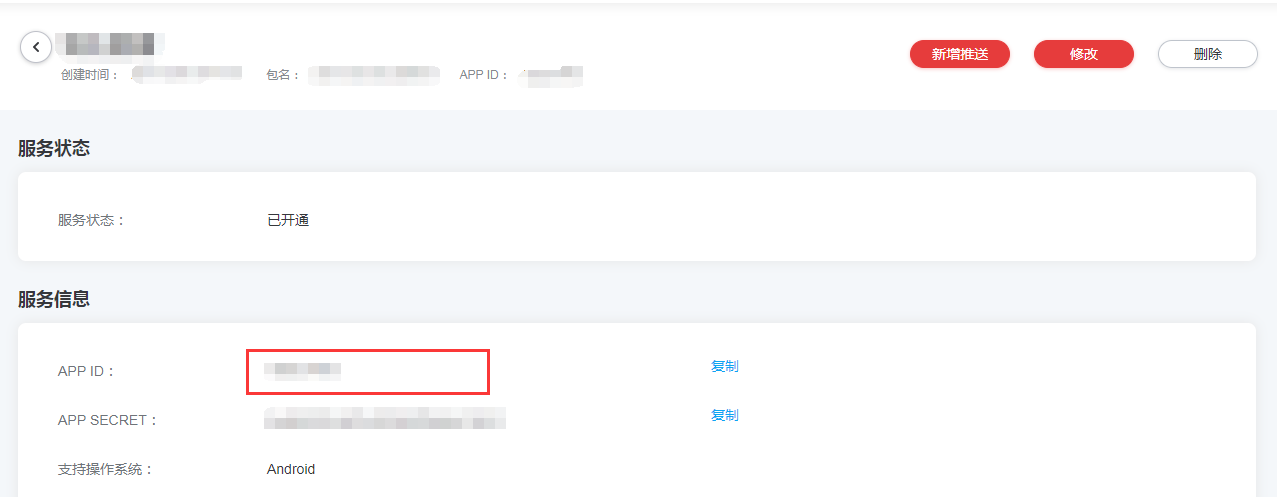
2.1. Access preparation
Reference to the official website Access preparation>
Register as Developer - Create Application - Get PUSH Service Parameters
Ultimately, you want to get the appid value

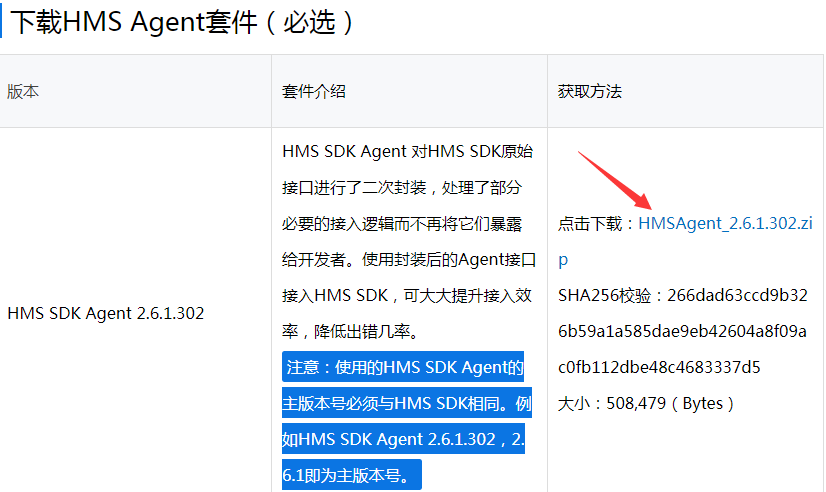
2.2, Download SDK (HMS Agent Kit, HMS SDK two)
(1) Download the HMS Agent Suite
(2) Download HMS SDK
Because most of the time Android Studio development environment is used, Gradle+maven integration is used directly.
2.3. Integrate HMS SDK first (integrated HMS Agent suite will be mentioned later)
(1) Configure maven warehouse
Add the following code to the project's build.gradle file
// Top-level build file where you can add configuration options common to all sub-projects/modules.

buildscript {

    repositories {
        google()
        jcenter()
    }
    dependencies {
        classpath 'com.android.tools.build:gradle:3.2.1'


        // NOTE: Do not place your application dependencies here; they belong
        // in the individual module build.gradle files
    }
}

allprojects {
    repositories {
        google()
        jcenter()
        //<!-- ======================Huawei Push SDK====================== -->
        maven {url 'http://developer.huawei.com/repo/'}
    }
}

task clean(type: Delete) {
    delete rootProject.buildDir
}
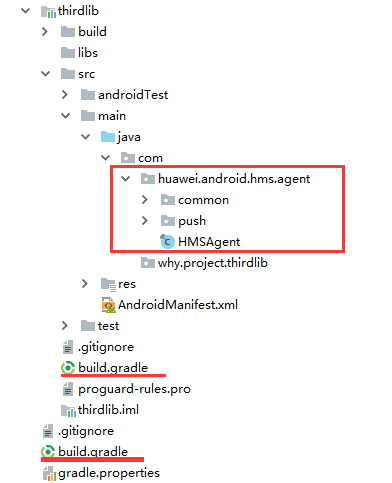
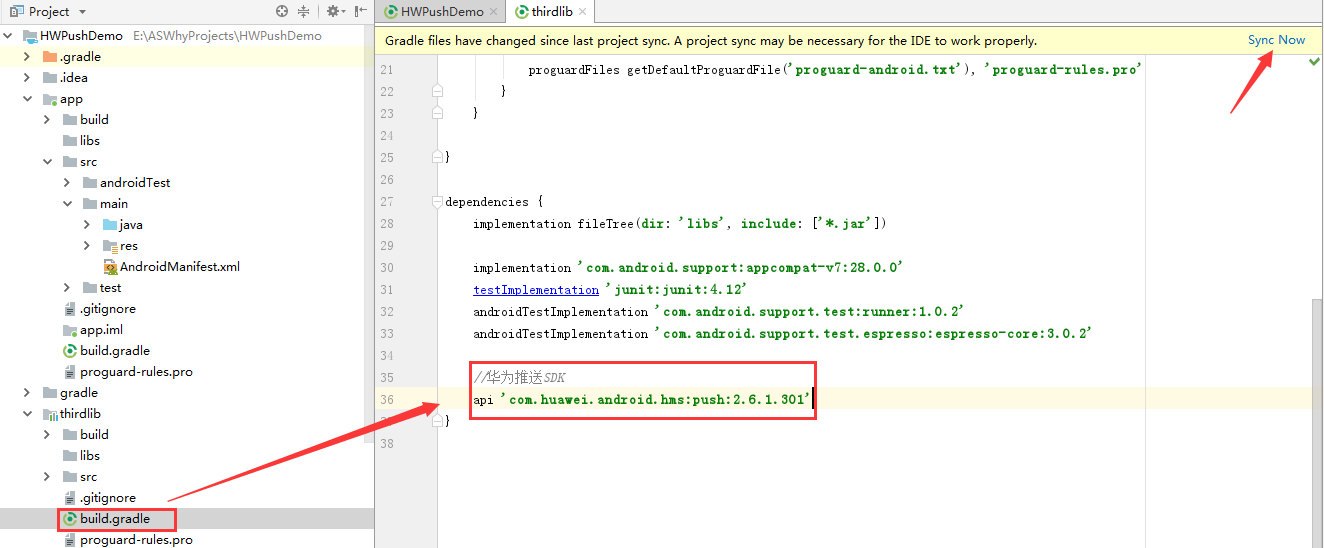
(2) Adding dependencies to the build.gradle file of a subproject (module)
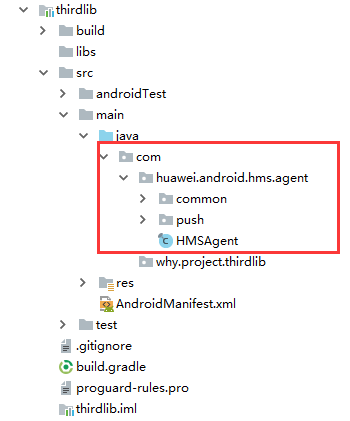
To facilitate unified management, I created a new module for ThirdLib in demo, which integrates Huawei push SDK s into ThirdLib.
apply plugin: 'com.android.library'

android {
    compileSdkVersion 28


    defaultConfig {
        minSdkVersion 16
        targetSdkVersion 28
        versionCode 1
        versionName "1.0"

        testInstrumentationRunner "android.support.test.runner.AndroidJUnitRunner"

    }

    buildTypes {
        release {
            minifyEnabled false
            proguardFiles getDefaultProguardFile('proguard-android.txt'), 'proguard-rules.pro'
        }
    }

}

dependencies {
    implementation fileTree(dir: 'libs', include: ['*.jar'])

    implementation 'com.android.support:appcompat-v7:28.0.0'
    testImplementation 'junit:junit:4.12'
    androidTestImplementation 'com.android.support.test:runner:1.0.2'
    androidTestImplementation 'com.android.support.test.espresso:espresso-core:3.0.2'

    //Huawei Push SDK
    api 'com.huawei.android.hms:push:2.6.1.301'
}
(3) Synchronize modified files
(4) You also need to rely on the thirdlib module in the app build.gradle file
apply plugin: 'com.android.application'

android {
    compileSdkVersion 28
    defaultConfig {
        applicationId "com.why.project.hwpushdemo"
        minSdkVersion 16
        targetSdkVersion 28
        versionCode 1
        versionName "1.0"
        testInstrumentationRunner "android.support.test.runner.AndroidJUnitRunner"
    }
    buildTypes {
        release {
            minifyEnabled false
            proguardFiles getDefaultProguardFile('proguard-android.txt'), 'proguard-rules.pro'
        }
    }
}

dependencies {
    implementation fileTree(dir: 'libs', include: ['*.jar'])
    implementation 'com.android.support:appcompat-v7:28.0.0'
    implementation 'com.android.support.constraint:constraint-layout:1.1.3'
    testImplementation 'junit:junit:4.12'
    androidTestImplementation 'com.android.support.test:runner:1.0.2'
    androidTestImplementation 'com.android.support.test.espresso:espresso-core:3.0.2'

    //thirdlib
    implementation project(':thirdlib')
}
2.4, Integrated HMS Agent Suite
(1) Unpack
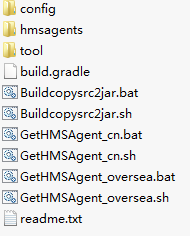
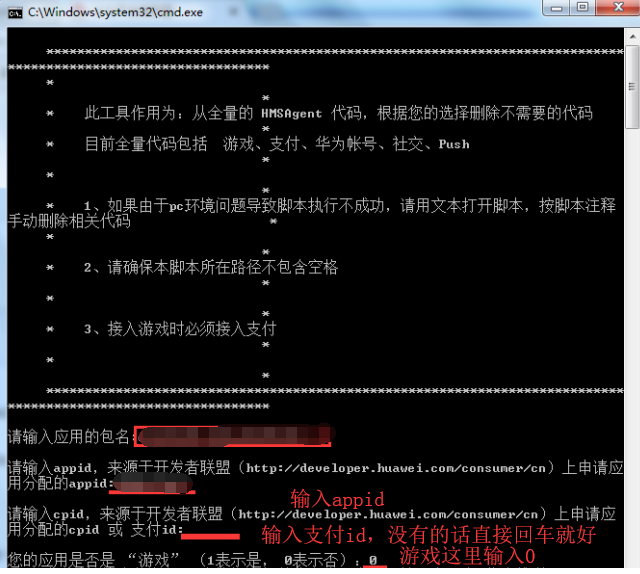
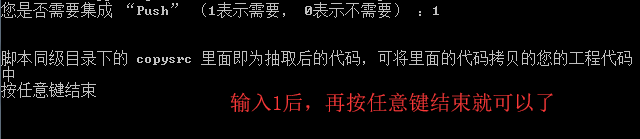
(2) Execute GetHMSAgent_xx.bat to generate a folder of copysrc, which contains the extracted HMSAgent code (java folder) and manifest file (AndroidManifest.xml) to integrate HMS services according to your choice
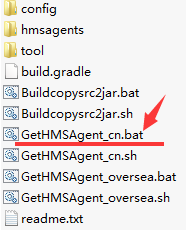
GetHMSAgent_cn.bat is a Chinese script
GetHMSAgent_oversea.bat is an English script


At this point, there is an additional copysrc directory
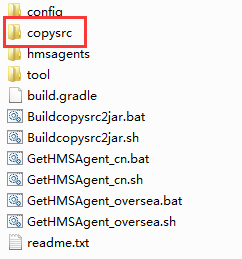
(3) Copy the code from copysrc/java into your existing project.Keep the path and structure of the package for the HMSAgent code unchanged
2.5. Configure AndroidManifest.xml for this module
Refer to the relevant codes in the AppManifestConfig.xml file under the copysrc directory and the information on the official website!
Note that it is the app module, not the thirdlib module!
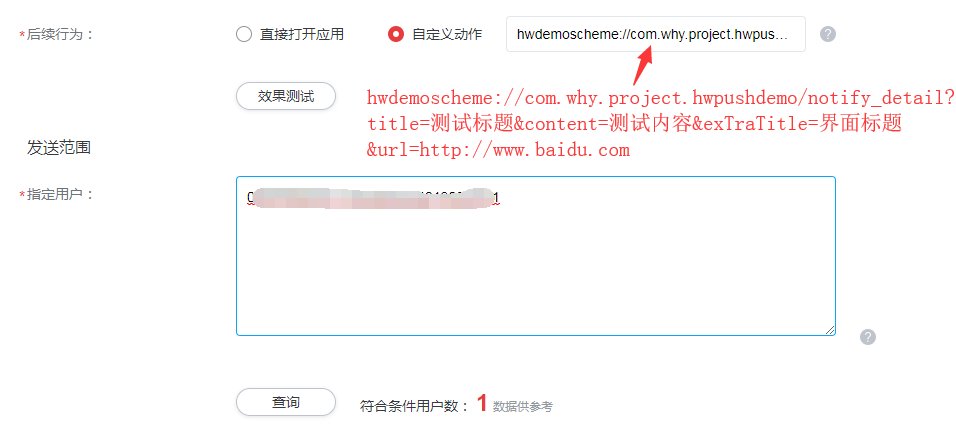
<?xml version="1.0" encoding="utf-8"?>
<manifest xmlns:android="http://schemas.android.com/apk/res/android"
          package="com.why.project.hwpushdemo">

    <!-- ======================Huawei Push SDK====================== -->
    <!--HMS-SDK Boot Upgrade HMS Functions, access OTA Server requires network privileges | HMS-SDK upgrade HMS Feature, access to OTA server requires network privileges-->
    <uses-permission android:name="android.permission.INTERNET" />
    <!--HMS-SDK Boot Upgrade HMS Function to save downloaded upgrade packs required SD Card Write Permissions | HMS-SDK upgrade HMS Feature, save downloaded upgrade pack requires SD card Write permission-->
    <uses-permission android:name="android.permission.WRITE_EXTERNAL_STORAGE" />
    <!--Detect network status | Detecting Network status-->
    <uses-permission android:name="android.permission.ACCESS_NETWORK_STATE"/>
    <!--Testing wifi state | Detecting WiFi status-->
    <uses-permission android:name="android.permission.ACCESS_WIFI_STATE"/>
    <!--Getting the user's mobile phone IMEI,Used to uniquely identify the device. | Gets the IMEI of the user's phone, used to uniquely identify the device.-->
    <uses-permission android:name="android.permission.READ_PHONE_STATE"/>
    <!--If it's Android 8.0,Applying compilation configuration targetSdkVersion>=26,Be sure to add the following permissions -->
    <uses-permission android:name="android.permission.REQUEST_INSTALL_PACKAGES" />
    <!-- Receive PUSH TOKEN Radio and PUSH Message needs to define this permission ${PACKAGE_NAME} To replace the package name you applied -->
    <permission
        android:name="${applicationId}.permission.PROCESS_PUSH_MSG"
        android:protectionLevel="signatureOrSystem"/>
    <!--Receive PUSH TOKEN Radio and PUSH Message needs to define this permission ${PACKAGE_NAME} To replace the package name you applied -->
    <uses-permission android:name="${applicationId}.permission.PROCESS_PUSH_MSG" />

    <application
        android:allowBackup="true"
        android:icon="@mipmap/ic_launcher"
        android:label="@string/app_name"
        android:roundIcon="@mipmap/ic_launcher_round"
        android:supportsRtl="true"
        android:theme="@style/AppTheme">
        <activity android:name=".MainActivity">
            <intent-filter>
                <action android:name="android.intent.action.MAIN"/>

                <category android:name="android.intent.category.LAUNCHER"/>
            </intent-filter>
        </activity>

        <!-- ======================Huawei Push SDK====================== -->
        <!-- Access HMSSDK Need to register appid Parameters. value "100222233444" in the value of the appid Replace with details of benefits derived from the developer consortium website application.
                    //Format android:value="appid=xxxxx"
                    Access HMSSDK need to register AppID parameters. Value "100223344" is replaced with the actual application APPID, derived from the Developer affiliate website application.
                    Format android:value= "appid=xxxxxx"-->
        <meta-data
            android:name="com.huawei.hms.client.appid"
            android:value="appid=1000222233444"/>

        <!-- Access HMSSDK Need to register activity | Access HMSSDK activity to be registered Definition HMS-SDK Some of the transparent pages needed for jumping-->
        <activity
            android:name="com.huawei.hms.activity.BridgeActivity"
            android:configChanges="orientation|locale|screenSize|layoutDirection|fontScale"
            android:excludeFromRecents="true"
            android:exported="false"
            android:hardwareAccelerated="true"
            android:theme="@android:style/Theme.Translucent" >
            <meta-data
                android:name="hwc-theme"
                android:value="androidhwext:style/Theme.Emui.Translucent" />
        </activity>

        <!-- Access HMSSDK Need to register activity | Access HMSSDK activity to be registered Is the page to be used to apply the self-upgrading interface-->
        <activity
            android:name="com.huawei.updatesdk.service.otaupdate.AppUpdateActivity"
            android:configChanges="orientation|screenSize"
            android:exported="false"
            android:theme="@style/upsdkDlDialog" >
            <meta-data
                android:name="hwc-theme"
                android:value="androidhwext:style/Theme.Emui.Translucent.NoTitleBar" />
        </activity>

        <!-- Access HMSSDK Need to register activity | Access HMSSDK activity to be registered Is the page to be used to apply the self-upgrading interface-->
        <activity
            android:name="com.huawei.updatesdk.support.pm.PackageInstallerActivity"
            android:configChanges="orientation|keyboardHidden|screenSize"
            android:exported="false"
            android:theme="@style/upsdkDlDialog" >
            <meta-data
                android:name="hwc-theme"
                android:value="androidhwext:style/Theme.Emui.Translucent" />
        </activity>

        <!-- Access HMSSDK Need to register provider,authorities Must not be the same as other applications, so this side com.why.project.hwpushdemo To replace the package name you applied
            Access HMSSDK need to register provider,authorities must not be the same as other applications, so this side ${package_name} to replace the package name you applied
            //Used to apply self-upgrade-->
        <provider
            android:name="com.huawei.updatesdk.fileprovider.UpdateSdkFileProvider"
            android:authorities="com.why.project.hwpushdemo.updateSdk.fileProvider"
            android:exported="false"
            android:grantUriPermissions="true">
        </provider>

        <!-- Access HMSSDK Application download service requiring registration | Access HMSSDK need to register app download service
        //Used to apply self-upgrade-->
        <service android:name="com.huawei.updatesdk.service.deamon.download.DownloadService"
                 android:exported="false"/>

        <!-- Use HMSAgent Code Access HMSSDK Need to register activity | Use hmsagent code to access HMSSDK activity that requires registration-->
        <!--Transparent interface to upgrade mobile services in Huawei (must be declared)-->
        <activity
            android:name="com.huawei.android.hms.agent.common.HMSAgentActivity"
            android:configChanges="orientation|locale|screenSize|layoutDirection|fontScale"
            android:excludeFromRecents="true"
            android:exported="false"
            android:hardwareAccelerated="true"
            android:theme="@android:style/Theme.Translucent" >
            <meta-data
                android:name="hwc-theme"
                android:value="androidhwext:style/Theme.Emui.Translucent" />
        </activity>

        <!-- Access HMSSDK Need to register provider,authorities Must not be the same as other applications, so this side com.why.project.hwpushdemo To replace the package name you applied
           Access HMSSDK need to register provider,authorities must not be the same as other applications, so this side ${package_name} to replace the package name you applied
           //Used for HMS-SDK boot upgrade HMS, provided to system installer to read upgrade file-->
        <provider
            android:name="com.huawei.hms.update.provider.UpdateProvider"
            android:authorities="com.why.project.hwpushdemo.hms.update.provider"
            android:exported="false"
            android:grantUriPermissions="true"/>

        <!-- Access HMSSDK PUSH Module requires registration, third party related :Receive Push Message (registration, Push Message, Push Connection Status) Broadcast,
                //This receiver class requires the developer to create and inherit the com.huawei.hms.support.api.push.PushReceiver class.
                //Refer to the class in the sample code: com.huawei.hmsagent.HuaweiPushRevicer
            Access to the HMSSDK push module requires registration:
                Receive push message (registration, push message, push connection state) broadcast.
                This receiver class requires the developer to create and inherit the com.huawei.hms.support.api.push.PushReceiver class.
                Reference to class in sample code: Com.huawei.hmsagent.HuaweiPushRevicer-->
        <!--For receiving PUSH Message receiver-->
        <!-- Access HMSSDK PUSH Module requires registration, third party related :Receive Push Message (registration, Push Message, Push Connection Status) Broadcast,
                //This receiver class requires the developer to create and inherit the com.huawei.hms.support.api.push.PushReceiver class.
                //Refer to the class in the sample code: com.huawei.hmsagent.HuaweiPushRevicer
            Access to the HMSSDK push module requires registration:
                Receive push message (registration, push message, push connection state) broadcast.
                This receiver class requires the developer to create and inherit the com.huawei.hms.support.api.push.PushReceiver class.
                Reference to class in sample code: Com.huawei.hmsagent.HuaweiPushRevicer-->
        <receiver android:name="com.why.project.hwpushdemo.huaweipush.HuaweiPushRevicer" >
            <intent-filter>
                <!-- Must,For receiving token | Must, for receiving token -->
                <action android:name="com.huawei.android.push.intent.REGISTRATION" />
                <!-- Must be used to receive messages | Must, used to receive messages-->
                <action android:name="com.huawei.android.push.intent.RECEIVE" />
                <!-- Optional to trigger when you click a button on the notification bar or notification bar onEvent Callback | Optional, click the button on the notification bar or the notification bar to trigger the onevent callback -->
                <action android:name="com.huawei.android.push.intent.CLICK" />
                <!-- Optional, view push Channel is connected, not needed without viewing | Optional, query whether the push channel is connected or not -->
                <action android:name="com.huawei.intent.action.PUSH_STATE" />
            </intent-filter>
        </receiver>

        <!-- Access HMSSDK PUSH Modules require registration :Receive notification bar messages from channels | The access HMSSDK push module needs to be registered: the notification bar message sent from the receiving channel -->
        <!--Receive notification bar messages from channels-->
        <receiver android:name="com.huawei.hms.support.api.push.PushEventReceiver" >
            <intent-filter>
                <action android:name="com.huawei.intent.action.PUSH" />
            </intent-filter>
        </receiver>
        <!-- Huawei Push Custom Action Open Interface [Need Transparency],Attention is required scheme Must set unique, and other on mobile phone APP Used scheme Dissimilarity -->
        <!--hwdemoscheme://{Package Name}/notify_detail?title={Title}&content={Content}-->
        <activity
            android:name="com.why.project.hwpushdemo.huaweipush.HWpushActivity"
            android:theme="@android:style/Theme.Translucent">
            <intent-filter>
                <action android:name="android.intent.action.VIEW"/>
                <category android:name="android.intent.category.DEFAULT"/>
                <data
                    android:host="${applicationId}"
                    android:path="/notify_detail"
                    android:scheme="hwdemoscheme"/>
            </intent-filter>
        </activity>
    </application>

</manifest>
1. The appid needs to be replaced by its own;
2. Replace all the package names (com.why.project.hwpushdemo) in the yellow-marked code with their own package names (if the code is copied from the copy src's AppManifestConfig.xml file, it is their own package names directly);
3. The full path of Huawei PushRevicer needs to be replaced with reality;
4. The complete path of HWpushActivity (the interface opened after clicking on the notification) needs to be replaced with the real one;
5. The host, path and schedule under HWpushActivity are to be replaced by their own projects, and the values of the other three fields are used when pushing.

2.6, Add HuaweiPushRevicer, HWpushActivity to the project
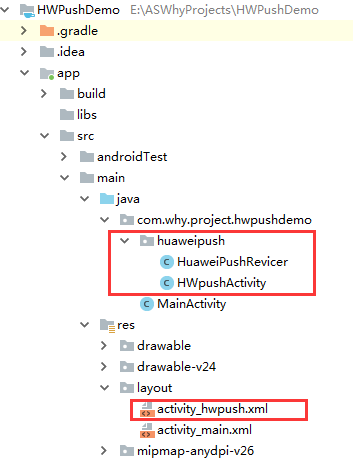
Among them, HuaweiPushRevicer does not care, HWpushActivity needs to be modified according to the actual situation, activity_hwpush.xml file does not care, is an empty layout.
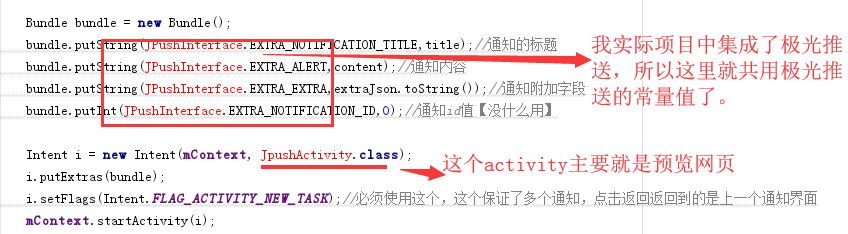
package com.why.project.hwpushdemo.huaweipush;

import android.app.Activity;
import android.content.Context;
import android.content.Intent;
import android.os.Bundle;
import android.util.Log;

import com.why.project.hwpushdemo.R;

import org.json.JSONObject;


/**
 * Created by HaiyuKing
 * Used Interface Opened by Huawei Push Custom Action [Huawei Push SDK]
 * https://www.jianshu.com/p/3b0df1c976a5
 * https://blog.csdn.net/gaoshang0304/article/details/80463246
 * https://blog.csdn.net/nsacer/article/details/80346965
 * https://blog.csdn.net/u013904672/article/details/71079278
 */
public class HWpushActivity extends Activity {
    private static final String TAG = HWpushActivity.class.getSimpleName();

    private Context mContext;

    @Override
    protected void onCreate(Bundle savedInstanceState) {
        super.onCreate(savedInstanceState);
        setContentView(R.layout.activity_hwpush);

        mContext = this;

        //Get the value of a custom action
        Intent intent = getIntent();
        String intentUri = intent.toUri(Intent.URI_INTENT_SCHEME);
        Log.e(TAG,"action yes:" + intentUri);
        //intent://com.why.project.hwpushdemo/notify_detail?title=Test Title&content=Test Content&exTraTitle=Interface Title&url=http://www.baidu.com#Intent;scheme=hwdemoscheme;launchFlags=0x13000000;component=com.why.project.hwpushdemo/.huaweipush.HWpushActivity;end

        //Close the current interface and jump to the specified interface
        try {
            String title = getIntent().getData().getQueryParameter("title");
            String content = getIntent().getData().getQueryParameter("content");
            String exTraTitle = getIntent().getData().getQueryParameter("exTraTitle");
            String url = getIntent().getData().getQueryParameter("url");

            JSONObject extraJson = new JSONObject();
            extraJson.put("exTraTitle",exTraTitle);
            extraJson.put("url",url);

            Bundle bundle = new Bundle();
            bundle.putString(JPushInterface.EXTRA_NOTIFICATION_TITLE,title);//Title of notification
            bundle.putString(JPushInterface.EXTRA_ALERT,content);//Notification Content
            bundle.putString(JPushInterface.EXTRA_EXTRA,extraJson.toString());//Notification Additional Field
            bundle.putInt(JPushInterface.EXTRA_NOTIFICATION_ID,0);//notice id Value [not useful]

            Intent i = new Intent(mContext, JpushActivity.class);
            i.putExtras(bundle);
            i.setFlags(Intent.FLAG_ACTIVITY_NEW_TASK);//Must use this, this guarantees multiple notifications, click back to the previous notification interface
            mContext.startActivity(i);
            finish();

        } catch (Exception e){
            e.printStackTrace();
        }

    }
}
To explain a little, the main role of this activity is to do the following two things:
1. Get the value of the custom action;
2. Close the current interface and jump to the specified interface (pass value to it);
In the above code, jump to the interface (orange marked code), which needs to be modified according to the actual situation.
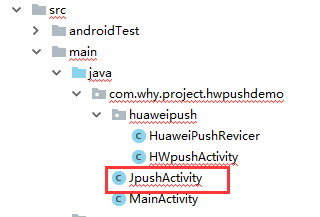
2.7. Add JpushActivity to the project (for reference only)
package com.why.project.hwpushdemo;

import android.content.Context;
import android.content.Intent;
import android.content.res.Resources;
import android.os.Bundle;
import android.support.v7.app.AppCompatActivity;
import android.support.v7.widget.Toolbar;
import android.view.KeyEvent;
import android.view.View;
import android.widget.TextView;

import org.json.JSONException;
import org.json.JSONObject;

/**
 * Used Aurora Push Point Open Interface After Notification
 * Share a layout file with WebViewPreviewActivity
 * You need to check if you are already logged in. If you are not logged in, you can log in directly without going back to the login interface.
 * Aurora Push SDK
 */
public class JpushActivity extends AppCompatActivity {
    private static final String TAG = JpushActivity.class.getSimpleName();

    /**Markup opened from the login interface (for passing parameters)*/
    public static final String EXTRA_ONLOGIN = "onlogin";

    /*Jpush Parameters passed in*/
    private Bundle jPushBundle;
    /**Notification Title*/
    private String jPushTitle;
    /**Notification Content*/
    private String jPushContent;
    /**Notification Additional Field*/
    private String jPushExtraJson;
    /**Notification id value*/
    private int jPushId;

    //Title displayed on navigation bar
    private String bundle_title;
    //Webpage url address
    private String bundle_url;

    /**Marks whether the status value is opened from the login interface*/
    private boolean bundle_onlogin = false;

    private Context mContext;

    private Toolbar mToolbar;

    private MyWebView myWebView;

    @Override
    protected void onCreate(Bundle savedInstanceState) {
        super.onCreate(savedInstanceState);
        setContentView(R.layout.activity_webviewpreview);

        mContext = this;

        //Initialize Control
        initViews();
        //Initialize data
        initData();
        initToolBar();//Initialization toolbar
    }

    @Override
    public void onDestroy()
    {
        //Destroy webview control
        myWebView.removeAllViews();
        myWebView.destroy();
        super.onDestroy();
    }

    /**
     * Initialize view
     */
    private void initViews() {
        myWebView = (MyWebView)findViewById(R.id.id_webView);
        myWebView.setCanBackPreviousPage(true,JpushActivity.this);//You can go back to the previous page
    }

    /**
     * Initialize the data [Receive data from the Click Notification Bar: Notification, Custom Message (just process the notification here)]
     */
    private void initData() {
        Intent intent = getIntent();
        if (null != intent) {
            jPushBundle = getIntent().getExtras();
            jPushTitle = jPushBundle.getString(JPushInterface.EXTRA_NOTIFICATION_TITLE);//Save the title of the notification pushed down by the server
            jPushContent = jPushBundle.getString(JPushInterface.EXTRA_ALERT);//Save notifications pushed down by the server
            jPushExtraJson = jPushBundle.getString(JPushInterface.EXTRA_EXTRA);//Save additional fields pushed down by the server.This is a JSON Character string
            jPushId = jPushBundle.getInt(JPushInterface.EXTRA_NOTIFICATION_ID);//SDK 1.3.5 Support for above versions,Notification bar Notification ID,Can be used to clean up Notification

            bundle_onlogin = jPushBundle.getBoolean(EXTRA_ONLOGIN);
        }

        if(!jPushExtraJson.equals("")){
            try {
                JSONObject extraJsonObj = new JSONObject(jPushExtraJson);
                if(extraJsonObj.has("from")){
                    extraJsonObj = new JSONObject(extraJsonObj.getString("from"));
                }
                if(!extraJsonObj.getString("exTraTitle").equals("")){
                    //Get Title
                    bundle_title = extraJsonObj.getString("exTraTitle");
                }
                if(!extraJsonObj.getString("url").equals("")){
                    //Get Web Address
                    bundle_url = extraJsonObj.getString("url");
                }
            } catch (Resources.NotFoundException e) {
                // TODO Auto-generated catch block
                e.printStackTrace();
            } catch (JSONException e) {
                // TODO Auto-generated catch block
                e.printStackTrace();
            }
        }

        if(! bundle_onlogin){//If it is opened from the login interface, then there is no need to verify
            initCheckLoginState();//Verify that you need to log in again
        }else{
            loadWebUrl();//Open Web Page
        }

    }

    private void initToolBar() {
        mToolbar = findViewById(R.id.toolbar_base);
        mToolbar.setTitle("");//This way, the title will not be displayed
        //Set a custom title (center)
        TextView toolBarTitle = mToolbar.findViewById(R.id.toolbarTitle);
        toolBarTitle.setText(bundle_title);
        setSupportActionBar(mToolbar);//Because toolbar Just a normal control, we'll ToolBar Set to ActionBar
        //Set the navigation icon to be in setSupportActionBar After method
        mToolbar.setNavigationIcon(R.drawable.nav_back);//If set to empty, the left icon will not be displayed
        //Yes NavigationIcon Add Click
        mToolbar.setNavigationOnClickListener(new View.OnClickListener() {
            @Override
            public void onClick(View v) {
                //Return to the home page interface (in case of re-login) or close yourself directly (without re-login)
                backHomeOrFinish();
            }
        });
    }

    /**
     * Click on the return key
     * event.getRepeatCount() == 0:When clicking the back key, this setting is made to prevent clicking too fast and triggering two back events.
     */
    @Override
    public boolean onKeyDown(int keyCode, KeyEvent event) {
        // TODO Auto-generated method stub
        if (keyCode == KeyEvent.KEYCODE_BACK && event.getRepeatCount() == 0) {
            //Return to the home page interface (if opened from the login interface) or close yourself (opened from notification)
            backHomeOrFinish();
        }
        return super.onKeyDown(keyCode, event);
    }


    //Return function
    private void backHomeOrFinish() {
        if (bundle_onlogin) {
            ActivityJump.NormalJumpAndFinish(JpushActivity.this, HomeActivity.class);
        } else {
            ActivityJump.Back(this);
        }
    }


    /**
     * Network requests check login status, mainly online
     */
    private void initCheckLoginState() {
        if(result.indexOf("alert(") != -1){
            //Logon Identity Failed, Please Log on Again
            ActivityJump.BundleJumpAndFinish(JpushActivity.this, LoginActivity.class,jPushBundle);
        }
        else{
            loadWebUrl();//Load Web Page
        }
    }

    /**
     * Load URL Address
     */
    private void loadWebUrl() {
        syncCookie(JpushActivity.this, ServerApi.SERVER_URL);

        if (!bundle_url.equals("")) {
            myWebView.loadWebUrl(ServerApi.SERVER_URL + bundle_url);
        } else {
            myWebView.loadUrl("about:blank");//Load a blank page
        }
    }

    /**
     * Sync Cookie
     */
    public static void syncCookie(Context context, String url){
        //Refer to this blog's " okhttputils[ Android An improved okHttp Encapsulation Library) Use (2)
    }
}
3. Initialize Agent
Initialize the HMSAgent in the onCreate method of the application.If you do not have your own application class, create and configure the name property of the application node in the manifest file.
package com.why.project.hwpushdemo;

import android.app.Application;

import com.huawei.android.hms.agent.HMSAgent;

/**
 * Created by HaiyuKing
 * Used
 */
public class MyApplication extends Application {
    @Override
    public void onCreate() {
        super.onCreate();

        //Huawei Push SDK
        initHuaWeiPush();
    }

    //Huawei Push SDK
    private void initHuaWeiPush(){
        HMSAgent.init(this);
    }

    @Override
    public void onTerminate() {
        super.onTerminate();
        //Huawei Push SDK
        HMSAgent.destroy();
    }
}
4. Call the connect interface
It is recommended that you call Connect at application startup.In which Activity is called, which Activity's alertDialog does not pop up, returns to the soft key click and does not respond.
package com.why.project.hwpushdemo;

import android.content.Context;
import android.content.Intent;
import android.os.Bundle;
import android.support.v7.app.AppCompatActivity;

import com.huawei.android.hms.agent.HMSAgent;
import com.huawei.android.hms.agent.common.handler.ConnectHandler;
import com.huawei.android.hms.agent.push.handler.GetTokenHandler;
import com.why.project.hwpushdemo.huaweipush.HuaweiPushRevicer;

import static com.why.project.hwpushdemo.huaweipush.HuaweiPushRevicer.ACTION_TOKEN;
import static com.why.project.hwpushdemo.huaweipush.HuaweiPushRevicer.ACTION_UPDATEUI;

/**
 * Created by HaiyuKing
 * Used
 */
public class WelcomeActivity extends AppCompatActivity implements HuaweiPushRevicer.IPushCallback{

    private static final String TAG = WelcomeActivity.class.getSimpleName();

    private Context mContext;

    @Override
    protected void onCreate(Bundle savedInstanceState) {
        super.onCreate(savedInstanceState);
        setContentView(R.layout.activity_welcome);

        mContext = this;

        /*====Huawei Push SDK Related======*/
        HuaweiPushRevicer.registerPushCallback(this);

        /*========================Huawei Push SDK Related================================*/
        HMSAgent.connect(this, new ConnectHandler() {
            @Override
            public void onConnect(int rst) {
                LogUtil.d(TAG,"HMS connect end:" + rst);
                //Push Of Token Will expire and fail, application integration Push After that, it is recommended that you invoke the getToken Method Application Token,This method can be called repeatedly and is obtained during its validity period Token The value will not change.
                //Recommended first in application Activity Of onCreate Method, invoke the request token Interface.[Why?Because if HomeActivity Called in, alertDialog No pop-up, no response after soft key click)
                LogUtil.d(TAG,"get token: begin");
                HMSAgent.Push.getToken(new GetTokenHandler() {
                    @Override
                    public void onResult(int rtnCode) {
                        LogUtil.d(TAG,"get token: end code=" + rtnCode);
                    }
                });
            }
        });
        //Check application upgrade for temporary use
        /*HMSAgent.checkUpdate(this, new CheckUpdateHandler() {
            @Override
            public void onResult(int rst) {
                LogUtil.d(TAG,"check app update end:" + rst);
            }
        });*/
    }

    @Override
    protected void onDestroy() {
        super.onDestroy();

        /*====Huawei Push SDK Related======*/
        HuaweiPushRevicer.unRegisterPushCallback(this);
    }

    @Override
    public void onReceive(Intent intent) {
        //===============Huawei Push SDK Relevant===============
        //In fact, there is a risk that you may not be able to do this because it is so short that you will not be able to do it until the data is returned. onDestory Method
        if (intent != null) {
            String action = intent.getAction();
            Bundle b = intent.getExtras();
            if (b != null && ACTION_TOKEN.equals(action)) {
                String hwToken = b.getString(ACTION_TOKEN);
                LogUtil.e(TAG,"hwToken="+hwToken);
                //Save data, available in HomeActivity
                PreferencesUtils.putString(mContext,Globals.HWPUSH_TOKEN_KEY,hwToken);
            } else if (b != null && ACTION_UPDATEUI.equals(action)) {
                String log = b.getString("log");
                LogUtil.e(TAG,log);
            }
        }
    }

}
Globals.java file
package com.why.project.hwpushdemo;

/**
 * Created by HaiyuKing
 * Used
 */
public class Globals {

    /*=======================================Huawei Push SDK Related===========================================================*/
    //Huawei Push token value
    public static final String HWPUSH_TOKEN_KEY = "HWPushToken";
}
5. Apply for Push token
package com.why.project.hwpushdemo;

import android.content.Context;
import android.os.Bundle;
import android.support.v7.app.AppCompatActivity;

public class MainActivity extends AppCompatActivity {

    private static final String TAG = WelcomeActivity.class.getSimpleName();

    private Context mContext;

    @Override
    protected void onCreate(Bundle savedInstanceState) {
        super.onCreate(savedInstanceState);
        setContentView(R.layout.activity_main);

        mContext = this;

        /*====Huawei Push SDK Related======*/
        getToken();
    }

    /*========================Huawei Push SDK Related======start=============================*/
    private void getToken(){
        String hwToken = PreferencesUtils.getString(mContext,Globals.HWPUSH_TOKEN_KEY,"");
        LogUtil.e(TAG,"hwToken="+hwToken);
        requestDeviceId(hwToken);//Determine whether to request an interface or to pop up a dialog
    }

   //Request Interface Storage Device id perhaps token Method
    private void requestDeviceId(String regId) {
        //The primary condition is the device id Value or token Value is not empty, otherwise the following judgment is meaningless
        //If no alias has been set, or an alias needs to be set
        //If the deviceID The value is null, indicating that the current user has not yet bound any devices, then requests the interface directly without needing to pop up a dialog box;
        //If the deviceID The value is not empty and the device acquired by the client id Value and on the server deviceID With the same value, you don't need to pop up a dialog box to request the interface directly (this is the case when uninstalling and reinstalling)
        //If the deviceid The value is not empty and the device acquired by the client id Value and on the server deviceID If the values are different, you need to pop up a dialog box (this is the case for switching devices)

        //If an alias has already been set (the device has been stored) id Value, but the current alias (device) id Value) and inconsistencies on the server, you need to reset the alias (storage device) id Value (this is the case with logins on other devices)
    }
}
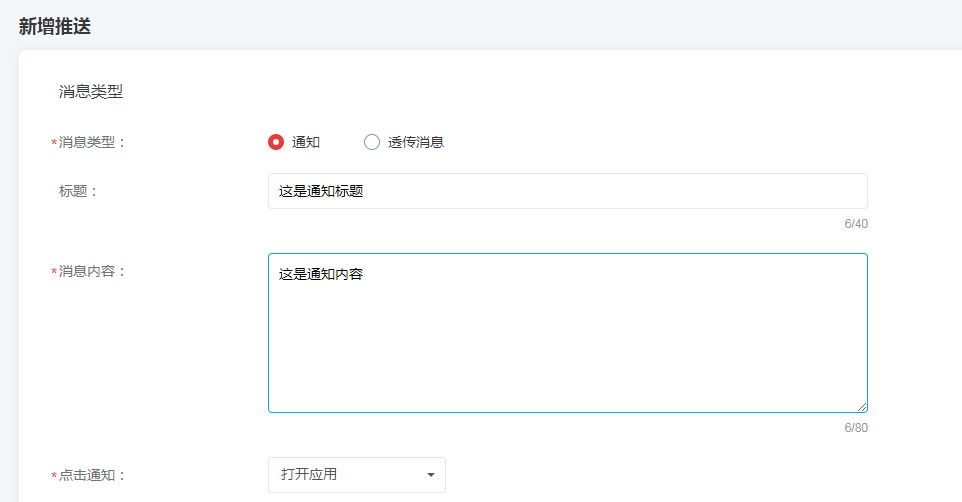
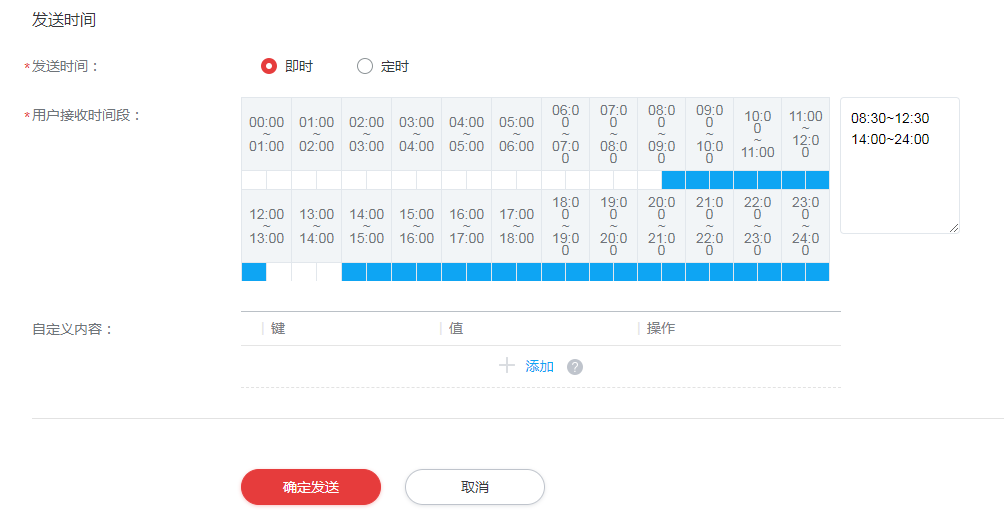
3. Sending messages
Reference to the official website send message>
Confusion Configuration
# Add project specific ProGuard rules here.
# You can control the set of applied configuration files using the
# proguardFiles setting in build.gradle.
#
# For more details, see
#   http://developer.android.com/guide/developing/tools/proguard.html

# If your project uses WebView with JS, uncomment the following
# and specify the fully qualified class name to the JavaScript interface
# class:
#-keepclassmembers class fqcn.of.javascript.interface.for.webview {
#   public *;
#}

# Uncomment this to preserve the line number information for
# debugging stack traces.
#-keepattributes SourceFile,LineNumberTable

# If you keep the line number information, uncomment this to
# hide the original source file name.
#-renamesourcefileattribute SourceFile
#=========================Huawei Push SDK==================
#Note: Do not confuse the resource files that come with the HMS SDK.Some applications and games can confuse all resource files in a project, so be careful not to confuse the resource files associated with the HMS SDK.
-ignorewarning
-keepattributes *Annotation*
-keepattributes Exceptions
-keepattributes InnerClasses
-keepattributes Signature
-keepattributes SourceFile,LineNumberTable
-keep class com.hianalytics.android.**{*;}
-keep class com.huawei.updatesdk.**{*;}
-keep class com.huawei.hms.**{*;}

-keep class com.huawei.android.hms.agent.**{*;}
-keep class com.huawei.gamebox.plugin.gameservice.**{*;}
Reference material
Summary of Android Integrated Huawei Push Crack
Android Integrated Huawei Push Practice
Summary of Android Integrated Huawei Push Issues
Project demo download address
Links: https://pan.baidu.com/s/13fw_2o4FGzdV9Q5-s-mxiw Extraction Code: qhk4