
Hello, I'm dashai, an old programmer.
preface
Recently, station B has just announced the top 100 UP in 2021. If I want to say my favorite UP, it must be @ good teacher. My name is he classmate. Every video of he made me feel amazing and creative.

Classmate he is also a person who pays great attention to details. I don't know if you have paid attention to the head map of personal space of station B of classmate he. The number displayed on the right is the time since he submitted his last contribution, which will change every day.

image.png
It's really a detail maniac~
I don't know how he realized it, but as an old programming ape who loves programming, the idea soon came to my mind. After a day of crazy code typing, I have fully achieved the same effect as he. I don't need to open the computer without a server. It will be updated automatically every day. The code is open source in github. If you just want to use it and don't want to know the technical details, please skip to the last to see the use teaching.
This article will teach you to realize it step by step. If you want to use programming to play with creativity with me, please like it, share it and support it.
Do it hand in hand
OK, next you will learn
- How to grab the request from station B
- Generate pictures in nodejs
- Get the latest submission calculation date of the user
- github action scheduled task
How to grab the request from station B
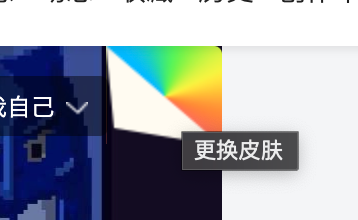
The premise of automatic is manual, so we need to know how to operate before we can change the personal space header map (this function requires large members of station B). Open your personal space at station B and click this area in the upper right corner of the header map to change the skin
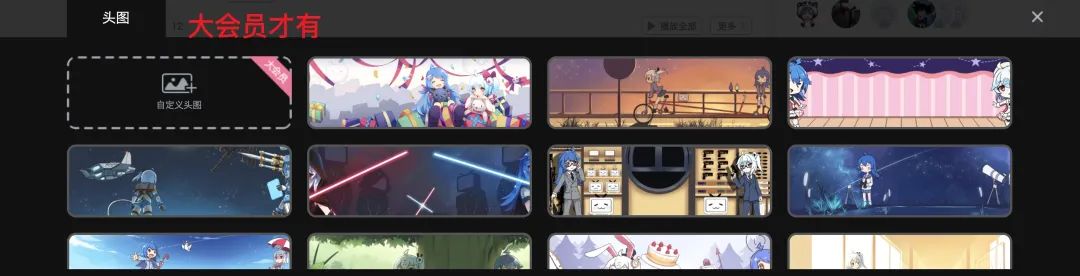
The operation panel for changing the header will pop up at the bottom of the web page. Only large members can upload any picture as the header.
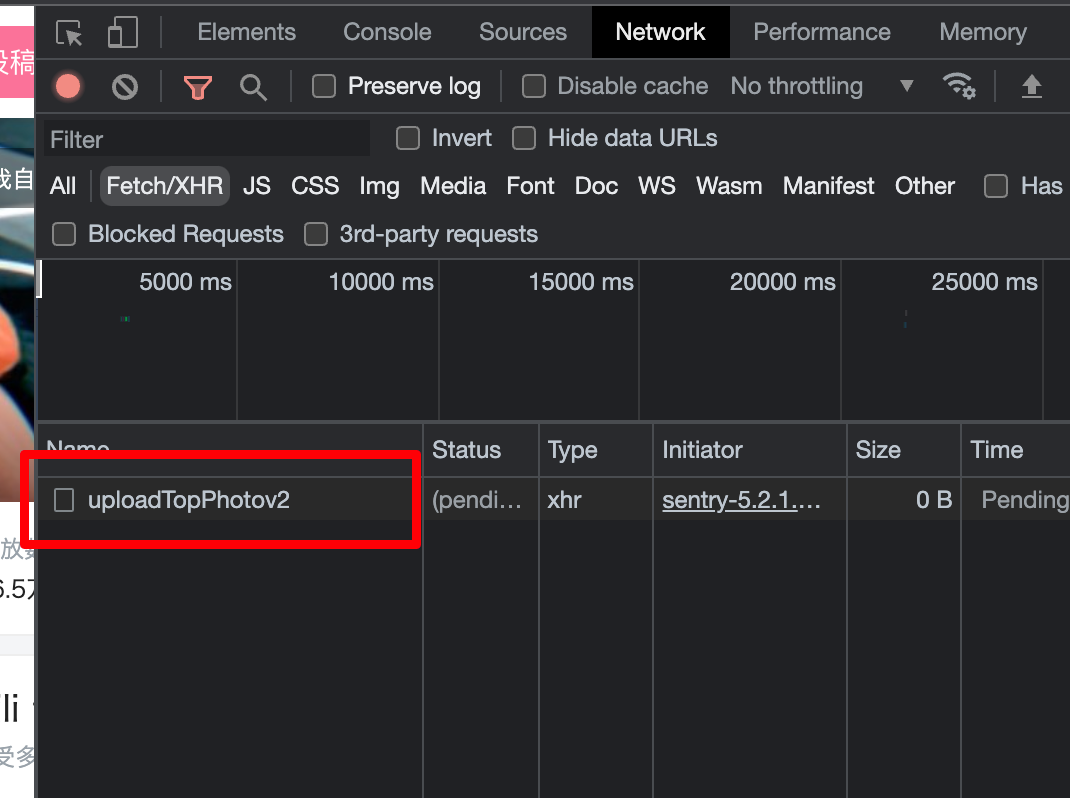
We press F12 to open the debugging panel and switch to the network tab. At this time, we can upload a picture and grab the interface of the upload header
https://space.bilibili.com/ajax/topphoto/uploadTopPhotov2
Right click and select Copy - > copy as node js fetch
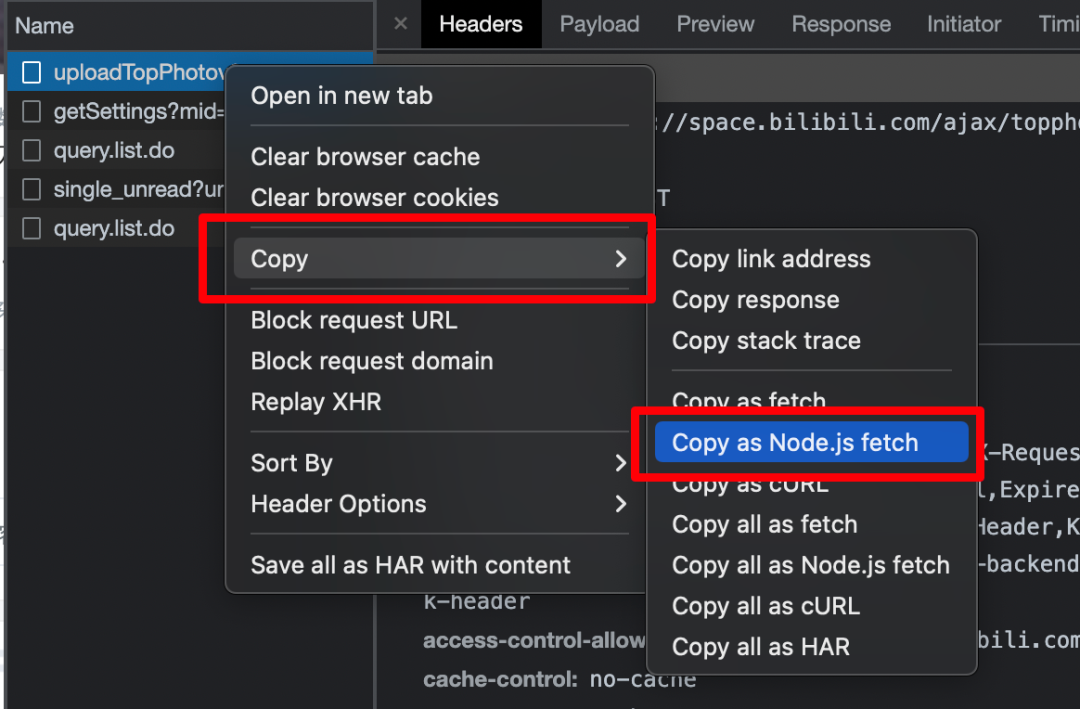
Open VSCode paste
fetch("https://space.bilibili.com/ajax/topphoto/uploadTopPhotov2", {

 "headers": {

 "accept": "application/json, text/plain, */*",

 "accept-language": "zh-CN,zh;q=0.9",

 "content-type": "application/x-www-form-urlencoded",

 "sec-ch-ua": "\" Not;A Brand\";v=\"99\", \"Google Chrome\";v=\"97\", \"Chromium\";v=\"97\"",

 "sec-ch-ua-mobile": "?0",

 "sec-ch-ua-platform": "\"macOS\"",

 "sec-fetch-dest": "empty",

 "sec-fetch-mode": "cors",

 "sec-fetch-site": "same-origin",

 "cookie": "",

 "Referer": "https://space.bilibili.com/422646817",

 "Referrer-Policy": "no-referrer-when-downgrade"

 },

 "body": "topphoto=xxxxxx&csrf=xxxxxx",

 "method": "POST"

});
Then we create a new nodejs project and install the node fetch library
//If your environment supports ESModule, use import
import fetch from 'node-fetch';

//If it is imported with require
const fetch = (...args) => import('node-fetch').then(({default: fetch}) => fetch(...args));
Now that you can complete the operation of uploading pictures just now through code, what should we pay attention to in this pile of parameters?
- cookie
For the parameters of user identity verification, we will mainly use bili_jct,SESSDATA,DedeUserID, DedeUserID__ckMd5
- body
topphoto is the data encoded by base64. csrf is bili_jct
If it is for your own use, you only need to generate the picture, convert it to base64 coding, and submit it to the interface of station B through the topphoto parameter
Generate pictures in nodejs
You know that you need to use canvas to generate pictures in the web page. There is also a library of canvas to generate pictures in the node environment
npm install canvas
This library needs to install different underlying drawing libraries under different systems.
# MacOS X
`brew install pkg-config cairo pango libpng jpeg giflib librsvg`

# Linux
`sudo apt-get install build-essential libcairo2-dev libpango1.0-dev libjpeg-dev libgif-dev librsvg2-dev`
Because I seldom use windows, my friends of windows go to see the official introduction by themselves, https://github.com/Automattic/node-canvas
The API design of drawing using this library is basically the same as that of Web canvas.
//Three methods of importing into canvas Library
const { createCanvas, loadImage ,registerFont } = require('canvas');

//The recommended size of station B is 2560x400
const canvasSize = {w:2560,h:400};
//Create canvas
const canvas = createCanvas(canvasSize.w, canvasSize.h);
//Get the painting object of the canvas
const ctx = canvas.getContext('2d');

async function painting(){
 //Add background image
 const bgImage = await loadImage('bg.jpg');
 //Draw the picture to the 0,0 coordinates of the canvas and set the width and height
 ctx.drawImage(bgImage, 0, 0, canvasSize.w, canvasSize.h);

}

painting();
With the background image, now let's add text
//Register font
registerFont('digit.ttf', { family: 'digit' });
//Set text color, font size and font
ctx.fillStyle = "#e6433a";
ctx.font = '97px digit';

let txt = "HELLO"

//Calculate text size
let size = ctx.measureText(txt);

//Draws text to the specified coordinates
ctx.fillText(txt, 0, 0);
image.png
The text in Mr. He's head picture is inclined in the vertical direction, which can also be realized in canvas
//Set the origin of the next tilt to the upper left corner of the text
ctx.translate(txt_x, txt_y);

/*
transform(a,b,c,d,e,f)
a Scale drawing horizontally
b Horizontal tilt drawing
c Vertical tilt drawing
d Scale drawing vertically
e Move drawing horizontally
f Move drawing vertically
*/
ctx.transform(1,-0.3,0,1,0,0);
The transform tilt algorithm is a little complicated. We will teach you a separate tutorial in the future. If you want to learn, remember to pay attention and don't get lost~
Next, use canvas Todataurl ("image / PNG") can convert the canvas into base64 encoded data. Note here that the topphoto parameter in the header interface of station B does not need the picture header information of the first 22 characters, so we need to intercept it
canvas.toDataURL("image/png").substring(22);
Of course, you are not sure whether the picture we generated is correct, so you can also save the picture as a local file to see if it is right
fs.writeFileSync("test.png",canvas.toBuffer());
Get the latest submission calculation date of the user
Through interface https://api.bilibili.com/x/space/arc/search You can capture the submission video of the specified user
//pn is the number of pages, ps is the number of entries per page, and order=pubdate represents the data returned according to the publishing time
fetch("https://api.bilibili.com/x/space/arc/search?mid="+DEDEUSERID+"&pn=1&ps=1&order=pubdate&jsonp=jsonp");
In the information of each video, the created attribute represents the release time (unit: seconds). We need to calculate the time difference between this time and the current system and convert it into days
//Calculate the number of days between two dates
const diffDays = (date, otherDate) => Math.ceil(Math.abs(date - otherDate) / (1000 * 60 * 60 * 24));
Here we recommend a website, which contains all kinds of functions realized with one line of code https://1loc.dev/
Github Action scheduled task
Github Action is a virtual container service provided by GitHub. Generally speaking, it means giving you a cloud server for free. The system of the cloud server and the code running environment can be customized according to the configuration. We can only use GitHub's workflow. Interestingly, we can also set regular tasks for it, run our workflow regularly, execute the code we have written, generate pictures and upload them at one go! Totally free!
Open terminal/Command line, in git Create a new directory under the project directory and create schedule.yml configuration file

mkdir .github
mkdir .github/workflows
touch .github/workflows/schedule.yml
schedule.yml configuration
# The name of this workflow
name: CI

# When can the workflow run
on:
  # Schedule is a scheduled task. Since the service is abroad, it needs to subtract 8 hours to be Beijing time
  schedule:
    - cron: '0 16 * * *'
  # This workflow is also allowed to be triggered manually in the github aciton panel
  workflow_dispatch:

# What are the tasks in the workflow
jobs:
  # This workflow contains a task named build
  build:
    # Install the latest ubuntu system
    runs-on: ubuntu-latest

    # Subtasks / steps included in this task
    steps:
      # Pull the latest code
      - uses: actions/checkout@v2

      # Install the running environment of Nodejs
      - name: Setup Node.js environment
        uses: actions/setup-node@v2.4.0

   # Install the necessary system drawing library of node canvas
      - name: Setup Basically Packages
        run:
          sudo apt-get install build-essential libcairo2-dev libpango1.0-dev libjpeg-dev libgif-dev librsvg2-dev

   # Install the dependency package of our own project
      - name: Install NPM dependencies
        run:
          npm install

   # Execute our own code
      - name: Run
        run:
          node index.js "${{secrets.BILI_JCT}}" "${{secrets.SESSDATA}}" "${{secrets.DEDEUSERID}}" "${{secrets.DEDEUSERID__CKMD5}}"
The configuration is over. At 0:00 a.m. Beijing time (16:00 U.S. time) every day, the B-stop map will be automatically generated and uploaded.

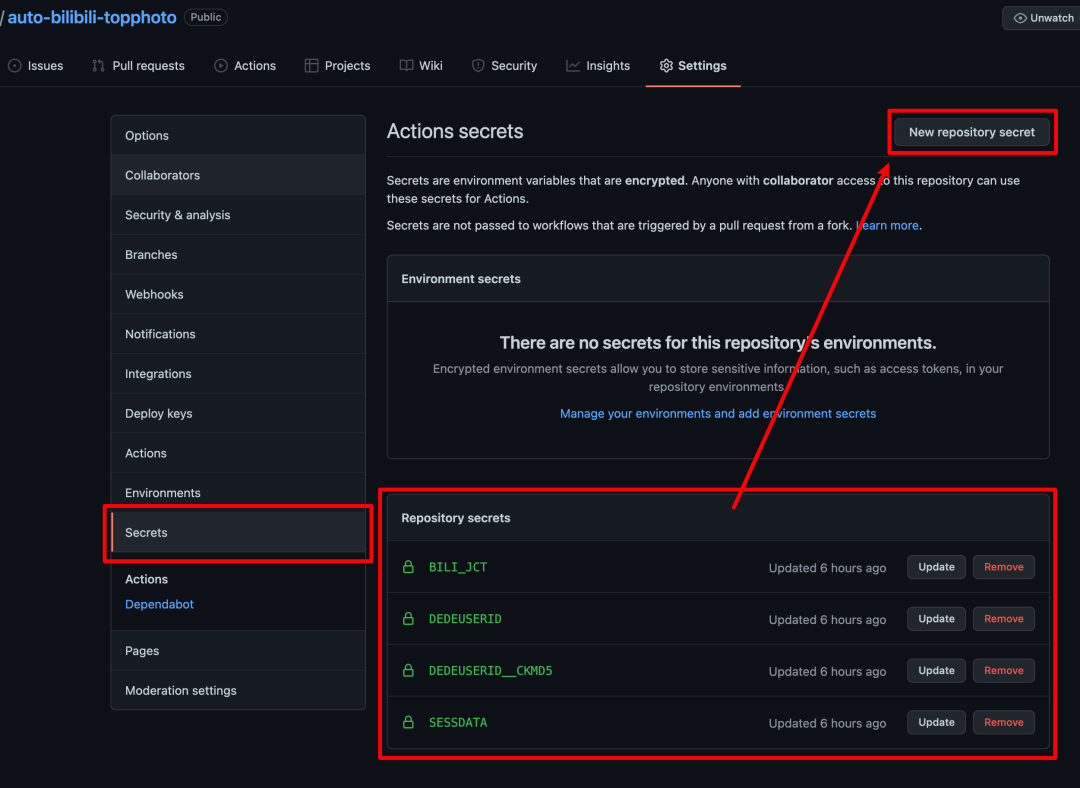
Secrets in configuration XXX is the parameter carried by our code when running. In order to make it more convenient for everyone to fork this open source warehouse, I set the parameters corresponding to the user identities of the four B stations to be customizable. The parameters of such secrets can be customized and protected from disclosure in Github.
Use this project
If you just want to use this warehouse to achieve the same effect, it is very simple, because I have encapsulated it and use it immediately
Warm tip: only major members of station B can customize the header
https://github.com/ezshine/auto-bilibili-topphoto
Step 1:
fork this warehouse
Step 2:
Open station B with Chrome browser, enter your personal space, press F12 and switch to the application tab
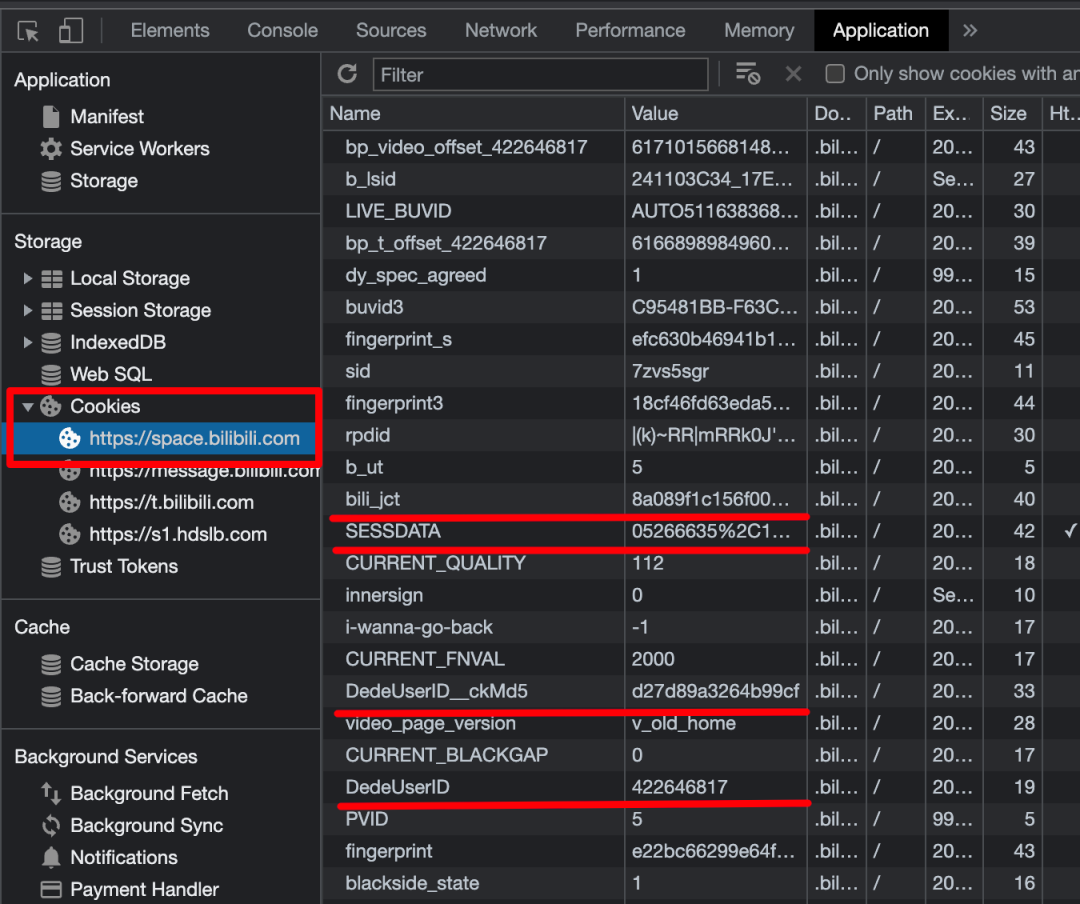
Find the four parameters in the Cookie, then open your branch warehouse, click Settings, enter Secrets, and click New repository secret to configure the four parameters one by one
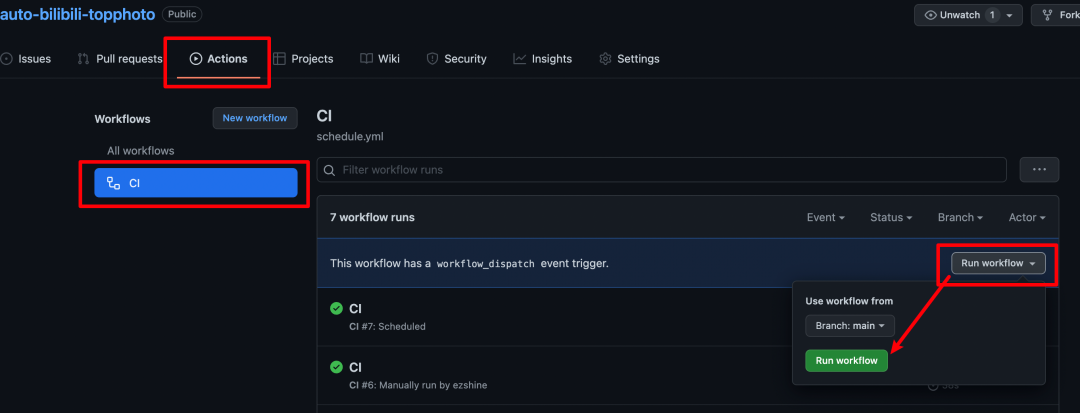
Step 3:
Manually execute the workflow once, and then it can run automatically and regularly!
Congratulations, you already have a personal space header of station B as interesting as classmate he