preface
Compared with ordinary two-dimensional codes, the small program chrysanthemum code has high recognition. You can scan wechat at a glance.
By default, we can customize the generated code Parameters, route, size, Automatically or manually configure the line color, and whether the background color is transparent These configuration items.
However, these configuration items are often unable to meet our customization needs.
For example, we need to not destroy Applet code In the case of identifiability, put the middle Logo Replace it. How? Next, I will teach you by hand.
Sort out ideas
We must first clarify the essence of this problem. This is actually a image processing Problem, and this work can be done by both server and client.
So there is two Two schemes:
-
The server generates codes and stitches the results Server processing scheme. Specific how to do, interested students can see the author's article Web function custom image practice: constructing image processing function
-
The server generates the code and the client stitches the scheme. This is what this article specifically refers to.
Note: the applet code is generally generated by the server calling wechat api interface
Cloud call -- the easiest way to generate code
As we all know, wechat applet environment wxacode.getUnlimited yes two Two generation modes, one is HTTPS call , One is Cloud call.
among Cloud call As a scene customization serverless solutions can often improve our development efficiency. Next, we quickly deploy a getWxacodeUnlimit function to provide us with test materials.
getWxacodeUnlimit/index.js:
import cloud from 'wx-server-sdk'cloud.init({
  env: cloud.DYNAMIC_CURRENT_ENV})export async function main (event, context) {
  const { scene = '', page, width = 430, autoColor, lineColor, isHyaline } = event
  const result = await cloud.openapi.wxacode.getUnlimited({
    scene,
    page,
    width,
    autoColor,
    lineColor,
    isHyaline
  })
  return result}//  The author uses the packaging tool,   Everybody wants to run straight, put   esm   Convert to   cjs   that will do
getWxacodeUnlimit/config.json:
{
  "permissions": {
    "openapi": ["wxacode.getUnlimited"]
  }}
Through the above two With this code block, our test function is deployed.
Return the
const suffixMap = {
  'image/jpeg': 'jpeg',
  ...}export function getPath(filename = 'tmp', contentType = 'image/jpeg') {
  return `${wx.env.USER_DATA_PATH}/${filename}.${suffixMap[contentType] || 'jpeg'}`}export function writeFile(buff, contentType = 'image/jpeg', filename = 'tmp') {
  return new Promise((resolve, reject) => {
    const fsm = wx.getFileSystemManager()
    const filePath = getPath(filename, contentType)
    fsm.writeFile({
      filePath,
      data: buff,
      encoding: 'binary',
      success() {
        resolve(filePath)
      },
      fail(error) {
        reject(error)
      }
    })
  })}....//  try directly where you need it   {
  loading('Generating')
  const result = await getQrcode(scene, option) //  Cloud call encapsulation function    return   await   writeFile(result.buffer,   result.contentType,   scene)  // :  string}   catch   (e)   {
  console.error(e)} finally {
  loaded()}
Client image processing
When it comes to client-side image processing, it has to be mentioned canvas This native component, so we just need to pass it to the middle of the applet code Logo Part, proceed Measurement and clipping replacement Just customize the image we want.
measure
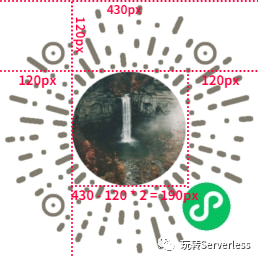
The default applet size is used here 430px * 430px For example. (in order to be easy to understand, this case uses the small program code of this resolution. If the required resolution is different, it can be calculated and cut in proportion.)
 Applet code label
It can be seen from the marks on the figure that 430px * 430px At the resolution, the margin of up, down, left and right is 120px , You can calculate the middle Logo circle The diameter of the is 190px, radius 95px.
So then you can write code easily and happily.
Using canvas 2d to realize
The Api version of generation 1 applet has been eliminated, and now the version of type = "2d" is directly used. The Api document is in MDN upper
Front labels and styles
<!-- uni-app vue Format, which can be converted to wxml Simple syntax transformation `: => {{}}` --><canvas
  :class="visible ? '': 'canvas offscreen'"
  type="2d"
  id="canvas"
  :style="{  width:width+'rpx',  height:height+'rpx'  }"></canvas>// scss
.canvas.offscreen{ //  2   class   Selector, increase priority
  position: absolute;
  bottom: 0;
  left: -9999rpx;
  //  This is called physical off screen rendering. Laugh~
}
Note: cannot be in Used on canvas hidden or display:none, which causes rendering whitespace.
Core js implementation
Initialize canvas instance and context
initialization canvas Examples and ctx Context:
let canvaslet ctx{...codes...}onReady(){
  uni
    .createSelectorQuery()
    .in(this)  //  If canvas is in the component, you need to add this line     . select('#canvas')
    .fields({
      node: true,
      size: true
    })
    .exec((res) => {
      if (res[0]) {
        this.canvas = canvas = res[0].node
        this.ctx = ctx = canvas.getContext('2d')
        //  The following can be based on the equipment   pixelRatio   It is adjusted according to the proportion. Here, for the convenience of demonstration, it is directly assigned.          canvas.width  =  four hundred and thirty
        canvas.height = 430
      }
    })}
First render - canvas background
For the first rendering, the applet code is passed into the canvas as an image. drawBackgroud:
async drawBackgroud (orginQrcodeUrl) {
  const [err, res] = await uni.getImageInfo({
    //  This can be a remote address (downloadurl needs to be configured)     //  It can also be a local address (directly return the parameter itself)     //  even to the extent that   cloud://   Prefix cloud storage url can also be yo      src:   orginQrcodeUrl
  })
  if (err) {
    throw err
  }
  const { path } = res
  const img = canvas.createImage()
  img.src = path
  await new Promise((resolve, reject) => {
    img.onload = () => {
      //  In the following line, spread the small program code into the canvas!        ctx.drawImage(img,   0   0   canvas.width,   canvas.height)
      resolve()
    }
    img.onerror = (event) => {
      reject(event)
    }
  })},
Second render - crop and fill
In the second rendering, cut the background into a circle and fill in the picture. drawAvatar:
async drawAvatar (remoteAvatarUrl) {
  const [err, res] = await uni.getImageInfo({
    //  For example, here I use the image address in the cloud storage   prefix:   cloud://      src:   remoteAvatarUrl
  })
  if (err) {
    throw err
  }
  const { path } = res
  const img = canvas.createImage()
  img.src = path
  //  The measurement data is used here    const   offsetX  =  one hundred and twenty  //  x   Axis offset   120px    const   offsetY  =  one hundred and twenty  //  y   Axis offset   120px    const   diam  =  one hundred and ninety  //  Diameter of circle   (430  -  120*   2)  /  two    const   radius  =  diam  /  two  //  Radius of circle    const   borderWidth  =  two  //  Add 2px to erase the solid edge of the original logo    const   circle  =  {  //  Size attribute of the cropped partial circle      x:   offsetX  +  radius,
    y: offsetY + radius,
    radius: radius + borderWidth
  }
  await new Promise((resolve, reject) => {
    img.onload = () => {
      ctx.save()
      //  Start!   Kill the original Logo in the middle!        ctx.arc(circle.x,   circle.y,   circle.radius,   0   Math.PI   2,   false)
      ctx.clip()
      //  end       //  Start!   Insert the custom image we need and tile it!        ctx.drawImage(
        img,
        offsetX - borderWidth,
        offsetY - borderWidth,
        circle.radius * 2,
        circle.radius * 2
      )
      //  end        ctx.restore()
      resolve()
    }
    img.onerror = (event) => {
      reject(event)
    }
  })},
Through the above steps, we can easily complete the image processing part and replace the default Logo in the middle with a custom image.
Preview and download to local
//  obtain   tempFilePathasync   getImage   ()   {
  const [err, res] = await uni.canvasToTempFilePath({
    canvas
  })
  if (err) {
    throw err
  }
  return res.tempFilePath}//  Preview async   preview   (src)   {
  if (src) {
    uni.previewImage({
      urls: [src]
    })
  }},//  Save to album async   save   (src)   {
  try {
    //  Authorize before saving      await   authorize('scope.writePhotosAlbum')
    const [err, res] = await uni.saveImageToPhotosAlbum({
      filePath: src
    })
    if (err) {
      throw err
    }
    this.$success('Saved successfully!')
  } catch (e) {
    console.error(e)
  }}
In this way, the complete solution for the client to generate custom applet code is completed
Effect display
 Custom code
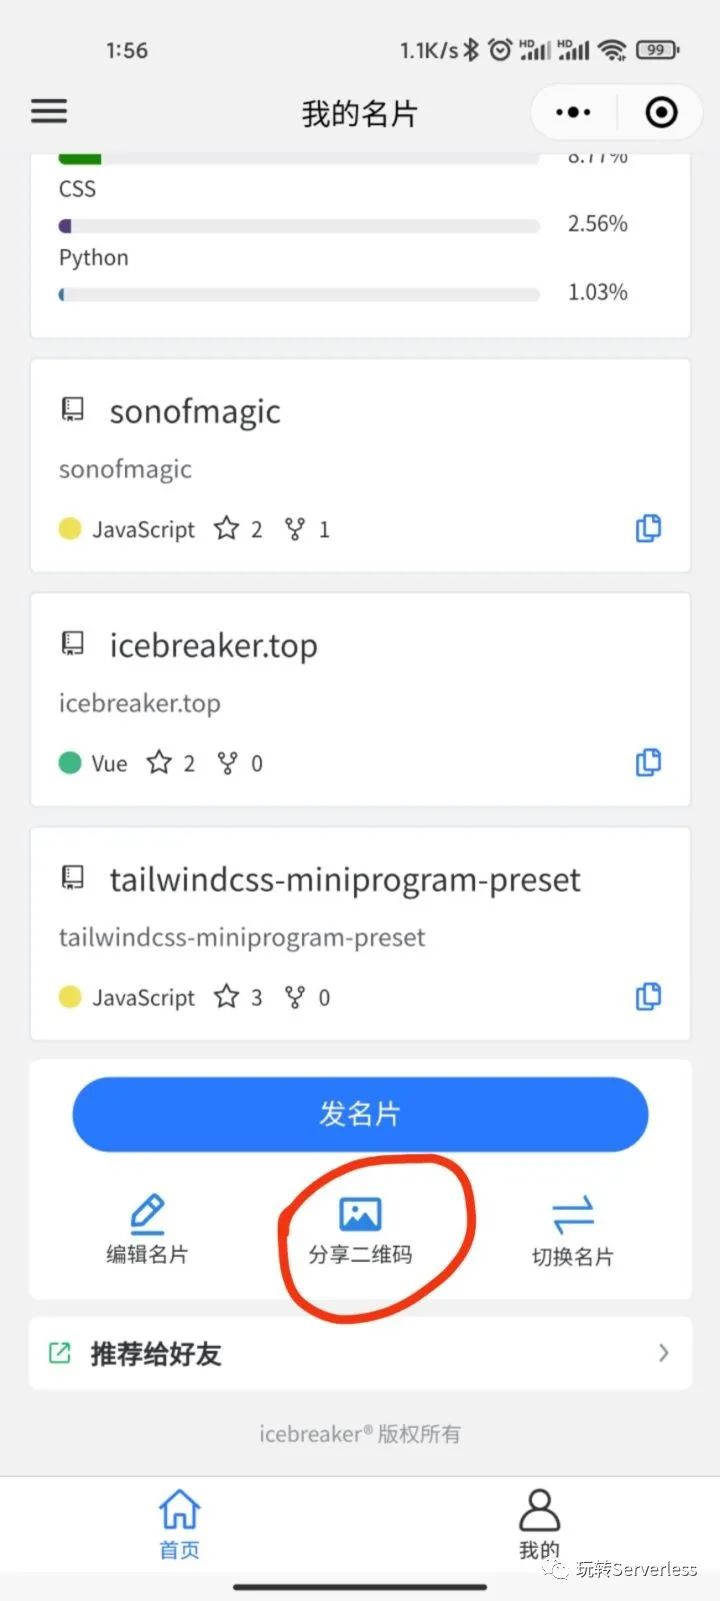
Or wechat search Programmer business card After, maintain the business card, upload the avatar, and then click below Share QR code Button to preview.
 screenshot
Custom generate and forward pictures
This article is a very simple case, and the author has written one before The small program Canvas 2D custom generates and forwards pictures, as well as custom sharing posters, which are similar in principle.
appendix
wxacode.getUnlimited interface document