1, Introduction to spring MVC
Spring MVC is a part of the Spring Framework and a lightweight Web framework based on Java to implement MVC.
MVC is a programming idea (it is divided into three layers, Model View Controller, and each layer is a package)
Spring MVC, as its name implies, is the same
1.1 let's make preparations
1. Because the framework is used and the jar package is imported through the pom.xml configuration file, Maven environment is required
2. IDE is indispensable for development, so I need to download the relevant IDE (I use Idea)
3.Idea configuration maven
4. Spring MVC simplifies the Servlet, but it also needs the support of Servlet(Web) for similar functions
Therefore, we need the server (I use Tomcat) and the web support of the project itself
5. An empty standard Maven project
6. Join web support
Note: the links of relevant preparations will be placed at the bottom of the article
1.2 business logic:
The simulated back-end data is transmitted to the front-end, and the value is displayed through jsp
2, Spring MVC execution process and Implementation
2.1 spring MVC process
1, The user sends a request to the front-end controller DispatcherServlet.
2, The dispatcher servlet receives a request to call the handler mapping processor mapper.
3, The processor mapper finds the specific processor (which can be found according to the xml configuration and annotation), generates the processor object and the processor interceptor (if any) and returns it to the dispatcher servlet.
4, Dispatcher servlet calls HandlerAdapter processor adapter.
5, The HandlerAdapter invokes a specific processor (Controller, also known as back-end Controller) through adaptation.
6, The Controller returns ModelAndView after execution.
7, The HandlerAdapter returns the Controller execution result ModelAndView to the dispatcher servlet.
8, The dispatcher servlet passes the ModelAndView to the viewrestrover view parser.
9, The viewrestrover returns the specific View after parsing.
10. The dispatcher servlet renders the View according to the View (that is, fills the View with model data).
11. Dispatcher servlet responds to the user.
2.2 specific implementation (two types)
2.2.1 configuration file implementation
1. Import dependency in pom.xml
<dependencies>
        <dependency>
            <groupId>junit</groupId>
            <artifactId>junit</artifactId>
            <version>4.12</version>
        </dependency>
        <dependency>
            <groupId>org.springframework</groupId>
            <artifactId>spring-webmvc</artifactId>
            <version>5.1.9.RELEASE</version>
        </dependency>
        <dependency>
            <groupId>javax.servlet</groupId>
            <artifactId>servlet-api</artifactId>
            <version>2.5</version>
        </dependency>
        <dependency>
            <groupId>javax.servlet.jsp</groupId>
            <artifactId>jsp-api</artifactId>
            <version>2.2</version>
        </dependency>
        <dependency>
            <groupId>javax.servlet</groupId>
            <artifactId>jstl</artifactId>
            <version>1.2</version>
        </dependency>
    </dependencies>
Note: don't forget to refresh after importing. If there is no local warehouse, you will go to the remote warehouse to download, which will be a little slower to ensure good network
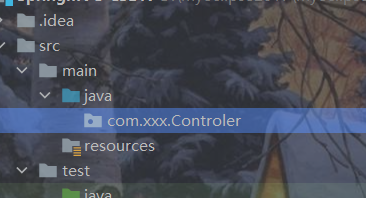
2. Create under main java com.xxx.Controller package
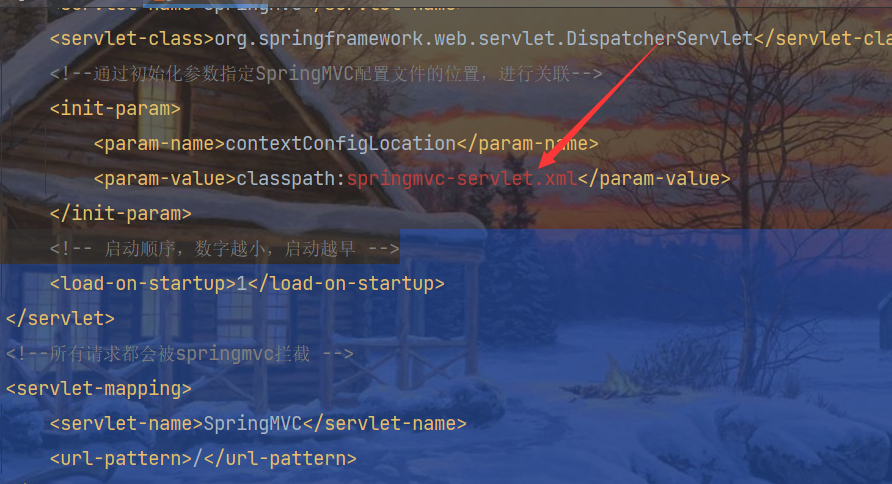
2. Paste the following code in the web.xml file (the configuration file or tool class are ready-made and can be copied directly with only minor changes)
<?xml version="1.0" encoding="UTF-8"?>
<web-app xmlns="http://xmlns.jcp.org/xml/ns/javaee"
         xmlns:xsi="http://www.w3.org/2001/XMLSchema-instance"
         xsi:schemaLocation="http://xmlns.jcp.org/xml/ns/javaee http://xmlns.jcp.org/xml/ns/javaee/web-app_4_0.xsd"
         version="4.0">
    <!--1.register servlet-->
    <servlet>
        <servlet-name>SpringMVC</servlet-name>
        <servlet-class>org.springframework.web.servlet.DispatcherServlet</servlet-class>
        <!--Specified by initialization parameters SpringMVC The location of the configuration file is associated-->
        <init-param>
            <param-name>contextConfigLocation</param-name>
            <param-value>classpath:springmvc-servlet.xml</param-value>
        </init-param>
        <!-- Start sequence: the smaller the number, the earlier the start -->
        <load-on-startup>1</load-on-startup>
    </servlet>
    <!--All requests will be rejected springmvc intercept -->
    <servlet-mapping>
        <servlet-name>SpringMVC</servlet-name>
        <url-pattern>/</url-pattern>
    </servlet-mapping>

    <filter>
        <filter-name>encoding</filter-name>
        <filter-class>org.springframework.web.filter.CharacterEncodingFilter</filter-class>
        <init-param>
            <param-name>encoding</param-name>
            <param-value>utf-8</param-value>
        </init-param>
    </filter>
    <filter-mapping>
        <filter-name>encoding</filter-name>
        <url-pattern>/</url-pattern>
    </filter-mapping>
</web-app>
An error will be reported here (the error location is as follows):
Note:
Because we need to specify the location of spring MVC configuration file through initialization parameters for association, we have not written the configuration file, so an error will be reported
resolvent:
Hover the mouse, click the position pointed by the arrow, and select the created path (remember to select the resources directory). It will automatically generate a file with the same binding name
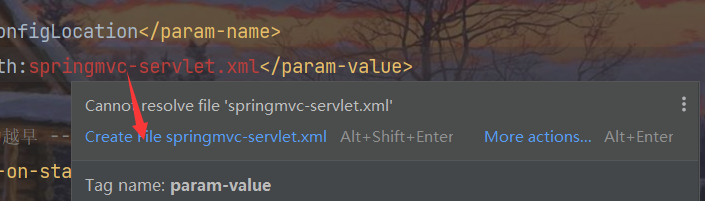 Automatically created profile

Personal perception:
Although the configuration file name to be bound can be created first, it will not be impressive, and it is easy to make mistakes when typing, and it is troublesome to copy. So when it becomes popular, we will hover the mouse to create it by ourselves, which will not only impress us, but also ensure the consistency of the name and the location
Of course, file names can be defined by themselves
3. Now that we have created the binding configuration file, we might as well copy the following code directly
<?xml version="1.0" encoding="UTF-8"?>
<beans xmlns="http://www.springframework.org/schema/beans"
       xmlns:xsi="http://www.w3.org/2001/XMLSchema-instance"
       xsi:schemaLocation="http://www.springframework.org/schema/beans
        http://www.springframework.org/schema/beans/spring-beans.xsd">

    <!--Processor mapping-->
    <bean class="org.springframework.web.servlet.handler.BeanNameUrlHandlerMapping" id="beanNameUrlHandlerMapping"/>
    <!--Processor adapter-->
    <bean class="org.springframework.web.servlet.mvc.SimpleControllerHandlerAdapter" id="adapter"/>

    <!--The view parser implements pre suffix splicing-->
    <bean class="org.springframework.web.servlet.view.InternalResourceViewResolver" id="internalResourceViewResolver">
        <property name="prefix" value="/WEB-INF/jsp/"/>
        <property name="suffix" value=".jsp"/>
    </bean>

    <bean class="com.xxx.Controller.SpringMVC_Demo" id="/hello"/>
</beans>
There are Handler, view parser... Related creation
A small mouth (can be crossed):
Spring objects are used for object instantiation (equivalent to a new object), and setter injection (equivalent to object. Setter method) is implemented through property
The last one is the instantiation of the object of the Controller layer < it's a little early to write here. You should create the class under the Controller and register here > (spring is used here, so the new object is not needed). Class is the class name and id is the object name
The id here is an address (spring MVC routine). At that time, the user can get the data from the back end through this request and display it to the front end (this id should correspond to the view name passed from the Controller class)
be careful:
The last bean needs to be added / because when accessing the address bar, the input is / Hello (personal understanding). If it is tested, it will report 404
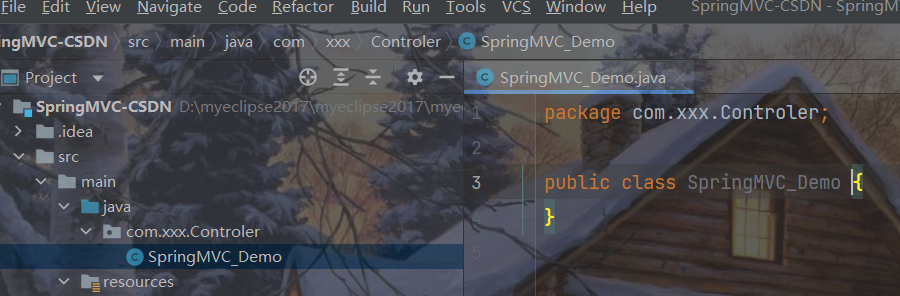
4. Create a Controller class named SpringMVC_Demo
5. Implement a Controller interface and press alt + enter to implement his method
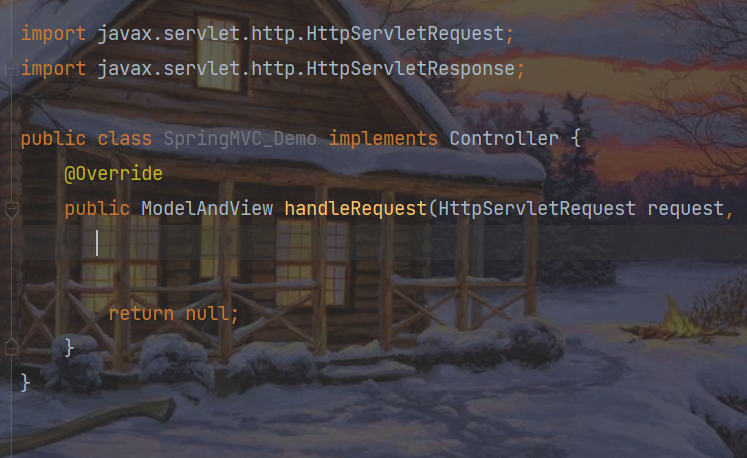
Personal understanding:
The return value of this method is a ModelAndView object
Model is the background data, also known as model
View is a view. I use the jsp here to display it
Data fetched from the back-end and sent to the front-end display must have corresponding Stored value method and method of sending foreground with parameters
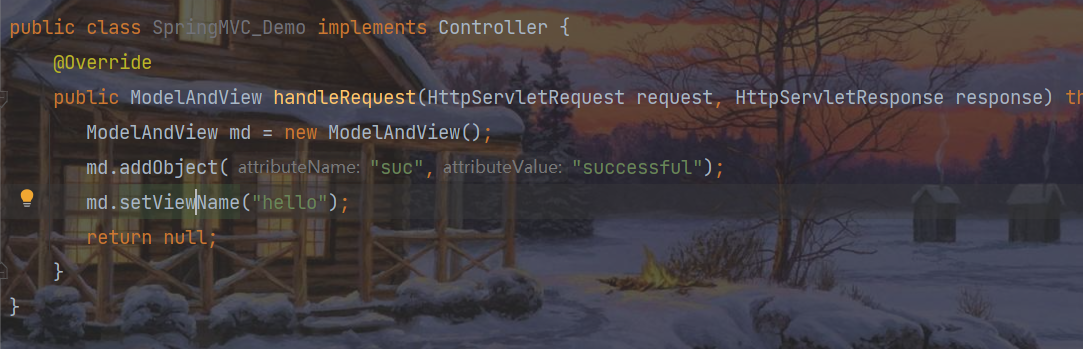
6.new one ModelAndView object Then, the parameter list in the object name. addObject() is a key value pair (take the following value from the front)
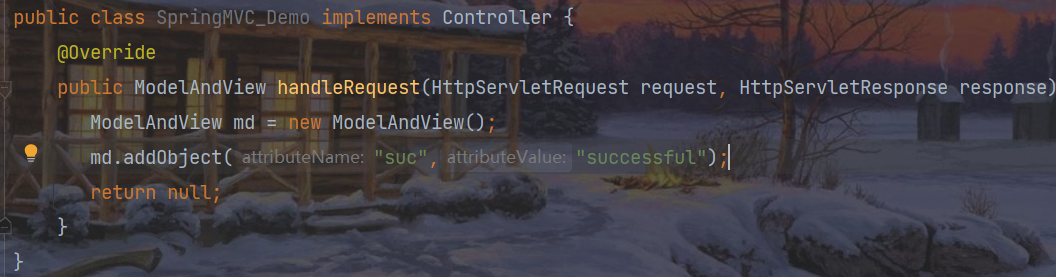
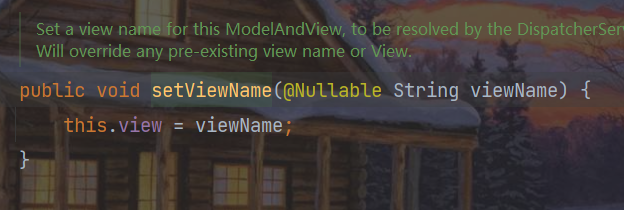
7.md.setViewName("hello"); "Page to jump to" You can add slash or no slash in it. It has been tested sure
Source code:
package com.xxx.Controler;

import org.springframework.web.servlet.ModelAndView;
import org.springframework.web.servlet.mvc.Controller;

import javax.servlet.http.HttpServletRequest;
import javax.servlet.http.HttpServletResponse;

public class SpringMVC_Demo implements Controller {
    @Override
    public ModelAndView handleRequest(HttpServletRequest request, HttpServletResponse response) throws Exception {
       ModelAndView md = new ModelAndView();
       md.addObject("suc","successful");
       md.setViewName("hello");
       return null;
    }
}
Tip:
Remember the bean configured in spring MVC? I said that it should be consistent with the value in setViewName on the front end
Evidence:


It can be seen from the source code that what passed is a string
Since the page value display is required, there must be a page value display (remember the hello string we configured earlier? It is also configured in the configuration file of spring MVC. This hello string is the page and directly copy the name)
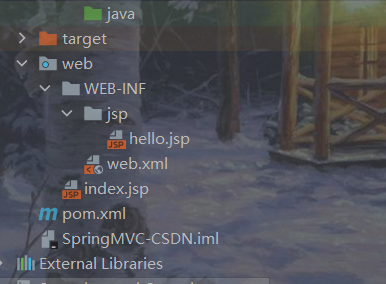
Create a folder under Web info and create a file with the name of the copied hello (without slashes or other things)
Note:
Why? Because the view parser is configured in the spring MVC configuration file. It will splice according to the prefix and suffix. You can find hello.jsp under jsp under WEB-INF
This is done for security. jsp is not exposed, but it is safe to put it in Web inf, but it cannot be accessed. The view parser plays this role (splicing path to find the jsp to be accessed)
jsp to make a simple connection value (this value is addObject (don't write the key in front of it wrong, or you won't get the value)
The code is as follows
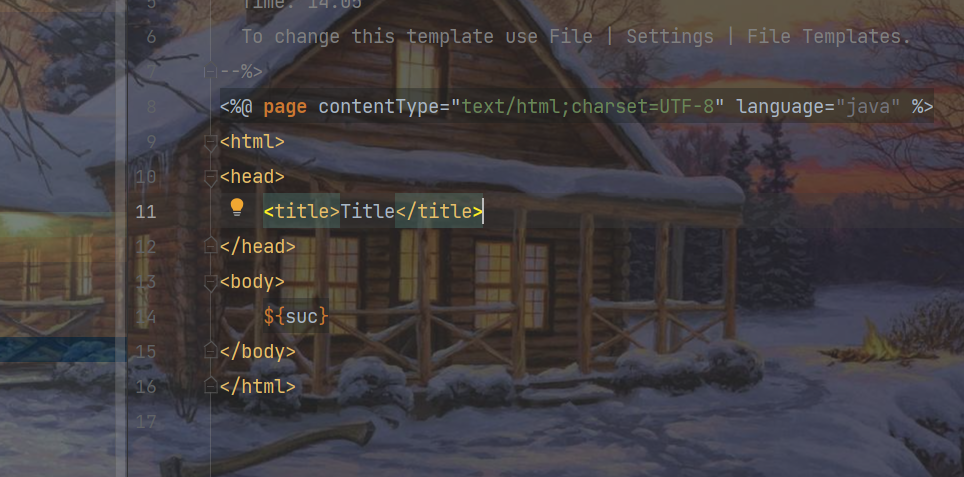
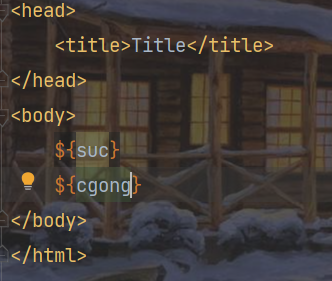
<%@ page contentType="text/html;charset=UTF-8" language="java" %>
<html>
<head>
    <title>Title</title>
</head>
<body>
    ${suc}
</body>
</html>
In theory, there is no problem. Let's start the test
1. Configure Tomcat
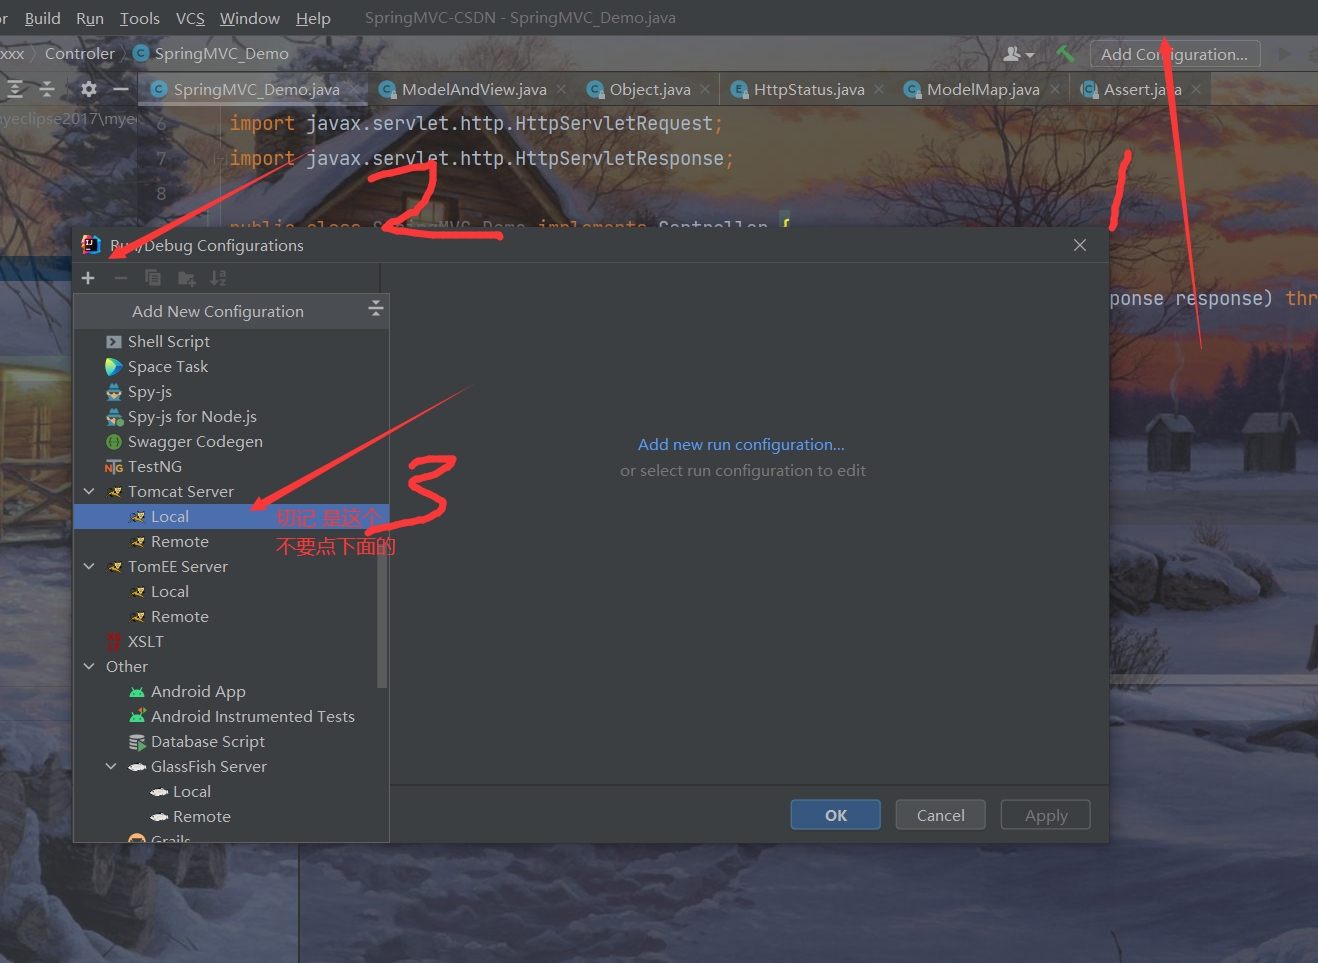
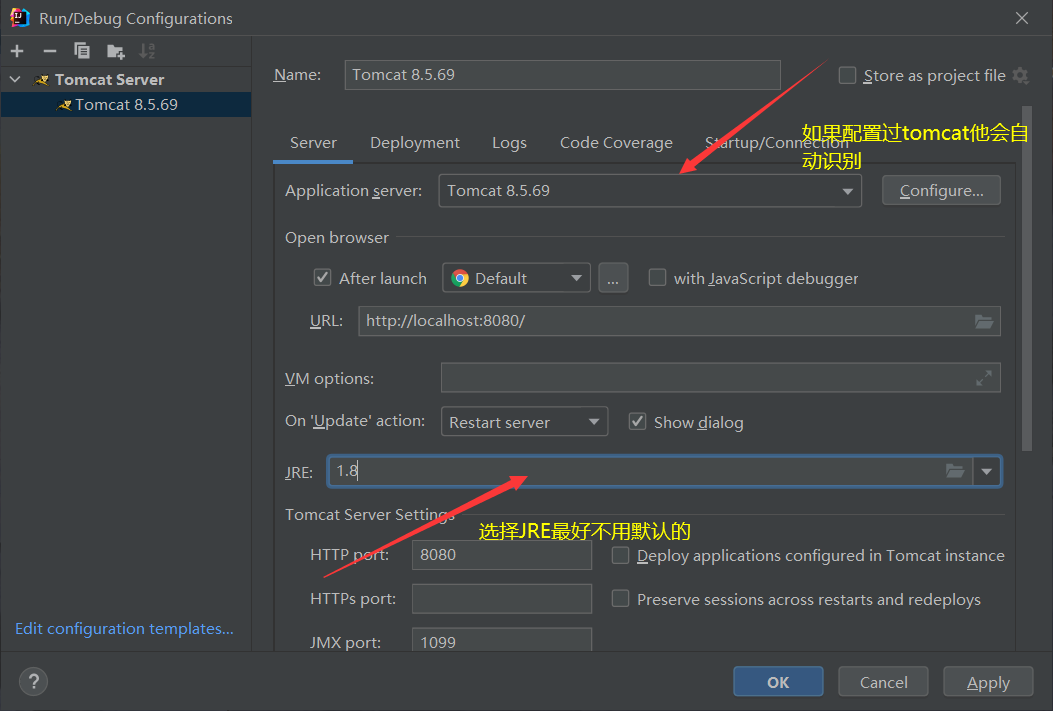
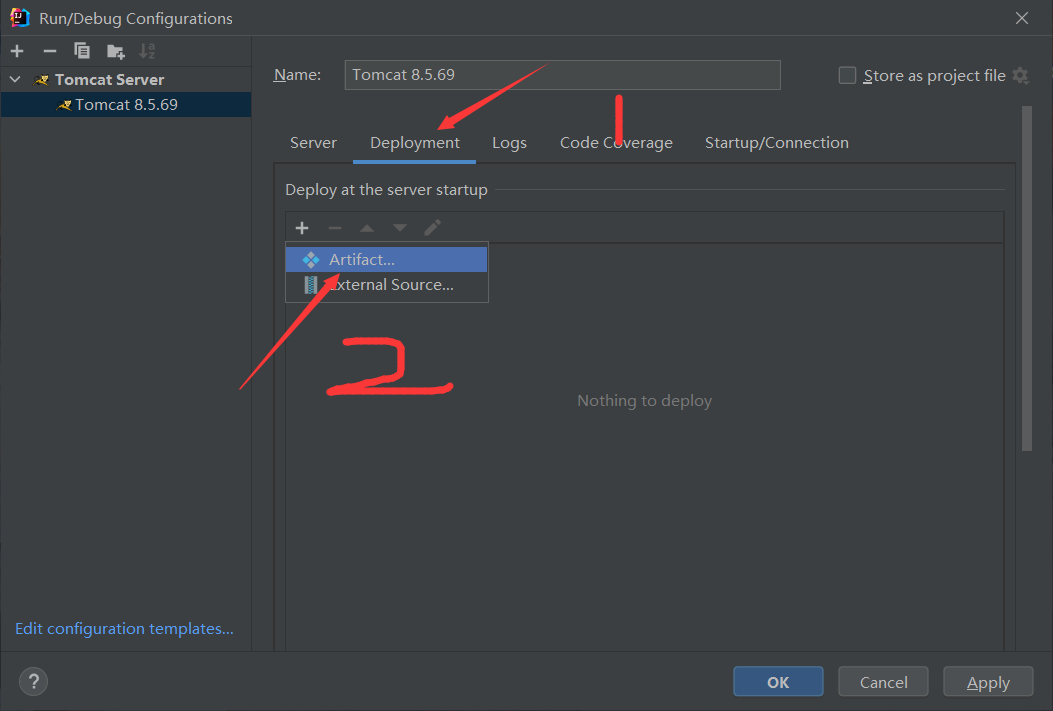
If the procedure is correct, it will be recognized automatically
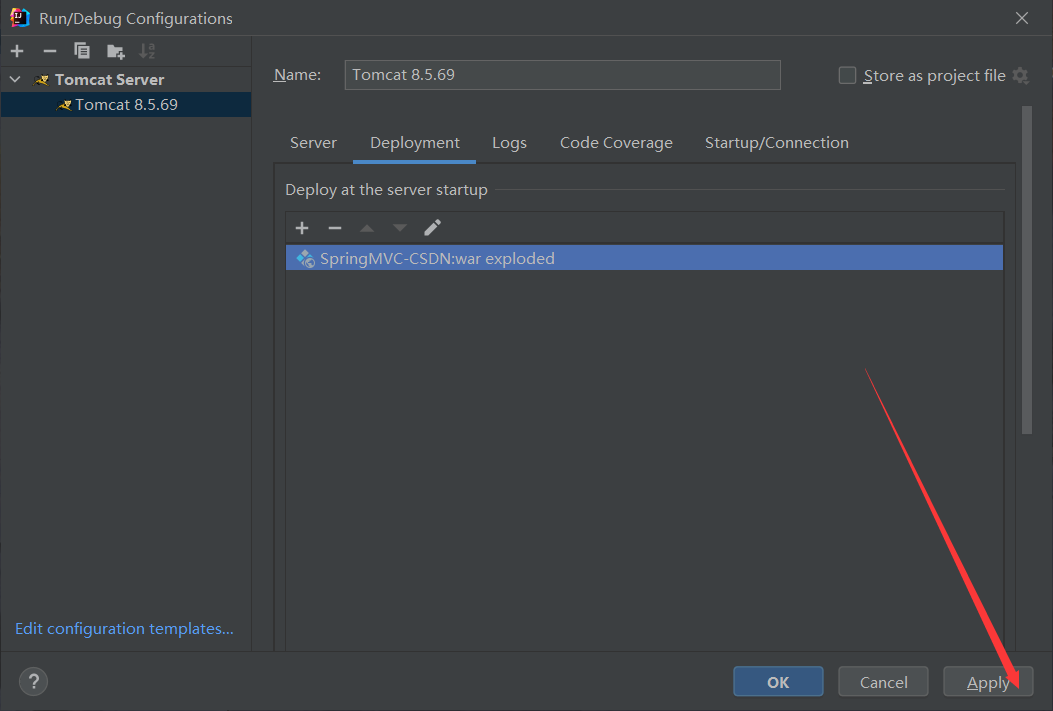
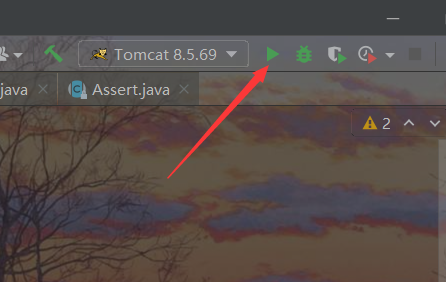
After configuration, the test runs
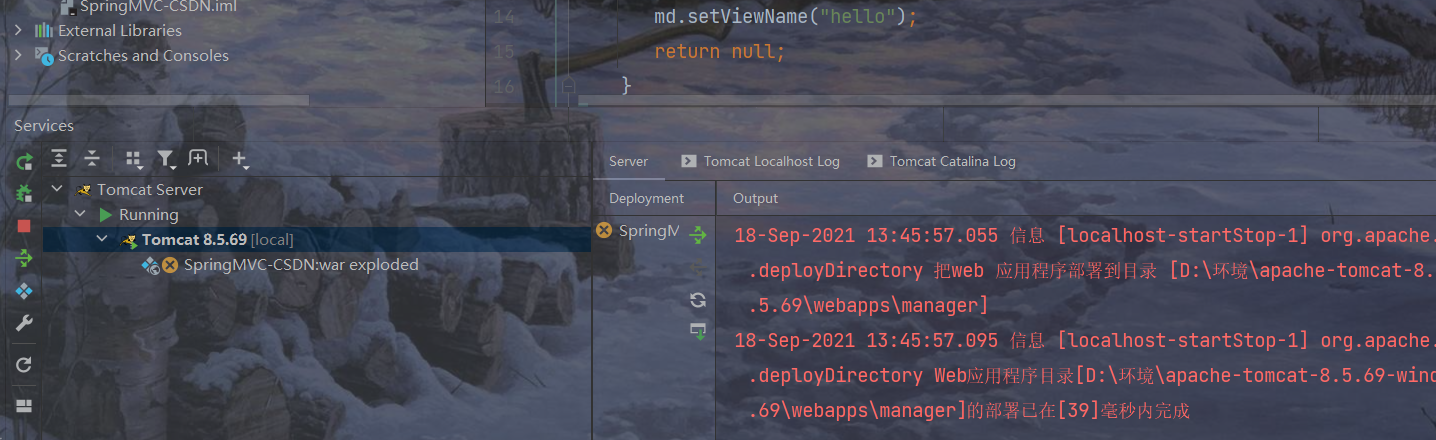
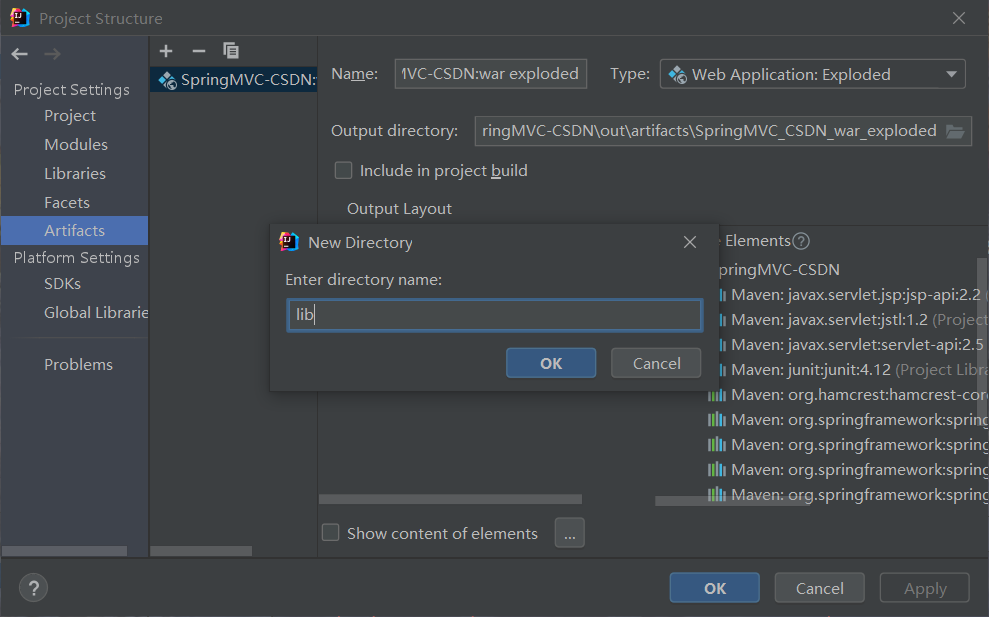
Don't panic when this problem occurs. The package may not be deployed
resolvent
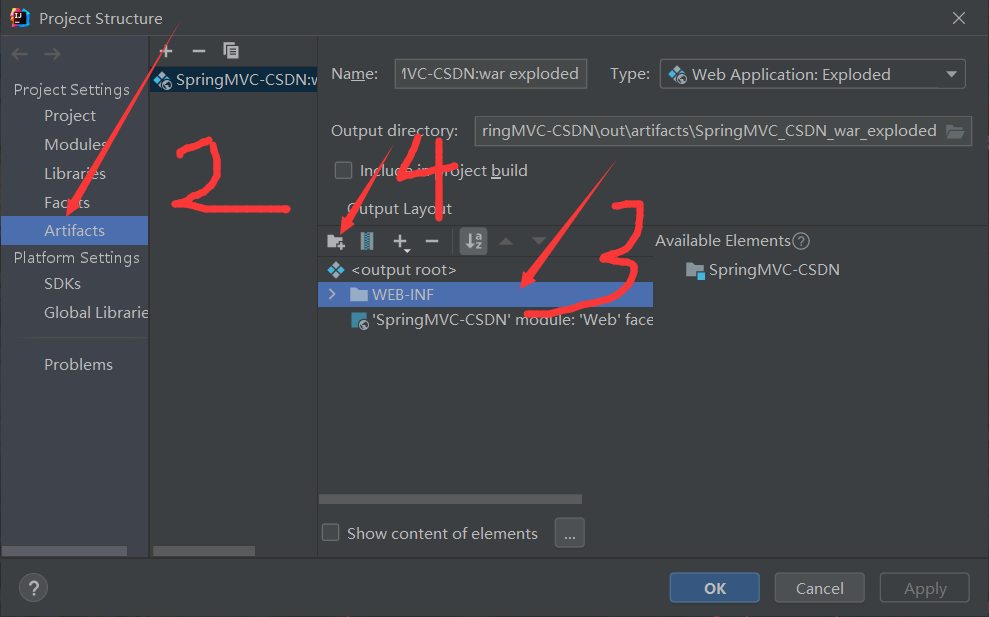
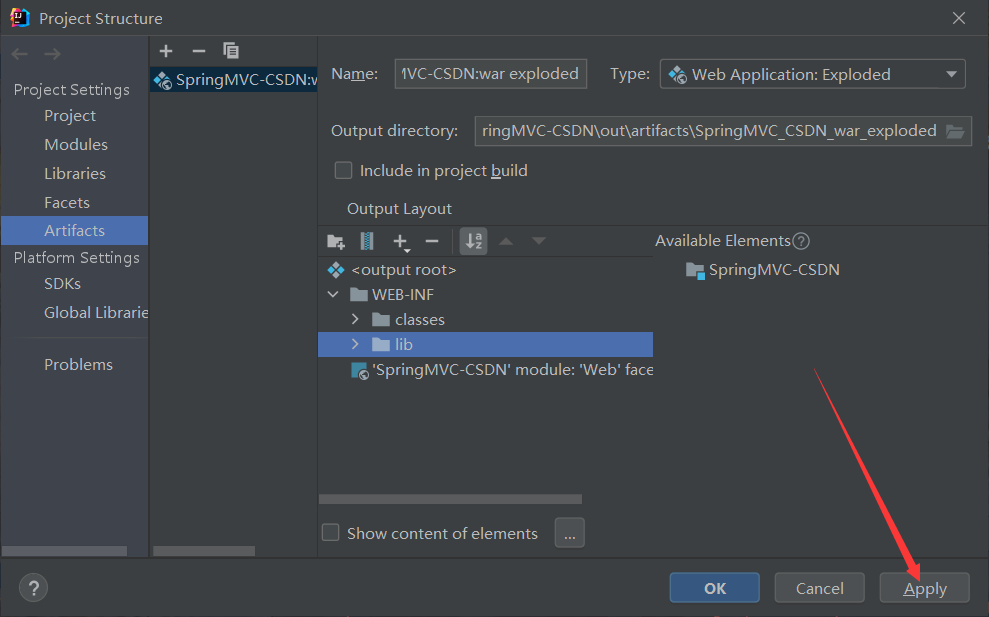
Once we checked that there was no lib, we added it manually. Follow steps 2, 3 and 4 above and enter lib
Click Library Files under the plus sign
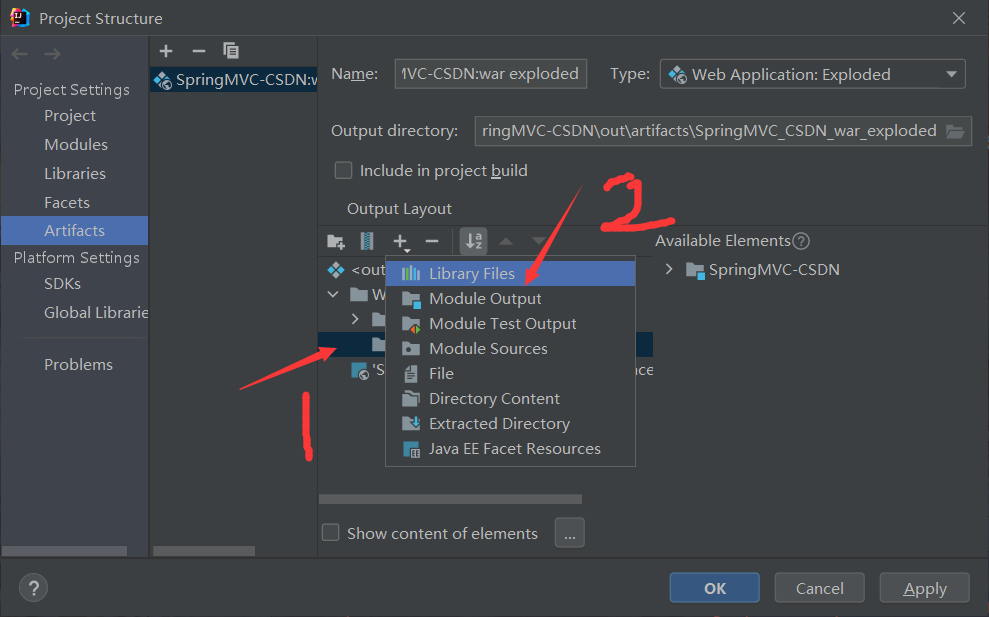
The lib package must be under WEB-INF, otherwise it will not work
Select these dependencies and click ok
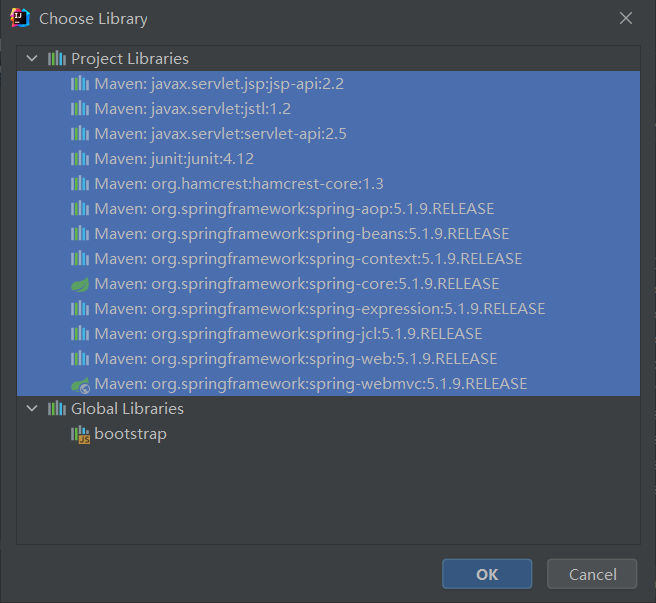
Don't forget to Apply
The key of basket making is closing. Don't forget to write the return value teacher Zhang Cong said in class, otherwise everything will be in vain
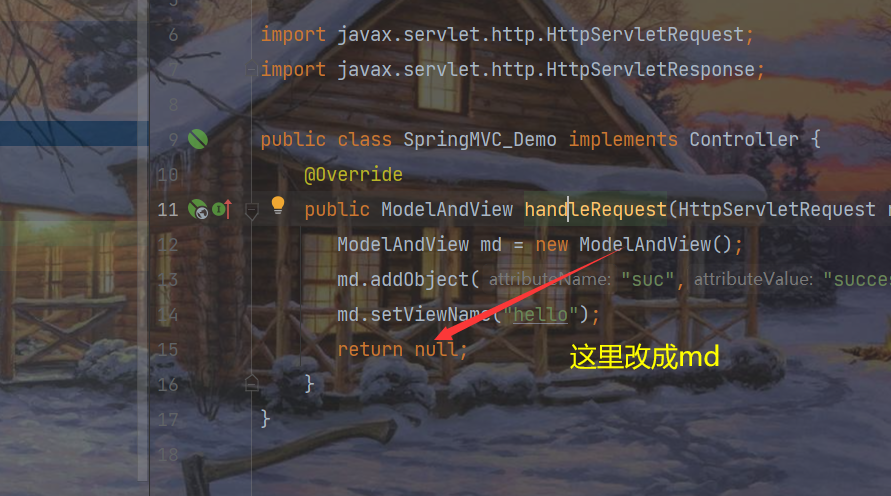
There will be some problems if the return value is null
Final code:
package com.xxx.Controler;

import org.springframework.web.servlet.ModelAndView;
import org.springframework.web.servlet.mvc.Controller;
import javax.servlet.http.HttpServletRequest;
import javax.servlet.http.HttpServletResponse;

public class SpringMVC_Demo implements Controller {
    @Override
    public ModelAndView handleRequest(HttpServletRequest request, HttpServletResponse response) throws Exception {
       ModelAndView md = new ModelAndView();
       md.addObject("suc","successful");
       md.setViewName("hello");
       return md;
    }
}
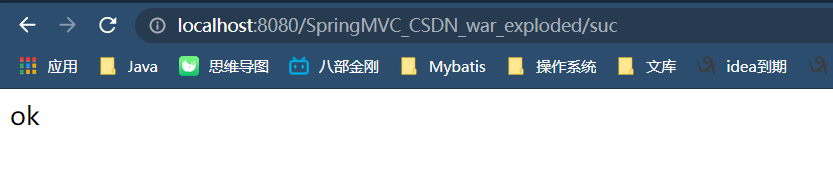
Click the run address bar and enter hello

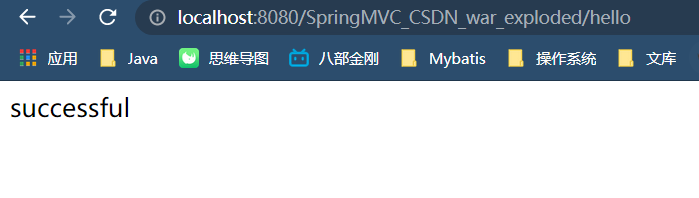
success
It seems that this is not cool enough. You will experience the fun of using annotations below
2.2.1 configuration file implementation
Maven may have the problem of resource filtering. Please paste the following code into the pom.xml file
   <build>
        <resources>
            <resource>
                <directory>src/main/java</directory>
                <includes>
                    <include>**/*.properties</include>
                    <include>**/*.xml</include>
                </includes>
                <filtering>false</filtering>
            </resource>
            <resource>
                <directory>src/main/resources</directory>
                <includes>
                    <include>**/*.properties</include>
                    <include>**/*.xml</include>
                </includes>
                <filtering>false</filtering>
            </resource>
        </resources>
    </build>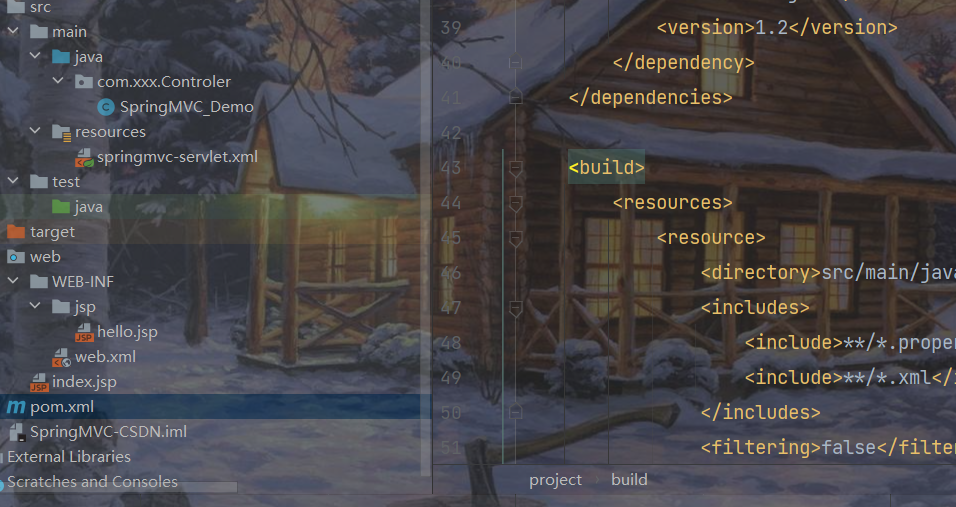
Routine start (script)
1. Click the spring MVC configuration file (springMVC servlet. XML) and overwrite the previous code with the following code
If you paste directly, note: the package name in the annotation scan should be changed to its own (if it is different from mine)
<?xml version="1.0" encoding="UTF-8"?>
<beans xmlns="http://www.springframework.org/schema/beans"
xmlns:xsi="http://www.w3.org/2001/XMLSchema-instance"
xmlns:context="http://www.springframework.org/schema/context"
xmlns:mvc="http://www.springframework.org/schema/mvc"
xsi:schemaLocation="http://www.springframework.org/schema/beans
http://www.springframework.org/schema/beans/spring-beans.xsd
http://www.springframework.org/schema/context
https://www.springframework.org/schema/context/spring-context.xsd
http://www.springframework.org/schema/mvc
https://www.springframework.org/schema/mvc/spring-mvc.xsd">
<!--Enable annotation scanning-->
<context:component-scan base-package="com.xxx.Controler"/>
<!-- Give Way Spring MVC Do not process static resources -->
<mvc:default-servlet-handler />
<mvc:annotation-driven />
<!-- view resolver -->
<bean class="org.springframework.web.servlet.view.InternalResourceViewResolver" id="internalResourceViewResolver">
<!-- prefix -->
<property name="prefix" value="/WEB-INF/jsp/" />
<!-- suffix -->
<property name="suffix" value=".jsp" />
</bean>
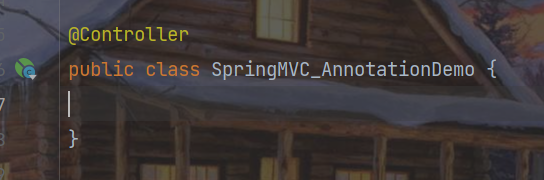
</beans>2. Create under Controller SpringMVC_AnnotationDemo class

3. Annotate @ Controller on the class, let the package scanner scan it, and hand it over to IOC container management
There are many annotations provided by spring MVC for scanner scanning, so I won't repeat them one by one
After typing the annotation, you will find that a small leaf appears, and clicking it will jump to indicate success
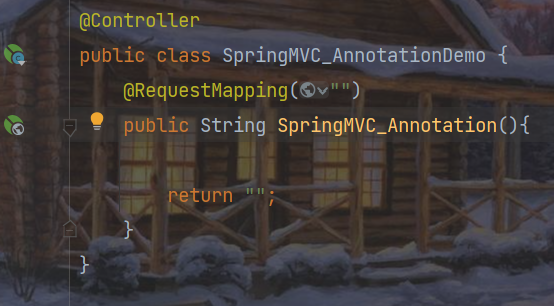
4. Write a spring MVC_ The return value type of annotation () method is String
The @ RequestMapping("") annotation is followed above
There will be an icon like the earth, in which the requested path (equivalent to URL pattern) will be written
return returns a string indicating the web page to jump to
5. Passing parameters to the page requires passing a parameter to the method Model, and then directly call
. addAttribute("", "") can write a pair of key value s, and then return to our written values through return
Hello. JSP (with view parser, write Hello directly) is equivalent to setViewName
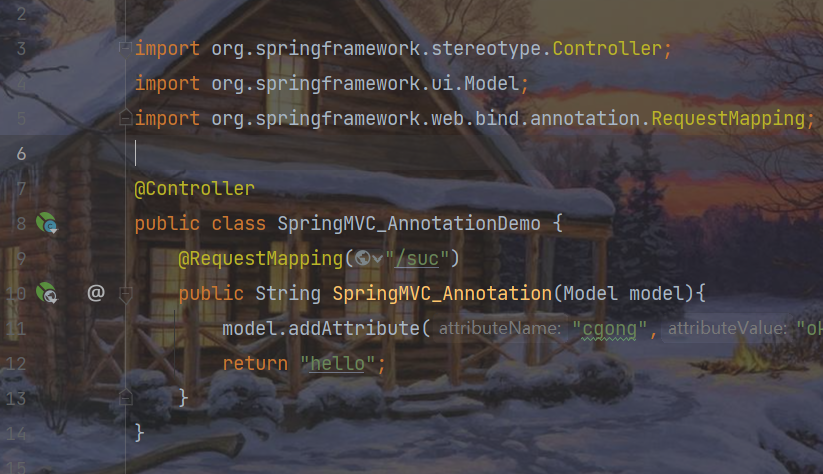
code:
package com.xxx.Controler;

import org.springframework.stereotype.Controller;
import org.springframework.ui.Model;
import org.springframework.web.bind.annotation.RequestMapping;

@Controller
public class SpringMVC_AnnotationDemo {
    @RequestMapping("/suc")
    public String SpringMVC_Annotation(Model model){
        model.addAttribute("cgong","ok");
        return "hello";
    }
}
6. jsp receives the key(cgong) just passed
7. Redeploy and test. This time, you should enter
Summary:
Two methods to implement spring MVC
First (profile):
1. Copy the web.xml configuration file, which contains
Processor mapping (BeanNameUrlHandlerMapping)
Processor adapter (SimpleControllerHandlerAdapter)
The view parser completes the splicing of. jsp paths
2. Quickly create the spring MVC configuration file (copy the content here)
3. Create Controller layer And create the corresponding class
Class to transfer parameters and request addresses
3. Register your own Controller bean through spring technology
Second (note):
1. Copy the web.xml configuration file, which contains
Annotation scanner
Annotation driven
Static resource filtering
view resolver
2. Generate spring MVC configuration file
3. Annotate @ Controller on the class to let the package scanner scan and hand it over to spring for management
Annotate the method ReqeuestMapping("request path")
The value transfer operation is realized through the Model
return "page";
Articles on preparatory work:
Download and configuration of Maven environment: Configure maven_ Progressive blog - CSDN blog
Idea download and unlimited trial: Download and use of Idea_ Progressive blog - CSDN blog
Maven project adds Web support: Maven project adds Web support_ Progressive blog - CSDN blog
Tomcat download, installation and configuration: Tomcat download and configuration of environment variables_ Progressive blog - CSDN blog