Simple book management system (SSM framework)
preface
A simple book management system implemented with SSM framework. First, unify the development environment. We use jdk1 8. mysql database.
1, Environment construction
1. Database and table building
Create a new database. The database name is ssmbulid. The database establishes a table books. There are four column names in the table, namely bookID, bookName, bookCounts and detail, as shown in the figure below.

2. Establish Maven project and configure POM XML file
Create a new project. It is suggested that the project name should correspond to the table name and be called ssmbuild
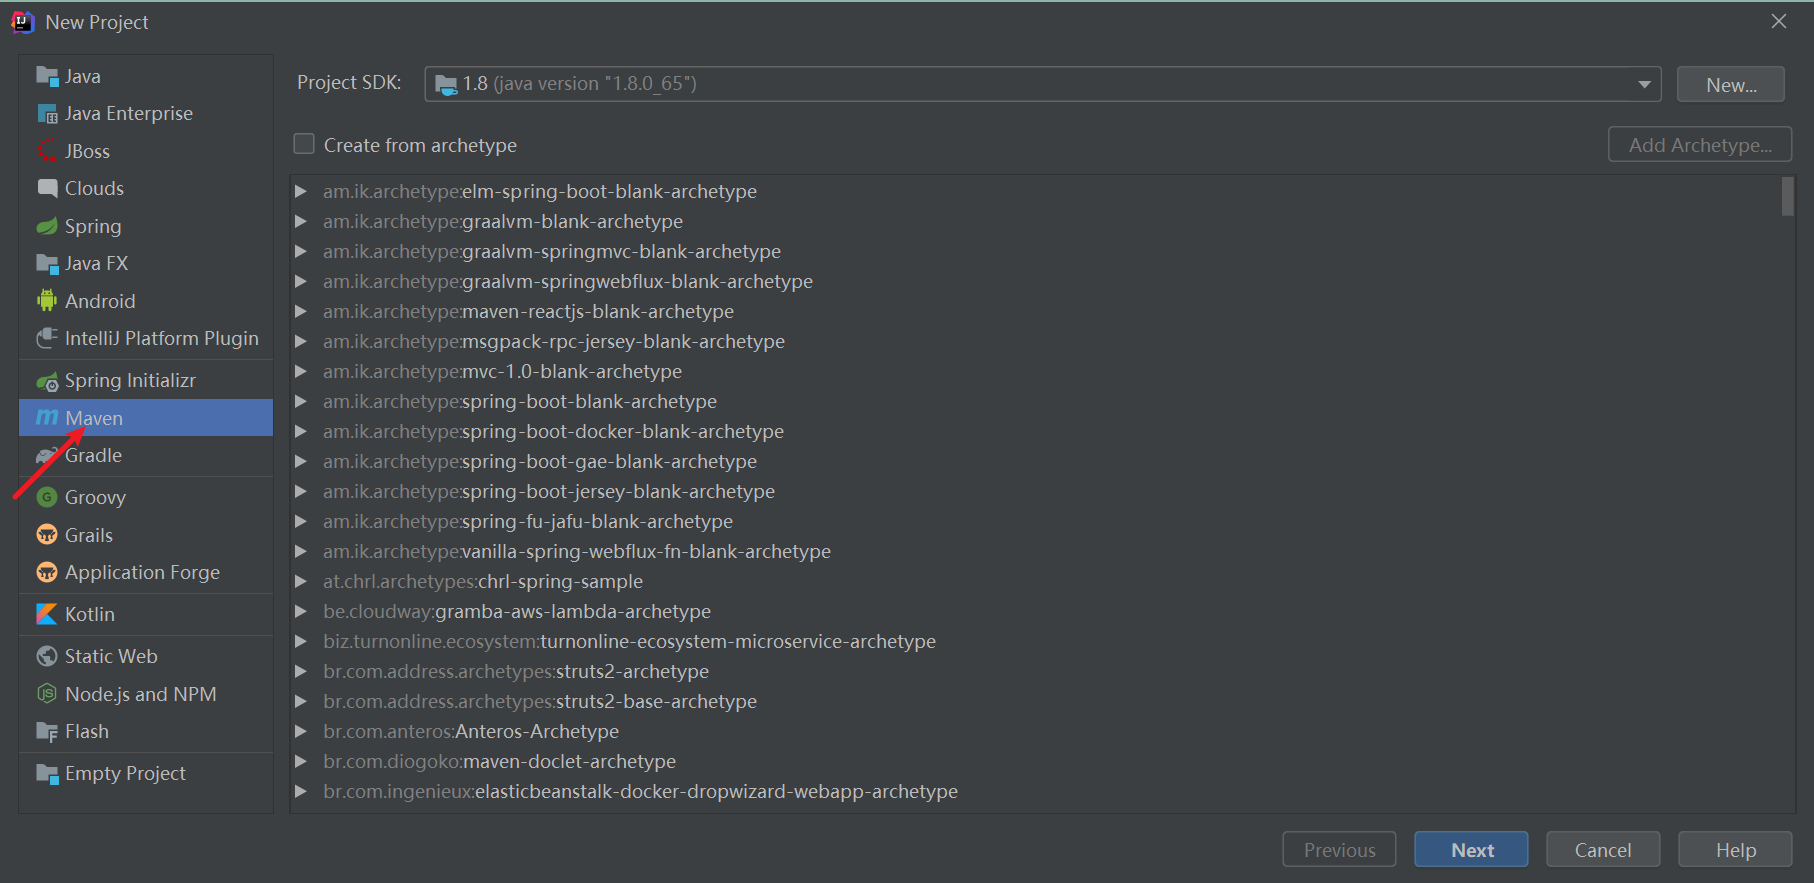
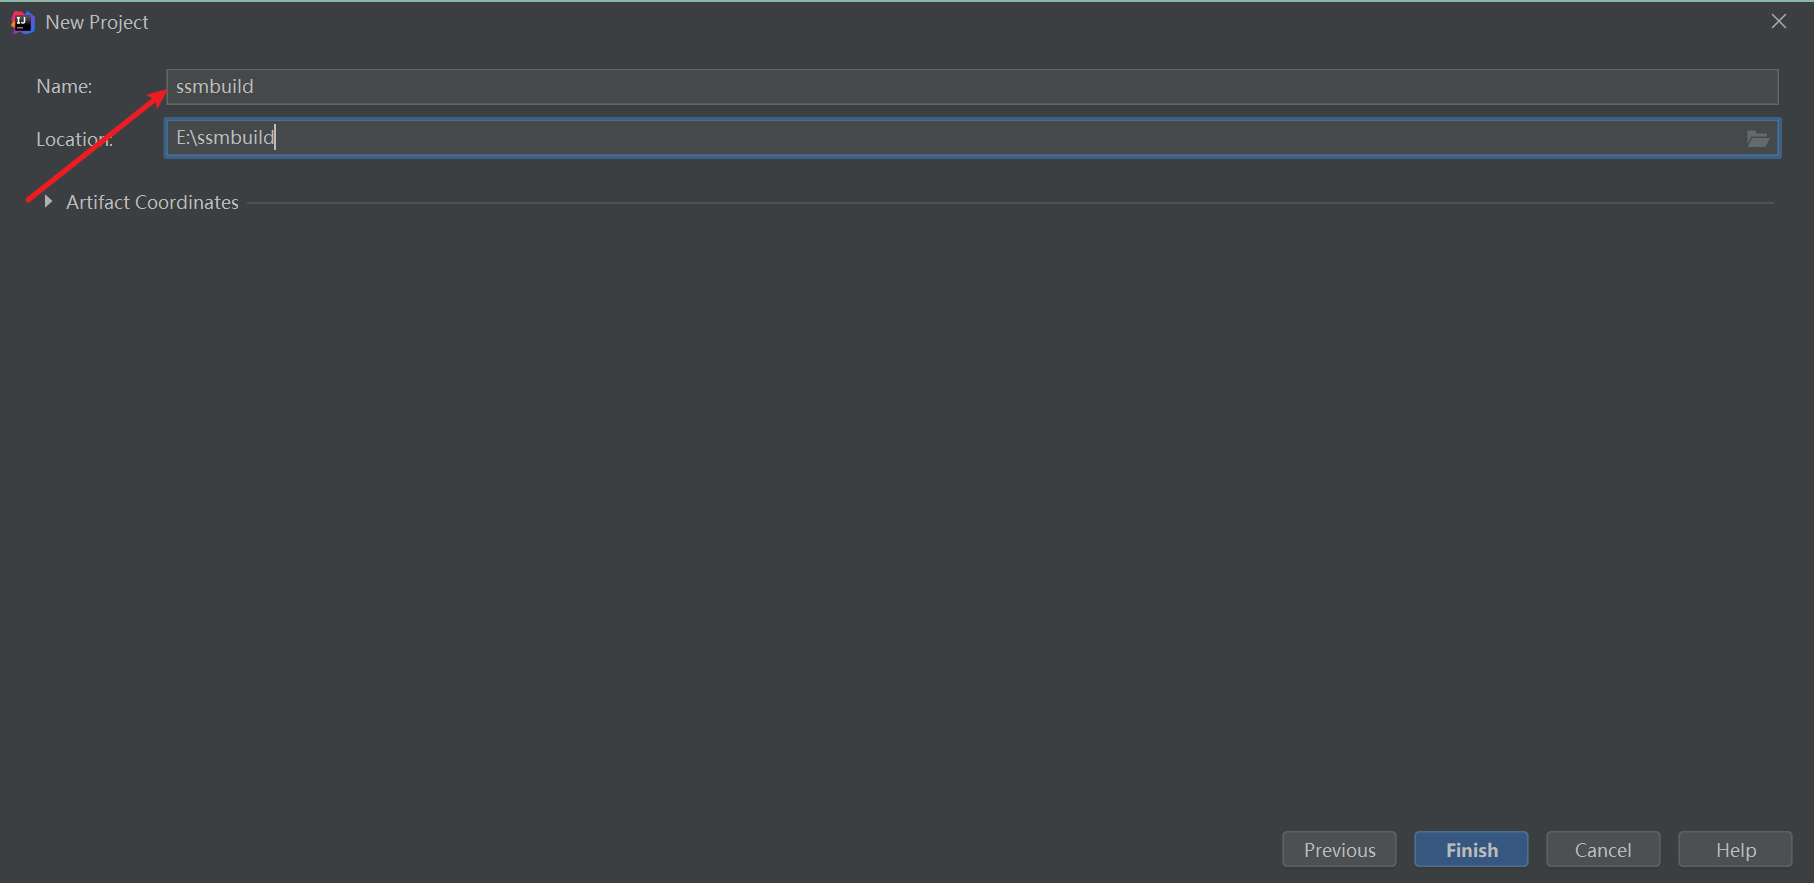
After the project is established, start configuring POM XML file, import the dependencies we need. There's nothing to repeat here. Import the dependencies we need. The code is as follows
<?xml version="1.0" encoding="UTF-8"?>
<project xmlns="http://maven.apache.org/POM/4.0.0"
         xmlns:xsi="http://www.w3.org/2001/XMLSchema-instance"
         xsi:schemaLocation="http://maven.apache.org/POM/4.0.0 http://maven.apache.org/xsd/maven-4.0.0.xsd">
    <modelVersion>4.0.0</modelVersion>
    <artifactId>ssmbuild</artifactId>
    <version>1.0-SNAPSHOT</version>
    <properties>
        <!-- spring Version number -->
        <spring.version>5.1.9.RELEASE</spring.version>
        <!-- mybatis Version number -->
        <mybatis.version>3.2.6</mybatis.version>
        <!-- log4j Log file management pack version -->
        <slf4j.version>1.7.7</slf4j.version>
        <log4j.version>1.2.17</log4j.version>
    </properties>
    <dependencies>
        <dependency>
            <groupId>com.mchange</groupId>
            <artifactId>c3p0</artifactId>
            <version>0.9.5.2</version>
        </dependency>
        <dependency>
            <groupId>javax.servlet</groupId>
            <artifactId>javax.servlet-api</artifactId>
            <version>4.0.1</version>
        </dependency>
        <dependency>
            <groupId>javax.servlet.jsp</groupId>
            <artifactId>javax.servlet.jsp-api</artifactId>
            <version>2.3.3</version>
            <scope>provided</scope>
        </dependency>
        <dependency>
            <groupId>log4j</groupId>
            <artifactId>log4j</artifactId>
            <version>1.2.17</version>
        </dependency>
        <dependency>
            <groupId>junit</groupId>
            <artifactId>junit</artifactId>
            <version>4.12</version>
            <scope>test</scope>
        </dependency>
        <!-- spring Core package -->
        <dependency>
            <groupId>org.springframework</groupId>
            <artifactId>spring-core</artifactId>
            <version>${spring.version}</version>
        </dependency>
        <dependency>
            <groupId>org.springframework</groupId>
            <artifactId>spring-web</artifactId>
            <version>${spring.version}</version>
        </dependency>
        <dependency>
            <groupId>org.springframework</groupId>
            <artifactId>spring-oxm</artifactId>
            <version>${spring.version}</version>
        </dependency>
        <dependency>
            <groupId>org.springframework</groupId>
            <artifactId>spring-tx</artifactId>
            <version>${spring.version}</version>
        </dependency>

        <dependency>
            <groupId>org.springframework</groupId>
            <artifactId>spring-jdbc</artifactId>
            <version>${spring.version}</version>
        </dependency>

        <dependency>
            <groupId>javax.servlet</groupId>
            <artifactId>jstl</artifactId>
            <version>1.2</version>
        </dependency>

        <dependency>
            <groupId>org.springframework</groupId>
            <artifactId>spring-webmvc</artifactId>
            <version>${spring.version}</version>
        </dependency>
        <dependency>
            <groupId>org.springframework</groupId>
            <artifactId>spring-aop</artifactId>
            <version>${spring.version}</version>
        </dependency>

        <dependency>
            <groupId>org.springframework</groupId>
            <artifactId>spring-context-support</artifactId>
            <version>${spring.version}</version>
        </dependency>

        <dependency>
            <groupId>org.springframework</groupId>
            <artifactId>spring-test</artifactId>
            <version>${spring.version}</version>
        </dependency>
        <!-- mybatis Core package -->
        <dependency>
            <groupId>org.mybatis</groupId>
            <artifactId>mybatis</artifactId>
            <version>${mybatis.version}</version>
        </dependency>
        <!-- mybatis/spring package -->
        <dependency>
            <groupId>org.mybatis</groupId>
            <artifactId>mybatis-spring</artifactId>
            <version>1.2.2</version>
        </dependency>
        <!-- Import java ee jar package -->
        <dependency>
            <groupId>javax</groupId>
            <artifactId>javaee-api</artifactId>
            <version>7.0</version>
        </dependency>
        <!-- Import Mysql Database link jar package -->
        <dependency>
            <groupId>mysql</groupId>
            <artifactId>mysql-connector-java</artifactId>
            <version>5.1.47</version>
        </dependency>
        <!-- Import dbcp of jar Bag, used in applicationContext.xml Configuration database in -->
        <dependency>
            <groupId>commons-dbcp</groupId>
            <artifactId>commons-dbcp</artifactId>
            <version>1.2.2</version>
        </dependency>
        <!-- JSTL Label class -->
        <dependency>
            <groupId>jstl</groupId>
            <artifactId>jstl</artifactId>
            <version>1.2</version>
        </dependency>
        <!-- Log file management pack -->
        <!-- log start -->
        <dependency>
            <groupId>log4j</groupId>
            <artifactId>log4j</artifactId>
            <version>${log4j.version}</version>
        </dependency>


        <!-- Format objects to facilitate log output -->
        <dependency>
            <groupId>com.alibaba</groupId>
            <artifactId>fastjson</artifactId>
            <version>1.1.41</version>
        </dependency>
        <dependency>
            <groupId>org.projectlombok</groupId>
            <artifactId>lombok</artifactId>
            <version>1.18.18</version>
        </dependency>
        <dependency>
            <groupId>org.slf4j</groupId>
            <artifactId>slf4j-api</artifactId>
            <version>${slf4j.version}</version>
        </dependency>

        <dependency>
            <groupId>org.slf4j</groupId>
            <artifactId>slf4j-log4j12</artifactId>
            <version>${slf4j.version}</version>
        </dependency>
        <!-- log end -->
        <!-- Reflect JSON -->
        <dependency>
            <groupId>org.codehaus.jackson</groupId>
            <artifactId>jackson-mapper-asl</artifactId>
            <version>1.9.13</version>
        </dependency>
        <!-- Upload component package -->
        <dependency>
            <groupId>commons-fileupload</groupId>
            <artifactId>commons-fileupload</artifactId>
            <version>1.3.1</version>
        </dependency>
        <dependency>
            <groupId>commons-io</groupId>
            <artifactId>commons-io</artifactId>
            <version>2.4</version>
        </dependency>
        <dependency>
            <groupId>commons-codec</groupId>
            <artifactId>commons-codec</artifactId>
            <version>1.9</version>
        </dependency>


    </dependencies>

    <build>
        <resources>
            <resource>
                <directory>src/main/java</directory>
                <includes>
                    <include>**/*.properties</include>
                    <include>**/*.xml</include>
                </includes>
                <filtering>true</filtering>
            </resource>
            <resource>
                <directory>src/main/resources</directory>
                <includes>
                    <include>**/*.properties</include>
                    <include>**/*.xml</include>
                </includes>
                <filtering>true</filtering>
            </resource>
            <resource>
                <directory>src/main/resources</directory>
                <filtering>true</filtering>
            </resource>
        </resources>

        <plugins>
            <plugin>
                <groupId>org.apache.maven.plugins</groupId>
                <artifactId>maven-resources-plugin</artifactId>
                <configuration>
                    <encoding>UTF-8</encoding>
                </configuration>
            </plugin>
        </plugins>
    </build>
</project>
Let's talk about this dependency
<dependency>
            <groupId>org.projectlombok</groupId>
            <artifactId>lombok</artifactId>
            <version>1.18.18</version>
        </dependency>
This dependency will automatically help us generate parameterized and nonparametric constructs, get() and set() methods, which do not need to be written manually. This will be demonstrated in detail in the pojo class below.
3. Build a web project and configure Tomcat
Click File and Project Structure
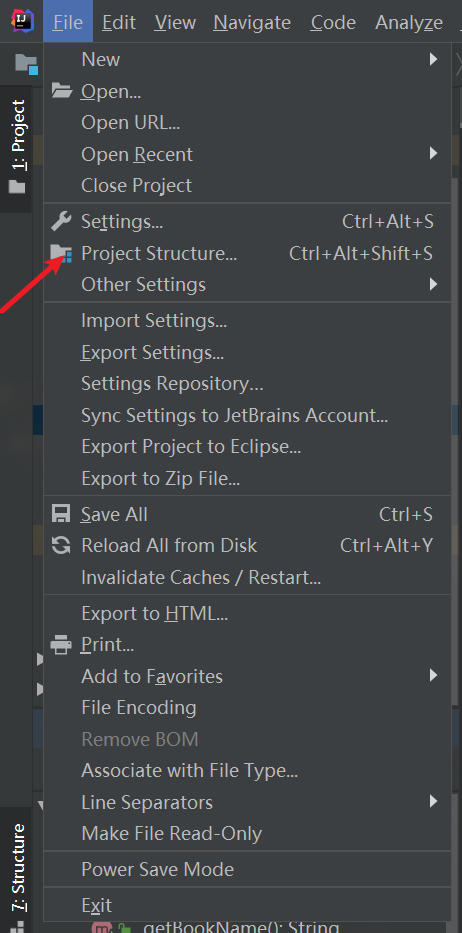
Click mouse and web services
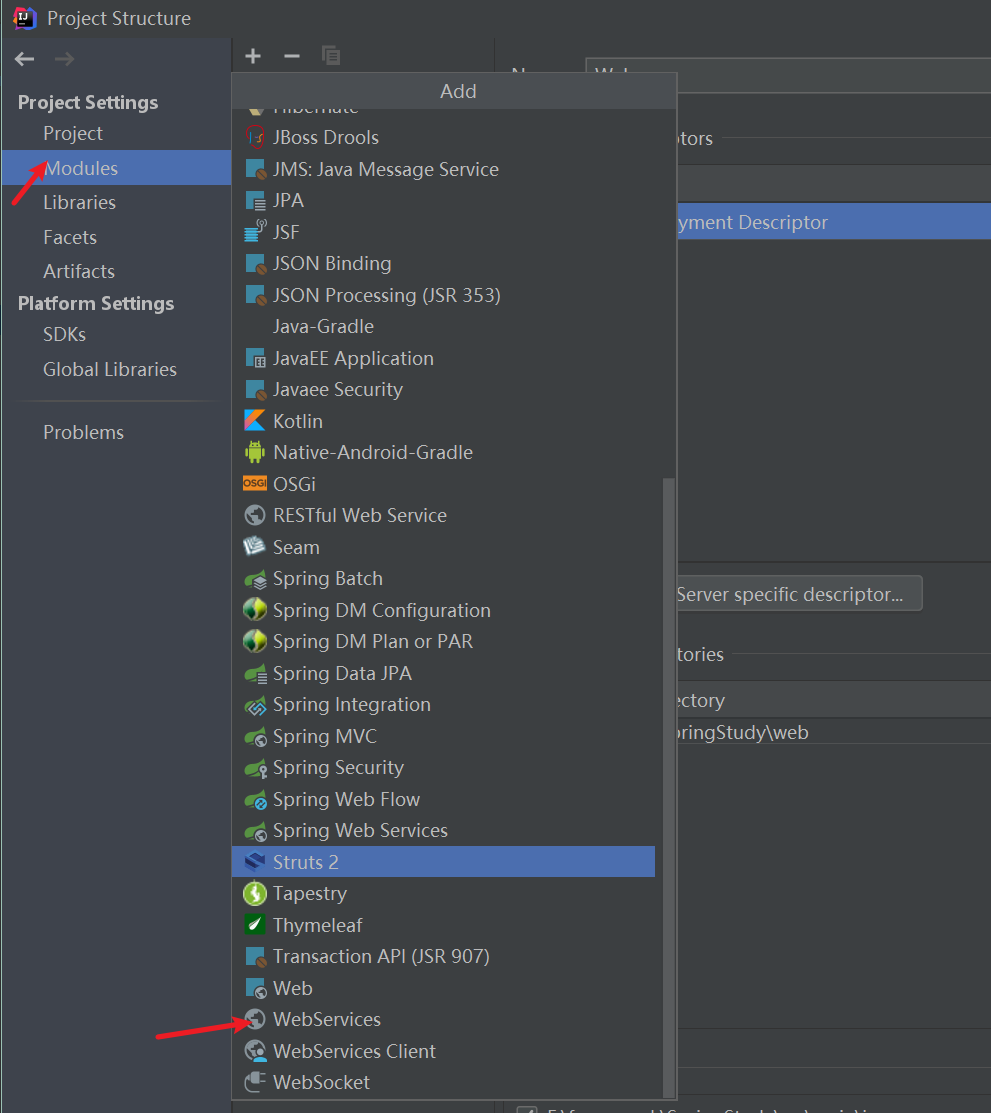
Click Artifacts, click web application, select the second one, Form Moudules, and finally the application, so that the web project can be built.
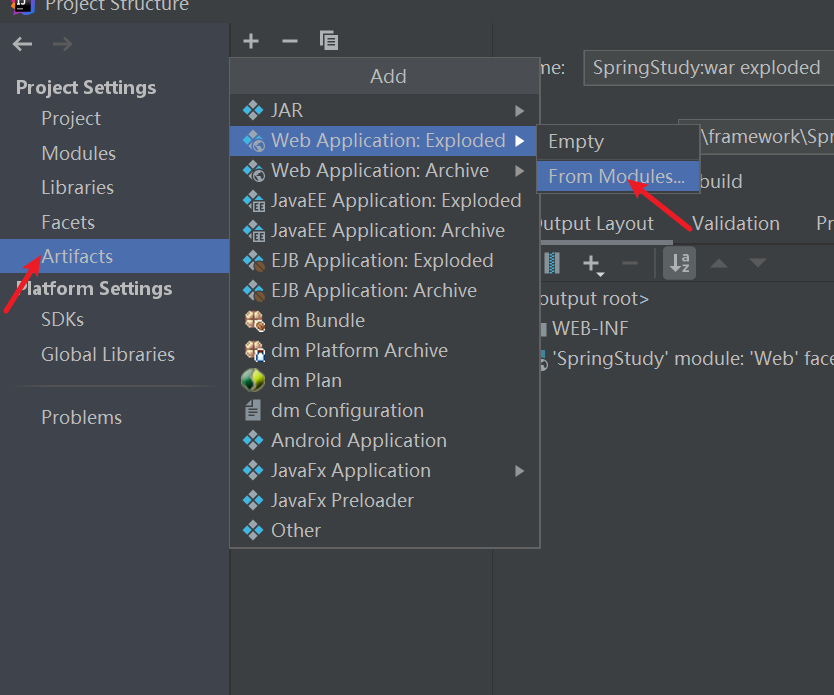
After the above steps, you will find that your project has an additional web folder

Pay attention to the little blue dot on the folder. Only with that little blue dot can your web project be built successfully. If there is no little blue dot, there is a problem with the release of your war package. Go to an artifact.
Next, let's configure Tomcat
Find Run/Debug Configurations, click the + sign, click Tomcat Server, and click Local
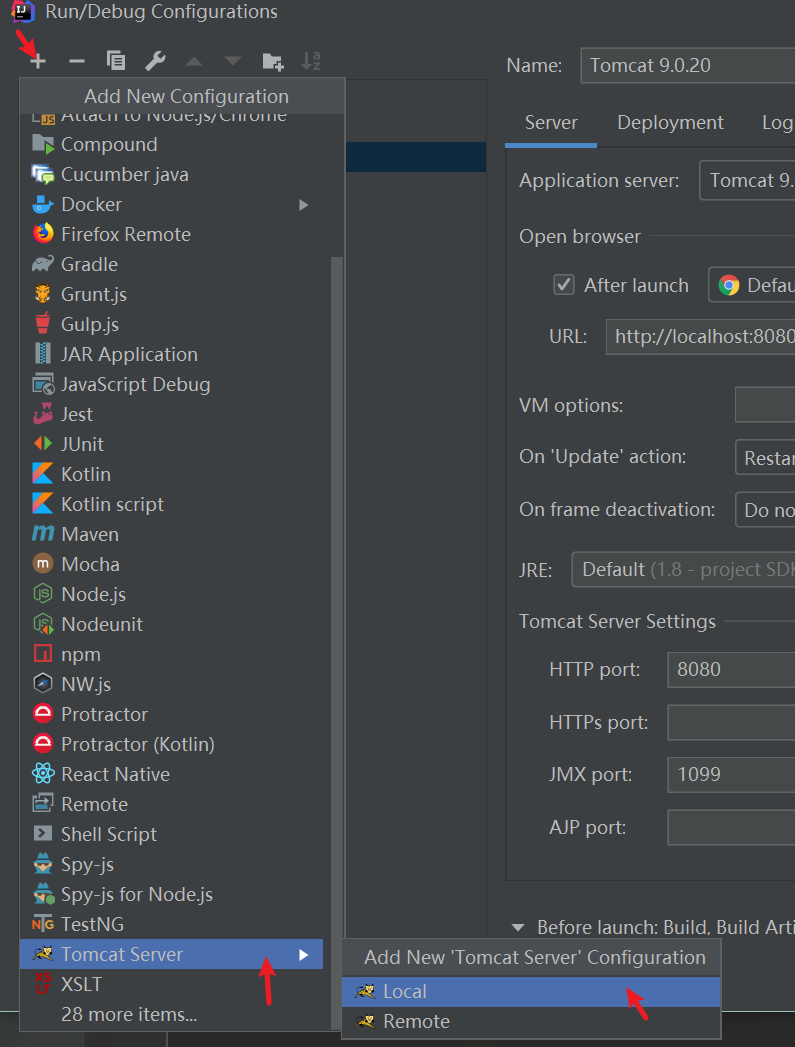
After clicking Local, select Deployment and Artifact to import the war package built before

Here, import the Tomcat path of the local computer. Here, Tomcat will be configured and you can start the formal writing project.

2, Write configuration file
SSM framework is Spring + spring MVC + mybatis, so it is better to separate our configuration file into three, so that the logic is clearer and more suitable for beginners and users who do not know the framework well.
Because it is the configuration file of the project, except web XML and other configuration files about the whole project are suggested to be placed in resource, which is convenient for management and modification.
1. Configure persistence layer
Title first write the Spring dao file. When we see dao, we know that this is a file integrated with Mybatis and Spring
The database connection pool we use here is c3p0
<?xml version="1.0" encoding="UTF-8"?>
<beans xmlns="http://www.springframework.org/schema/beans"
      xmlns:xsi="http://www.w3.org/2001/XMLSchema-instance"
       xmlns:context="http://www.springframework.org/schema/context"
      xsi:schemaLocation="http://www.springframework.org/schema/beans
      http://www.springframework.org/schema/beans/spring-beans.xsd
      http://www.springframework.org/schema/context https://www.springframework.org/schema/context/spring-context.xsd">
        <!--1.Associated database profile-->
        <context:property-placeholder location="classpath:database.properties"/>
<!--2.Connection pool
        dbcp:Semi automatic operation, unable to connect automatically
        c3p0:Automatic operation, automatic loading of configuration files, and can be automatically set into objects
        druid:Druids are Java The best database connection pool in the language. Druid It can provide powerful monitoring and expansion functions.
        hikari:SpringBoot Default data source for
        -->
    <bean id="dataSource" class="com.mchange.v2.c3p0.ComboPooledDataSource">
        <property name="driverClass" value="${jdbc.driver}"/>
        <property name="jdbcUrl" value="${jdbc.url}"/>
        <property name="user" value="${jdbc.username}"/>
        <property name="password" value="${jdbc.password}"/>
        <!--c3p0 Private properties of connection pool-->
        <property name="maxPoolSize" value="30"/>
        <property name="minPoolSize" value="10"/>
        <!-- Do not connect automatically after closing-->
        <property name="autoCommitOnClose" value="false"/>
        <!--Get connection timeout-->
        <property name="checkoutTimeout" value="10000"/>
        <!-- Number of retries when getting connection failed -->
        <property name="acquireRetryAttempts" value="2"/>
    </bean>
<!--3.sqlSessionFactory-->
    <bean id="sqlSessionFactory" class="org.mybatis.spring.SqlSessionFactoryBean">
    <!--Inject data source
         adopt ref quote dataSource
            -->
    <property name="dataSource" ref="dataSource"/>
    <!--binding MaBatis Configuration file for-->
    <property name="configLocation" value="classpath:mybatis-config.xml"/>
    </bean>
<!--to configure Dao The interface scanning package is dynamically realized by using reflection Dao Interface can be injected into Spring In container-->
    <bean class="org.mybatis.spring.mapper.MapperScannerConfigurer">
        <!--injection sqlSessionFactory-->
        <property name="sqlSessionFactoryBeanName" value="sqlSessionFactory"/>
        <!--scanning Dao-->
        <property name="basePackage" value="com.wang.dao"/>
    </bean>
</beans>
Under the resources folder, create the file datebase Property, the format of this file is very fixed, which is used to write data.

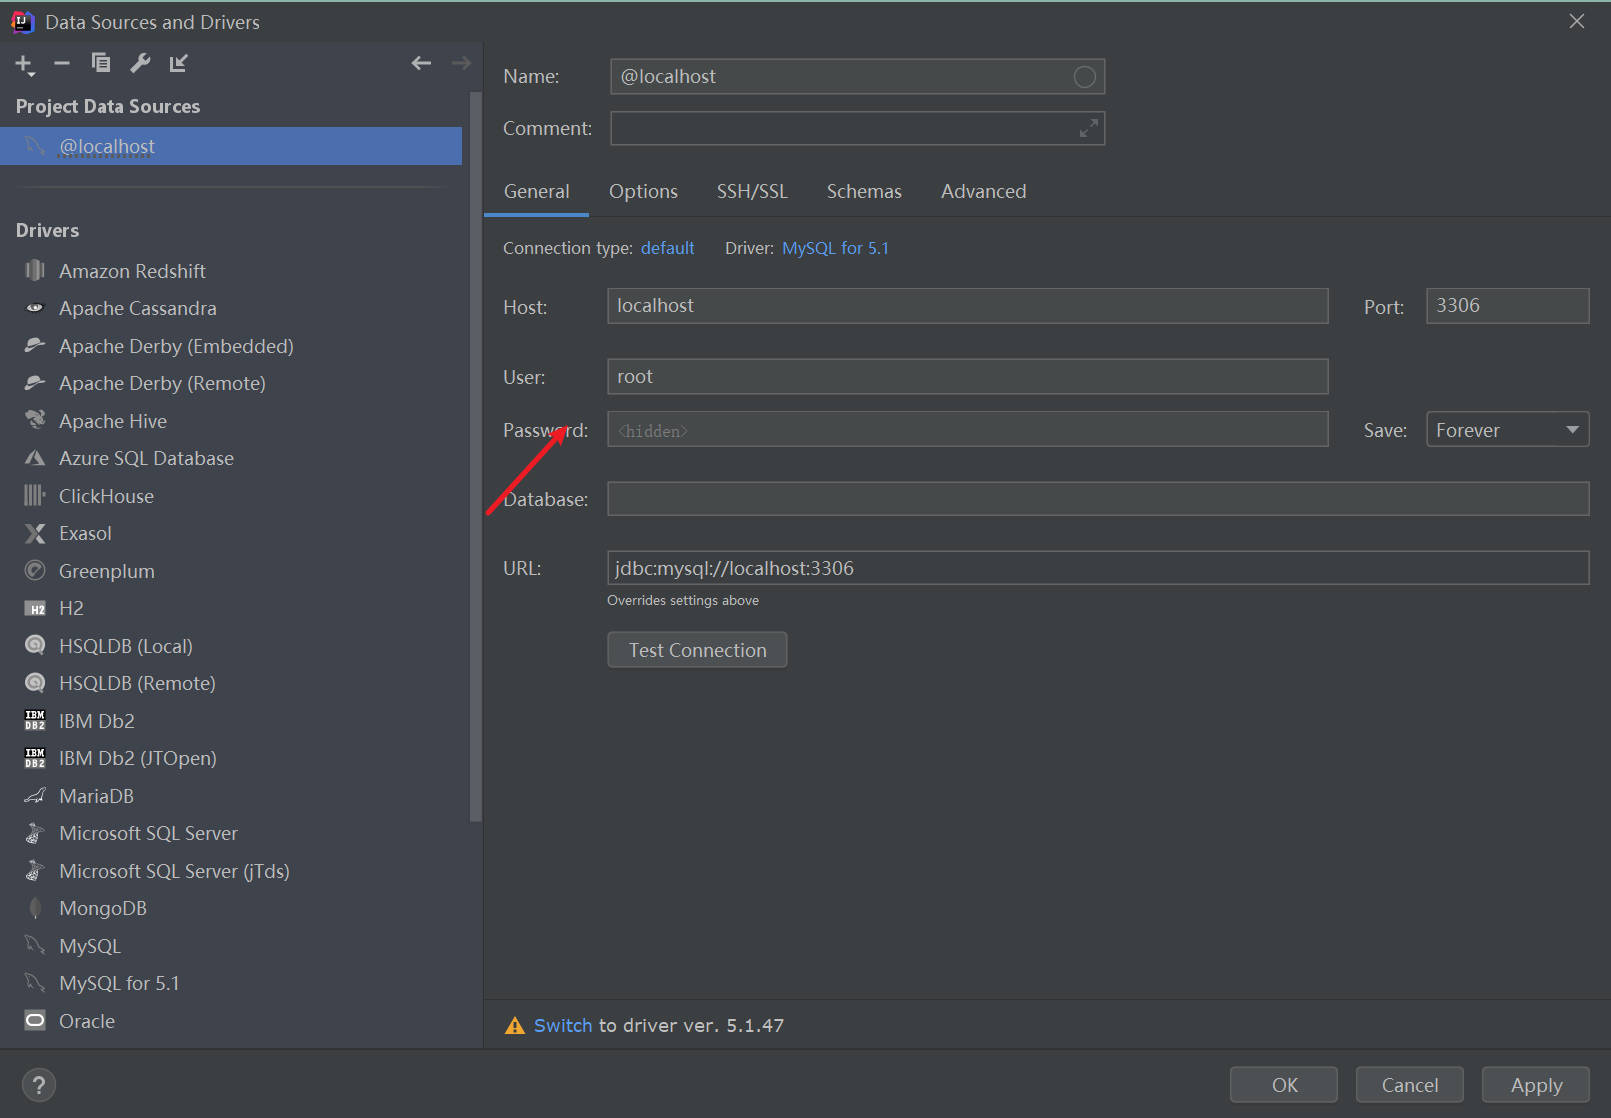
After writing the database file, let's connect to the database
In the tool behind idea, we choose Database
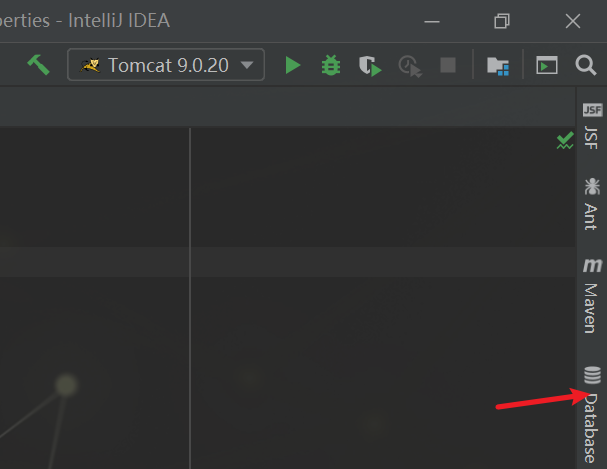
Click Database and select Mysql
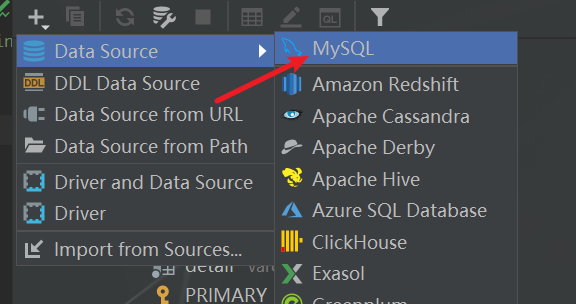
Fill in the password
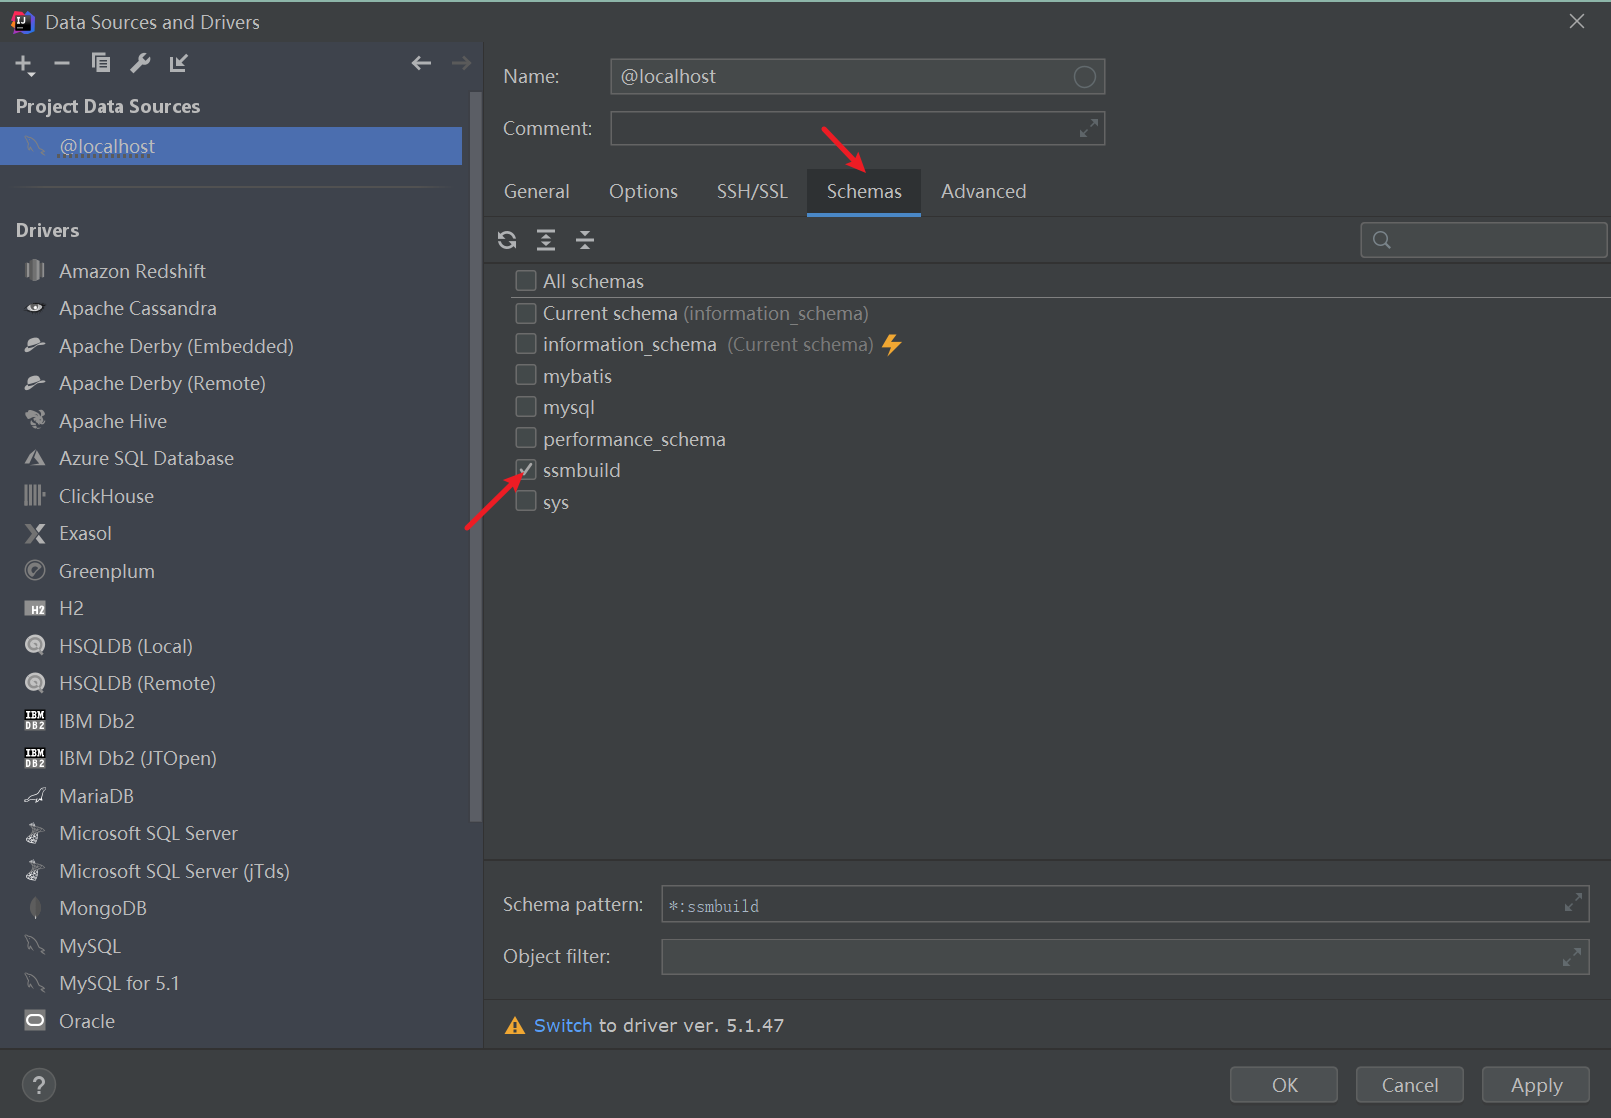
Click Schemas and select the corresponding database (just established)
2. Configure control layer and business layer
Next, we will write Spring MVC and Spring service. As the name suggests, these two configuration files are the configuration files of Spring integrating Spring MVC
First, spring MVC XML, we know that the ssm framework relies on spring MVC to realize the front-end and back-end interaction, so the call between levels is also the Controller (control layer) calling the Service (business layer), and the Service (business layer) calling Dao (persistence layer), so scan the spring MVC of the Controller layer The XML code is as follows.
<?xml version="1.0" encoding="UTF-8"?>
<beans xmlns="http://www.springframework.org/schema/beans"
       xmlns:xsi="http://www.w3.org/2001/XMLSchema-instance"
       xmlns:aop="http://www.springframework.org/schema/aop" xmlns:mvc="http://www.springframework.org/schema/mvc"
       xmlns:context="http://www.springframework.org/schema/context"
       xsi:schemaLocation="http://www.springframework.org/schema/beans
       http://www.springframework.org/schema/beans/spring-beans.xsd
        http://www.springframework.org/schema/mvc https://www.springframework.org/schema/mvc/spring-mvc.xsd http://www.springframework.org/schema/context https://www.springframework.org/schema/context/spring-context.xsd">
    <!--1.Annotation driven-->
    <mvc:annotation-driven/>
    <!--2.Static resource filtering-->
    <mvc:default-servlet-handler/>
    <!--3.Scan package( controller)-->
    <context:component-scan base-package="com.wang.controller"/>
    <!--4.view resolver -->
    <bean class="org.springframework.web.servlet.view.InternalResourceViewResolver">
        <property name="prefix" value="/WEB-INF/jsp/"/>
        <property name="suffix" value=".jsp"/>
    </bean>
<!--    Packet scanning-->
    <context:component-scan base-package="com.wang.controller"/>
</beans>
Go on to spring Service XML, understand the above spring MVC XML file, this spring Service The XML file is easy to understand. Yes, it is used to configure the scanning Service layer. The specific code is as follows.
<?xml version="1.0" encoding="UTF-8"?>
<beans xmlns="http://www.springframework.org/schema/beans"
       xmlns:xsi="http://www.w3.org/2001/XMLSchema-instance"
       xmlns:context="http://www.springframework.org/schema/context"
       xsi:schemaLocation="http://www.springframework.org/schema/beans
      http://www.springframework.org/schema/beans/spring-beans.xsd
      http://www.springframework.org/schema/context https://www.springframework.org/schema/context/spring-context.xsd">
    <!--1.scanning service Package under-->
    <!--dao Layer and service There are two ways to associate layers. One is to use import,The other is to use idea Put the configuration files together-->
    <context:component-scan base-package="com.wang.service"/>
    <!--2.Inject all business classes into Spring,It can be implemented through configuration or annotation-->
    <bean id="BookServiceImpl" class="com.wang.service.BookServiceImpl">
        <property name="bookMapper" ref="bookMapper"/>
    </bean>
    <!--Declarative transaction configuration (auto commit)-->
    <bean id="transactionManager" class="org.springframework.jdbc.datasource.DataSourceTransactionManager">
        <!--Injection data source-->
        <property name="dataSource" ref="dataSource"/>
    </bean>
</beans>
Finally, create a new configuration file ApplicationContext XML and integrate the three configuration files into this file
<?xml version="1.0" encoding="UTF-8"?>
<beans xmlns="http://www.springframework.org/schema/beans"
       xmlns:xsi="http://www.w3.org/2001/XMLSchema-instance"
       xmlns:aop="http://www.springframework.org/schema/aop"
       xsi:schemaLocation="http://www.springframework.org/schema/beans
       http://www.springframework.org/schema/beans/spring-beans.xsd
        http://www.springframework.org/schema/aop
        http://www.springframework.org/schema/aop/spring-aop.xsd">
    <import resource="classpath:spring-dao.xml"/>
    <import resource="classpath:spring-service.xml"/>
    <import resource="classpath:spring-mvc.xml"/>
</beans>
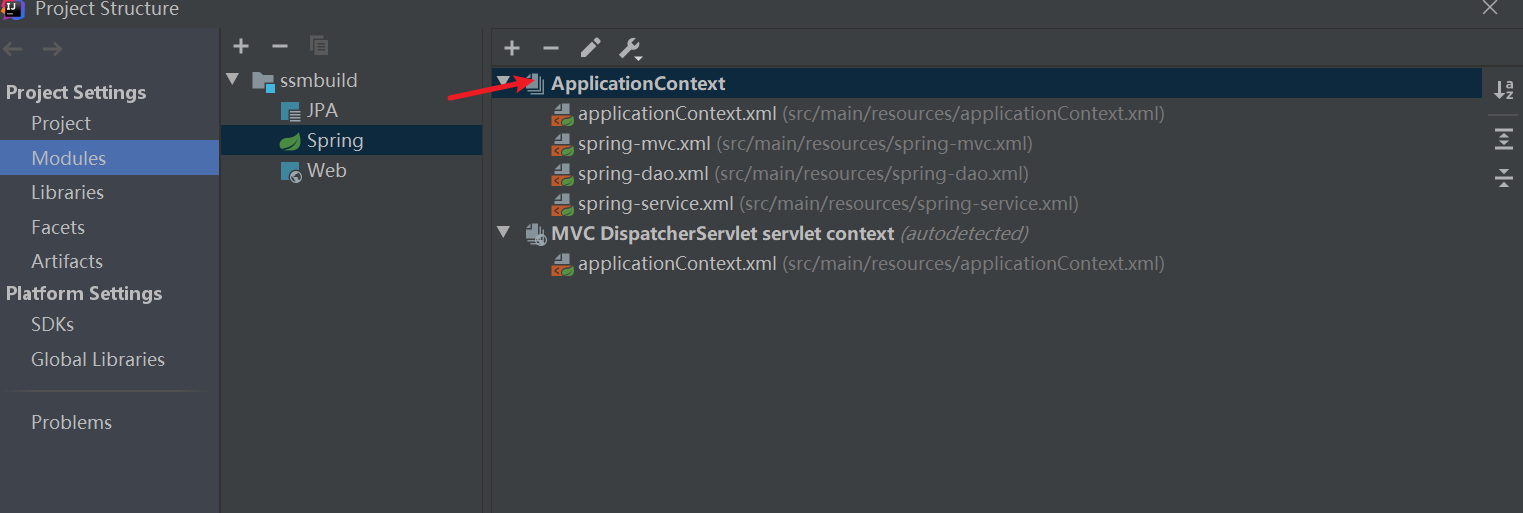
Click the Project Structure mentioned above and then click Module. We can see the following structure, which looks logical and clear at a glance.
3, Write code
1.pojo
Create a pojo package and put entity classes in it. The pojo in it is equivalent to JavaBean s
Establish entity class Books. The entity class name should be similar to the database table name, and the object name of the entity class should be the same as the column name of the database, which is convenient for writing. The code is as follows
import lombok.AllArgsConstructor;
import lombok.Data;
import lombok.NoArgsConstructor;
@Data
@AllArgsConstructor
@NoArgsConstructor
public class Books {
    private int bookID;
    private String bookName;
    private int bookCounts;
    private String detail;
}
The lombok mentioned above is used here. Only three tags are needed to replace the structures with parameters and without parameters, as well as the get and set methods. Personally, I think using tags is simpler than using shortcut keys.
2.dao layer
The essence of Dao layer is the mapping between objects and data, so this layer has its own characteristics in the naming of classes. We establish a BookMapper interface to write CRUD methods. The specific code is as follows:
mport com.wang.pojo.Books;
import org.apache.ibatis.annotations.Param;
import java.util.List;
public interface BookMapper {
        int addBook(Books books);
        int deleteBook(@Param("bookID") int id);
        int updateBook(Books books);
        Books queryBookBYId(@Param("bookID") int id);
        List<Books> queryAllBook();
}
Next, create a mapper XML configuration file, which is mainly used to write database statements, that is, the corresponding file of method operation database in BookMapper interface. The code is as follows:
<?xml version="1.0" encoding="UTF-8" ?>
<!DOCTYPE mapper
        PUBLIC "-//mybatis.org//DTD Mapper 3.0//EN"
        "http://mybatis.org/dtd/mybatis-3-mapper.dtd">
<!--namespace Unique location-->
<!--This interface is implemented-->
<mapper namespace="com.wang.dao.BookMapper">
    <insert id="addBook" parameterType="Books">
       insert into ssmbuild.books (bookName, bookCounts, detail)
       values (#{bookName},#{bookCounts},#{detail});
    </insert>
    <delete id="deleteBook" parameterType="int">
        delete from ssmbuild.books where bookID=#{bookID}
    </delete>
    <update id="updateBook" parameterType="Books">
        update ssmbuild.books set bookName=#{bookName} ,bookCounts=#{bookCounts},detail=#{detail}
         where bookID=#{bookID};
    </update>
    <select id="queryBookBYId" resultType="Books">
        select *from ssmbuild.books where bookID=#{bookID}
    </select>
    <select id="queryAllBook" resultType="Books">
        select * from ssmbuild.books
    </select>
</mapper>
If we add other functions in Dao layer, such as UserMapper interface, we also need to write a corresponding database configuration file for this interface, but we are a simple system, so we won't repeat so much!
3.service layer
The Service layer is used to call the Dao layer
We need to establish a BookService interface first
package com.wang.service;
import com.wang.pojo.Books;
import org.apache.ibatis.annotations.Param;
import java.util.List;
public interface BookService {
    int addBook(Books books);
    int deleteBook(int id);
    int updateBook(Books books);
    Books queryBookBYId(int id);
    List<Books> queryAllBook();
}
Then implement the methods in the interface and establish an implementation class of BookService, BookServiceImpl
package com.wang.service;

import com.wang.dao.BookMapper;
import com.wang.pojo.Books;
import org.springframework.beans.factory.annotation.Autowired;
import org.springframework.stereotype.Service;

import java.util.List;
//Service layer to Dao layer
@Service
public class BookServiceImpl implements BookService {
//    service adjustment layer: composite dao
    private BookMapper bookMapper;
//Direct injection
    public void setBookMapper(BookMapper bookMapper) {
        this.bookMapper = bookMapper;
    }

    public int addBook(Books books) {
        return bookMapper.addBook(books);
    }

    public int deleteBook(int id) {
        return bookMapper.deleteBook(id);
    }

    public int updateBook(Books books) {
        return bookMapper.updateBook(books);
    }

    public Books queryBookBYId(int id) {
        return bookMapper.queryBookBYId(id);
    }

    public List<Books> queryAllBook() {
        return bookMapper.queryAllBook();
    }
}
In some large-scale programs, the business layer actually needs some business logic, which is also the key of a project. It usually won't be touched by novices... But our project is just a simple management system, so we just call the Dao layer, emmmm, which is really a little hip pulling······
4.controller layer
The controller layer can be regarded as the core of the whole program. Our business logic is written here. In fact, this layer is well understood. Now we have a back-end database. The controller layer is a channel for front-end and back-end interaction, and the code of this layer is relatively regular.
First, we create a class bookcontyloller to realize CRUD and other functions and pass it to the front-end page. The code is as follows:
package com.wang.controller;

import com.wang.pojo.Books;
import com.wang.service.BookService;
import com.wang.service.BookServiceImpl;
import org.springframework.beans.factory.annotation.Autowired;
import org.springframework.beans.factory.annotation.Qualifier;
import org.springframework.stereotype.Controller;
import org.springframework.ui.Model;
import org.springframework.web.bind.annotation.PathVariable;
import org.springframework.web.bind.annotation.RequestMapping;

import java.util.List;

@Controller
@RequestMapping("/book")
public class BookController {
//    Adjust service
@Autowired
@Qualifier("BookServiceImpl")
    private BookService bookService ;
//    Query all the books and return to the book display page

    @RequestMapping("/allBook")
    public String list(Model model){
        List<Books> list=bookService.queryAllBook();
        model.addAttribute("list",list);
        return "allBook";
    }
//    Jump to add data page
    @RequestMapping("/toAddBook")
    public String toAddPaper(){
        return "addBook";
    }
//Request to add books
    @RequestMapping("/addBook")
    public String addBook(Books books){
        bookService.addBook(books);
        return "redirect:/book/allBook";//Redirect to @ RequestMapping ("allBook") request
    }

    @RequestMapping("/toUpdateBook")
    public String toUpdateBook(Model model, int id) {
        Books books = bookService.queryBookBYId(id);
        System.out.println(books);
        model.addAttribute("book",books );
        return "updateBook";
    }

    @RequestMapping("/updateBook")
    public String updateBook(Model model, Books book) {
        System.out.println(book);
        bookService.updateBook(book);
        Books books = bookService.queryBookBYId(book.getBookID());
        model.addAttribute("books", books);
        return "redirect:/book/allBook";
    }
    @RequestMapping("/del/{bookId}")
    public String deleteBook(@PathVariable("bookId") int id) {
    bookService.deleteBook(id);
    return "redirect:/book/allBook";
    }
}
So far, all our back-end code is over. In fact, the back-end code is very regular, because many things are done by the annotation tags or configuration files of the framework. The code we want to write is very regular, and we will master it as long as we practice hard.
5. Front end interface
What will you think of first when writing the front-end interface? Write jsp?
No, no, no... we need to write the web first In fact, the front and back ends of XML configuration files have something in common here. As the saying goes, if you want to do a good job, you must first sharpen your tools. Writing the configuration file and then writing the code will have twice the result with half the effort.
web. In fact, XML is to write a response request and a filter. This is also a file that does not need to be opened after configuration. It is very regular. The code is as follows:
<?xml version="1.0" encoding="UTF-8"?>
<web-app xmlns="http://xmlns.jcp.org/xml/ns/javaee"
         xmlns:xsi="http://www.w3.org/2001/XMLSchema-instance"
         xsi:schemaLocation="http://xmlns.jcp.org/xml/ns/javaee http://xmlns.jcp.org/xml/ns/javaee/web-app_4_0.xsd"
         version="4.0">
<!--    DispatchServlet Took over all requests-->
    <servlet>
        <servlet-name>DispatcherServlet</servlet-name>
        <servlet-class>org.springframework.web.servlet.DispatcherServlet</servlet-class>
        <init-param>
            <param-name>contextConfigLocation</param-name>
            <param-value>classpath:applicationContext.xml</param-value>
        </init-param>
        <load-on-startup>1</load-on-startup>
    </servlet>
    <servlet-mapping>
        <servlet-name>DispatcherServlet</servlet-name>
        <url-pattern>/</url-pattern>
    </servlet-mapping>
<!--    Garbled code filtering-->
    <filter>
        <filter-name>encodingFilter</filter-name>
        <filter-class>
            org.springframework.web.filter.CharacterEncodingFilter
        </filter-class>
        <init-param>
            <param-name>encoding</param-name>
            <param-value>utf-8</param-value>
        </init-param>
    </filter>
    <filter-mapping>
        <filter-name>encodingFilter</filter-name>
        <url-pattern>/*</url-pattern>
    </filter-mapping>
<!--Session Expiration time-->
    <session-config>
        <session-timeout>15</session-timeout>
    </session-config>
</web-app>
Written web After XML, we create an index JSP file to make a home page for our book management system. Of course, my development focuses on the back end. Please don't dislike the ugliness of the front-end page. I really tried my best······
<%@ page language="java" contentType="text/html; charset=UTF-8" pageEncoding="UTF-8" %>
<!DOCTYPE HTML>
<html>
<head>
       <title>home page</title>
       <style type="text/css">
           a {
         text-decoration: none;
         color: black;
          font-size: 18px;
        }
           h3 {
         width: 180px;
         height: 38px;
       margin: 100px auto;
        text-align: center;
         line-height: 38px;
         background: deepskyblue;
        border-radius: 4px;
       }
       </style>
</head>
<body>
<h3>
       <a href="${pageContext.request.contextPath}/book/allBook">Click to enter the list page</a>
</h3>
</body>
</html>
After making a home page, we should start our CRUD function page, create a jsp folder under the web folder, and put our CRUD function page here for easy management.
Query all books
<%@ taglib prefix="c" uri="http://java.sun.com/jsp/jstl/core" %>
<%@ page contentType="text/html;charset=UTF-8" language="java" %>
<html>
<head>
       <title>List of books</title>
       <meta name="viewport" content="width=device-width, initial-scale=1.0">
       <!-- introduce Bootstrap -->
       <link href="https://cdn.bootcss.com/bootstrap/3.3.7/css/bootstrap.min.css" rel="stylesheet">
</head>
<body>

<div class="container">
       <div class="row clearfix">
           <div class="col-md-12 column">
               <div class="page-header">
                   <h1>
                       <small>Book list - displays all books</small>
                   </h1>
               </div>
           </div>
       </div>
       <div class="row">
           <div class="col-md-4 column">
               <a class="btn btn-primary" href="${pageContext.request.contextPath}/book/toAddBook">New books </a>
           </div>
       </div>
       <div class="row clearfix">
           <div class="col-md-12 column">
               <table class="table table-hover table-striped">
                   <thead>
               <tr>
                       <th>Book number</th>
                       <th>Book name</th>
                       <th>Number of books</th>
                       <th>Book details</th>
                       <th>operation</th>
                   </tr>
               </thead>
                   <tbody>
                <%--Books are queried from the database list Traversal from: foreach
                    var yes book Each value in
                    --%>
               <c:forEach var="book" items="${requestScope.get('list')}">
                       <tr>
                           <td>${book.getBookID()}</td>
                           <td>${book.getBookName()}</td>
                           <td>${book.getBookCounts()}</td>
                           <td>${book.getDetail()}</td>
                           <td>
                               <a href="${pageContext.request.contextPath}/book/toUpdateBook?id=${book.getBookID()}">change</a> |
                               <a href="${pageContext.request.contextPath}/book/del/${book.getBookID()}">delete</a>
                           </td>
                       </tr>
                   </c:forEach>
               </tbody>
               </table>
           </div>
       </div>
</div>
Add books
<%@ taglib prefix="c" uri="http://java.sun.com/jsp/jstl/core" %>
<%@ page contentType="text/html;charset=UTF-8" language="java" %>

<html>
<head>
       <title>New books</title>
       <meta name="viewport" content="width=device-width, initial-scale=1.0">
       <!-- introduce Bootstrap -->
       <link href="https://cdn.bootcss.com/bootstrap/3.3.7/css/bootstrap.min.css" rel="stylesheet">
</head>
<body>
<div class="container">
       <div class="row clearfix">
           <div class="col-md-12 column">
               <div class="page-header">
                   <h1>
                       <small>New books</small>
                   </h1>
               </div>
           </div>
       </div>
       <form action="${pageContext.request.contextPath}/book/addBook" method="post">
           Book Name:<input type="text" name="bookName"><br><br><br>
           Number of books:<input type="text" name="bookCounts"><br><br><br>
           Book details:<input type="text" name="detail"><br><br><br>
           <input type="submit" value="add to">
       </form>
</div>
Modify and delete books
<%@ taglib prefix="c" uri="http://java.sun.com/jsp/jstl/core" %>
<%@ page contentType="text/html;charset=UTF-8" language="java" %>
<html>
<head>
       <title>Modify information</title>
       <meta name="viewport" content="width=device-width, initial-scale=1.0">
       <!-- introduce Bootstrap -->
       <link href="https://cdn.bootcss.com/bootstrap/3.3.7/css/bootstrap.min.css" rel="stylesheet">
</head>
<body>
<div class="container">
       <div class="row clearfix">
           <div class="col-md-12 column">
               <div class="page-header">
                   <h1>
                       <small>Modify information</small>
                   </h1>
               </div>
           </div>
       </div>
       <form action="${pageContext.request.contextPath}/book/updateBook" method="post">
           <input type="hidden" name="bookID" value="${book.getBookID()}"/>
           Book Name:<input type="text" name="bookName" value="${book.getBookName()}"/>
           Number of books:<input type="text" name="bookCounts" value="${book.getBookCounts()}"/>
           Book details:<input type="text" name="detail" value="${book.getDetail() }"/>
           <input type="submit" value="Submit"/>
       </form>
</div>
There are many ways to write the front-end interface. We use a very simple one here. If you have spare time, you can enrich the page.
Supplement (troubleshooting ideas)
In the development process, you may encounter many bugs, but for projects written with frameworks, most of the production places of bugs are configuration files. Here are some troubleshooting ideas for you. Welcome to supplement and communicate~
1.Mapper.xml
The easiest place for this configuration file to overturn is the sql statement. It is recommended that you learn the sql statement well. This is really important
2.web.xml
You are configuring web When using XML, you should pay attention to the path problem and directly scan ApplicationContext XML is enough, because this configuration file includes the other three configuration files
3. Common problems of classes and interfaces
When you write code, you must correspond to the object name, or you will report an error. You must pay attention to the case.
summary
This is a simple book management system, which is mainly to help you integrate the SSM framework. In fact, the code of the framework is very regular. When you learn, you should not simply learn the framework, but learn the idea and implementation principle of the framework.