1 objectives
- SpringBoot project can be created quickly (without writing any configuration files)
- Introduction to the basic principles of SpringBoot
- Introduction and use of SpringBoot configuration file
- SpringBoot integrates Mybatis, Redis and timer
- Spring boot sends Http request
- Testing in SpringBoot
- Spring boot packaged deployment
2 create a SpringBoot project using Spring Initializr
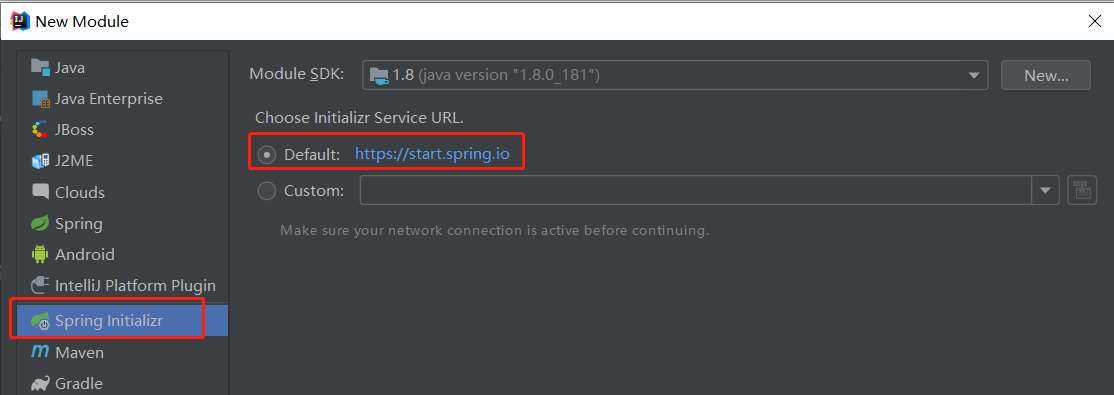
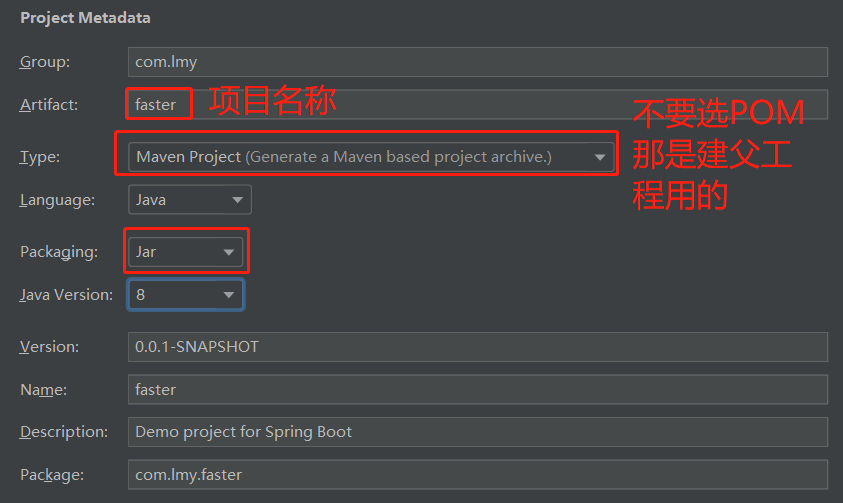
- Configure item information
- Check start dependency
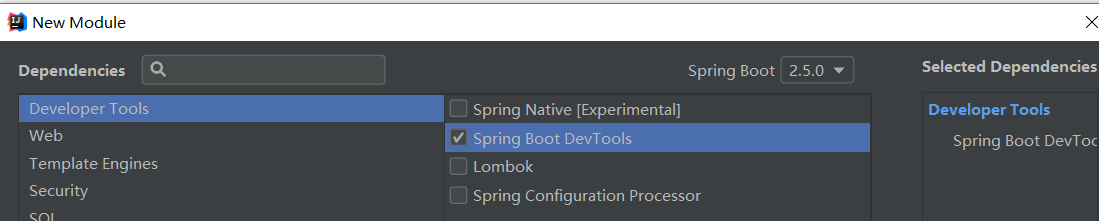
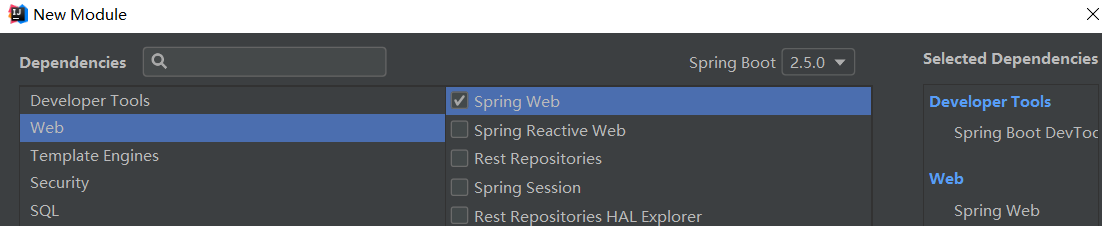
The dependent Jar package is no longer handwritten by Pom file, but directly checked, which is much more convenient! After checking start dependency, you can create the project according to the normal steps.
So far, after the basic project is created, you only need to write the business code in the controller by yourself. There is no need to write pom files and the startup boot class of sprigboot. Compared with the previous project, the construction of the project is much simpler!
In addition, the annotations used to modify the boot class in the two projects are different. Obviously, the @ SpringBootApplication annotation is more convenient:
/*IDEA Quickly create a SpringBoot project*/

@SpringBootApplication
/**
 * @SpringBootApplication One annotation is the top three:
 *  @Configuration Configuration class annotation, indicating that the current class is a configuration class
 *  @ComponentScan Package scanning annotation: if the parameter basePackages is not written, the current package and its sub packages will be scanned
 *  @EnableAutoConfiguration Turn on automatic configuration
 */
public class Springboot02FasterApplication {

    public static void main(String[] args) {
        SpringApplication.run(Springboot02FasterApplication.class, args);
    }

}
/*Maven Create a SpringBoot project*/
/**
* SpringBoot Boot class for
* @Configuration Configuration class annotation, indicating that the current class is a configuration class
* @ComponentScan Package scanning annotation: if the parameter basePackages is not written, the current package and its sub packages will be scanned
* @EnableAutoConfiguration Turn on automatic configuration
*/
@Configuration
@ComponentScan
@EnableAutoConfiguration
public class DemoApplication {
public static void main(String[] args) {
/**
* SpringBoot Application entry (standard configuration)
* SpringApplication.run(Bytecode file of boot class, main function parameter)
* The return value is the container of spring
*/
ConfigurableApplicationContext ioc = SpringApplication.run(DemoApplication.class, args);
}
}3 basic principles in springboot
3.1 starter
starters are the collation and encapsulation of dependencies and the integration of a set of dependent coordinates, which makes it easier to import project dependent coordinates
With these Starters, there is no need to configure (automatic configuration) and copy and paste dependent coordinates. All entry-level operations can be completed with one coordinate.
For example: for Web development, you only need to import the 'spring boot starter Web' coordinates
<dependency>
    <groupId>org.springframework.boot</groupId>
    <artifactId>spring-boot-starter-web</artifactId>
</dependency>
Of course, you can write your own pom file after building a maven project, or you can use spring initializer to generate the project with one click without writing your own configuration
Each Starter contains many necessary dependency coordinates under the current function. These dependency coordinates are necessary for project development, launch and operation. At the same time, these dependencies also support dependency transmission
There are many commonly used starters. For details, please refer to the link: SpringBoot-Starts
3.2 dependency management
Dependency management is the extraction and reuse of dependency coordinates. It is a function provided by Maven to uniformly manage the version of dependency coordinates.
My understanding is that Maven's dependency management function has been integrated into starter
3.3 automatic configuration
Encapsulate the configuration information into the AutoConfiguration class according to the requirements, and write the configuration information into the AutoConfiguration class in advance.
My understanding is: don't write a copy of configuration information such as ip and port number into the configuration file, but first specify the default value of the configuration information, that is, "agreement is greater than configuration", so generally don't modify it.
4. Configuration file of springboot
4.1 query configuration
Many SpringBoot configuration parameters have default values. There are two ways to query the default values:
- Method 1: find it directly from the dependent jar package of the SpringBoot project
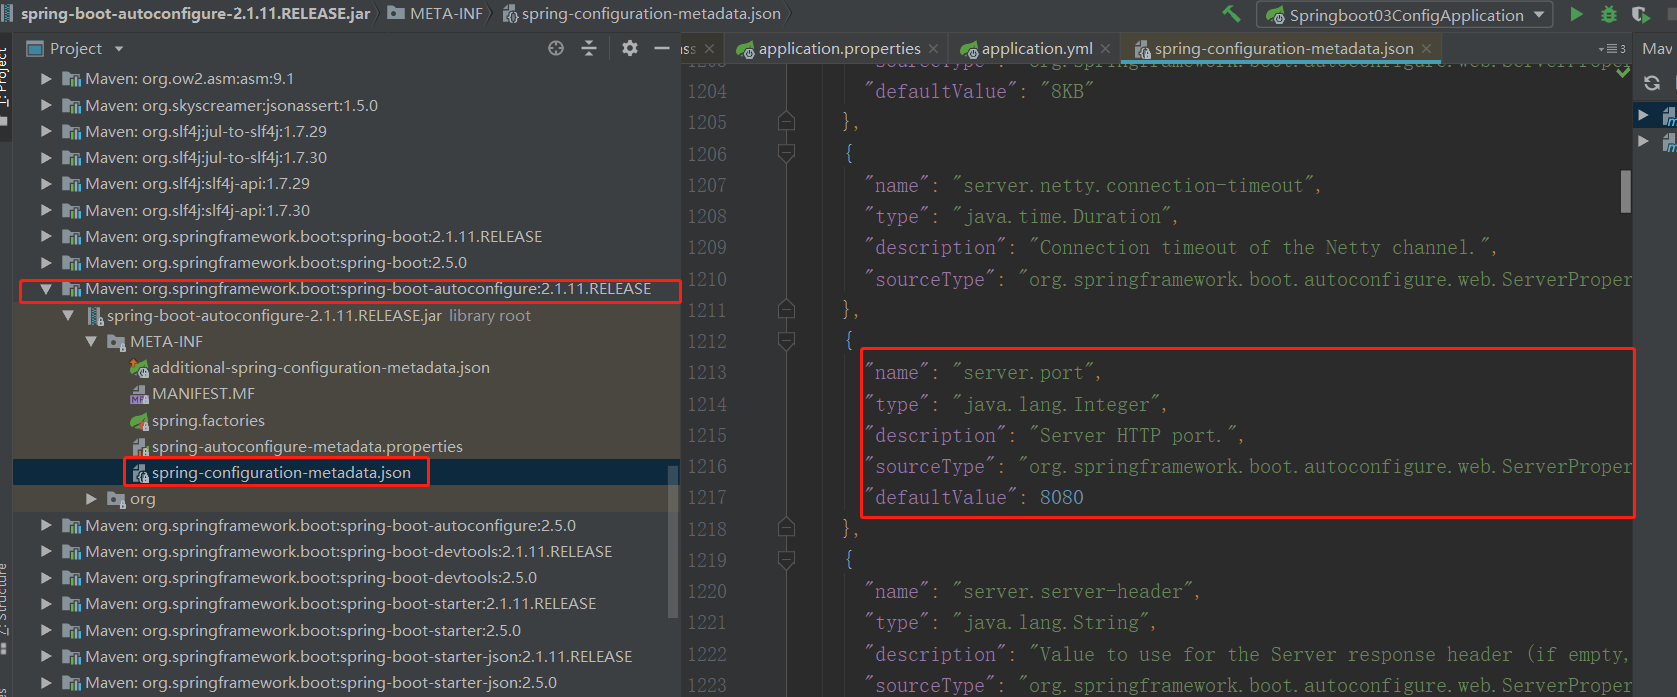
- Method 2: go to the official website to query: Configuration information official website query link
4.2 modify configuration
Although many configuration parameters of SpringBoot have default values, which are agreed to be greater than the configuration, sometimes it is unnecessary to modify some configuration parameters, so two ways are provided to modify the default configuration information:
- application.properties (commonly used, in the form of pure key value pairs, only applicable to java language)
- application.yml (can be used to describe objects, with certain simple syntax rules, slightly complex, applicable to all languages)
#properties file to modify the configuration

#port configuration
server.port=8888
#Enable the debug mode and output the detailed log, which is a setting for development
debug=true
#Configuration log: logging level. Specify the log under the package
logging.level.com.lmy=debug
#Configure context path
server.servlet.context-path=/demo
#yml file modification configuration

server:
  port: 8888
  servlet:
    context-path: /demo
Property and yml file conversion tool: Conversion link
The syntax rules of yml file are as follows:
- Case sensitive
- The value must be preceded by a space as a separator
- Use indents to indicate hierarchical relationships
- Tabs are not allowed for indentation, only spaces are allowed, and the number of spaces indented is not important, as long as the elements of the same level are aligned to the left
- #Indicates a comment
- Arrays and collections use "-" to represent each element of the array
#A person has the attributes of name, age, address, city (multiple), pet (multiple pets, each pet is an object)
person:
	name: haohao
	age: 31
	addr: beijing
	city:
        - beijing
        - shanghai
        - guangzhou
	pets:
        - name: dog
          age: 2
        - name: tomcat
          age: 3
        - name: pig
          age: 5
In addition, the yml file also has the functions of "reference" and "generate random number"
#The name attribute in the person class refers to the value of the name variable
name: xiaoming
person:
	name: ${name}
# Generate random string
my.secret: ${random.value}
# Generate random number
my.number: ${random.int}
# The generated random number is less than 10
my.number.less.than.ten: ${random.int(10)}
# The generated random number ranges from 1024 to 65536
my.number.in.range: ${random.int[1024,65536]}4.3 configuration file injection Bean
- Method 1: @ value annotation maps the value of the configuration file to the Bean attribute value managed by Spring
Features: convenient, but only one variable can be configured

- Method 2: use the annotation @ ConfigurationProperties
5. Spring boot integrates Mybatis
5.1 summary of integration steps
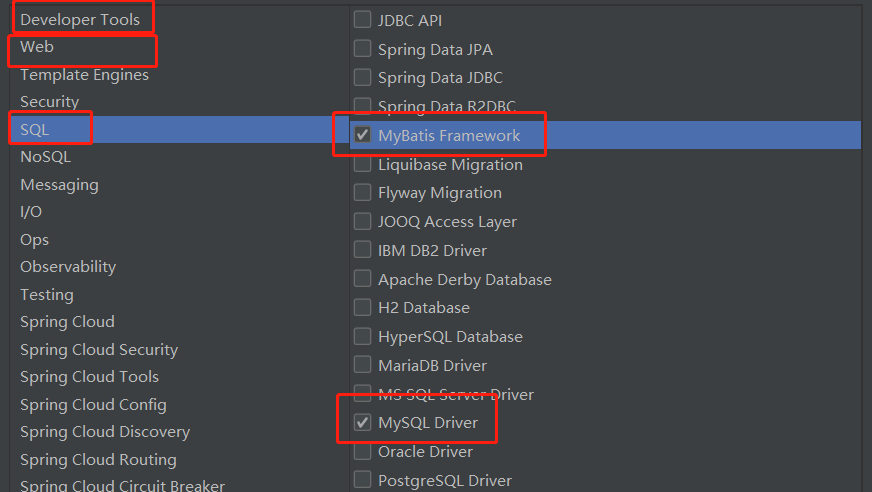
- Create a SpringBoot project and check MyBatis dependent coordinates
- Create User table and entity User class in Mysql database
- Write a three-tier architecture: Mapper, Service and controller, and write the method of querying all findAll()
- Write the SQL statement of the method findAll() in Mapper interface
- Profiles: database connection information
- Access test address http://localhost:8080/queryUsers
5.1.1 create SpringBoot project and check MyBatis dependent coordinates:
5.1.1 create User table and entity User class in Mysql database:
#Mysql script to create database tables

DROP TABLE IF EXISTS `user`;
CREATE TABLE `user` (
`id` INT(11) NOT NULL AUTO_INCREMENT,
`username` VARCHAR(50) DEFAULT NULL,
`password` VARCHAR(50) DEFAULT NULL,
`name` VARCHAR(50) DEFAULT NULL,
PRIMARY KEY (`id`)
) ENGINE=INNODB AUTO_INCREMENT=3 DEFAULT CHARSET=utf8;
-- ----------------------------
-- Records of user
-- ----------------------------
INSERT INTO `user` VALUES ('1', 'zhangsan', '123', 'Zhang San');
INSERT INTO `user` VALUES ('2', 'lisi', '123', 'Li Si');
/*Create User object*/
package com.lmy.pojo;

import lombok.Data;

@Data
public class User {
    private Integer id;
    private String username; //user name
    private String password; //password
    private String name;     //full name
}
5.1.3 write a three-tier architecture: Mapper, Service and controller, and write the method of querying all findAll():
5.1.3.1 write Mapper layer
mapper layer is an interface, or sql statements can be written directly on the interface file and annotated with @ Select (or other)
/**
* Inject the implementation class object of the current interface into the spring container
* @Mapper = @Component = @Service = @Repository = @Controller
*/
@Mapper
public interface UserMapper {
/**
* Query all
*/
@Select("select * from user;")
List<User> findAll();
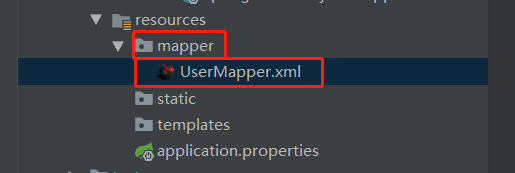
}Alternatively, if you don't want to write the sql statement in the interface file, you can use xml file instead. The location of the xml file is as follows. The black bird is the logo used by Mybatis to write sql. It is a plug-in: mybatiscodehelper pro. The 7-day trial is free.
<?xml version="1.0" encoding="utf-8" ?>
<!DOCTYPE mapper
        PUBLIC "-//mybatis.org//DTD Mapper 3.0//EN"
        "http://mybatis.org/dtd/mybatis-3-mapper.dtd">
<mapper namespace="com.lmy.mapper.UserMapper">
    <select id="findAll" resultType="user">
        select *
        from user;
    </select>
</mapper>
5.1.3.2 write Service layer
The interface layer is relatively simple, and the service layer is written first
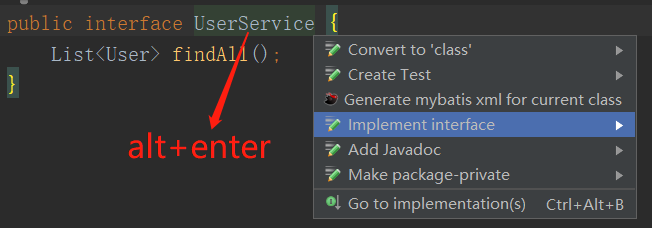
public interface UserService {
    List<User> findAll();
}
Then implement this interface. The implementation class of this interface can be generated automatically by IDEA instead of writing it manually:
The interface implementation class of the Service layer needs to use the @ Service annotation to identify the layer as the business layer, use the @ Autowired annotation to use the objects of the persistence layer, and use the methods of the persistence layer instead of new.
@Service
public class UserServiceImpl implements UserService {

    @Autowired
    private UserMapper mapper;

    @Override
    public List<User> findAll() {
        return mapper.findAll();
    }
}
5.1.3.3 writing Controller layer
Controller layer has no interface, @ RestController annotation = @ ResponseBody + @Controller
The function of @ ResponseBody is to convert java objects into json format data
Where @ Controller is used to process Http requests, @ Controller only defines a Controller class, and the method annotated with @ RequestMapping is the processor to process requests.
@RestController
public class UserController {
    @Autowired
    private UserService service;

    /**
     * Query all users
     * @return
     */
    @RequestMapping("/user/findAll")
    public List<User> findAll(){
        return service.findAll();
    }
}
5.1.4 fill in the database connection information in the configuration file
In application Set the database information in the properties file and register the alias for the JavaBean, so that when writing the sql statement configuration file, the return value does not need to write the full class name of the class, even in lowercase
#Configuration database link information: database name, user name and password
spring.datasource.url=jdbc:mysql://127.0.0.1:3306/test?useUnicode=true&characterEncoding=UTF-8&serverTimezone=UTC
spring.datasource.password=root
spring.datasource.username=root
#Register an alias for JavaBean, so that when writing the sql statement configuration file, the return value does not need to write the full class name of the class, even in lowercase
mybatis.type-aliases-package=com.lmy,pojo
5.1.5 local access after configuration
http://localhost:8080/user/findAll
6. Spring boot integrates Redis
It's very simple. Add the redis dependency in the pom file. Be sure to add it correctly, or you'll spend more than 3 hours to find the problem!
   <dependency>
            <groupId>org.springframework.boot</groupId>
            <artifactId>spring-boot-starter-redis</artifactId>
            <version>1.4.0.RELEASE</version>
   </dependency>
After the dependency is added, the business code is written, and the implementation logic is:
- User sends request to query data
- If the data exists in redis, it will be returned
- If it doesn't exist, query from mysql. Before the query result is returned, save the result in redis
- The key name of this data in redis is: "fully qualified class name + method name of service (in fact, it doesn't matter what name format. It can be uniquely identified and can be obtained every time you query)"
@RestController
public class UserController {
    @Autowired
    private UserService service;
    @Autowired
    private RedisTemplate redisTemplate;

    /**
     * Query all users
     * @return
     */
    @RequestMapping("/user/findAll")
    private List<User> findAll(){
        /**
         * First, fetch data from redis cache: key, fully qualified name of service interface + method name
         * If it is returned to the user, if it is not returned to the user from mysql query, it will coexist with reids
         */

        //The key value (fully qualified class name + method name) in redis. Value is the result of querying all users
        String key = service.getClass().getName() + "findAll";
        //Function return value, that is, user information
        List<User> users = null;
        //Fetch data from redis
        users = (List<User>) redisTemplate.boundValueOps(key).get();
        //If you don't get it, you can query the data from mysql and save a copy to the cache. If you find it, you can return it directly
        if(users==null){
            //There is no data in the cache. Go to mysql and save a copy of the result to redis
            users = service.findAll();
            redisTemplate.boundValueOps(key).set(users);
            System.out.println("Fetch data from database");
        }else {
            System.out.println("from redis Fetch data from cache");
        }
        return users;
    }
}
7 SpringBoot integration timer
Implementation steps
- On the startup class, start the timer annotation (@ enableshcheduling)
- Write timer method (@ Component + @Scheduled)
/**
 * @EnableScheduling Enable the timer function support of springboot
 */

@SpringBootApplication
@EnableScheduling
public class Springboot04MybatisApplication {
    public static void main(String[] args) {
        SpringApplication.run(Springboot04MybatisApplication.class, args);
    }
}
@Component
public class TimerUtils {
//Inject the interface implementation class object of the service layer
@Autowired
private UserService service;
/**
* @Scheduled In addition to the cron expression property, you can also set the execution rules of the current method
* cron Properties: setting general time rules
* initialDelay: How long is the execution delay after initializing the current service
* fixedDelay: How long after the last task is completed, the next task will be executed
* fixedRate: Execute at a fixed frequency, regardless of the execution time of the previous task
*/
// Let the following code output the current time every 5 seconds
//@Scheduled(cron = "0/5 * * * * ? ")\
//Making the "display time" task execute every 2 seconds is more friendly than cron expression and makes up for the poor readability of cron expression, but cron expression is more powerful
@Scheduled(fixedDelay=2000)
public void myTask2(){
//Write business flow logic
System.out.println(new Date());
}
}8 send Http request
RestTemplate is used to send Http requests.
Spring's RestTemplate encapsulates HTTP based clients and is the HTTP client template tool class of Rest.
Achieve the following functions: after accessing an address, the server sends an http request to Baidu
- Create a springboot project
- Configure the object Bean of RestTemplate into the Spring container
- Inject the RestTemplate object in the Spring container with @ Autowired in the test class
- Send get request through getForObject of RestTemplate object
Configure the object Bean of RestTemplate into the Spring container:
@SpringBootApplication
@EnableScheduling
public class Springboot04MybatisApplication {
    public static void main(String[] args) {
        SpringApplication.run(Springboot04MybatisApplication.class, args);
    }
    //Inject RestTemplate object into Spring container


    //The RestTemplate object injected into the spring container is written in the boot class because the boot class itself is also a configuration class. Of course, you can also write a configuration class yourself
    @Bean
    public RestTemplate restTemplate() {
        return new RestTemplate();
    }
}
After accepting the request from the browser, the server sends a request to Baidu and responds to the browser
@RestController
public class HelloController {
    @Autowired
    private RestTemplate restTemplate;

    @RequestMapping("/sendHttp")
    public String sendHttpRequest(){
        /**
         * Methods corresponding to different Http request modes
         * get: getForObject()
         * post: postForObject()
         * delete: delete
         * put: put
         */
        //Send get request
        String responseBody = restTemplate.getForObject("http://baidu.com/", String.class);
        System.out.println(responseBody);
        return responseBody;
    }
}
9 test
It is convenient to use annotations on this class for testing. For springboot 2 2. In previous versions, the test class needs to write two notes:
- @RunWith(SpringRunner.class): initialize the test class, springboot2 Not since version 2
- @SpringBootTest: indicates that the current class is a spring test class
The following test class code tests the http get request method of RestTemplate class
@RunWith(SpringRunner.class)
@SpringBootTest
public class Springboot04MybatisApplicationTests {

    @Autowired
    private RestTemplate restTemplate;

    /**
     * The RestTemplate is used to test whether the http get request can succeed
     */
    @Test
    public void contextLoads() {
        String forObject = restTemplate.getForObject("http://www.baidu.com", String.class);
        System.out.println(forObject);
        System.out.println("Hello 1 aaaa");
    }
}
10 spring boot packaged deployment
10.1 jar package deployment
Now the method of making jar packages is popular (you don't need to write a special class for deployment, jar packages can be executed directly, and you don't need your own Tomcat environment).
The traditional packaging method is to make war package (write a class yourself, and use your own Tomcat running environment to run war package).
The steps of converting the SpringBoot project into a jar package are as follows:
- Open Maven Toolkit - > lifecycle - > package on the right side of IDEA
- Note the packaging type of the project pom file, which is jar by default or manually identified as jar: < packaging > jar < / packaging >,
- Note that the project pom file must have maven plug-in: spring boot maven plugin (make the current spring boot project into an executable jar package)
- After packaging, there is a project jar package in the Target file of the project. Copy it to a path, such as disk d
- Open the windows command line window and enter the following startup instructions. At this time, the whole project will be started.
1 out of 3 start command
- Basic instruction: java -jar target/day01_springboot_demo01-1.0-SNAPSHOT.jar
- The specified web port number is attached when starting: java -jar target/day01_springboot_demo01-1.0-SNAPSHOT.jar --server.port=8081
- Set the memory occupied by the project at startup (20-80Mb): java -Xmx80m -Xms20m - jar target/day01_springboot_demo01-1.0-SNAPSHOT.jar
Note: the reason why the configuration parameter of the second instruction (the port number directly configured during deployment is 8081) can take effect is that the parameter "args" is passed in when the spring boot project starts the run method call in the main function of the boot class. Otherwise, it will not take effect!
10.2 # war package deployment
Making war package deployment is a traditional method (you need to write a class yourself, and you need to run war package with your own Tomcat running environment). The steps are as follows:
- Determine the packaging type of project pom file as: < packaging > war < / packaging >
- Registered startup class, details are as follows
- Maven tool packaging project on the right side of IDEA
- Copy the project war package to the webapps directory of Tomcat
- Double click startup.com under the bin directory where Tomcat is running bat
- Access (when accessing, the access path should be prefixed with the name of the project war package under the webapps directory at the beginning!)
Register startup class
The registered startup class is a class written by ourselves. As the entry of the war package, it is placed at the same level as the controller package
Registering a startup class is a standard way to write it. You only need to The parameters in the sources() method can be changed to the bytecode file object of the boot class of the SpringBoot project)
/**
 * war Package, program entry
 * Equivalent to WEB-INF / Web XML configuration file
 */
public class ServletInitializer extends SpringBootServletInitializer {
    @Override
    protected SpringApplicationBuilder configure(SpringApplicationBuilder builder) {
        /**
         * Parameter: bytecode file of SpringBoot boot boot class
         */
        return builder.sources(Springboot02FasterApplication.class);
    }
}
11 precautions
Maven version should not be lower than 3.5. Originally, I wanted to use my own warehouse. My Maven version is 3.3.9. It may be that the version problem always leads to errors when importing pom files (especially when importing redis dependent packages), so I now use the local warehouse in the default configuration and want to change to my own custom warehouse in the future.