If a worker wants to do well, he must first sharpen his tools
preface
In the last article, we mainly learned about VirtualBox. Using VirtualBox to build virtual machines may be cumbersome for experienced developers. Then, in order to meet the "big man"'s full sense of confidence in front of novices, it is necessary for us to learn another development weapon Vagrant.
1, Vagrant overview
Vagrant is a tool for building and managing virtual machine environments in a single workflow. Support multiple operating systems. With easy-to-use workflow and focus on automation, vagrant shortens the setting time of development environment, increases production value, and makes the excuse of "works on my machine" a thing of the past. Generally speaking, vagrant is mainly used to create and deploy a virtualized development environment.
Vagrant provides an easy to configure, replicable and portable work environment based on industry standard technology and controlled by a single and consistent workflow to help maximize team productivity and flexibility.
Vagrant uses virtualization technologies such as VirtualBox, VMware and AWS. At the same time, vagrant uses industry standard provisioning tools (such as shell script, Chef or Puppet) to automatically install and configure software on virtual machines.
2, Vagrant advantage
- Cross platform
- portability
- Automated deployment requires no human involvement
3, Build your own Vagrant
Since the author uses the Windows operating system, the following case will be built on the Windows operating system.
-
Step 1: download the installation package
-
Step 2 installation
Find the downloaded installation package vagrant_2.2.18_x86_64.msi double click and follow the prompts.
-
Step 3 verification
We need to enter the vagrant -v command at the operating system terminal or a command line terminal such as PowerShell. How to open the terminal?
Windows opens the shortcut key win+r of the terminal. Enter cmd in the pop-up window and click the OK button to enter the command line terminal, the legendary black window. Ang ~ just like below.
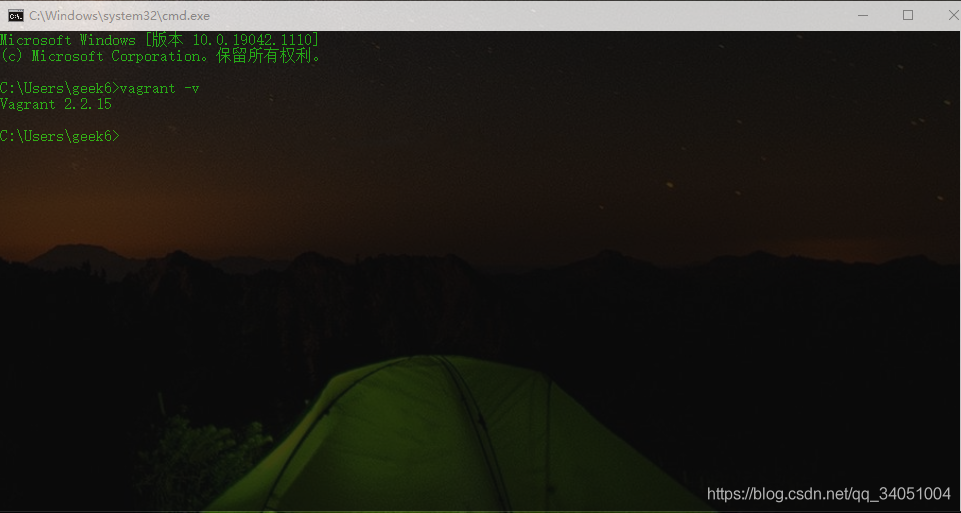
Enter vagrant -v to view the version
vagrant -v
# Output information
Vagrant 2.2.15
Seeing the version number indicates that Vagrant has been successfully installed.
4, Getting started with Vagrant
Build a virtual machine by using Vagrantfile.
Online installation
Create a new folder. Here I name it centos7, which can be named according to my own situation.
Enter the new folder, enter the terminal and execute the vagrant init command, which will help you automatically generate the vagrant file in the current directory. PS: we can also create a Vagrantfile manually.
vagrant init
Modify Vagrantfile
# -*- mode: ruby -*-
# vi: set ft=ruby :
Vagrant.configure("2") do |config|
  # boxes at https://vagrantcloud.com/search.
  config.vm.box = "centos/7"
  config.vm.provider "virtualbox" do |vb|"
      vb.memory = "2048"
      vb.name = "geek"
      vb.cpus = 2
  end
end
Start the virtual machine. From the terminal, we can see that vagrant will automatically https://vagrantcloud.com/centos/7 Download the image file. If the network is not very good, we can go to this website or other third-party websites to download the image file for offline installation.
vagrant up
Generally, there will be no problem in the startup process. Unfortunately, some errors will be encountered. Please solve it yourself.
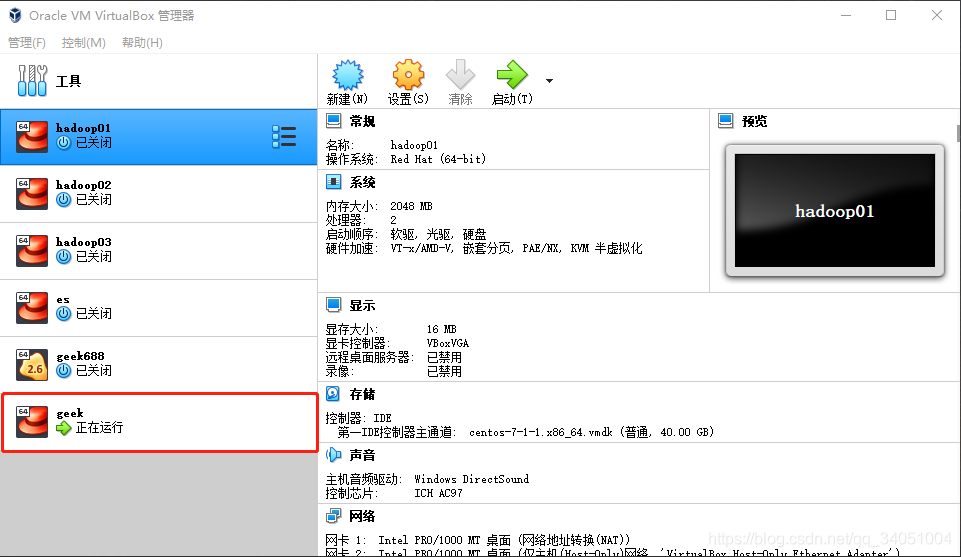
Now we open the VirtualBox, and we can see that the virtual machine we just created is already in the vritalbox.
It's not over yet. How can we connect the virtual machine? Is it convenient to enter the virtual machine we created by entering vagrant ssh on the terminal.
vagrant ssh
If vagrant ssh cannot connect to the virtual machine, please log in to the virtual machine using Vritualbox and modify / etc / SSH / SSH_ The configuration item PasswordAuthentication yes in the config file. Restart the virtual machine and use vagrant ssh to connect
Offline installation
After mastering the online installation of virtual machines, offline installation is also a piece of cake for you.
We will download the image VirtualBox Add box to vagrant manager
vagrant box add centos/7 D:\virtualbox.box
Use vagrant box list to view images managed by vagrant
vagrant box list
The output information indicates that we have successfully added the image to the vagrant manager
centos/7 (virtualbox, 2004.01)
Start the virtual machine
vagrant up
Follow up steps are as like as two peas on the Internet. Is it very simple?
5, Vagrant common instructions
| instructions | explain | remarks |
|---|---|---|
| vagrant halt | Elegant close | |
| vagrant up | Normal start | |
| vagrant ssh | Virtual machines created using ssh connections | |
| vagrant status | View status | |
| vagrant destroy | delete | |
| vagrant reload |
summary
The above is the main content of this article. The introduction to Vagrant is completed. This article introduces what Vagrant is, why Vagrant is used, how to build Vagrant, and how to use Vagrant. The content is relatively simple. The follow-up of this column will take you to explore the advanced usage of Vagrant. Please look forward to it (* ^ ▽ ^ *).
statement
The above contents are from the network. If there are errors, please include more.
reference
Complete operation records are attached
PS G:\geek-space\VMs> dir


    catalogue: G:\geek-space\VMs


Mode                 LastWriteTime         Length Name
----                 -------------         ------ ----
d-----          2021/8/9     16:02                centos7


PS G:\geek-space\VMs> cd .\centos7\
PS G:\geek-space\VMs\centos7> vagrant init
==> vagrant: A new version of Vagrant is available: 2.2.18 (installed version: 2.2.15)!
==> vagrant: To upgrade visit: https://www.vagrantup.com/downloads.html

A `Vagrantfile` has been placed in this directory. You are now
ready to `vagrant up` your first virtual environment! Please read
the comments in the Vagrantfile as well as documentation on
`vagrantup.com` for more information on using Vagrant.
PS G:\geek-space\VMs\centos7> dir


    catalogue: G:\geek-space\VMs\centos7


Mode                 LastWriteTime         Length Name
----                 -------------         ------ ----
-a----          2021/8/9     16:05           3080 Vagrantfile


PS G:\geek-space\VMs\centos7>
PS G:\geek-space\VMs\centos7> vagrant up
Bringing machine 'default' up with 'virtualbox' provider...
==> default: Box 'centos/7' could not be found. Attempting to find and install...
    default: Box Provider: virtualbox
    default: Box Version: >= 0
==> default: Loading metadata for box 'centos/7'
    default: URL: https://vagrantcloud.com/centos/7
==> default: Adding box 'centos/7' (v2004.01) for provider: virtualbox
    default: Downloading: https://vagrantcloud.com/centos/boxes/7/versions/2004.01/providers/virtualbox.box
==> default: Box download is resuming from prior download progress
Download redirected to host: cloud.centos.org
    default:
    default: Calculating and comparing box checksum...
==> default: Successfully added box 'centos/7' (v2004.01) for 'virtualbox'!
==> default: Importing base box 'centos/7'...
==> default: Matching MAC address for NAT networking...
==> default: Checking if box 'centos/7' version '2004.01' is up to date...
==> default: Setting the name of the VM: geek
==> default: Clearing any previously set network interfaces...
==> default: Preparing network interfaces based on configuration...
    default: Adapter 1: nat
==> default: Forwarding ports...
    default: 22 (guest) => 2222 (host) (adapter 1)
==> default: Running 'pre-boot' VM customizations...
==> default: Booting VM...
==> default: Waiting for machine to boot. This may take a few minutes...
    default: SSH address: 127.0.0.1:2222
    default: SSH username: vagrant
    default: SSH auth method: private key
    default:
    default: Vagrant insecure key detected. Vagrant will automatically replace
    default: this with a newly generated keypair for better security.
    default:
    default: Inserting generated public key within guest...
    default: Removing insecure key from the guest if it's present...
    default: Key inserted! Disconnecting and reconnecting using new SSH key...
==> default: Machine booted and ready!
==> default: Checking for guest additions in VM...
    default: No guest additions were detected on the base box for this VM! Guest
    default: additions are required for forwarded ports, shared folders, host only
    default: networking, and more. If SSH fails on this machine, please install
    default: the guest additions and repackage the box to continue.
    default:
    default: This is not an error message; everything may continue to work properly,
    default: in which case you may ignore this message.
==> default: Rsyncing folder: /cygdrive/g/geek-space/VMs/centos7/ => /vagrant
PS G:\geek-space\VMs\centos7>
PS G:\geek-space\VMs\centos7> vagrant ssh
[vagrant@localhost ~]$
[vagrant@localhost ~]$ su
Password:
[root@localhost vagrant]# ip addr
1: lo: <LOOPBACK,UP,LOWER_UP> mtu 65536 qdisc noqueue state UNKNOWN group default qlen 1000
    link/loopback 00:00:00:00:00:00 brd 00:00:00:00:00:00
    inet 127.0.0.1/8 scope host lo
       valid_lft forever preferred_lft forever
    inet6 ::1/128 scope host
       valid_lft forever preferred_lft forever
2: eth0: <BROADCAST,MULTICAST,UP,LOWER_UP> mtu 1500 qdisc pfifo_fast state UP group default qlen 1000
    link/ether 52:54:00:4d:77:d3 brd ff:ff:ff:ff:ff:ff
    inet 10.0.2.15/24 brd 10.0.2.255 scope global noprefixroute dynamic eth0
       valid_lft 84701sec preferred_lft 84701sec
    inet6 fe80::5054:ff:fe4d:77d3/64 scope link
       valid_lft forever preferred_lft forever
[root@localhost vagrant]#