Android ListView is probably the most commonly used and difficult control in Android. To be honest, the use of this control really made me feel awkward for a while. I need to know that I can understand the program, but after leaving the book, I find that I can't write it out. It's really frustrating. Fortunately, now I can finally write it myself, so here I record the process of writing a custom ListView, to provide a train of thought, hoping to help some beginners.
True Question is mainly divided into three parts to introduce the custom ListView:
- Basic ListView Implementation
- ListView Implementation of Custom Subitem
- Simple optimization of custom ListView
To write a custom ListView, first of all, we need to have the most basic understanding of ListView. ListView is a control. This control can slide up and down. There is an Item on the control. This is the basic image of ListView. Next, we start with the implementation of the simplest ListVeiw.
Environment: Android Studio
Basic ListView Implementation
Ignore the process of building new projects.
First of all, since it is a control, it is natural to add ListView control in the main layout. The core code is as follows:
<com.example.citylistview.MyListView
        android:layout_width="match_parent"
        android:layout_height="match_parent"
        android:id="@+id/list_view" >
    </com.example.citylistview.MyListView>
The above is a simple control layout, but also the simplest property settings, without explanation;
Then, since a control is placed, a new ListView control is created in MainActivity, and the control variable is associated with the change control by using the control id. The core code is as follows:
private MyListView myCityListView;
myCityListView = findViewById (R.id.list_view);
After completing this step, you can imagine that there is no Item in ListView, right. Then create a new array of String type, each variable of which is each Item. The code is as follows:
private String[] city = {"Beijing", "Nanjing", "Shanghai", "Chengdu", "Tianjin"...};You can write more in this variable so that the List will be longer. Since ListView uses Adapter as the input list variable, you need to create a new Adapter type variable and associate it with this String type list:
private ArrayAdapter<String> mArrayAdapter;
mArrayAdapter = new ArrayAdapter<String>(MainActivity.this, android.R.layout.simple_list_item1, city);
As you can see, this constructor takes three parameters, the first is the Context type, which is passed into MainActivity.this, and the second is an Item layout that Android comes with, which can be understood as a small bar with only one TextView.
Finally, the mListView variable is used to put the adapter in.
myCityListView.setAdapter (cityAdapter);Then a run turned out to be like this:
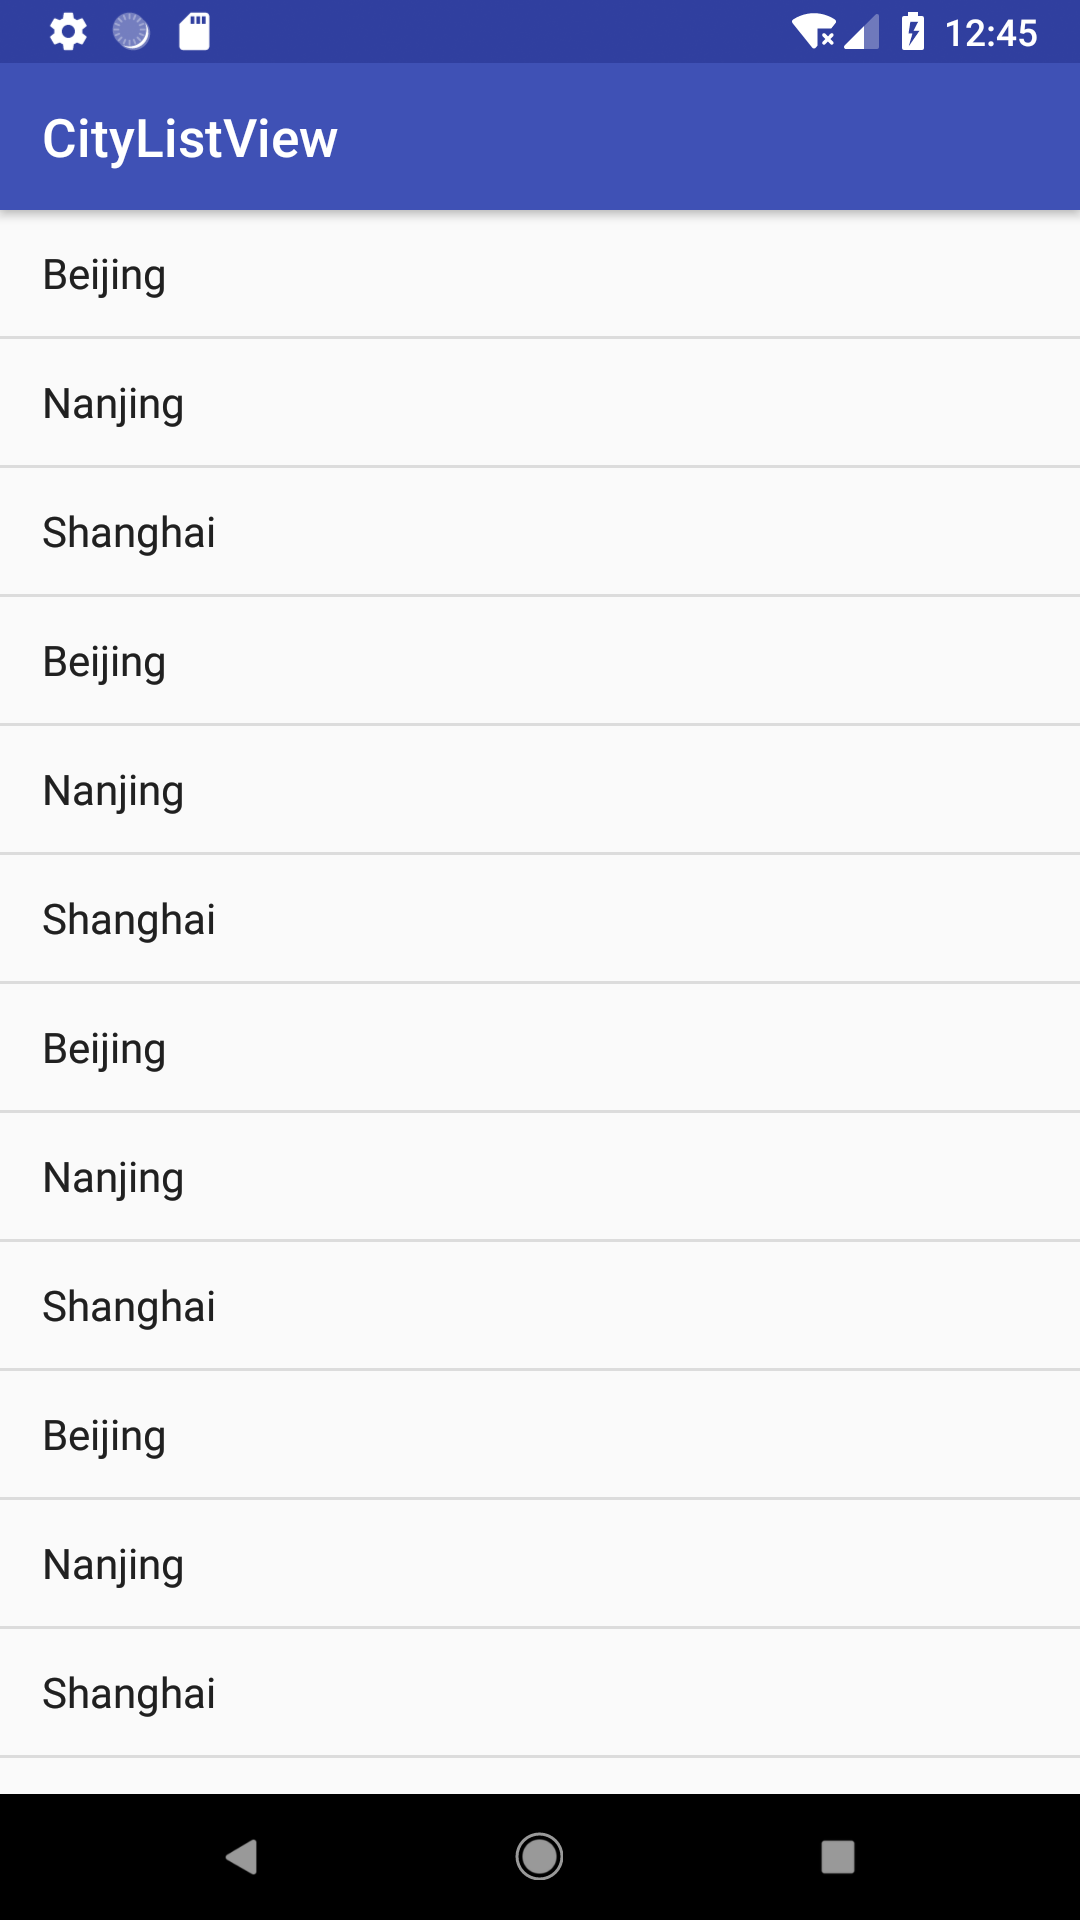
The basic idea of ListView implementation is clear and not difficult. Next, we are going to implement ListView of custom sub-items.
ListView Implementation of Custom Subitem
The ListView of custom subitem is mainly to implement the item column defining ListView. From the previous section, you can see that each column of ListView is a TextView, which is somewhat monotonous, so the custom ListView we are implementing now needs to place an ImageView and a TextView in each item.
First of all, since we want to change the item column, we can't use the self-contained item "android.R.layout.simple_list_item1" used in the previous section. So, we create a new layout named item_layout. The layout is as follows:
<ImageView
        android:layout_width="wrap_content"
        android:layout_height="wrap_content"
        android:id="@+id/city_image" />

    <TextView
        android:layout_width="wrap_content"
        android:layout_height="wrap_content"
        android:id="@+id/city_name"
        android:layout_gravity="center_vertical"
        android:textSize="18sp"/>
As you can see, the code is very simple: an ImageView, a TextVeiw; because now there are ImageView and TextView in an Item, that is to say, these two things should be bound together, so naturally we want to put these two variables into a class to manage, so we create a new City class in src/java:
public class City {

    private String name;
    private int imageId;

    public City(String name, int imageId){
        this.name = name;
        this.imageId = imageId;
    }

    public String getName(){
        return name;
    }

    public int getImageId() {
        return imageId;
    }
}
The d code is also simple. name is used to assign values to TextView in item, and imageId is used to assign values to ImageView in item. The reason why this is an int variable is that we use the resource id when setting IamgeVeiw resources.
Next is the variable of Array Adapter <>, which has always been a headache to me. Since we used the variable of Array Adapter directly at the beginning, we actually called the method of getView() in the class, and the default method of gitView is just to get a TextVeiw variable. Now we have an additional ImageView in item, so we need to rewrite the G. EtView method, so we create a new CityAdapter that inherits from the ArrayAdapter class:
public class CityAdapter extends ArrayAdapter<City> {
    private int newResourceId;
    public CityAdapter(Context context, int resourceId, List<City> cityList){
        super(context, resourceId, cityList);
        newResourceId = resourceId;
    }

    @Override
    public View getView(final int position, View convertView, ViewGroup parent){

        City city = getItem (position);
        View view = LayoutInflater.from (getContext ()).inflate (newResourceId, parent, false);

        TextView cityName = view.findViewById (R.id.city_name);
        ImageView cityImage = view.findViewById (R.id.city_image);

        cityName.setText (city.getName ());
        cityImage.setImageResource (city.getImageId ());
        return view;
    }
}
In this class, a constructor and a getView method receive three parameters. resourceId defines a layout of Item items for ourselves. cityList is the previous array of String types.
The most important thing is the getView method. The main purpose of this method is to get every Item item of ListView. The simple understanding is that each line in ListView needs to return a View type variable.
The method of getView is clear now. It is important to know that the position parameter is the location parameter of each item. With this parameter, we can get the corresponding City variable of each item; with the inflate method of LayouInflater (which is very important), we can get the corresponding View variable of the layout of Item, and then use this view to find the ImageView and TextView control in each line, and most importantly. The text image resources are then set for the two controls. From this point of view, the train of thought is clearer.
Thus, the effect is as follows:
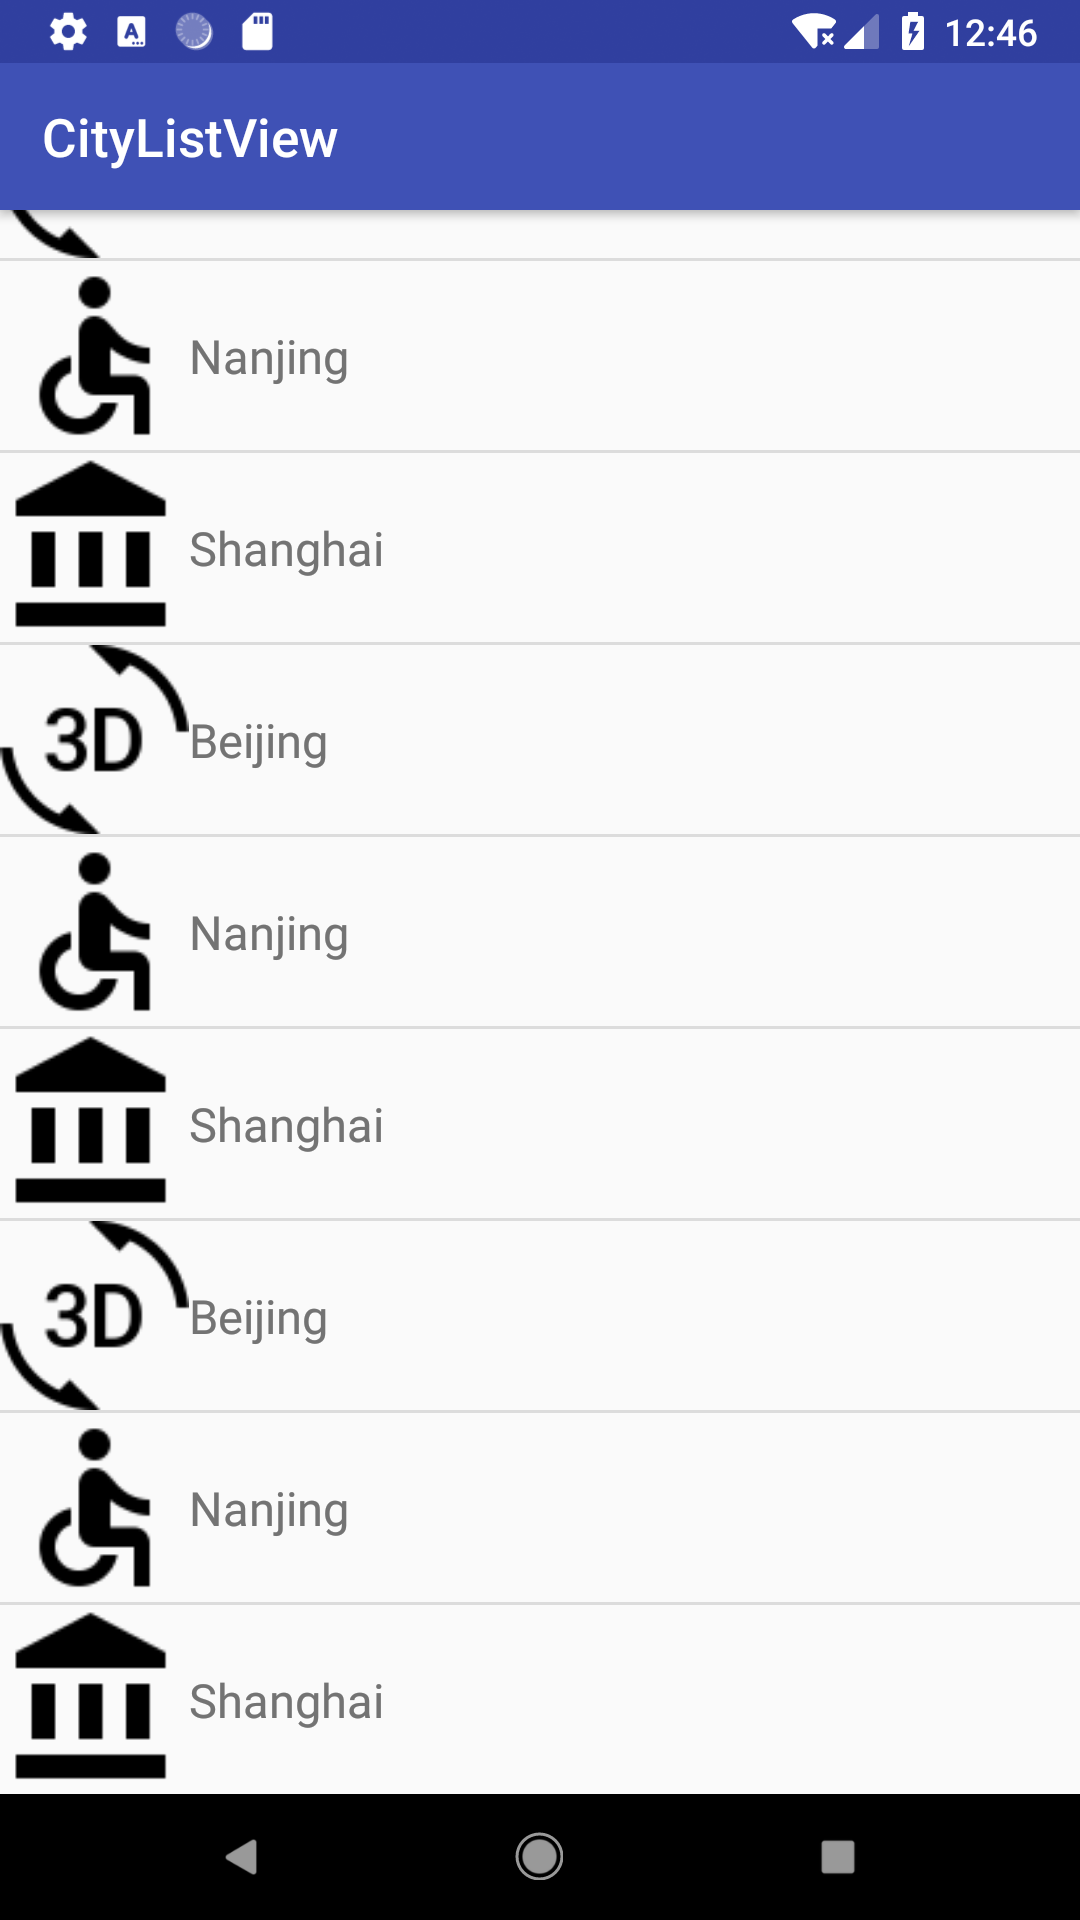
—— Don't tangle with the pictures, look for them by yourself ___________.
Here's a point that needs special attention: because ImageView and TextView are on the layout of item layout s, we must use the findView method as view.findVeiw, otherwise we can't find the corresponding two controls!
Finally, let's talk about some ways to improve the efficiency of customizing ListView.
Simple optimization of custom ListView
- Using convertView Cache
- New Internal ViewHolder Class
- Click Response of ListView
- Implementation of ListView Springback Effect
After we implement the custom ListView, the efficiency of ListView is relatively low, because every time we slide ListView up and down, once a new item appears on the screen <Here to be verified>, the getView method of CityAdapter class will look for Item layout, which greatly reduces the efficiency (Log can be tested here). Therefore, we need to optimize.
The first method is to judge the convertView parameter of getView, because this parameter is actually the result of caching the original loaded layout, so we judge this variable. If it is not null, we use the convertView directly. If it does not exist, then we create the corresponding view. The core code is as follows:
getView(final int position, View convertView, ViewGroup parent){
    if(null != convertView){
            view = convertView;
    }
    else{
        view = LayoutInflater.from...
    }
}
Although this method can use cached convertView to improve efficiency, but still need to use view to find the corresponding ImageView and TextView each time, so what can be improved? The second approach is to add an internal class to CityAdapter, which has two member variables, namely, ImageView type and TextView type, and then associate this class with our previously cached convertView. In this way, once convertView exists, ImageView and TextView in the associated class will be taken out and used directly, if they do not exist. The view variable is created and the corresponding ImageView and TextView are stored in the associated classes so that they can be used for later retrieval and use.
First, add an internal class to the CityAdapter class:
public class ViewHolder2{
        private ImageView cityImage;
        private TextView cityName;
    }
Then change the getView method to:
@Override
    public View getView(final int position, View convertView, ViewGroup parent){
        ViewHolder2 viewHolder;
        if(null != convertView){
            viewHolder = (ViewHolder2) convertView.getTag ();
        }
        else{
            viewHolder = new ViewHolder2 ();
            convertView = LayoutInflater.from (getContext ()).inflate (newResourceId, parent, false);

            Context testContext = getContext ();
            Log.d ("CityAdapter", "test context" + testContext);

            viewHolder.cityImage = convertView.findViewById (R.id.city_image);
            viewHolder.cityName = convertView.findViewById (R.id.city_name);
            viewHolder.cityImage.setImageResource (getItem (position).getImageId ());
            viewHolder.cityName.setText (getItem (position).getName ());
            convertView.setTag (viewHolder);
        }
        Log.d ("CityAdapter", "getView is called");
        return convertView;
    }
Among them, setTag and getTag are the methods mentioned above to associate the inner class with the View variable we need and obtain the inner class variable.
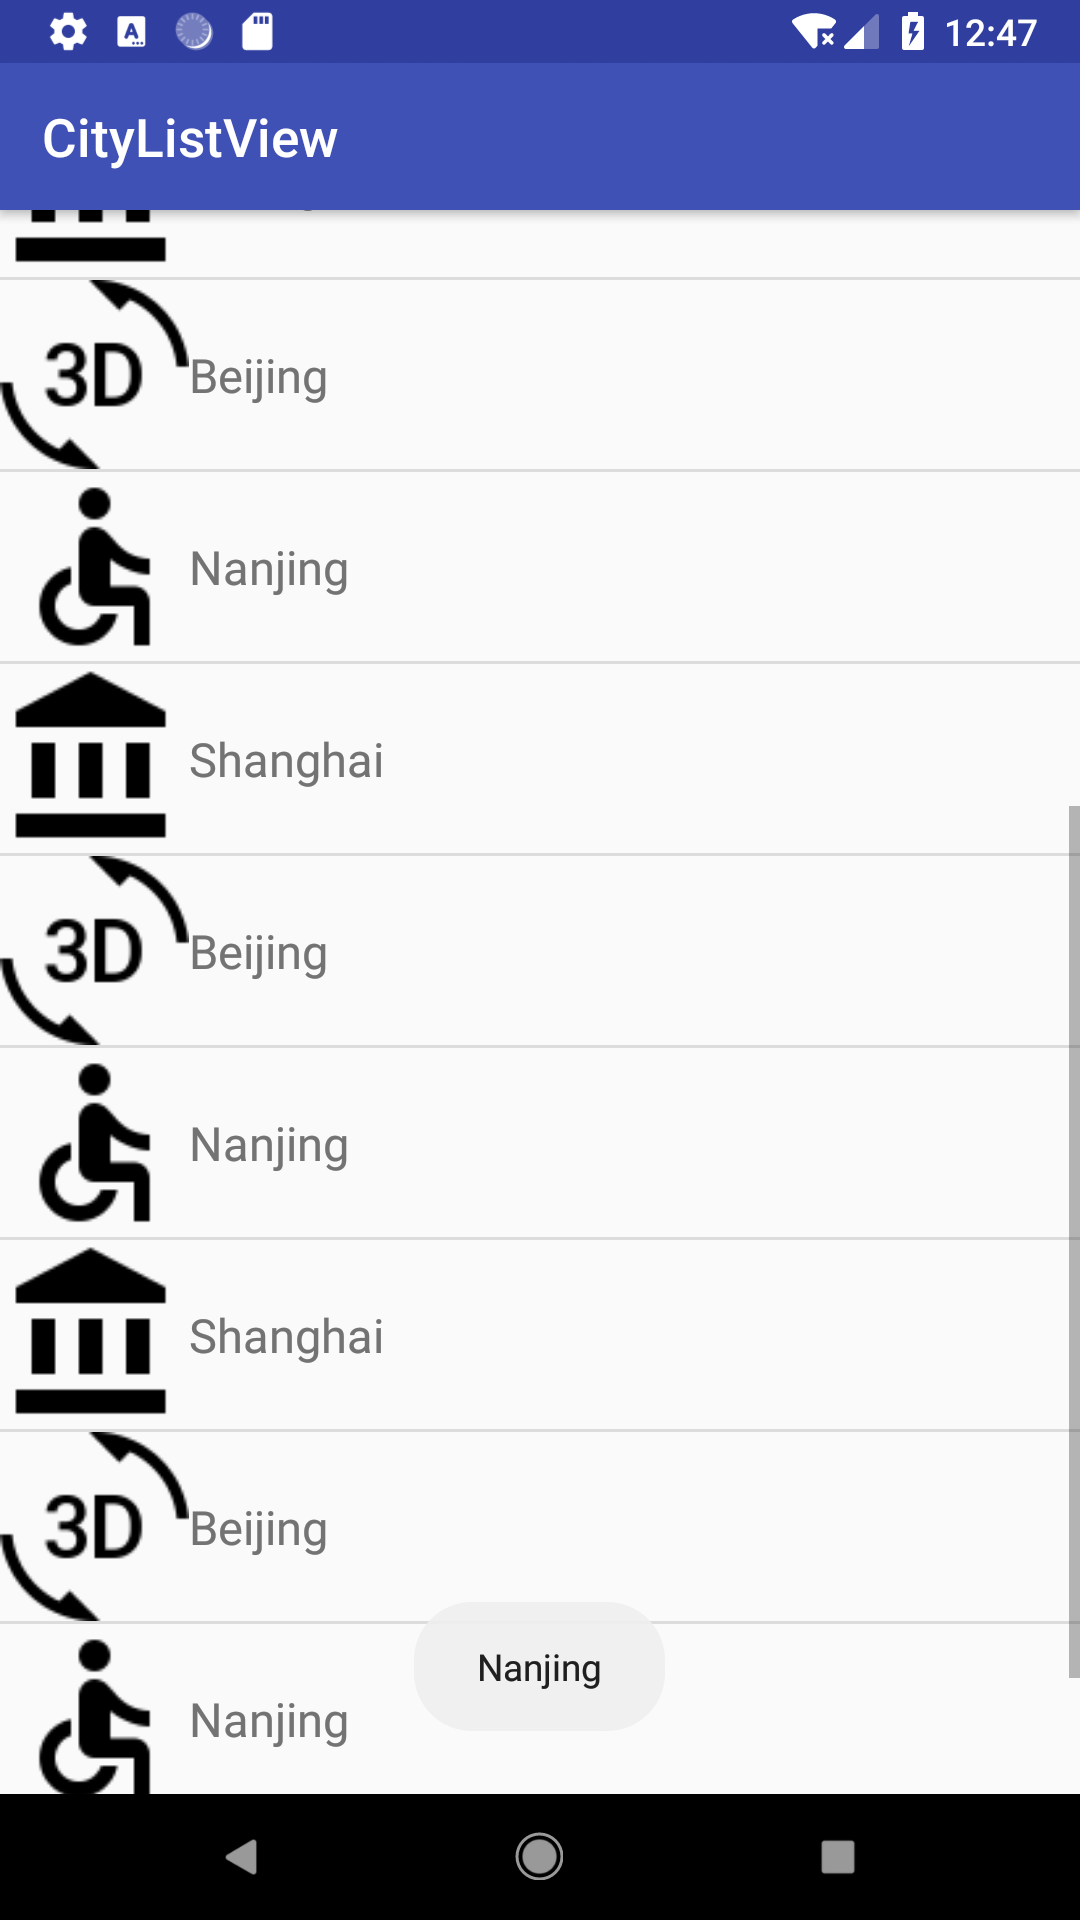
After some optimization of ListView, we should also allow ListView to respond to the most basic click events. ListView implements click response in two ways: 1. View variable in getView of CityAdapter, which is actually a small bar of each item, so it can not call setOnClickListener; 2. Let ListView directly call setOnItemClickListener method;
For the first method, the core code is as follows:
convertView.setOnClickListener (new View.OnClickListener () {
    @Override
    public void onClick(View view) {
    Toast.makeText (getContext (), getItem(position).getName (), Toast.LENGTH_SHORT).show ();
    }
});
This is as simple as the response of a normal control.
For the second, the core code is modified in MainActivity as follows:
myCityListView.setOnItemClickListener(new AdapterView.OnItemClickListener (){
            @Override
            public void onItemClick(AdapterView<?> adapterView, View view, int position, long id){
                City cityTemp = cityList.get (position);
                Toast.makeText (MainActivity.this, cityTemp.getName (), Toast.LENGTH_SHORT).show ();
            }
        });
When you click Item in ListView, the effect is as follows:
Later, add the rebound effect to achieve!