1, Project introduction
The main function of this project is to support dragging the text editing area or commodity picture to the canvas for editing and adjustment according to the uploaded background picture as the canvas, and finally generate the picture and css style for use by other terminals.
This project is based on html/vue/css / native js event binding
- Drag and drop html tags (text tags / picture tags) from outside the canvas into the canvas
- Drag and adjust the position of elements in the canvas
- Drag and drop elements in the canvas to zoom in and out
- Overall scaling of the canvas (elements in the canvas follow and adjust the position)
- Label element content in Canvas / css style editing
- Selection & deletion of elements in canvas
- Generate rendering from HTML canvas based on html2canvas
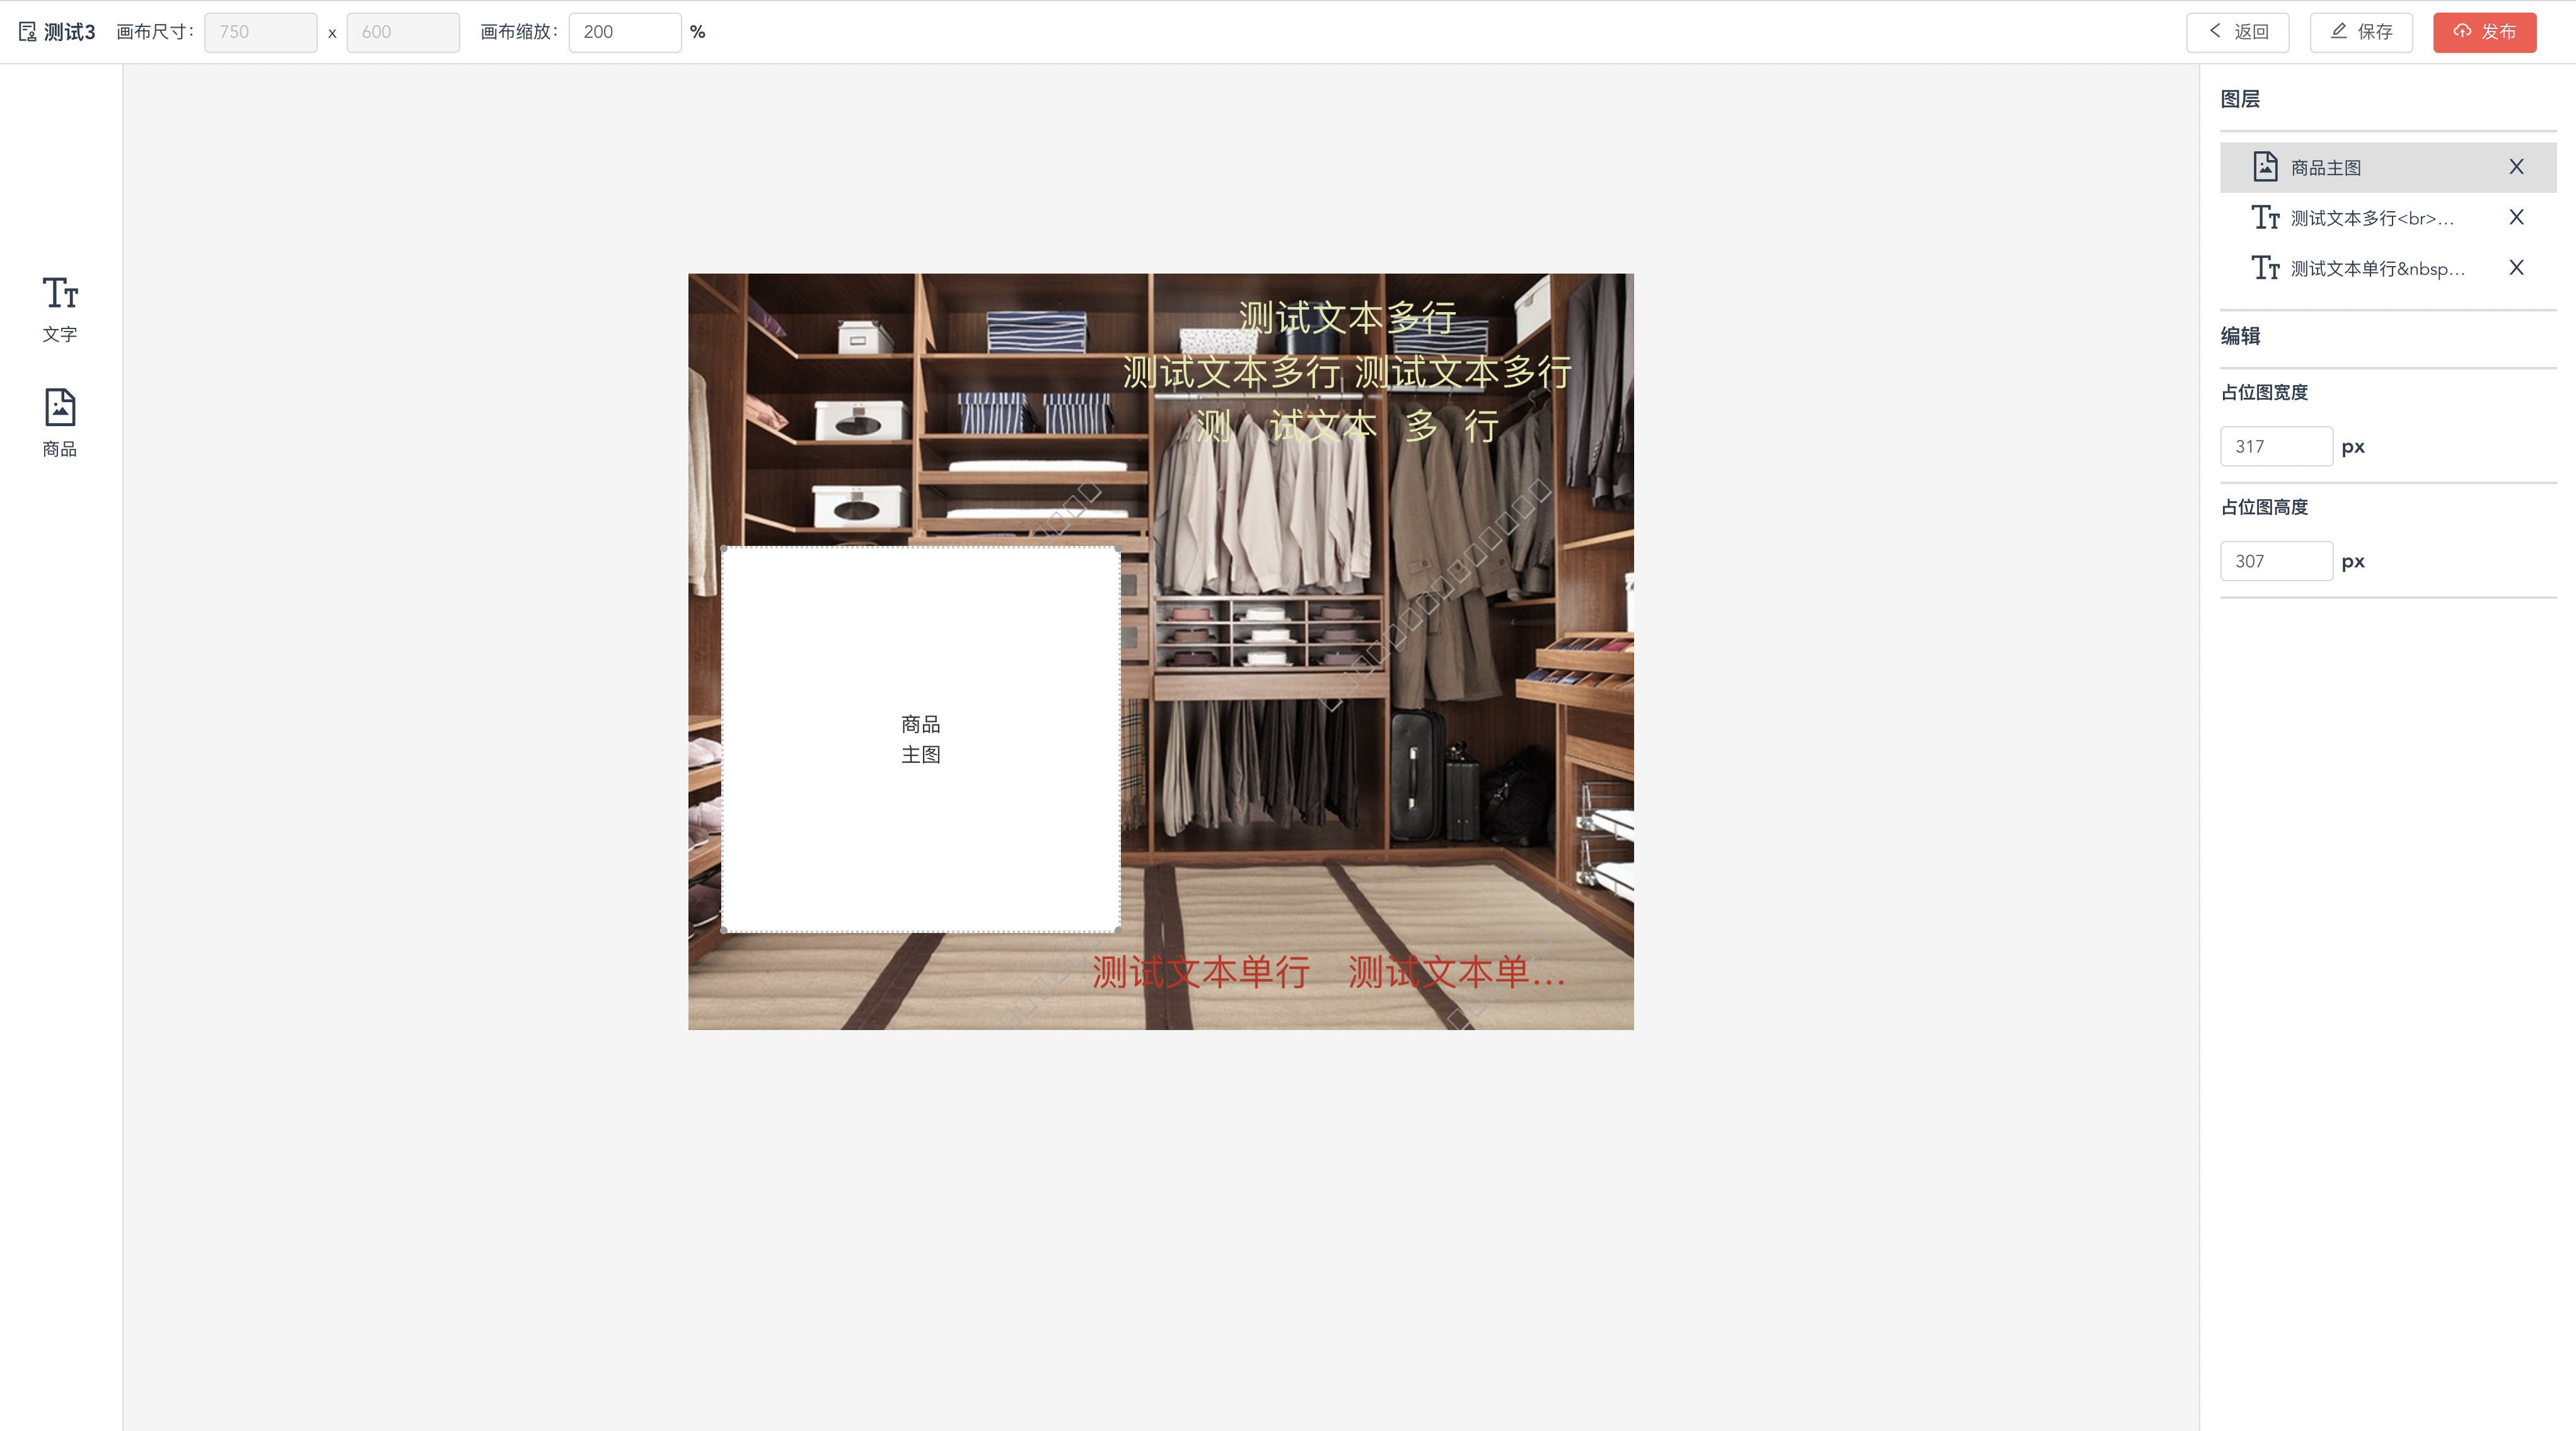
The effect is as follows:
2, Function module
1. Page structure
The realization of the page structure is mainly divided into four parts:
(1) Head area
The head area is used to store relevant function buttons, including the adjustment of canvas size and the overall scaling function of canvas.
(2) Left toolbar
be similar to ps Or some online editing tools. The left toolbar provides users with tag elements that can be dragged. Users can select the required tag elements in the toolbar and drag them to the canvas for editing.
(3) Canvas
For the module actually operated by users, this project adopts a positioning as position: relative; The div of implements the canvas area. The span label of the toolbar dragged into the canvas is fixed in the canvas in the way of absolute positioning. The element can be dragged and dropped in the canvas to change the position and size, and the part beyond the canvas is hidden.
(4) Right edit area
Edit the css of the selected elements in the canvas, and display the thumbnail content of the existing elements in the canvas. The layer module in the editing area can select / delete the existing elements in the canvas and operate to synchronize the canvas display in real time.
Due to the demand of the project, currently only the editing of text labels and a picture space are provided for replacing with picture display. Similarly, if necessary, the space can also be changed into pictures, and the editing area maintains the attributes of pictures.
2. Tag dragging
The toolbar drag function relies on three mouse events.
When the mouse is pressed on a tool in the left toolbar, record the type of the tool currently pressed and the position of the pressing point based on the browser window, and the given mouse pressing attribute keyDownStatus is assigned true, which means that the current mouse is pressed.
      // Text tag mouse down event
      this.$refs.textTag.addEventListener('mousedown', (e) => {
        e.stopPropagation();
        this.selectTagType = 'text'
        this.tagThumbClientX = e.clientX
        this.tagThumbClientY = e.clientY
        this.keyDownStatus = true
        // console.log('3-mosuedown', e);
      }, true);
Similarly, when the mouse is raised, the above state is clear
   // Mouse up event
      this.$refs.container.addEventListener('mouseup', (e) => {
        this.tagAddEvent(e) // Monitor whether the tag option on the left is dragged into the canvas to release the new tag
        this.expanderStatus = null // Release zoom mode
        this.tagMouceDown =false // Release tag movement status
        this.leftStart =  null
        this.rightStart =  null
      }, true);
It should be noted that it is meaningless to listen to the mouse events of the toolbar or tool after the mouse leaves the toolbar, so the strong thing here is the keyup event of the outermost parent container. Release the mouse anywhere on the page to reset the state.
Next, click the tool and keep the mouse down. Drag the mouse to drag the tool onto the canvas:
First of all, an effect should be realized. When the mouse is pressed on the tool, a small thumbnail corresponding to the current dragging tool will be generated according to the above four field attributes. The thumbnail will follow the movement of the mouse all the way. It is known that the mouse is lifted at any position. If it is calculated that the mouse is lifted in the canvas area, a corresponding tool label will be added on the canvas, Otherwise, reset the properties.
The corresponding mouse movement events are realized as follows:
      // Root container mouse movement event
      this.$refs.container.addEventListener('mousemove', (e) => {
        // console.log('container mousemove')
        e.stopPropagation();
        e.preventDefault();
        // Left tag logic
        if (this.keyDownStatus && this.selectTagType) {
          this.tagThumbClientX = e.clientX
          this.tagThumbClientY = e.clientY
        }
        // Element movement logic in canvas
        if (this.tagMouceDown && this.currentOptionTag) {
          // Press the mouse on the corresponding tag and the corresponding tag has been selected
          this.tagMoveEvent(e)
        }

        if(this.expanderStatus) {
          // Zoom on performs a zoom operation
          this.expanderEvent(e)
        }
      }, true);
It also listens to the mouse movement event of the parent container. When the mouse keydownstatus = true (mouse pressed) and the selectTagType have a value (img/text corresponds to the type of tool selected on the left), the thumbnail is synchronized according to the mouse movement. Based on the browser position, the effect is that the mouse drag tool moves on the page,
Finally, when the mouse button is raised, you need to judge whether to release it inside or outside the canvas
If it is outside the canvas, the operation is invalid and can be reset directly.
If the operation is effective in the canvas, you need to add an actual function label at the release position of the mouse on the canvas:
The key to judge whether the mouse landing point is in the canvas is to obtain the distance between the canvas up / down / left / right based on the whole page and the width and height of the current canvas. First, add the code:
    tagAddEvent(e){
      // debugger
      if (this.keyDownStatus && this.selectTagType) {
        // Press the tag type selection item on the left side of the mouse and there is a selected tag type
        this.leftStart =  null
        this.rightStart =  null
        this.keyDownStatus = false
        const clientXB = e.clientX
        const clientYB = e.clientY
        // const domRectB = this.canvasInfo.domRect
        const domRectB =this.$refs.canvas.getBoundingClientRect()
        // Judge whether the mouse release point is on the canvas
        if (clientXB >= domRectB.left
        && clientXB <= (domRectB.left + domRectB.width)
        && clientYB >= domRectB.top && clientYB <= (domRectB.top + 		domRectB.height)) {
          console.log('Fall on the canvas')
          const newtag = {
              tag: this.selectTagType,
              show: this.selectTagType === 'text',
              timeSpan: new Date().getTime() + '',
              content: '', styleAttr: {}
          }
          newtag.styleAttr.zIndex = 1
          // Left on the element canvas = X coordinate of the mouse landing position - the distance from the canvas to the left of the browser
          newtag.styleAttr.left = clientXB - domRectB.left
          // top on the element canvas = Y coordinate of mouse landing position - distance from the canvas to the upper side of the browser
          newtag.styleAttr.top = clientYB - domRectB.top
          // transparency
          newtag.styleAttr.opacity = 100

          // Add elements to canvas
          this.addTag(newtag)
        }
        this.selectTagType = ''
      }
    },
The main logic of this part is:
if (clientXB >= domRectB.left
        && clientXB <= (domRectB.left + domRectB.width)
        && clientYB >= domRectB.top && clientYB <= (domRectB.top + 		domRectB.height))
Through the X and y of the landing point, the matching range of the landing point is in the area between the top, bottom, left and right of the canvas, which means that the landing point is in the canvas, otherwise the landing point is outside, which is an invalid operation.
If the operation is effective, add a corresponding tool tag in the canvas. The json of the tag can be customized as needed. The tag json format defined in the project is given below for reference only:
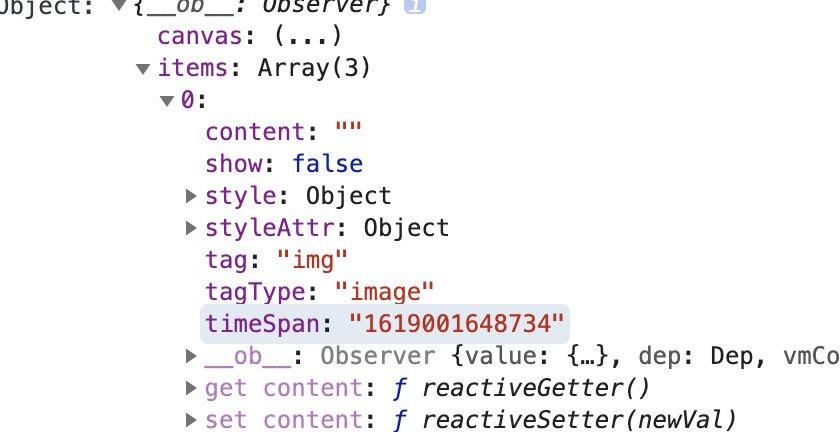
Due to the vue used in the project at that time, the label of the canvas here is directly traversed through the for loop in html. The implementation principle of other mvvm frameworks is similar
3. Canvas element movement
This function is based on the premise that the previous steps are completed, the label is successfully added in the canvas, and the position of the label can be changed arbitrarily by dragging with the mouse:
Operation steps: select the label in the canvas and press the mouse = > drag the label to the appropriate position = > release the mouse
Realization idea:
Because labels are not fixed like toolbar tools, and labels in the canvas are added dynamically, mouse events are placed directly on label elements.
<div class="tag"
   @mousedown.stop="handleTagClick(item)"
   @mouseup.stop="handleTagMouceUp"
   @contextmenu.prevent.stop="handleTagDelete"
   :class="{'tag-text': item.tag === 'text',
   'tag-img': item.tag === 'img',
   'single-row': item.tag === 'text' && item.styleAttr.textType === 'single',
   }"
   v-for="item in resultObject.items"
   :style="{'z-index': item.styleAttr.zIndex,
   'left': `${item.styleAttr.left}px`,
   'top': `${item.styleAttr.top}px`,
   'text-align': item.styleAttr.textAlign || 'left',
   'opacity':item.tag === 'img' ? 1 : item.styleAttr.opacity/100,
   'font-family': item.styleAttr.fontFamily,
   'color': item.styleAttr.color || '#ffffff',
   'font-size': `${item.styleAttr.fontSize}px`,
   'height': `${item.styleAttr.textType === 'multi'? 'auto':item.styleAttr.height+'px'}`,
   'width': `${item.styleAttr.width+'px'}`}"
   :key="item.timeSpan">
Monitor @ mousedown and @ mouseup of the tag receiving the mouse event to determine which tag is to be dragged and whether dragging is allowed. The premise of dragging is the same as that of the tool. The tag can be dragged only when the mouse is pressed.
The event processing on the tag is relatively simple. The main thing is to record the mouse down state and the tag code of the recording operation is as follows:
/**
 * @description Tag click event
*/
handleTagClick(it) {
  console.log('handleTagClick')
  // Clear selected
  this.resultObject.items.forEach((i) => {
    i.show = false
  })
  if (it.tag === 'text') {
    it.show = true
  }
  this.currentOptionTag = it ///Record the elements of the operation, mvvm two-way binding, and directly assign the reference of the object
  this.tagMouceDown = true // Record the status of pressing the mouse on the label
},
The lifting of the tag is mainly to release the tagMouceDown state
handleTagMouceUp() {
  this.tagMouceDown = false
},
The drag and drop of the tag is handled by the event of moving the mouse over the parent container:
  // Root container mouse movement event
  this.$refs.container.addEventListener('mousemove', (e) => {
    // console.log('container mousemove')
    e.stopPropagation();
    e.preventDefault();
    // Left tag logic
    if (this.keyDownStatus && this.selectTagType) {
      this.tagThumbClientX = e.clientX
      this.tagThumbClientY = e.clientY
    }
    // Element movement logic in canvas
    if (this.tagMouceDown && this.currentOptionTag) {
      // Press the mouse on the corresponding tag and the corresponding tag has been selected
      this.tagMoveEvent(e)
    }

    if(this.expanderStatus) {
      // Zoom on performs a zoom operation
      this.expanderEvent(e)
    }
  }, true);
The implementation code of tag dragging is as follows:
  /**
     * @description tag Drag event
    */
    tagMoveEvent(e){
      if(!this.leftStart && !this.rightStart) {
        this.leftStart =  this.currentOptionTag.styleAttr.left
        this.rightStart =  this.currentOptionTag.styleAttr.top
        this.oldClientXB = e.clientX
        this.oldClientYB = e.clientY
      }
      console.log('handleTagMouceMove', this.tagMouceDown)
      const clientXB = e.clientX
      const clientYB = e.clientY
      // const domRectB = this.canvasInfo.domRect

      // Left on the element canvas = X coordinate of the mouse landing position - the distance from the canvas to the left of the browser
      this.currentOptionTag.styleAttr.left = this.leftStart + (clientXB - this.oldClientXB )
      // top on the element canvas = Y coordinate of mouse landing position - distance from the canvas to the upper side of the browser
      this.currentOptionTag.styleAttr.top = this.rightStart + (clientYB - this.oldClientYB )
    },
The implementation logic here is that when the tag starts to move, record the absolute positioning top and left values before the current tag moves, move later, dynamically add the moving distance to the initial value and assign it to the tag, so that it can dynamically change the positioning value based on the canvas to move the tag. Of course, there are other implementation methods, A scheme for dynamically calculating the distance according to the moving difference time will be provided later.
Drag and drop end, mouse up event, clear leftStart and rightStart
The X and Y coordinates of the above mouse events are based on the browser, and the final calculated value is based on the canvas
4. Drag to change element size
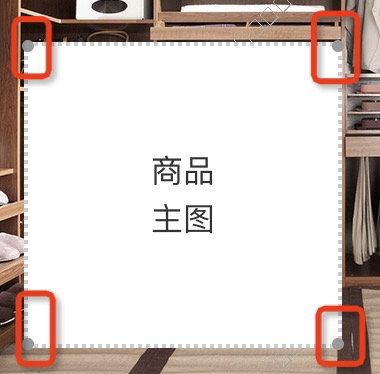
To realize the function, drag the four corners of the label element to increase the size of the label element accordingly.
The main difficulty is to change the size of the label element on the premise that the left and top values of the label element based on the canvas are still accurate. Since the absolute positioning is based on the positioning of the upper left corner of the label element, when dragging the other three corners except the lower right corner, the left and top values of the corresponding label element also need to be changed.
Firstly, for the sake of effect, four dots are fixed by absolute positioning at the four corners of the label element. When the element is selected, the far points of the four corners of the real element are used as the receiving points of the drag event.
The html structure is as follows:
<span class="img-expander" v-if="currentOptionTag.tag === 'img' && item.tag === 'img'">
   <span class="img-expand-top-left" @mousedown.stop="expanderMouceDown"></span>
   <span class="img-expand-top-right" @mousedown.stop="expanderMouceDown"></span>
   <span class="img-expand-bottom-left" @mousedown.stop="expanderMouceDown"></span>
   <span class="img-expand-bottom-right" @mousedown.stop="expanderMouceDown"></span>
 </span>
Each directional point receives a mouse press event. When the mouse is pressed at a certain point, we record the className of the event occurrence point to distinguish which point to drag (the calculation logic of the four points is different), and record the starting coordinate of the press point.
The codes are as follows:
    /**
     * Picture zoom press
    */
    expanderMouceDown(ev){
      console.log(ev)
      this.expanderStatus = ev.target.className
      this.expanderStartX = ev.clientX
      this.expanderStartY = ev.clientY
    },
The mouse movement monitoring is still placed in the monitoring of the root container:
      // Root container mouse movement event
      this.$refs.container.addEventListener('mousemove', (e) => {
        // console.log('container mousemove')
        e.stopPropagation();
        e.preventDefault();
        if(this.expanderStatus) {
          // Zoom on performs a zoom operation
          this.expanderEvent(e)
        }
      }, true);
Drag and drop logic implementation code:
/**
 * @description Drag zoom event
*/
expanderEvent(e){
  const hSpan = e.clientY - this.expanderStartY
  const wSpan = e.clientX - this.expanderStartX
  if(this.expanderStatus === 'img-expand-bottom-right') {
    // Lower right point
    this.currentOptionTag.styleAttr.width = Number(this.currentOptionTag.styleAttr.width) + wSpan
    this.currentOptionTag.styleAttr.height = Number(this.currentOptionTag.styleAttr.height) + hSpan
  }
  if(this.expanderStatus === 'img-expand-top-left') {
    // Upper left point
    this.currentOptionTag.styleAttr.width = Number(this.currentOptionTag.styleAttr.width) - wSpan
    this.currentOptionTag.styleAttr.height = Number(this.currentOptionTag.styleAttr.height) - hSpan
    this.currentOptionTag.styleAttr.left = Number(this.currentOptionTag.styleAttr.left) + wSpan
    this.currentOptionTag.styleAttr.top = Number(this.currentOptionTag.styleAttr.top) + hSpan
  }
  if(this.expanderStatus === 'img-expand-top-right') {
    // Upper left point
    this.currentOptionTag.styleAttr.width = Number(this.currentOptionTag.styleAttr.width) + wSpan
    this.currentOptionTag.styleAttr.height = Number(this.currentOptionTag.styleAttr.height) - hSpan
    // this.currentOptionTag.styleAttr.left -= wSpan
    this.currentOptionTag.styleAttr.top = Number(this.currentOptionTag.styleAttr.top) + hSpan
  }
  if(this.expanderStatus === 'img-expand-bottom-left') {
    // Upper left point
    this.currentOptionTag.styleAttr.width = Number(this.currentOptionTag.styleAttr.width) - wSpan
    this.currentOptionTag.styleAttr.height = Number(this.currentOptionTag.styleAttr.height) + hSpan
    this.currentOptionTag.styleAttr.left = Number(this.currentOptionTag.styleAttr.left) + wSpan
    // this.currentOptionTag.styleAttr.top += hSpan
  }
  this.expanderStartY = e.clientY
  this.expanderStartX = e.clientX
},
The scheme of dynamically calculating the distance according to the moving difference time mentioned in step 3 is used here
Pass before entering the method
  const hSpan = e.clientY - this.expanderStartY
  const wSpan = e.clientX - this.expanderStartX
Calculate the position offset of this time relative to the last time, and continuously accumulate the offset to the changed value (width / height / left/top of operation label).
Refer to the above code for the calculation logic of each point.
At the end of this method, the latest clientX and clientY coordinates need to be updated to the latest state. The calculation of the next mouse movement difference will be based on the latest coordinates.
5. Simulate transparent text input box
Since the text that needs to be transmitted to the front end in the end of text editing needs to be rich text content with html elements such as line breaks and spaces, and html native input boxes such as input and textarea are not supported, a new attribute of html: contenteditable="true" simulated input box is adopted here, with the following structure:
<span  v-if="item.show"
  rows="1"
  class="textarea"
  :style="{
    'text-align': item.styleAttr.textAlign || 'left',
    'color': item.styleAttr.color || '#ffffff',
  }"
  @keyup.enter="texteraKeyOption"
  @blur="updateTagContentEdit"
  @focus="focusTagContent"
  :contenteditable="true" >
  </span>
css
.textarea{
  padding: 0;
  margin: 0;
  height: 100%;
  display: inherit;
  border: none;
  outline: none;
  min-height: 12px;
  // min-width: 16px;
  width: 100%;
  outline: 1px dotted #333333;
  // background: rgba(255,255,255,0.5);
  text-align: left;
  color: #333333;
  // background: transparent;
  display: inline-block;
  word-break: break-all;
}
The final effect is a transparent text input area with dotted line border. Since it is necessary to realize automatic line feed when the input reaches the maximum width, there is a problem when the input content is English or numbers, so word break: break all needs to be added here;
The binding data of the analog input box is different from that of the original input box. The two-way binding of v-model fails here. Therefore, the focus loss event @ blur is adopted here. When the input box loses focus, the edited text content is obtained through the @ blur event. The method is as follows:
/**
 * contenteditable Analog input
*/
updateTagContentEdit(e){
  if (this.currentOptionTag){
    console.log('updateTagContentEdit',e)
    this.currentOptionTag.content = e.target.innerHTML
    console.log('updateTagContentEdit2',this.currentOptionTag)
    this.currentOptionTag.show = false //Turns off the current label element input mode
    // this.currentOptionTag={}
  }
},
The final text format is as follows:
"Test text multiline<br>Test text multiline Test text multiline<br>measure Trial text many that 's ok<br>"
You can see that the final text will carry, for example
Such html elements will regenerate a corresponding element every time you hit the space or enter key, so that the front end will treat the effect of restoring the input as a rich text.
When you select the text tag again to enter the editing mode, you need to rebind the text to the: contentditable = "true" element
The @ focus event is used here accordingly.
focusTagContent(e){
    e.target.innerHTML = this.currentOptionTag.content
  },
In addition, it is suggested that all scenes that need to set the border used in the project should be replaced with outline, because the width of the border will occupy the width of the element, resulting in deviation in the calculation of the positioning value.
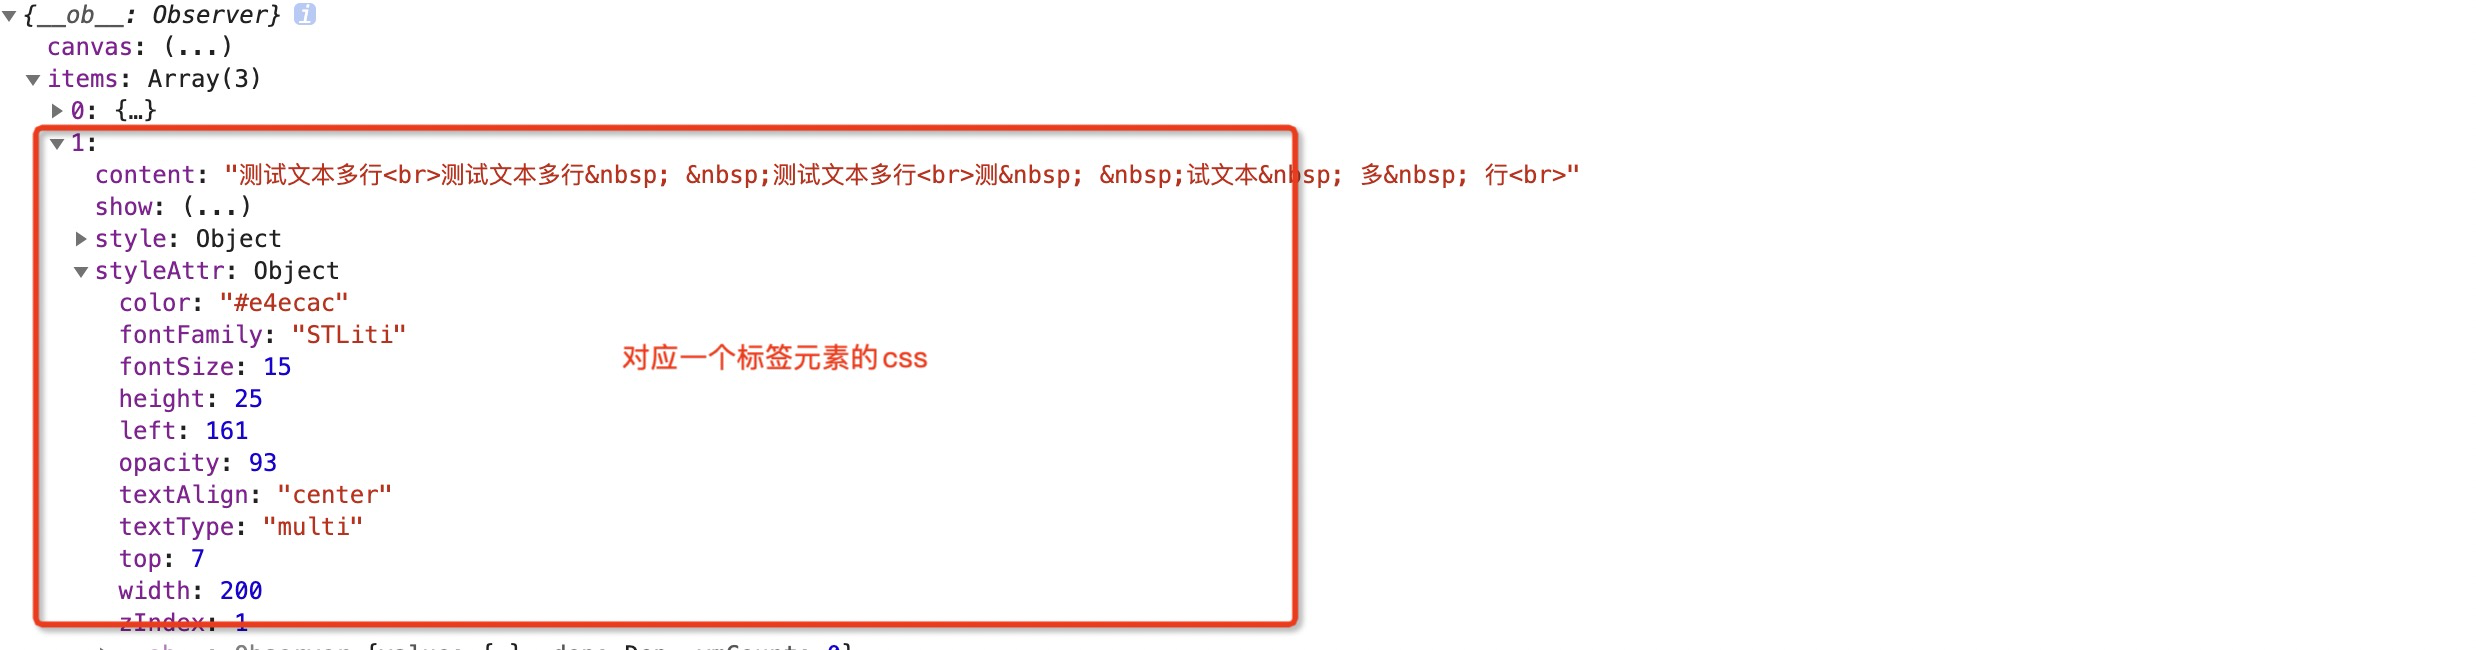
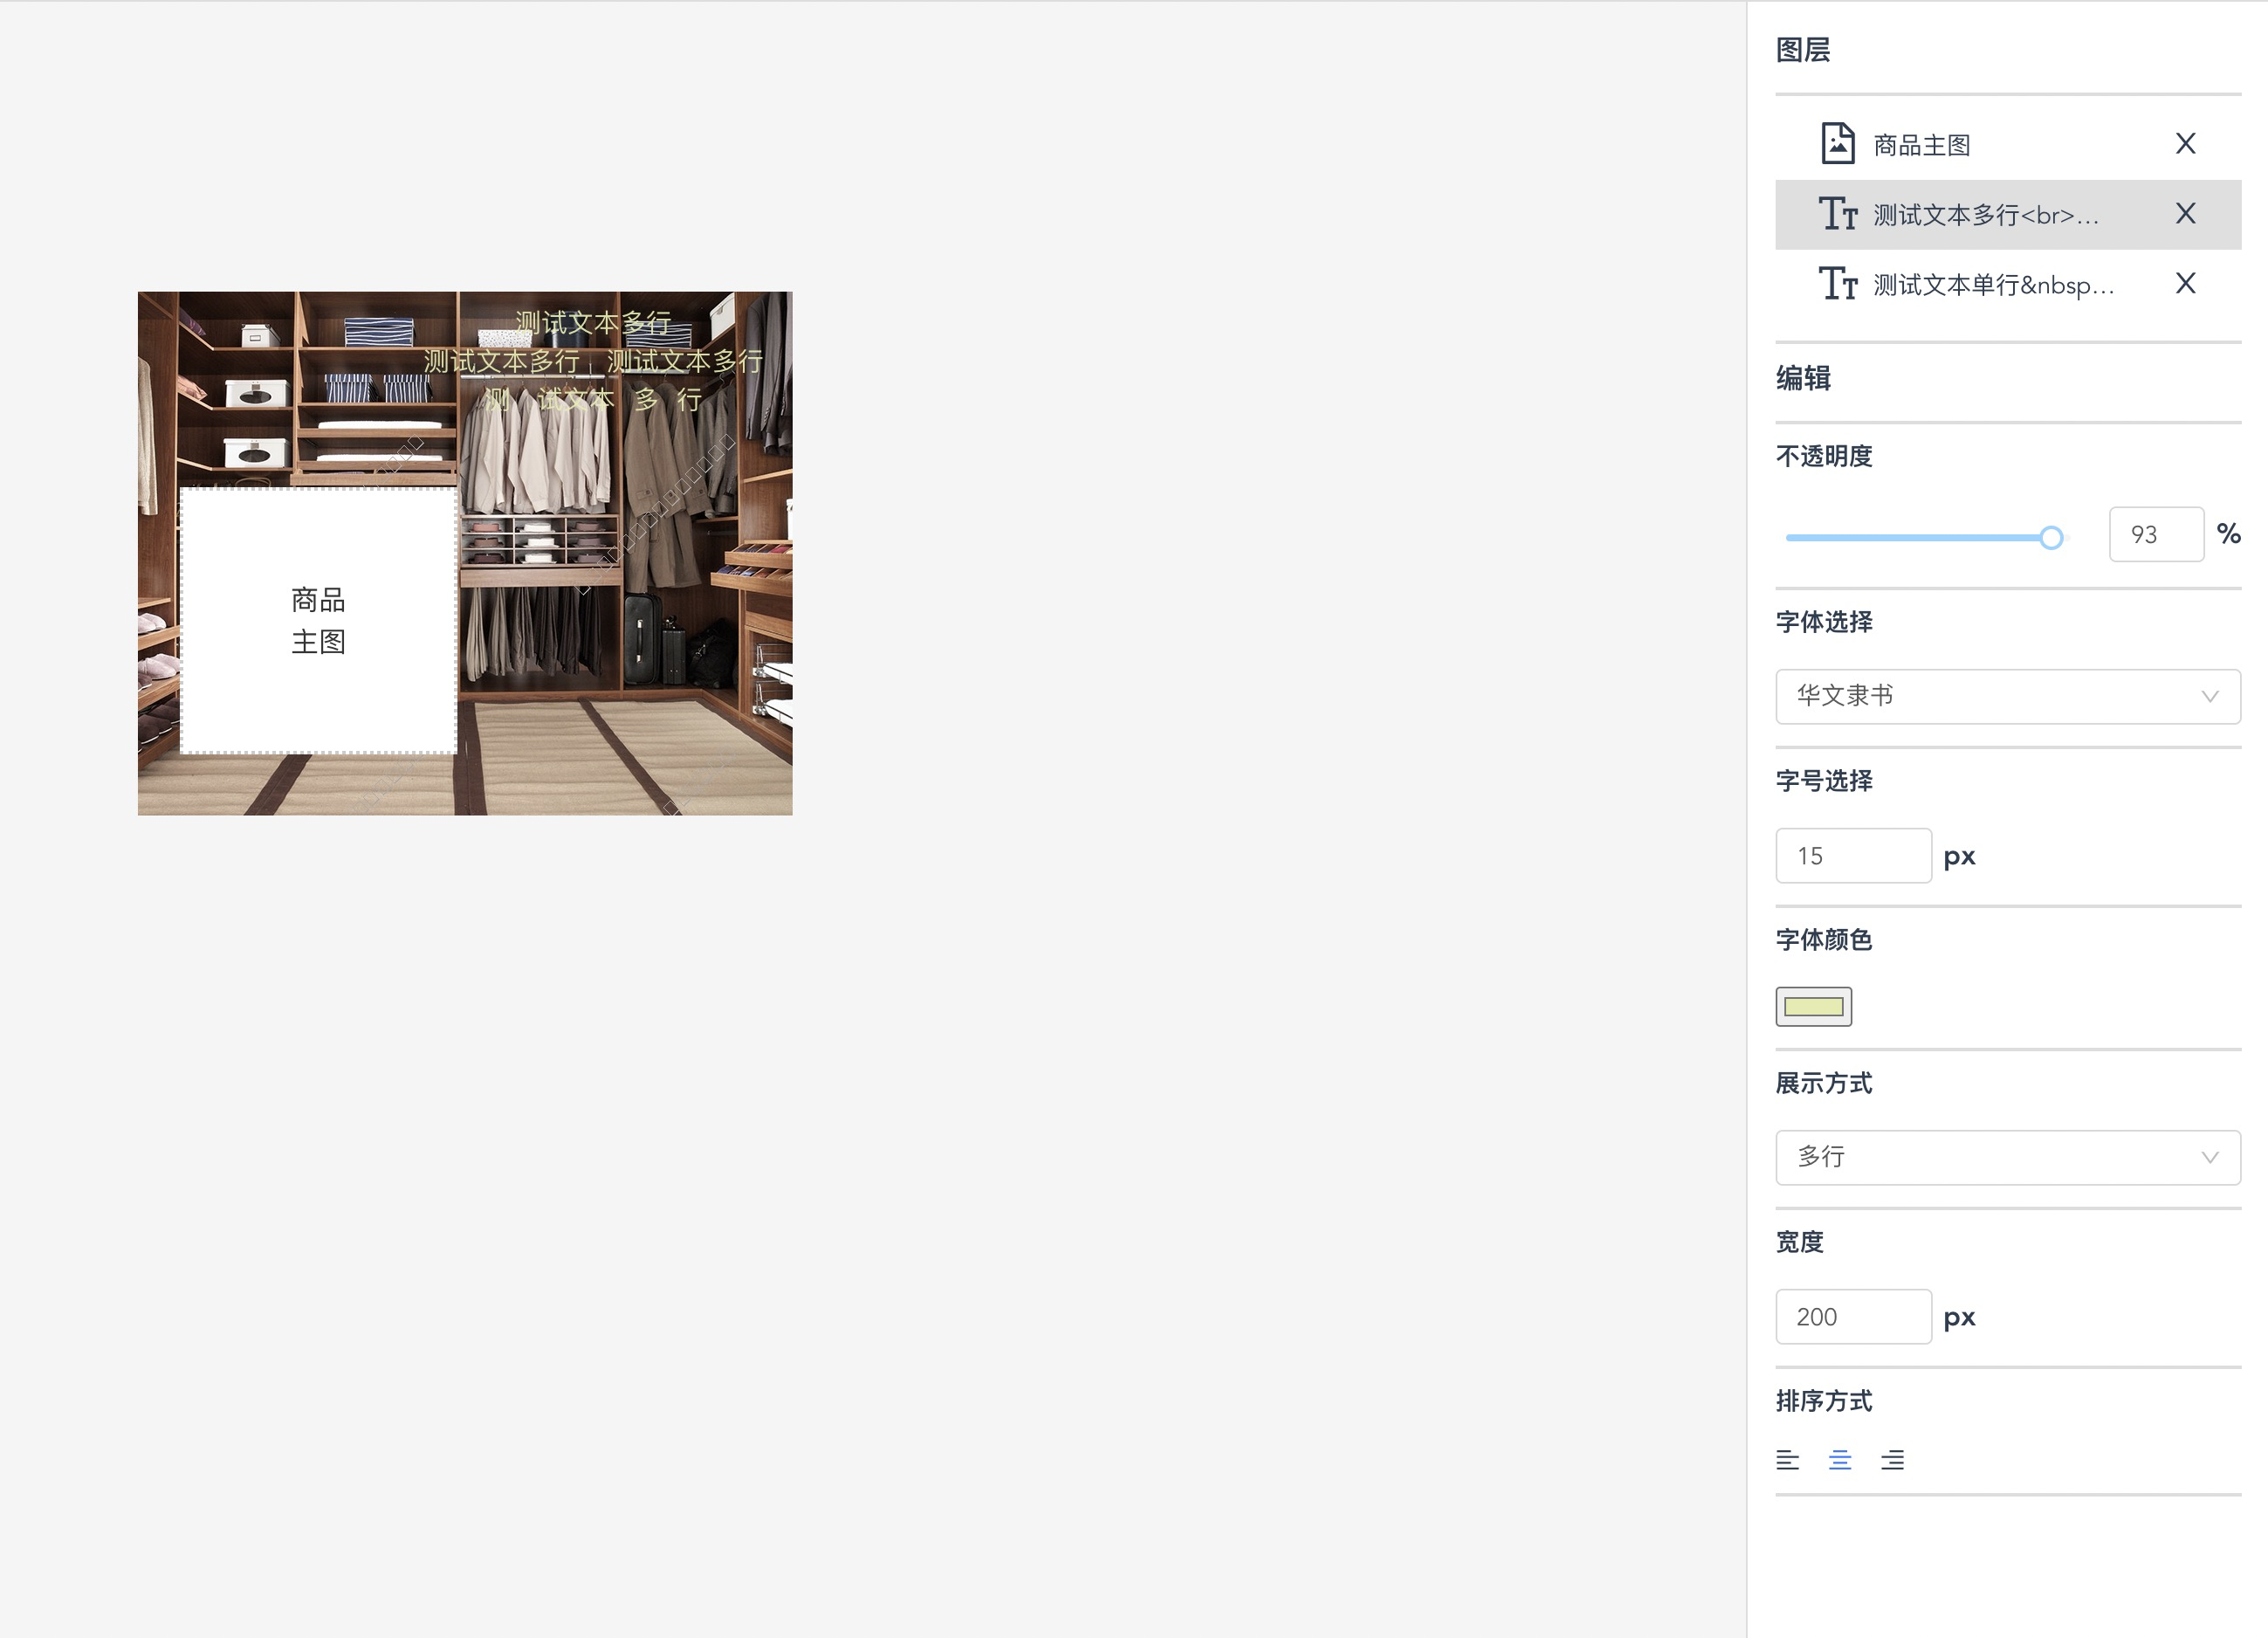
6. Text element css online editing
The implementation of text css editing mainly depends on the two-way data binding function of mvvm framework. Here, we integrate the css style of each tag into the json object. We bind the css field corresponding to the json object to the visual text editing module. When changing the style in the right editing window, we synchronize it to the element style in real time to realize text editing.
json format is as follows:
Implementation code:
html part example:
<div class="tag"
  @mousedown.stop="handleTagClick(item)"
  @mouseup.stop="handleTagMouceUp"
  @contextmenu.prevent.stop="handleTagDelete"
  :class="{'tag-text': item.tag === 'text',
  'tag-img': item.tag === 'img',
  'single-row': item.tag === 'text' && item.styleAttr.textType === 'single',
  }"
  v-for="item in resultObject.items"
  :style="{'z-index': item.styleAttr.zIndex,
  'left': `${item.styleAttr.left}px`,
  'top': `${item.styleAttr.top}px`,
  'text-align': item.styleAttr.textAlign || 'left',
  'opacity':item.tag === 'img' ? 1 : item.styleAttr.opacity/100,
  'font-family': item.styleAttr.fontFamily,
  'color': item.styleAttr.color || '#ffffff',
  'font-size': `${item.styleAttr.fontSize}px`,
  'height': `${item.styleAttr.textType === 'multi'? 'auto':item.styleAttr.height+'px'}`,
  'width': `${item.styleAttr.width+'px'}`}"
  :key="item.timeSpan">
Example of editing area:
<template v-if="currentOptionTag.tag === 'text'">
  <div class="title">edit</div>
  <div class="divider"></div>
  <div class="form-item">
      <div class="form-item-top">Opacity</div>
      <div class="form-item-input">
          <a-slider v-model="currentOptionTag.styleAttr.opacity" :min="0" :max="100" :step="1" />
            <a-input-number
                v-model="currentOptionTag.styleAttr.opacity"
                :min="0"
                :max="100"
                :step="1"
                style="marginLeft: 16px; width: 55px;"/><span class="px-right">%</span>
      </div>
      <div class="divider"></div>
  </div>
   <div class="form-item">
      <div class="form-item-top">Font selection</div>
      <div class="form-item-input">
        <a-select placeholder="Please select" v-model="currentOptionTag.styleAttr.fontFamily" style="width:100%;" @change="handleFontChange">
            <a-select-option v-for="font in fontList" :key="font.value">
            {{ font.label }}
            </a-select-option>
        </a-select>
      </div>
      <div class="divider"></div>
  </div>
  <div class="form-item">
      <div class="form-item-top">Font size selection</div>
      <div class="form-item-input">
        <!-- <a-select placeholder="Please select" v-model="currentOptionTag.styleAttr.fontSize" style="width:100%;" @change="handleFontSizeChange">
            <a-select-option v-for="font in fontSizeList" :key="font">
            {{ font }}
            </a-select-option>
        </a-select> -->
       <!-- <a-input type="number" @change="changeFrontSize" v-model="currentOptionTag.styleAttr.fontSize"/><span class="px-right"> px</span> -->
       <a-input-number @change="changeFrontSize" v-model="currentOptionTag.styleAttr.fontSize" :min="0"/><span class="px-right"> px</span>
      </div>
      <div class="divider"></div>
  </div>
  <div class="form-item">
      <div class="form-item-top">Font color</div>
      <div class="form-item-input">

        <input type="color" v-model="currentOptionTag.styleAttr.color" id="color" @change="changeColor">
      </div>
      <div class="divider"></div>
  </div>
  <div class="form-item">
      <div class="form-item-top">Display mode</div>
      <div class="form-item-input">
        <a-select placeholder="Please select" v-model="currentOptionTag.styleAttr.textType" style="width:100%;" @change="handleTextTypeChange">
            <a-select-option v-for="text in textConfig" :key="text.value">
            {{ text.label }}
            </a-select-option>
        </a-select>
      </div>
      <div class="divider"></div>
  </div>
  <div class="form-item" >
      <div class="form-item-top">width</div>
      <div class="form-item-input">
          <!-- <a-input type="number" v-model="currentOptionTag.styleAttr.width"/><span class="px-right"> px</span> -->
       <a-input-number v-model="currentOptionTag.styleAttr.width" :min="0"/><span class="px-right"> px</span>
      </div>
      <div class="divider"></div>
  </div>
  <div class="form-item" v-if="currentOptionTag.styleAttr.textType === 'single'">
      <div class="form-item-top">height</div>
      <div class="form-item-input">
       <!-- <a-input type="number" v-model="currentOptionTag.styleAttr.height"/><span class="px-right"> px</span> -->
       <a-input-number v-model="currentOptionTag.styleAttr.height" :min="0"/><span class="px-right"> px</span>
      </div>
      <div class="divider"></div>
  </div>
    <div class="form-item">
      <div class="form-item-top">sort order</div>
      <div class="form-item-input">
        <a-icon class="px" :class="{'align-active': this.currentOptionTag.styleAttr.textAlign === 'left'}" type="align-left" @click="align('left')"/>
        <a-icon class="px" :class="{'align-active': this.currentOptionTag.styleAttr.textAlign === 'center'}" type="align-center" @click="align('center')"/>
        <a-icon class="px" :class="{'align-active': this.currentOptionTag.styleAttr.textAlign === 'right'}" type="align-right" @click="align('right')"/>
      </div>
      <div class="divider"></div>
  </div>
</template>
Final effect:
7. Keep the overall effect and zoom the canvas
Because our canvas is not really a picture, but the html structure of the absolute positioning layout, when we zoom, the internal labels cannot follow the scale like a picture, so additional processing is required here.
<a-input-number @change="changeZoom" v-model="canvasZoom" :step="15" :min="75" :max="200"/><span class="prefix"> %</span>
Here, we use an input number to receive the current zoom level. Since the project is ultimately used by the mobile terminal, here we define the corresponding width of zoom level 100 as 375, and the minimum allowable zoom is 75%. Of course, this value can be adjusted according to the use scenario, but it is not recommended to allow zoom level 0. The reason will be explained later.
Here, the @ change event of the digital input box is monitored to synchronize the zoom level of the canvas in real time when the zoom level changes.
The implementation logic is as follows:
changeZoom() {
   // debugger
   console.log(this.canvasZoom)
   if(this.canvasZoom<75) this.canvasZoom = 75
   let radio = (this.canvasZoom)/100
   // 1. Zoom canvas
  this.canvasInfo.canvasWidth = Math.round(375*radio)||1
  this.canvasInfo.canvasHeight = Math.round((this.canvasInfo.canvasHeight/this.oldZoom)*radio)||1
  console.log(" this.canvasInfo.canvasWidth:", this.canvasInfo.canvasWidth)
  console.log(" this.canvasInfo.canvasHeight:", this.canvasInfo.canvasHeight)

   // // 2.  Zoom tag
   // this.resultObject = this.trans(this.resultObject)
   this.resultObject.items.forEach(i => {
    if(i.styleAttr.height) i.styleAttr.height = Math.round((i.styleAttr.height/this.oldZoom)*radio)
    if(i.styleAttr.left) i.styleAttr.left = Math.round((i.styleAttr.left/this.oldZoom)*radio)
    if(i.styleAttr.top) i.styleAttr.top = Math.round((i.styleAttr.top/this.oldZoom)*radio)
    if(i.styleAttr.width) i.styleAttr.width = Math.round((i.styleAttr.width/this.oldZoom)*radio)
    if(i.styleAttr.fontSize) i.styleAttr.fontSize = Math.round((i.styleAttr.fontSize/this.oldZoom)*radio)

   })
   this.oldZoom = radio
 },
if(this.canvasZoom<75) this. Canvaszoom = 75 is used to limit the zoom level. In fact, it is mainly to avoid the occurrence of zoom level 0.
We change the zoom level to percentage by let radio = (this. Canvas zoom) / 100.
The canvas is scaled by math Round (375 * radio) 𞓜 1 obtains the actual display width by multiplying the base width 375 by the zoom ratio.
this.oldZoom is to record the zoom ratio edited last time when you leave the page and enter again. Here, divide the current value by this Oldzoom to obtain the actual corresponding value based on the width 375 edited last time (which can be understood as the reference value of the equivalent corresponding value of height / element width when the canvas width is 375). After obtaining the reference values based on the width 375 multiplied by the current zoom scale, the actual value that should be displayed at the current front end is the actual value.
For example, in the code, not only the width and height of the canvas are calculated, but also the width and height / positioning value / font size of all label elements are processed in the same way while zooming, so as to ensure that the zooming can be realized like a whole picture as much as possible.
There is another point to note. Since the scaling scale is decimal, the calculated actual values may be the float value of uncertain digits after the decimal point. If conditions permit, the accuracy calculation can be retained, otherwise math is recommended The round error is relatively small, while math Floor and math The accuracy of ceil is relatively poor.
8. Generate renderings
After the final editing, an effect picture needs to be generated for display. The html2canvas component used in the project can convert part of the HTML structure into a whole picture.
It can be imported by file
npm installation is recommended here. The installation instructions are as follows:
npm install --save html2canvas
Import in the page after installation
import html2canvas from 'html2canvas'
After the introduction, images can be generated directly through his html2canvas method.
The usage is as follows:
_html2canvas() {
   return new Promise((resolve, reject) => {
     // debugger
     // Create a new canvas
     const _canvas = this.$refs['canvas']
     // This is used to solve the problem that the screenshot is not clear. Enlarge the generated canvas and then fill it into the original container
     const width = _canvas.offsetWidth
     const height = _canvas.offsetHeight
     const canvas2 = document.createElement('canvas')
     const ctx = canvas2.getContext('2d')
     const ratio = this._getPixelRatio(ctx)
     // const scale = ratio
     const scale = 1

     canvas2.width = width * scale
     canvas2.height = height * scale
     ctx.scale(scale, scale)
     const opts = {
       scale: 1,
       canvas: canvas2,
       // logging: true, / / log switch to facilitate viewing the internal execution process of html2canvas
       width,
       height,
       allowTaint: false,
       useCORS: true, // [important] enable cross domain configuration
       scrollY: 0,
       scrollX: 0,
     }
     html2canvas(_canvas, opts).then(async canvas => {
       const context = canvas.getContext('2d')
       // [important] turn off anti aliasing
       context.mozImageSmoothingEnabled = false
       context.webkitImageSmoothingEnabled = false
       context.msImageSmoothingEnabled = false
       context.imageSmoothingEnabled = false

       const screenUrl = canvas.toDataURL('image/png')
       let blob = this.dataURLtoBlob(screenUrl);
         // blob to file
       let file = new window.File([blob], 'Template effect.png', { type: 'image/png' })
       // console.log('_html2canvas file', file)
       // console.log('_html2canvas blob', blob)
       // console.log('_html2canvas base64', screenUrl)
       resolve(file)
     })
   })
 },
const _canvas = this.$refs['canvas'] specifies the template structure to be converted into a picture, and finally returns a canvas object, which can be used directly or through canvas Todataurl ('image / PNG ') is transferred to base64 encoded picture data.
Of course, because the image data is relatively large, if there is a need to store it in the database, it is recommended not to store base64 data directly. Here, we can convert it into a file object, so that it can be uploaded as a native way. We can call the back-end interface through post to save it into the image format and put it on the image server. Finally save a picture address.
html2canvas will encounter the problem of cross domain images when generating images. When the image server used does not support cross domain images, the generated final images will not contain images that do not support cross domain in html structure.
In case of this problem, if the back end is convenient to handle, it can be supported on the server. If it is inconvenient, such as the third-party image server address, here is a front-end solution.
The logic is that since cross domain images are not supported, they will be converted to local images.
Here, the remote image is directly converted into base64 data and bound into html structure.
The implementation method is as follows:
    /**
     * @description Picture object to 64
    */
   getBase64Image(img) {
    //  debugger
     let bgcanvas = document.createElement("canvas");
     bgcanvas.width = img.width;
     bgcanvas.height = img.height;
     let ctx = bgcanvas.getContext("2d");
     ctx.drawImage(img, 0, 0, img.width, img.height);
     let ext = img.src.substring(img.src.lastIndexOf(".")+1).toLowerCase();
     let dataURL = bgcanvas.toDataURL("image/"+ext);
     return dataURL;
   },
   /**
     * @description Picture address to base64
    */
   initBgImg(url){
     // backgroundImg
     var image = new Image();
      image.src = url + '?v='+ new Date().getTime();
      image.crossOrigin= 'anonymous'
      image.onload = () =>{
        this.backgroundImg = this.getBase64Image(image);
        // console.log('initBgImg',this.backgroundImg);
      }
   },
3, Summary
This kind of scenario project is involved for the first time. The development time is tight, and it is also done in a hurry. There may be many better ways to deal with it. If you find something that can be optimized, you are welcome to let us know. Because there are many contents, there are many places
It may not be too detailed. If you don't understand anything, you are welcome to contact the comment area or private letter.
It's not easy to sort out. Please indicate the source for reprint. thanks