Single Sign On (SSO) is one of the most popular solutions for business integration.
SSO is defined as an application system in which users can access all trusted applications with only one login.
Implementing single sign-on
Before the beginning
If you don't know about user pooling, single sign-on, and authentication authorization, read it first Basic concepts.
Preparatory knowledge
- Basic knowledge of HTML and CSS
- Intermediate JavaScript Skills
Tools required
- Your favorite text editor
- Web servers that can run locally (such as NPM install http-server-g)
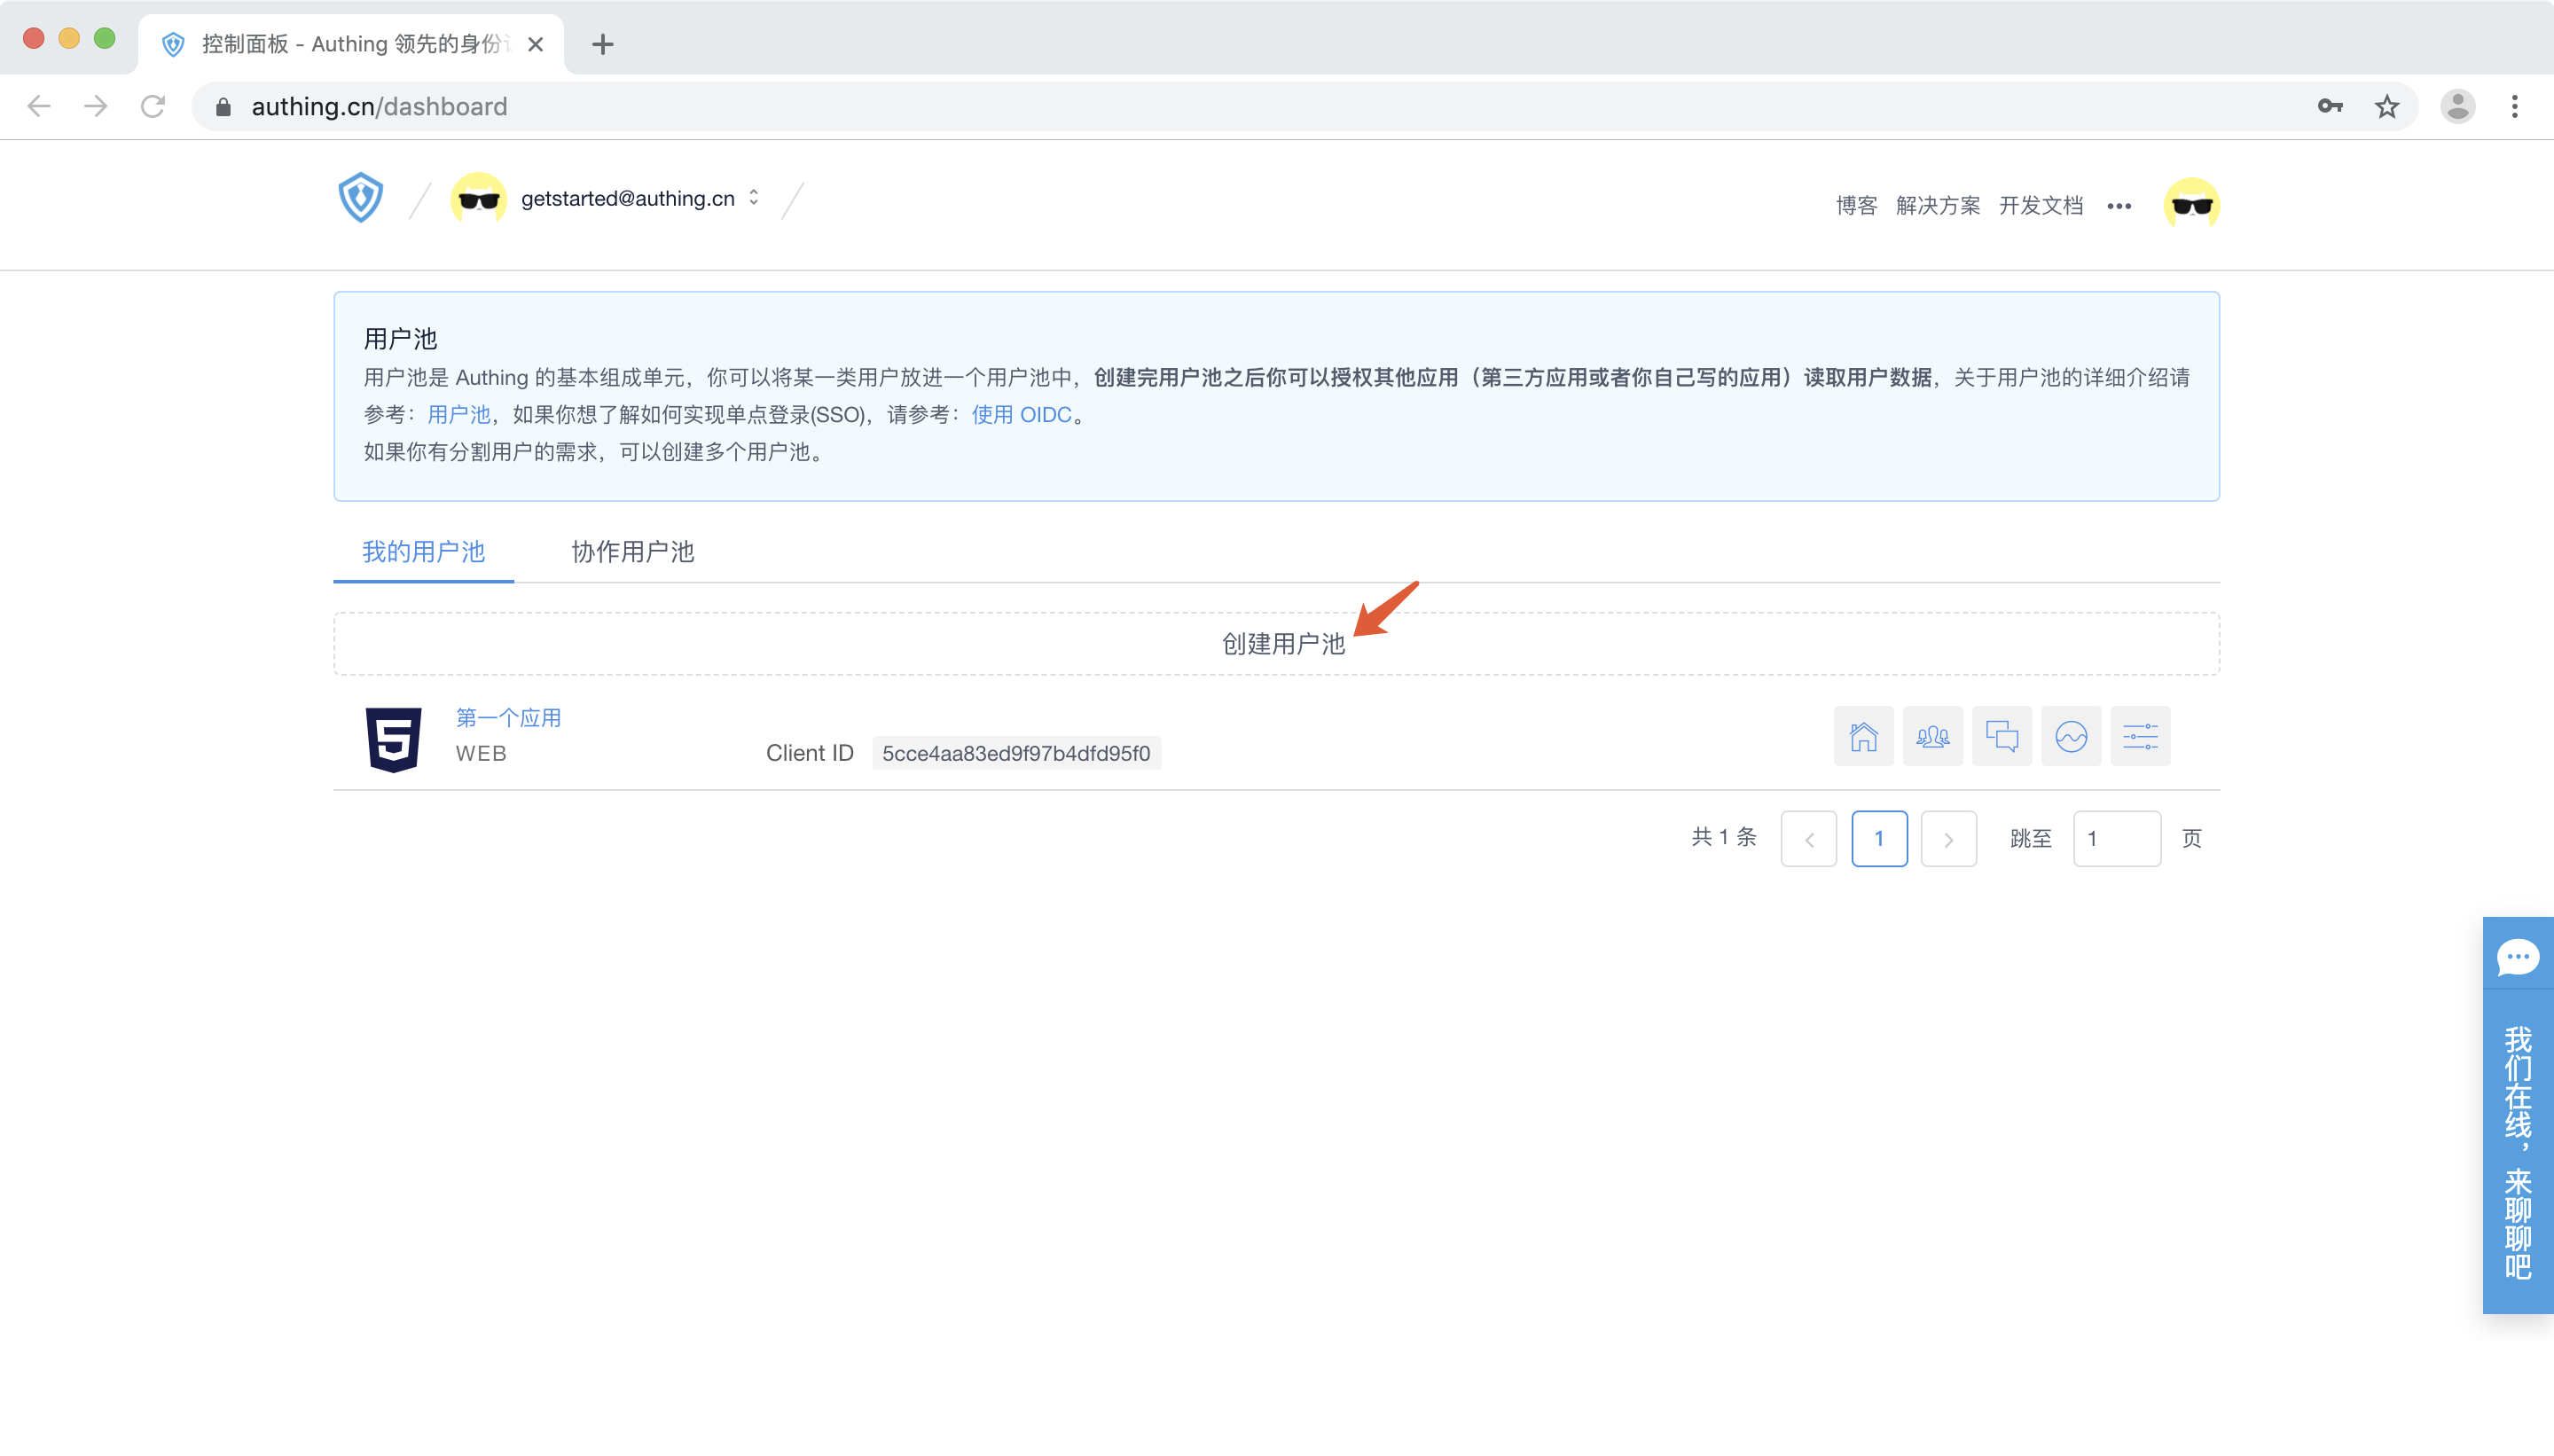
Register an Authing account
If you don't have an account, please Click here to register for Authing account After registration, please rails c And create a user pool.
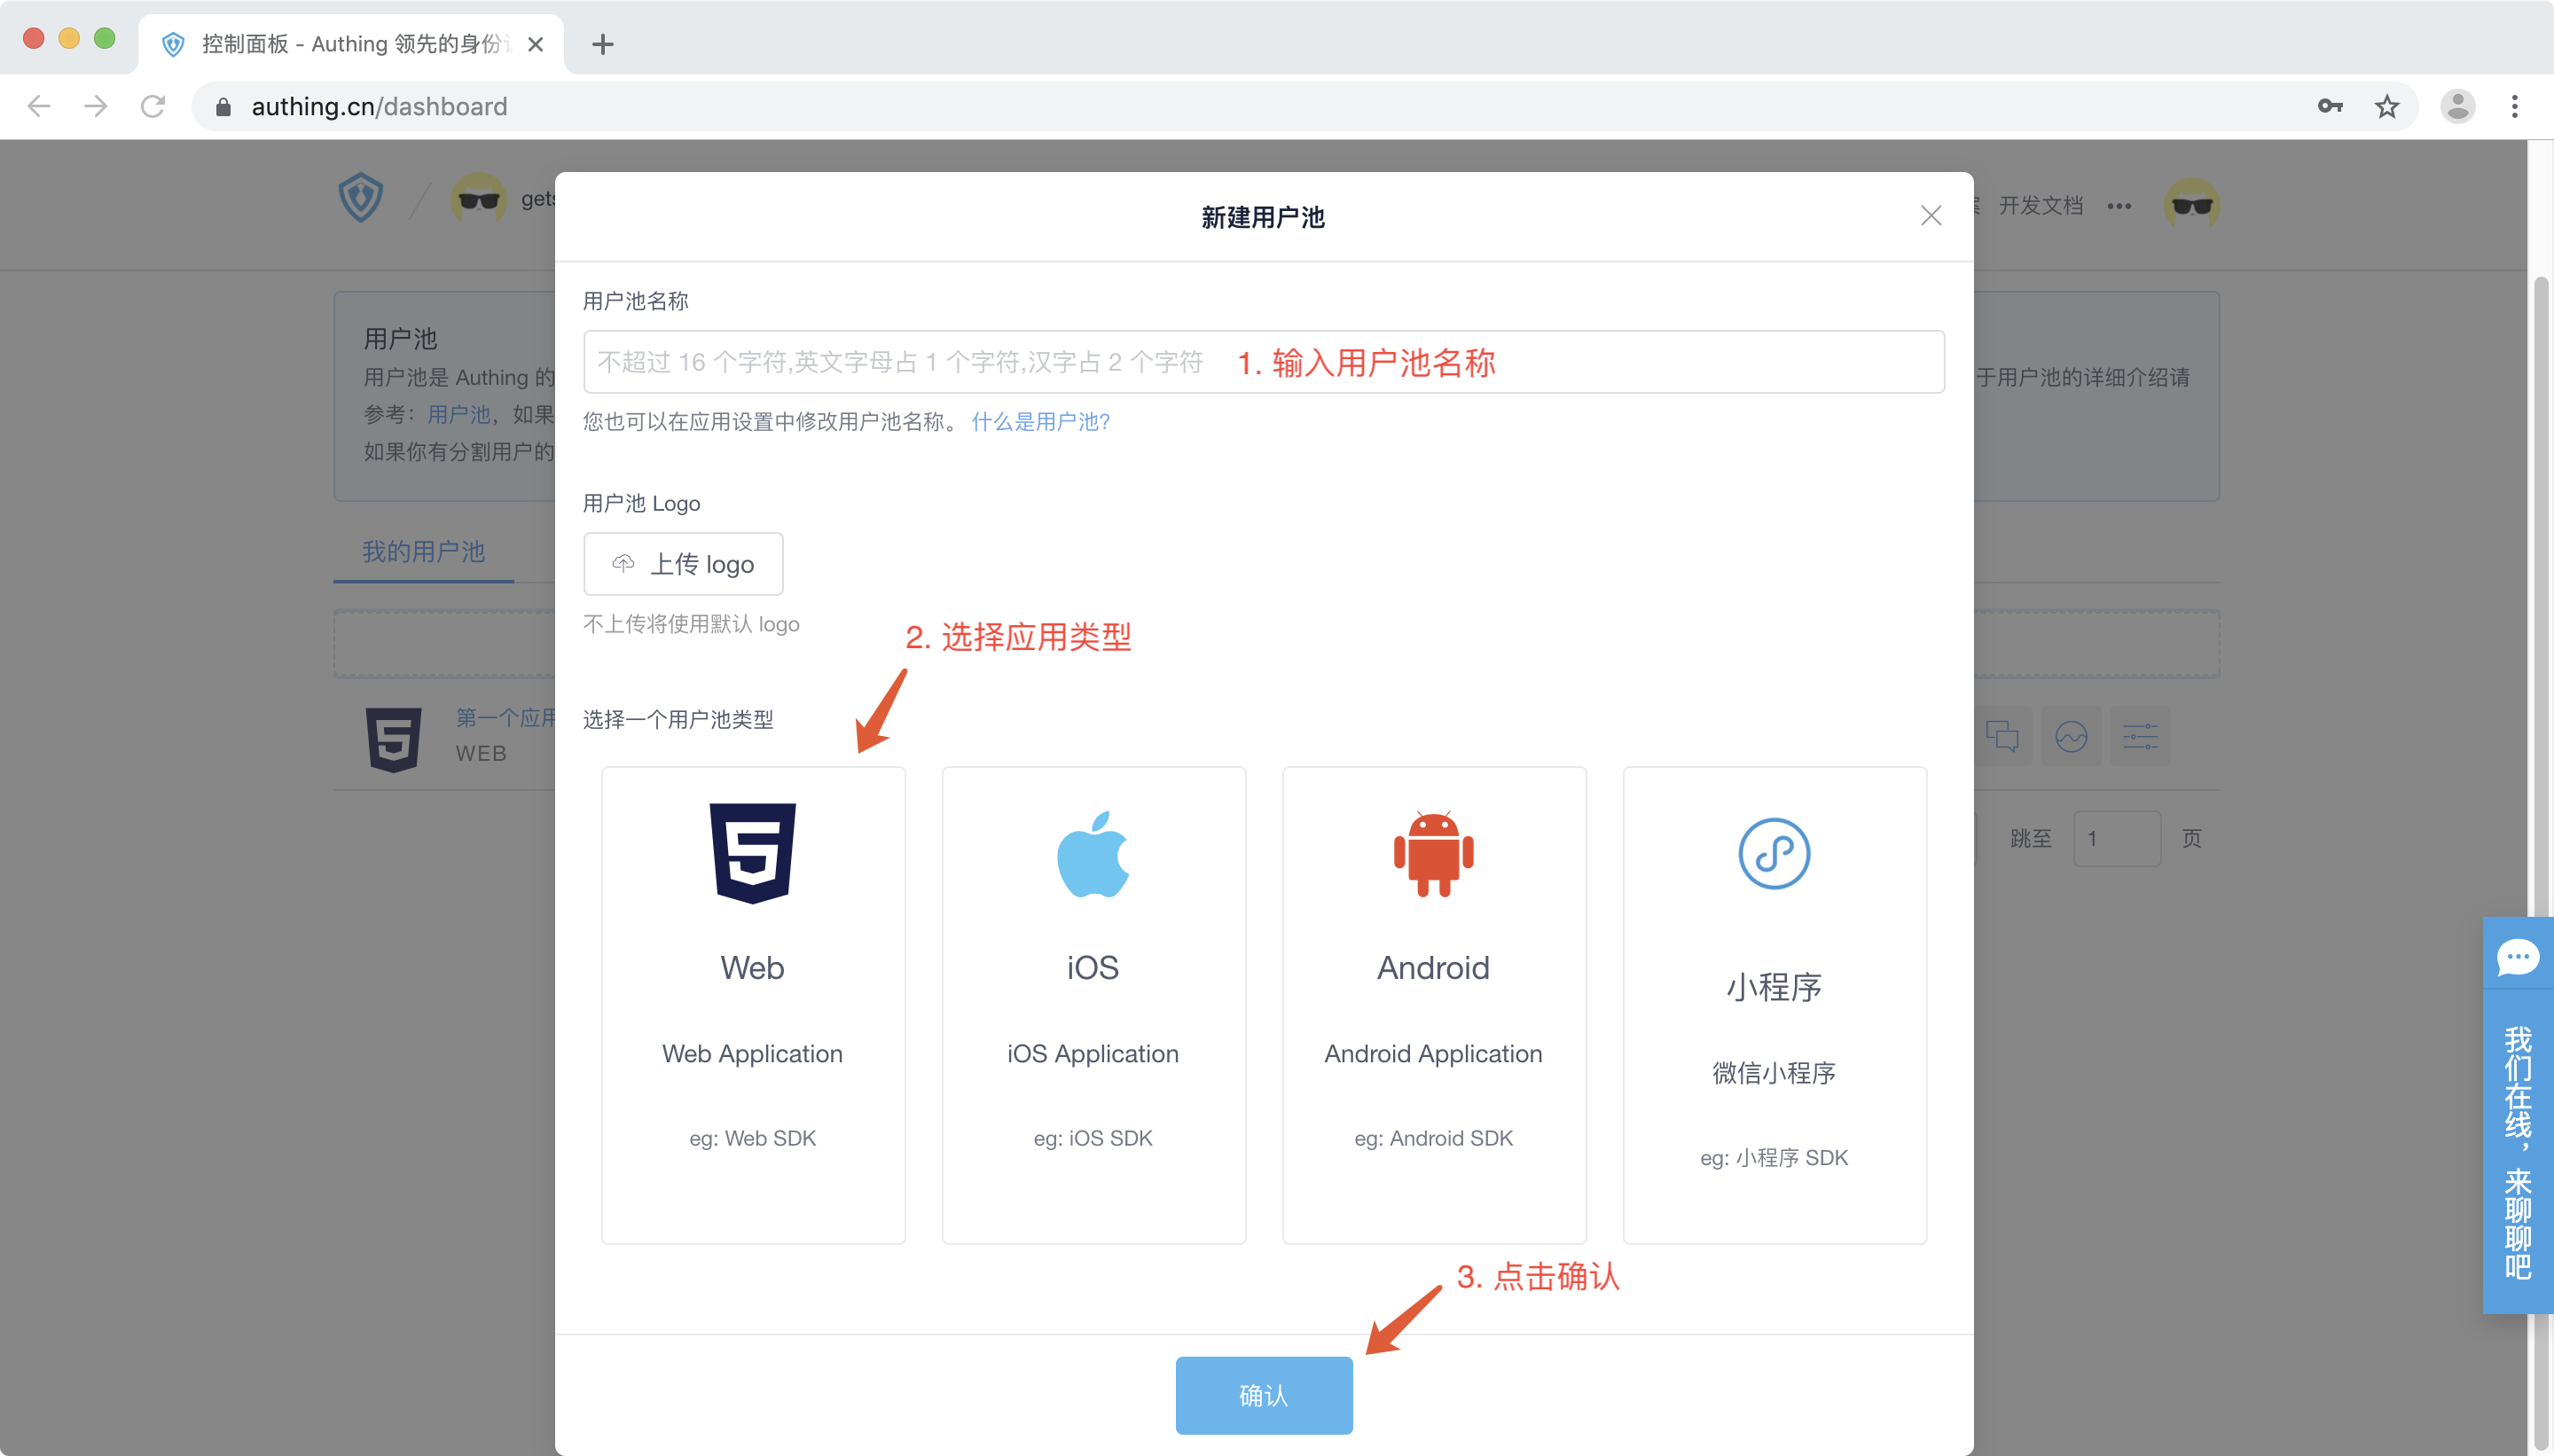
Create an OIDC application
Third party login - > OIDC application tab, click the blue "Create OIDC application" button.

Fill in your application name, specify the secondary domain name (authentication address) of this OIDC application, call back address, and leave other parameters as default. Click OK.

Parametric Interpretation
Authentication address, a secondary domain name of authing.cn, where users will log in.
Callback URL, OIDC login success, callback to the developer's own business address. This tutorial is for demonstration, and the address to be filled in is ___________. http://localhost 8080, you should fill in your business address in the actual scenario.
In the application list, click on the newly created application and record the AppID and the secondary domain name for future use.
Integrated single sign-on using AuthingSSO SDK
Create a blank HTML document to write Authing programs
This tutorial is for demonstration purposes only, so we did not choose an advanced framework, which allows us to focus on Authing itself.
<!DOCTYPE html>
<html lang="en">
  <head>
    <meta charset="UTF-8" />
    <meta name="viewport" content="width=device-width, initial-scale=1.0" />
    <meta http-equiv="X-UA-Compatible" content="ie=edge" />
    <title>Authing SSO Example</title>
  </head>
  <body></body>
</html>
Add three buttons
Three button controls were added to the body to demonstrate how to use SDK to manage single sign-on status.
<button id="btn-login">login</button>
<button id="btn-track-session">trackSession</button>
<button id="btn-logout">logout</button>
Introduce AuthingSSO and initialize
Loading from CDN AuthingSSO SDK. Fill in your OIDC application ID and domain name for initialization.
<script src="https://cdn.jsdelivr.net/npm/@authing/sso/dist/AuthingSSO.umd.min.js"></script>
<script>
  let auth = new AuthingSSO({
    appId: "YOUR_OIDC_APP_ID",
    appType: "oidc",
    appDomain: "OIDC_APP_DOMAIN.authing.cn"
  });
</script>
Register click events for buttons
The results achieved are as follows:
- Click the login button, the browser will jump to the OIDC login page, and complete the identification with the user.
- Click the trace session button to display the current login status.
- Click the logout button to log out single-click.
let login = document.getElementById("btn-login");
let trackSession = document.getElementById("btn-track-session");
let logout = document.getElementById("btn-logout");
login.onclick = function() {
  auth.login();
};
trackSession.onclick = async function() {
  let res = await auth.trackSession();
  alert(JSON.stringify(res));
};
logout.onclick = async function() {
  let res = await auth.logout();
  alert(JSON.stringify(res));
};
Complete code
<!DOCTYPE html>
<html lang="en">
  <head>
    <meta charset="UTF-8" />
    <meta name="viewport" content="width=device-width, initial-scale=1.0" />
    <meta http-equiv="X-UA-Compatible" content="ie=edge" />
    <title>Authing SSO Example</title>
  </head>
  <body>
    <button id="btn-login">login</button>
    <button id="btn-track-session">trackSession</button>
    <button id="btn-logout">logout</button>
    <script src="https://cdn.jsdelivr.net/npm/@authing/sso/dist/AuthingSSO.umd.min.js"></script>
    <script>
      let auth = new AuthingSSO({
        appId: "YOUR_OIDC_APP_ID",
        appType: "oidc",
        appDomain: "OIDC_APP_DOMAIN.authing.cn"
      });
      let login = document.getElementById("btn-login");
      let trackSession = document.getElementById("btn-track-session");
      let logout = document.getElementById("btn-logout");
      login.onclick = function() {
        auth.login();
      };
      trackSession.onclick = async function() {
        let res = await auth.trackSession();
        alert(JSON.stringify(res));
      };
      logout.onclick = async function() {
        let res = await auth.logout();
        alert(JSON.stringify(res));
      };
    </script>
  </body>
</html>
The sample code is available from Github It is recommended to download and run the code on Github.
Operating method
Run the following commands in the terminal
$ git clone https://github.com/Authing/authing-sso-demo
$ cd authing-sso-demo
$ npm install -g http-server
$ http-server
Later access in the browser http://localhost:8080.
{% hint style="warning" %}
If the local 8080 port has been occupied, the application may run on subsequent ports such as 8081 and 8082.
{% endhint %}
Operation effect
Initially, we were not logged in, so clicking the trackSession button gave us an empty login status.

Now when we click the login button, we will jump to the user authentication page of the OIDC application and enter the username password for login.

The browser is redirected to the callback link we set up earlier, and the code parameters are recorded for later exchange of user information.
Click the trackSession button to get the user's login status, including user ID, application ID, application type.

Click the logout button to output a single successful logout.

At this point, we click the trace session button again, and we can see that the login status is empty, indicating that the user has logged out singly.

Getting User Information
Exchange access_token with the code returned from the OIDC process
Send a POST request to the following address:
POST https://OIDC_APP_DOMAIN.authing.cn/oauth/oidc/token
body parameter
| Parameter name | Significance |
|---|---|
| client_id | app_id for OIDC Applications |
| redirect_uri | One of the values in the OIDC callback url configured in the console |
| scope | Request permissions, phone email if you need to get email and phone number, and refresh_token if you need to include offline_access Reference scope table |
| response_type | The OIDC mode can be code, id_token, id_token token, code id_token, code token, code id_token token, code token, code id_token token. Reference to OIDC Specification |
| prompt | For none, login, consent, or select_account, specify how AP interacts with End-User. If refresh_token is required, it must be consent. Reference to OIDC Specification |
| state | A random string used to guard against CSRF attacks if the state value in response is different from the state value set before sending the request |
| nonce | A random string to guard against Replay attacks |
Return an example
{
  "access_token": "eyJhbGciOiJSUzI1NiIsInR5cCI6IkpXVCIsImtpZCI6InIxTGtiQm8zOTI1UmIyWkZGckt5VTNNVmV4OVQyODE3S3gwdmJpNmlfS2MifQ.eyJqdGkiOiJ4R01uczd5cmNFckxiakNRVW9US1MiLCJzdWIiOiI1YzlmNzVjN2NjZjg3YjA1YTkyMWU5YjAiLCJpc3MiOiJodHRwczovL2F1dGhpbmcuY24iLCJpYXQiOjE1NTQ1Mzc4NjksImV4cCI6MTU1NDU0MTQ2OSwic2NvcGUiOiJvcGVuaWQgcHJvZmlsZSBvZmZsaW5lX2FjY2VzcyBwaG9uZSBlbWFpbCIsImF1ZCI6IjVjYTc2NWUzOTMxOTRkNTg5MWRiMTkyNyJ9.wX05OAgYuXeYM7zCxhrkvTO_taqxrCTG_L2ImDmQjMml6E3GXjYA9EFK0NfWquUI2mdSMAqohX-ndffN0fa5cChdcMJEm3XS9tt6-_zzhoOojK-q9MHF7huZg4O1587xhSofxs-KS7BeYxEHKn_10tAkjEIo9QtYUE7zD7JXwGUsvfMMjOqEVW6KuY3ZOmIq_ncKlB4jvbdrduxy1pbky_kvzHWlE9El_N5qveQXyuvNZVMSIEpw8_y5iSxPxKfrVwGY7hBaF40Oph-d2PO7AzKvxEVMamzLvMGBMaRAP_WttBPAUSqTU5uMXwMafryhGdIcQVsDPcGNgMX6E1jzLA",
  "expires_in": 3600,
  "id_token": "eyJhbGciOiJSUzI1NiIsInR5cCI6IkpXVCIsImtpZCI6InIxTGtiQm8zOTI1UmIyWkZGckt5VTNNVmV4OVQyODE3S3gwdmJpNmlfS2MifQ.eyJzdWIiOiI1YzlmNzVjN2NjZjg3YjA1YTkyMWU5YjAiLCJub25jZSI6IjIyMTIxIiwiYXRfaGFzaCI6Ik5kbW9iZVBZOEFFaWQ2T216MzIyOXciLCJzaWQiOiI1ODM2NzllNC1lYWM5LTRjNDEtOGQxMS1jZWFkMmE5OWQzZWIiLCJhdWQiOiI1Y2E3NjVlMzkzMTk0ZDU4OTFkYjE5MjciLCJleHAiOjE1NTQ1NDE0NjksImlhdCI6MTU1NDUzNzg2OSwiaXNzIjoiaHR0cHM6Ly9hdXRoaW5nLmNuIn0.IQi5FRHO756e_eAmdAs3OnFMU7QuP-XtrbwCZC1gJntevYJTltEg1CLkG7eVhdi_g5MJV1c0pNZ_xHmwS0R-E4lAXcc1QveYKptnMroKpBWs5mXwoOiqbrjKEmLMaPgRzCOdLiSdoZuQNw_z-gVhFiMNxI055TyFJdXTNtExt1O3KmwqanPNUi6XyW43bUl29v_kAvKgiOB28f3I0fB4EsiZjxp1uxHQBaDeBMSPaRVWQJcIjAJ9JLgkaDt1j7HZ2a1daWZ4HPzifDuDfi6_Ob1ZL40tWEC7xdxHlCEWJ4pUIsDjvScdQsez9aV_xMwumw3X4tgUIxFOCNVEvr73Fg",
  "refresh_token": "WPsGJbvpBjqXz6IJIr1UHKyrdVF",
  "scope": "openid profile offline_access phone email",
  "token_type": "Bearer"
}
Verify the validity of access_token and id_token
OIDC uses OIDC application secret s to verify token by default (that is, HS256 algorithm is selected by default when creating an application). If you use javascript, you can use JSON webtoken for validation:
const jwt = require('jsonwebtoken');
let decoded = jwt.verify(token, <appSecret>);
If it is in other languages, then you need to use app_secret as HS256 signature parameter to calculate signature and compare it with the signature in JWT. The pseudocode is as follows:
HMACSHA256(
  base64UrlEncode(header) + "." +
  base64UrlEncode(payload),
  "1133fd20c14e4cc29b6ecb71fb8eb952"// app_secret
)
If it is an asymmetric encryption algorithm such as RS256, the public key is needed to verify the signature. Authing will use the private key to sign. Please use Authing's public key to verify the signature:
-----BEGIN PUBLIC KEY-----
MIIBIjANBgkqhkiG9w0BAQEFAAOCAQ8AMIIBCgKCAQEAxRijj2seoesv5K0Z+ymR
K7DSDPxdsM2sGQD2ZVhLjLsxZWJtXUXh7ERdUU6OT3BqYZZf7CLIhN6yyNtTOgfg
pLG9HVJd7ZSKzuy2dS7mo8jD8YRtptAJmNFqw6z8tQp5MNG1ZHqp9isKqJmx/CFY
kRdXBmjjj8PMVSP757pkC3jCq7fsi0drSSg4lIxrSsGzL0++Ra9Du71Qe/ODQKU0
brxaI1OKILtfcVPTHTaheV+0dw4eYkSDtyaLBG3jqsQbdncNg8PCEWchNzdO6aaj
Uq4wbOzy/Ctp399mz0SGKfuC5S8gqAFABFT3DH3UD21ZztQZwFEV2AlvF+bcGEst
cwIDAQAB
-----END PUBLIC KEY-----
Exchange user information with access_token
Developers can use access_token in exchange for user information in their own services. Depending on the scope, the returned information here will be different, and the fields will match. OIDC Specification For field explanations, please refer to Meaning of User Information Field . Request link:
GET https://users.authing.cn/oauth/oidc/user/userinfo?access_token=<access_token>
Returns an example:
{
  "sub": "<Users are in the ____________ Authing Unique ID>",
  "nickname": "Authing",
  "name": "Zhang San",
  "locale": "en-US"
}
For more field explanations, please refer to Meaning of User Information Field.
Next you may need to
Understand the OIDC protocol:
The console is where you manage all the Authing resources. Learn about the contents of the Authing console modules and what you can do in the console:
Understand the various deployment models provided by Authing to help you choose how to deploy Authing:
What is Authing?
Authing provides professional identity authentication and authorization services.
We provide developers and businesses with the authentication modules needed to ensure application security, which makes it unnecessary for developers to become security experts.
You can connect any platform application to Authing (whether new or old applications can), and you can also customize the login mode of the application (e.g. mailbox/password, short message/authentication code, scanned login, etc.).
You can choose our SDK or call relevant API s to access your application according to the technology you use. When a user initiates an authorization request, Authing will help you authenticate their identity and return the necessary user information to your application.
The Position of <div align=center>Authing in Application Interaction </div>
- Official website: http://authing.cn
- Small login: https://wxapp.authing.cn/#/
-
Warehouse: welcome star, welcome pr
-
Demo:
- File: https://docs.authing.cn/authing/